Table of Contents >> Show >> Hide
- Before You Cut a Single Board: Quick Planning
- 17 Weekend-Ready Planter Box Plans
- 1) Classic Cedar Rectangle (Beginner)
- 2) Elevated Waist-High Planter With Legs
- 3) Rolling Planter on Casters
- 4) Deck-Rail Planter (Two-Channel “Saddle” Style)
- 5) Window Box With French-Cleat Hanger
- 6) Stair-Step Tiered Herb Planter
- 7) Tall Privacy-Planter (Slatted Screen + Box)
- 8) Trellis-Backed Tomato or Cucumber Planter
- 9) Self-Watering SIP (Sub-Irrigated Planter) Box
- 10) Narrow Balcony Planter (Urban Slimline)
- 11) Modular Square-Foot Grid Planter
- 12) Corner “L” Planter
- 13) Paver/Concrete Block Planter
- 14) Metal Trough Conversion (Stock Tank Planter)
- 15) Bench-Planter Combo
- 16) Indoor “Built-In Look” Planter Console
- 17) Mini Water-Garden Planter Box
- Materials, Soil & Drainage: What Actually Matters
- Micro How-To: Build the 1-Hour Starter Box
- Pro Tips That Save Time, Money, and Plants
- Common Mistakesand Easy Fixes
- Conclusion
- 500-Word Field Notes: Real-World Planter Lessons
Short on time, long on plant dreams? These weekend-friendly planter box ideas range from classic cedar rectangles to clever self-watering buildseach with clear tips on materials, drainage, depth, and durability so your herbs and flowers thrive.
Before You Cut a Single Board: Quick Planning
Pick a spot: Aim for 6–8 hours of sun for veggies and herbs. Balconies and shaded patios are perfect for foliage-forward displays.
Choose a material: Cedar and redwood resist rot naturally; pine and fir are budget-friendly but need extra care. Modern pressure-treated lumber is commonly used outdoors; if building for edibles and you want extra peace of mind, add a heavy-duty plastic liner on the inside and keep soil a few inches below the rim to minimize splash-back on wood.
Size & depth: Keep most boxes under 4 feet wide so you can reach the center without stepping in. Many herbs and greens are happy in 8–10 inches of soil; fruiting cropstomatoes, peppers, squashprefer 12–18 inches. On hard surfaces, prioritize deeper boxes or grow shallow-rooted plants.
Drainage & airflow: Drill weep holes or leave 1/8–1/4 inch gaps between bottom boards. Line the bottom with landscape fabric to keep soil in and let water out.
Fasteners & finish: Use exterior-rated screws, deck screws, or construction screws. If you finish the exterior, use exterior paint or a plant-safe sealer; leave the inside raw or line with plastic to reduce moisture cycling.
17 Weekend-Ready Planter Box Plans
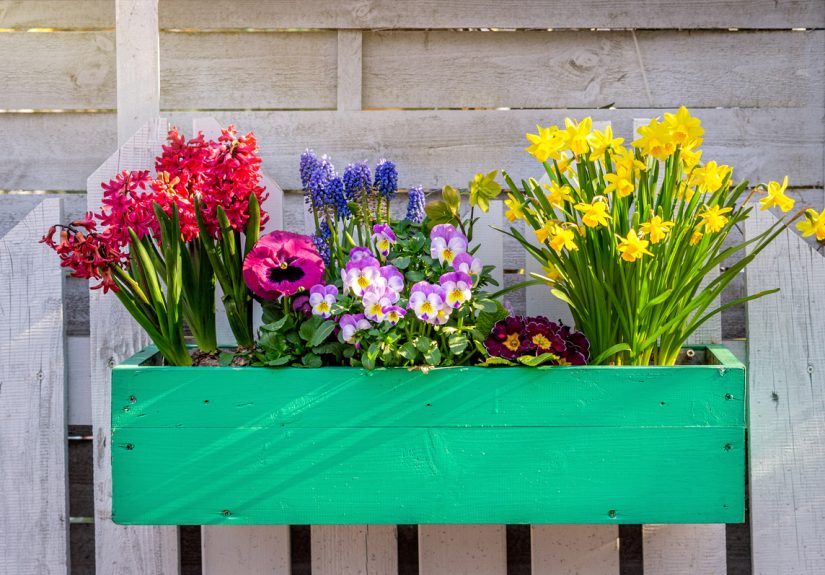
1) Classic Cedar Rectangle (Beginner)
Why it works: Clean lines, durable wood, fits anywhere. A perfect first project.
Typical size: 48" L × 18" W × 12" H. Rip or stack boards to reach height.
Build notes: Edge-join 1×6 or 1×8 boards for the sides. Add 2×2 corner cleats inside for strength. Bottom slats spaced 1/4" apart for drainage, with landscape fabric over slats.
2) Elevated Waist-High Planter With Legs
Why it works: Back-friendly gardening and pest resistance on patios or decks.
Typical size: 36" × 14" × 10" deep box set on 30–36" legs with a lower shelf.
Build notes: Frame the box with 2x2s or 2x4s; use half-lap or pocket-screw joinery for leg frames. Line the bottom with hardware cloth under fabric for support.
3) Rolling Planter on Casters
Why it works: Chase the sun, dodge storms. Great for renters.
Build notes: Add four heavy-duty, exterior-rated casters to a 3/4" plywood base. Install corner braces inside the box and keep soil height modest to reduce weight.
4) Deck-Rail Planter (Two-Channel “Saddle” Style)
Why it works: Maximizes railing real estate; perfect for greens and compact herbs.
Build notes: Build two narrow troughs that straddle the rail, then add cleats that snug to your specific rail width. Include drain holes and drip trays where run-off matters.
5) Window Box With French-Cleat Hanger
Why it works: Easy on/off for seasonal replanting and cleaning.
Build notes: Mount a beveled French cleat to the wall studs; the mating cleat is screwed to the box. Add a hidden aluminum or plastic liner tray for longevity.
6) Stair-Step Tiered Herb Planter
Why it works: Three shallow tiers = lots of herbs in small footprint.
Build notes: Create three stacked “U” frames with 1x6s; each tier 6–8" deep. Offset tiers to avoid shading and make harvesting easy.
7) Tall Privacy-Planter (Slatted Screen + Box)
Why it works: Grows climbers and screens a viewdeck living, upgraded.
Build notes: Build a 12–16" deep box and attach a vertical slatted screen of 1x2s or 1x3s. Add a top rail and planter trellis clips for beans or jasmine.
8) Trellis-Backed Tomato or Cucumber Planter
Why it works: Built-in support keeps vines upright and patios tidy.
Build notes: Integrate a rigid trellis panel (2×2 frame with galvanized wire mesh) bolted to the planter’s back. Ensure at least 12–16" of soil depth.
9) Self-Watering SIP (Sub-Irrigated Planter) Box
Why it works: A reservoir at the bottom cuts watering frequency; plants wick up moisture as needed.
Build notes: Build a sealed interior liner from pond liner or use a plastic tote insert inside a wood shell. Include an overflow hole ~2" above the base, a fill tube, and an aeration screen above the reservoir.
10) Narrow Balcony Planter (Urban Slimline)
Why it works: Fits behind furniture or along railings without crowding.
Typical size: 36–60" L × 8–10" W × 10–12" H.
Build notes: Use 1×10 sides with 1×2 top trim for stiffness; hidden aluminum angle braces keep the long run straight.
11) Modular Square-Foot Grid Planter
Why it works: Organizes crops, simplifies rotation and replanting.
Build notes: Build a 48" square box, then add removable 1×2 crosspieces to form 12" squares. Label corners for crop tracking.
12) Corner “L” Planter
Why it works: Wraps a patio corner or fence for a custom look.
Build notes: Build two rectangles and tie them together with a shared corner post. Add diagonal braces inside the corner to resist soil pressure.
13) Paver/Concrete Block Planter
Why it works: No saws required; landscape block adhesive does the heavy lifting.
Build notes: Dry-fit first. Glue courses with landscape adhesive; leave small gaps for drainage, or core a drain hole before final set.
14) Metal Trough Conversion (Stock Tank Planter)
Why it works: Ultra-durable, modern look, fast to set up.
Build notes: Drill drain holes with a step bit; add 1–2" of coarse gravel then fabric and soil. Elevate slightly on composite shims for airflow.
15) Bench-Planter Combo
Why it works: Seating + greenery = instant outdoor room.
Build notes: Build two identical square planters and span with a slatted bench. Anchor the bench to inside cleats on each planter.
16) Indoor “Built-In Look” Planter Console
Why it works: Brings biophilic design inside without major remodeling.
Build notes: Build a shallow box (8–10" deep) sized to your wall niche or behind-sofa space; drop in watertight liners and include a discreet drip tray.
17) Mini Water-Garden Planter Box
Why it works: Divides one box into a planter side and a lined aquatic side for water plantssmall footprint, big wow.
Build notes: Use a pond-safe liner and keep the water section isolated from soil. Place away from heavy leaf fall; add a small solar bubbler if desired.
Materials, Soil & Drainage: What Actually Matters
Wood & alternatives
Cedar/redwood: Rot-resistant and stable, ideal for long-lived boxes. Pine/fir: Cheaper, expect more maintenance. Pressure-treated: Common outdoors; for food crops, many gardeners use a plastic liner as an extra precaution. Non-wood: Pavers, concrete block, galvanized steel, or composite boards are durable and low-maintenance.
Depth guidelines (quick picks)
- Leafy greens, radishes, herbs: 8–10"
- Strawberries, bush beans, onions: 10–12"
- Tomatoes, peppers, squash: 12–18" (more is better on a patio)
- Root crops (carrots, beets): 12–16" depending on variety
Drainage done right
Planters fail more from soggy soil than drought. Include bottom gaps or holes every 6–8 inches. Lay breathable fabric over slats to keep soil in place. On decks, consider a thin drain mat or saucers to protect surfaces.
Soil mix & volume math
For planters 10–16" deep, a light mix keeps roots happy: ~60% high-quality potting mix, ~30% finished compost, ~10% mineral amendment (perlite/pumice) by volume. To estimate volume, multiply Length × Width × Height in inches and divide by 1,728 to get cubic feet.
Micro How-To: Build the 1-Hour Starter Box
- Cut list: Four 1×8 boards @ 48" (long sides), four 1×8 boards @ 16" (short sides), four 2×2 cleats @ 10.5" (corners), five 1×4 bottom slats @ 16".
- Assemble sides: Glue and screw short sides between long sides to form a rectangle. Add 2×2 cleats inside corners, flush with the rim.
- Bottom & fabric: Screw 1×4 slats to cleats with 1/4" gaps. Staple landscape fabric over slats.
- Finish & fill: Add a 1×2 rim if desired. Pre-moisten soil mix, fill to 1–2" below the top, and plant.
Tools: Circular saw or miter saw, drill/driver, exterior screws (1-5/8" and 2-1/2"), square, sandpaper, stapler.
Pro Tips That Save Time, Money, and Plants
- Reinforce long runs: Add a mid-span brace inside planters longer than 4 feet to resist bowing.
- Vent the base: Set boxes on composite shims or rubber feet; airflow = longer life.
- Think watering now: Pre-route a drip line or add a fill tube for a future SIP conversion.
- Right fasteners: Use coated deck screws; for hardwoods or metal, pre-drill.
- Edibles + peace of mind: Use rot-resistant wood or line the interior if using pressure-treated lumber.
- Weight management: On balconies, go shallower and lighter; consider perlite or bark fines to reduce weight.
- Season extension: Add a simple cold-frame lid (polycarbonate panel on hinges) to keep salads coming.
Common Mistakesand Easy Fixes
- Overwatering: If leaves yellow and soil stays wet, add more drain holes and increase perlite.
- Underfilling: Soil settles 10–15% in the first weeks; top up after two waterings.
- No gap from walls: Wet soil against siding is a rot riskleave a 1–2" gap or use a drip tray.
- Too wide to reach: Cap width at 48" unless you can access from both sides.
Conclusion
Whether you want a low, modern rectangle or a waist-high herb bar, the right materials and drainage are what make planters lastand plants flourish. Pick one plan above, keep fasteners exterior-rated, drill those drain holes, and you’re harvesting sooner than you think.
sapo: Ready to green up your porch or patio? This hands-on guide delivers 17 DIY planter box plans you can finish in a weekendplus pro tips on wood choices, safe finishes, soil depth, and drainage. Whether you’re chasing fresh basil on a balcony or screening a view with climbers, you’ll find clear steps, cut-list ideas, and time-saving tricks so your planters look great and your plants thrive.
500-Word Field Notes: Real-World Planter Lessons
If you’ve ever built a planter on Friday and planted it on Saturday, you learn a few thingsfast. First, wood moves. That gorgeous long board you loved at the store can bow the minute moisture hits it. On planters over 4 feet, I now add an interior stretcher or a mid-span post; it keeps walls straight and corners square, which makes lids and trellises actually fit. Second, drainage is destiny. People think more soil equals happier plants; the truth is that roots want oxygen as much as water. The boxes that performed best for me had generous weep holes or spaced slats with fabric. When I retrofitted older planters by drilling 1/2-inch holes every 6 inches, saggy basil perked up in a week.
Third, height changes behavior. A 12-inch-deep box produces great greens, but a 16-inch one changes watering intervals from daily to every second or third day in July. That extra depth is also a buffer for tomatoes and peppers on patiosless tip-over risk and steadier moisture. If weight is a worry, swap 10–15% of the soil volume for perlite or chunky bark fines; the mix stays aerated and lighter. On balconies, I’ve used a narrow 10-inch-wide profile and tucked drip lines along the back edge, fed by a small battery timer. Consistency beats hero watering.
Fourth, finishing choices matter more than you think. Exterior paint on the outside (never the inside) gives softwoods like pine a second life. I’ve also had success with a plant-safe penetrating oil on the exterior faceseasy to refresh each spring. Inside, a robust plastic liner attached just below the rim keeps wet soil off wood; punch plenty of liner drain holes level with your planter’s weep holes so you don’t create a sump. On metal troughs, a thin spacer under the base (rubber feet or composite shims) stops trapped moisture from rusting anything out.
Fifth, trellises: build them once, use them forever. An integrated trellis framed with 2x2s and galvanized mesh turns a humble box into a vertical garden. It’s a snap to tie tomatoes or snake a cucumber vine up the grid, and it doubles as a privacy element. For the screen-planter combo, I learned to anchor posts to the box’s internal structurenot just the thin side panelsso wind loads transfer into the base. A top cap across posts stiffens everything and looks finished.
Finally, plan your maintenance like it’s part of the build. I keep a dedicated “planter kit” in a small caddy: a bag of slow-release fertilizer, a coil of drip line, a handful of emitters, spare screws, and a roll of landscape fabric. When a box settles or a leak appears, the fix is minutes away. The difference between a planter you baby and a planter you enjoy is usually one Saturday afternoon spent drilling drain holes, raising it on feet, and topping up the mix. Do that once, and next weekend can be about harvesting mint for lemonade instead of hunting for a missing Torx bit.
The punchline: The best planter is the one you’ll actually build. Start with the classic cedar rectangle if you’re new, go elevated if your back demands it, or get fancy with a self-watering box if summer is busy. Pick one, cut square, pre-drill, and let the plants do the showing off.