Table of Contents >> Show >> Hide
- Before You Start: 3 Quick Checks (So You Don’t Fight the Wrong Problem)
- Tools You’ll Want Nearby (Nothing Fancy)
- Easy Way #1: Score the Paint Seal (Clean Cut, Minimal Drama)
- Easy Way #2: Slide a Putty Knife + Use Shims (Break the Hidden Grip)
- Easy Way #3: Remove the Stops (A Little “Window Surgery,” Still DIY-Friendly)
- What To Do After You Open It (So It Doesn’t Re-Seal Itself)
- Troubleshooting: Why Your Window Still Won’t Open
- Quick Safety Notes (Especially for Older Homes)
- Conclusion: Fresh Air, Restored Dignity
- Real-Life Window-Wrangling Experiences (Because You’re Not Alone)
Painted-shut windows are a special kind of homeownership comedy: you’re trying to let in a breeze, and your window is
basically saying, “No thanks, I’ve chosen a quieter life.” The good news? Most painted shut windows can be freed with
a few simple techniquesno demolition, no dramatic shoulder checks, and (ideally) no shattered glass.
This guide covers three easy, practical ways to open painted shut windows, plus what to do afterward so
they don’t glue themselves shut again next season. It’s written for typical U.S. homes, especially older ones with
double-hung wood windowsbut the logic works for many window styles.
Before You Start: 3 Quick Checks (So You Don’t Fight the Wrong Problem)
1) Confirm it’s paint, not hardware
Look at the lock, latch, or sash fasteners. Sometimes paint covers a latch so thoroughly it can’t release, which makes
the window feel “painted shut” when it’s actually “locked shut.” If paint is bridging over hardware, remove the
hardware carefully (or have an adult/pro handle it) and set it aside.
2) Check inside and outside seams
Many windows get sealed on the interior, the exterior, or both. If you cut the interior paint line but the sash still
won’t move, the exterior may still be holding on like it pays rent.
3) If your home was built before 1978, assume lead paint until proven otherwise
Lead-based paint was widely used in U.S. homes before 1978. Disturbing old paint can create hazardous dust. If you
suspect lead paint (or you’re unsure), use lead-safe practices, minimize dust, and consider hiring a lead-safe
certified professionalespecially if kids or pregnant people are in the home. If you’re a teen, ask a parent/guardian
to supervise any work involving blades, scraping, or heat.
Tools You’ll Want Nearby (Nothing Fancy)
- Utility knife (or a sharp razor knife)
- Putty knife (thin and flexible is ideal)
- Painter’s multi-tool (often called a 5-in-1 or 10-in-1)
- “Window zipper” tool (optional but very helpful for thick paint build-up)
- Wood shims (thin wedges)
- Work gloves, safety glasses, and a mask (especially for older paint)
- Drop cloth and painter’s tape
Now, let’s free that windowstarting with the easiest method that preserves paint the best.
Easy Way #1: Score the Paint Seal (Clean Cut, Minimal Drama)
Paint forms a “seal” where the sash meets the stops, jamb, sill, or frame. Your goal is to slice that seal
so the sash can move again. Think of it like cutting the frosting between two cake layersexcept the cake is your house
and you’d like to keep all your fingers.
Where to score (double-hung windows)
- The vertical seams where the sash meets the side jamb/stops
- The bottom seam where the sash meets the sill/stool
- The seam at the meeting rail (where top and bottom sashes meet)
- Any painted-over gap around the lock/latch area
How to do it (simple, safe approach)
- Stabilize the area: Lay down a drop cloth and tape off nearby trim if you want to protect the finish.
- Score lightly first: Make a gentle pass along the seam to define a line. Multiple light passes are
safer and cleaner than one aggressive cut. - Deepen the cut as needed: If you see thick paint ridges, a window zipper tool can help cut through
layers without chewing up the wood. - Repeat on the exterior if needed: If the window still won’t budge, score the same seams outside.
- Test the sash: Try lifting or sliding the sash with steady, even pressure. Avoid twisting or yanking.
If it moves a little… but stops
That usually means you’ve cut one part of the seal, but paint is still gripping in a deeper channel or at a different seam.
Don’t force itmove to Easy Way #2 to break the deeper bond.
Easy Way #2: Slide a Putty Knife + Use Shims (Break the Hidden Grip)
Sometimes paint seeps into tiny gaps and hardens where you can’t see it. Even if you’ve scored the seam, the sash may
still be stuck because paint has formed a deeper “bridge.” This method uses a thin blade to separate those hidden
paint bonds, and shims to keep your progress from snapping back shut.
What you’re doing (in plain English)
You’re gently working a thin putty knife into the gap to pry apart paint layers. Then you slip in a wood shim to hold
the gap open while you move to the next sectionlike unzipping a jacket that’s stuck halfway.
Steps
- Start where you already scored: Choose a corner or side seam. Slide the putty knife into the gap as
flat as possible to avoid stressing the glass. - Work around the sash: Move the blade along the seam a few inches at a time. If you hit resistance,
back up and approach from a slightly different angle. - Use a shim to “save” your progress: Insert a thin wood shim where the seam has opened. Don’t drive it
deepjust enough to keep the gap from re-sealing. - Repeat on the meeting rail and sill seam: Many stubborn windows cling at the bottom edge where paint
pooled and dried. - Try the sash again: Use steady pressure. If it moves, open it slightly, then close it, then open it
a bit morethis “exercise” helps clear lingering friction.
Common mistake to avoid
Don’t escalate to brute force with a pry bar and a heroic speech. Windows and glass do not respond to motivational
shouting. They respond to patienceand not being twisted.
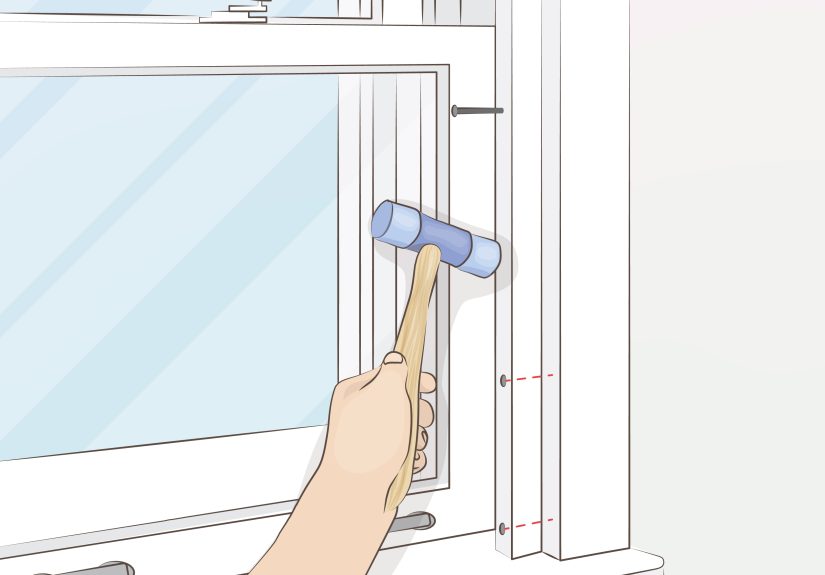
Easy Way #3: Remove the Stops (A Little “Window Surgery,” Still DIY-Friendly)
If the window is painted shut so thoroughly that scoring and sliding tools aren’t enough, the next move is to
remove the interior stop molding (and sometimes parting beads on older double-hung windows) so you can
free the sash directly. This is still a common, legitimate repair approachespecially in older homes where layers of
paint have built up for decades.
What are “stops” and “parting beads”?
- Interior stops are thin strips of wood that hold the lower sash in place and guide it.
- Parting beads (on many older double-hung windows) separate the upper and lower sash tracks.
When to choose this method
- The sash won’t move at all after scoring and putty knife work
- You can see thick paint build-up along the stop molding
- The window is older and likely has multiple paint layers binding wood-to-wood
Steps (high-level and careful)
- Score the stop edges: Cut the paint line where the stop meets the frame so you don’t tear wood fibers
or rip off chunks of finish. - Pry gently: Use a putty knife as a shield against the trim, then carefully pry the stop away a little
at a time. Work slowly along the length instead of “popping” it in one dramatic move. - Label pieces: If you remove stops, mark where they came from (left/right/top) so reinstalling is easy.
- Free the sash: With the stop removed, you can wiggle the sash free from paint bonds more directly and
cleanly. - Reinstall and test: Once the window moves, reinstall stops carefully, leaving enough clearance for the
sash to operate smoothly.
If you discover broken cords, jammed weights, or rotted wood while you’re in there, that’s your sign to pause and
consider a window restoration pro. Sometimes the window isn’t just stuckit’s been silently quitting its job for years.
What To Do After You Open It (So It Doesn’t Re-Seal Itself)
Clean the tracks and contact points
Once the sash moves, open it a few inches and look for paint flakes, dust, or sticky residue along the track edges.
Carefully remove debris so the sash slides without grinding. For older paint, use lead-safe cleanup habits and avoid
creating dust clouds.
Lightly smooth paint ridges
Thick ridges of paint are like speed bumps for windows. Carefully scraping high spots can make a huge difference.
If you need to sand, be extra cautious in older homes because sanding can generate fine dust (which is a major lead
concern if lead paint is present).
Lubricate for a smoother glide
A small amount of dry lubricant (often silicone-based) or wax can help reduce friction without attracting grime.
Avoid oily products that collect dirt and turn your window track into a lint magnet.
Future-proof your next paint job
- Don’t paint the sliding edges of the sash and stops like they’re one solid wall.
- Open and close windows while paint is drying (carefully) so they don’t seal shut.
- Use painter’s tape on contact edges if you’re prone to “just one more brush stroke.”
Troubleshooting: Why Your Window Still Won’t Open
The latch is painted over
If hardware is locked in place by paint, the sash may be free but still unable to move. Carefully free or remove the
latch before trying again.
It’s swollen wood, not paint
Humidity can swell wood sashes, especially in older homes. If you freed the paint seal and the sash still jams, the
issue may be seasonal swelling. Cleaning and lubrication help; in some cases, careful planing/sanding by a pro is the fix.
The sash cords or balances are broken
Some windows open once you break the sealbut then slam shut because the sash weights or balances aren’t doing their job.
That’s not a “you” problem; that’s a “time to repair the window mechanism” problem.
Quick Safety Notes (Especially for Older Homes)
- Wear eye protection. Paint chips and tiny glass splinters are the opposite of fun.
- Go slow near glass. Twisting pressure can crack panes, especially in older windows.
- Lead matters. If you suspect lead paint, minimize dust, clean thoroughly, and consider professional help.
- If you’re under 18: Ask an adult to supervise or handle cutting, prying, and any heat-based methods.
Conclusion: Fresh Air, Restored Dignity
Opening painted shut windows is usually less about brute strength and more about outsmarting the paint. Start with
scoring the seam, move to putty knife + shims if the bond is deeper, and if the window
is still refusing to cooperate, remove the stops to free the sash properly. Once it’s open, clean and
lubricate the contact points so the next time you want a breeze, you don’t have to negotiate with 12 layers of latex.
Real-Life Window-Wrangling Experiences (Because You’re Not Alone)
The first time you meet a painted-shut window, you assume it’s a quick fix. “How stuck can it be?” you think,
confidently, as you grab the sash like you’re opening a jar of pickles. Two seconds later, you realize the previous
homeowner treated paint like grout: it’s everywhere, it’s thick, and it has formed a bond more committed than most
high school relationships.
One of the most common “learning moments” is discovering you only cut the inside seam. You score the paint line,
feel proud, tug again… and nothing. That’s when it hits you: the outside seam is still sealed. It’s like unlocking the
front door but forgetting the deadbolt. Once you walk outside and score the exterior edges too, the window often gives
you that tiny first movementthe home-repair version of a handshake. Not a hug. A handshake.
Another classic experience: the window that moves one inch and stops like it remembered it left the stove on.
This is where the putty knife and shims feel like magic. You slide the blade in, gently work around the sash, and use
a shim to hold your place. Suddenly, you’re not “forcing” the windowyou’re persuading it. Homeowners often say this
stage is where they stop feeling like they’re about to break something. The window isn’t fighting your strength anymore;
it’s losing its grip because you’re removing its grip.
In older homes, a lot of people have a moment of realization: “Wait… this paint might be lead.” That thought changes
everything (in a good way). Instead of aggressive scraping, you switch to careful scoring, controlled work areas, and
thorough cleanup. Many homeowners describe this as the point where the project becomes “less satisfying” and “more
responsible,” which is adulting in a nutshell. It’s also why some people choose to call a lead-safe certified pro,
especially if the window is in a kid’s bedroom or a high-traffic area where dust control matters most.
Then there’s the stop-molding methodwhat people try after the first two methods aren’t enough. Removing stops can feel
intimidating until you realize it’s mostly patience and gentle leverage. Homeowners often report that once the stop is
off, the whole situation becomes obvious: paint globs in the track, ridges on the sash edge, and a seam that never had
a chance. After cleaning and reinstalling, the window sometimes opens so smoothly that it feels suspiciouslike it’s
planning to stick again just to mess with you. (It’s not. Probably.)
The best “after” experience is the first breeze. It sounds dramatic, but it’s real: the room smells different, the light
feels different, and you get a weird sense of victory over a problem that’s been quietly annoying you for years. And the
next time you paint? You’ll keep that window slightly moving while the paint dries, because you’ve learned the truth:
paint doesn’t just decorate. Paint also plots.