Table of Contents >> Show >> Hide
- Before You Start: Know Your Leather (So You Don’t Accidentally Ruin It)
- What You’ll Need (Basic Kit)
- Way #1: The Quick Clean (Dust, Light Dirt, Everyday Refresh)
- Way #2: The Deep Clean (Grime, Old Buildup, Salt Stains, and “What Happened Here?”)
- Way #3: Condition + Polish (The “Bring Back the Shine” Finish)
- Common Mistakes (A.K.A. How Leather Shoes End Up in a ‘Before’ Photo Forever)
- A Simple Maintenance Routine (That Won’t Take Over Your Life)
- Extra: of Real-World “Leather Shoe Cleaning” Experiences (The Stuff Guides Don’t Always Say)
- Conclusion
Leather shoes are a little like good friends: they age well, they show up for you, and they absolutely remember every time you
ignored them in the corner while you wore sneakers for three months straight. The good news? Cleaning leather shoes isn’t hard.
The bad news? It’s easy to do it wrongusually by soaking them, scrubbing like you’re sanding a deck, or using whatever
“all-purpose” cleaner lives under the sink (a.k.a. the leather’s villain origin story).
This guide breaks leather shoe cleaning into three practical methods you can pick based on what your shoes actually need:
a quick refresh, a deeper clean for grime and stains, and the “make them look expensive again” finish (conditioning + polish).
You’ll also get real-world examples, common mistakes, and a simple routine so you don’t have to guess next time.
Before You Start: Know Your Leather (So You Don’t Accidentally Ruin It)
“Leather shoes” can mean a few different surfaces, and they don’t all behave the same:
- Smooth leather (most dress shoes, many boots): the easiest to clean and polish.
- Oiled/waxed or waterproof leathers (work boots): often cleaned with milder methods; heavy polish may not be the goal.
- Patent leather (shiny, glossy): needs gentle wiping and specialized careskip saddle soap.
- Suede/nubuck (velvety): not the same cleaning approach as smooth leatheravoid water-heavy methods.
If you’re unsure, look inside the shoe for a label or check the brand’s care recommendations. When in doubt, do a small
spot test on an inconspicuous area (like the inside heel) before you treat the whole shoe.
What You’ll Need (Basic Kit)
- Soft brush (horsehair brush is ideal) or a clean, dry microfiber cloth
- Two soft cloths (one for cleaning, one for drying/buffing)
- Mild soap or a leather cleaner (for Method 1 and 2)
- Saddle soap (optional, for deeper cleaning on smooth leather)
- Leather conditioner (Method 3)
- Cream polish (color-matched if possible) and optional wax polish
- Shoe trees or paper to help shoes keep their shape while drying
One big rule: avoid soaking leather. Too much water can lead to stiffness, discoloration, or warping.
And pleaseno washing machine “experiments.” Leather doesn’t enjoy roller coasters.
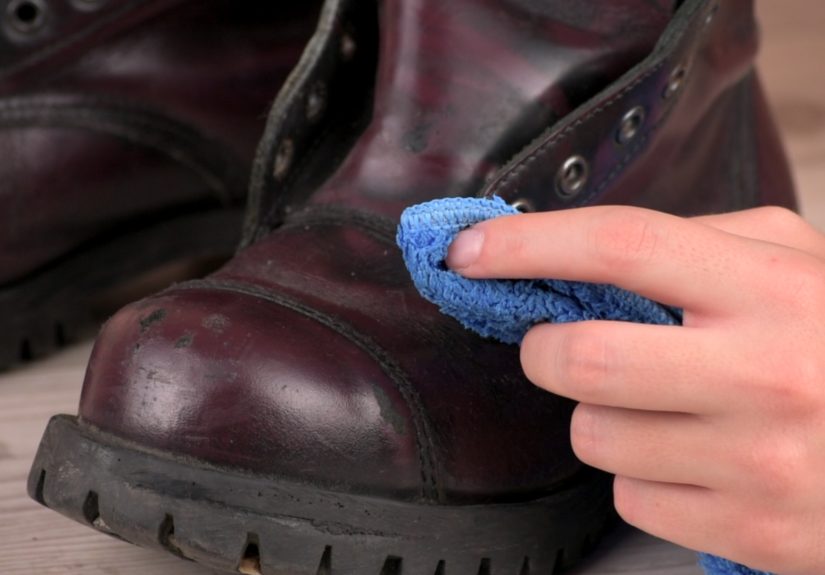
Way #1: The Quick Clean (Dust, Light Dirt, Everyday Refresh)
Use this method when your shoes look dull, dusty, or mildly dirty, but not deeply stained. It’s the “five minutes now saves
fifty minutes later” approach, and it’s ideal after a normal day of wear.
Step-by-step
- Remove laces (if they’re in the way). You can wash laces separately in mild soapy water and let them air dry.
-
Brush off dust and grit. Focus on seams, the welt (where the upper meets the sole), and around the tongue.
This prevents you from grinding dirt into the leather once it’s dampened. -
Wipe with a barely damp cloth. If needed, add a tiny drop of mild soap to the cloth (not directly on the shoe)
and wipe gently in small sections. - Wipe again with a clean damp cloth to remove soap residue.
- Air dry naturally, away from direct heat or sunlight. Stuff with paper or use shoe trees to hold shape.
When this works best
- Office/dress shoes with normal dust buildup
- Leather sneakers with light scuffs or city grime
- Between deeper cleans to keep leather from looking tired
Example: “My black loafers look dusty, not dirty.”
Brush them, do a quick damp wipe, and let them dry. If they still look flat, jump to Method #3 for conditioner and a little cream polish.
Most of the time, shoes don’t need a full “spa day”they just need a rinse of reality.
Way #2: The Deep Clean (Grime, Old Buildup, Salt Stains, and “What Happened Here?”)
Use this method when a quick wipe doesn’t cut itthink winter salt lines, sticky spots, ground-in dirt, or shoes that haven’t
been cleaned since your last phone had a home button.
For smooth leather, a leather cleaner or saddle soap can lift embedded grime. For salt stains, a diluted vinegar-and-water wipe
is a common go-tobut you should use it carefully, wipe evenly, and recondition afterward to replace lost moisture.
Option A: Deep clean with leather cleaner or saddle soap (smooth leather)
- Brush thoroughly to remove loose grit (this matters more than people think).
- Dampen a cloth (not soaked). Add a small amount of saddle soap or leather cleaner to the cloth.
- Clean in gentle circular motions, working section by section. Don’t scrub like you’re mad at the shoe.
- Wipe off residue with a separate clean damp cloth.
- Air dry fully (this can take several hours). Keep away from heaters and hair dryers.
- Condition afterward (Method #3), because deep cleaning can remove oils along with grime.
Option B: Remove salt stains (smooth leather) with a diluted vinegar solution
Salt is basically the glitter of winter: it gets everywhere and never leaves quietly. A gentle vinegar-and-water mix can help
dissolve salt marks, but you must avoid soaking the leather and follow with conditioner.
- Make a diluted mix (commonly equal parts water and white vinegar, or more diluted for delicate leather).
-
Dampen a soft cloth in the solution and wipe evenly across the affected panel (not just the line),
so you don’t create a new “clean stripe.” - Wipe with a clean damp cloth to remove leftover solution.
- Air dry completely, then condition the leather.
Spot problems and what to do
- Sticky residue: start with mild soap and water on a cloth; if it doesn’t lift, use a dedicated leather cleaner.
- White salt lines on boots: vinegar solution, wipe evenly, condition afterward.
- Scuffs: often improve with conditioner + cream polish (Method #3). Deep cleaning isn’t always necessary.
If your shoes are oiled/waxed or waterproof leathers (common in work boots), brands often recommend simpler cleaning:
remove dirt with a brush, use water sparingly, wipe dry, and then apply the appropriate conditioner or boot oil in a light coat.
Overdoing oils can darken leather or leave it feeling limpso “more” is not automatically “better.”
Way #3: Condition + Polish (The “Bring Back the Shine” Finish)
Cleaning removes dirt. Conditioning restores flexibility. Polishing restores color and shine. If your shoes look clean but tired,
this is the method that makes people ask, “Wait… did you buy new shoes?”
Step-by-step
- Start with clean, dry leather. Do Method #1 or #2 first if needed, and make sure the shoe is fully dry.
-
Apply leather conditioner in a thin layer using a soft cloth. Work it in gently. Let it absorb for the time
recommended on the product (often 10–20 minutes). - Buff lightly with a horsehair brush or clean cloth to remove excess and even out the finish.
- Apply cream polish (optional but amazing). Cream polish helps restore color and covers minor scuffs. Use a small amount.
- Buff again until the leather looks even and lively.
- Optional: wax polish for extra shine, especially on dress shoes. Apply sparingly and buff for that glossy finish.
How often should you condition leather shoes?
It depends on how often you wear them, climate, and the leather type. A helpful rule of thumb:
condition when the leather looks dull, feels dry, or after a deep cleanrather than on a rigid schedule.
Too much conditioner can lead to a “soggy” or over-softened feel and can attract dirt.
Example: “These brown oxfords have toe scuffs.”
If the scuffs aren’t deep gouges, skip harsh cleaning. Wipe them clean, apply conditioner, then add a matching cream polish.
Buff well. Most toe scuffs are basically the leather version of bedheadannoying, but fixable.
Common Mistakes (A.K.A. How Leather Shoes End Up in a ‘Before’ Photo Forever)
- Soaking the shoes: leather isn’t a sponge; use a damp cloth, not a bath.
- Using harsh cleaners (bleach, ammonia, strong detergents, alcohol-heavy products): these can strip oils and damage finish.
- Drying with heat: direct heat can dry leather too fast and cause stiffness or cracking.
- Skipping conditioner after deep cleaning: you cleaned out grimeand some moistureso put a little life back in.
- Over-conditioning: too frequent or heavy application can soften leather too much and attract dirt.
A Simple Maintenance Routine (That Won’t Take Over Your Life)
- After wear: quick brush or wipe (Method #1 “brush step” is your best friend).
- Monthly-ish (or when they look dull): conditioner + cream polish (Method #3).
- Seasonal (winter/salt season): address salt stains quickly; condition afterward.
- Storage: use shoe trees when possible; keep away from direct heat; let shoes dry naturally.
Extra: of Real-World “Leather Shoe Cleaning” Experiences (The Stuff Guides Don’t Always Say)
People tend to learn leather shoe care the same way they learn cooking: one day you try something “creative,” and the result
is… educational. A common story goes like this: someone buys nice leather shoes, wears them everywhere, and assumes they’re as
indestructible as their favorite hoodie. Then winter hits, salt stains appear like mysterious white crop circles, and suddenly
the shoes look older than your aunt’s antique end table. The biggest lesson? Speed matters. Salt stains are much
easier to remove when they’re fresh, and a quick wipe + dry + condition beats a desperate deep clean weeks later.
Another frequent experience is the “too much water” problem. It’s natural to think, “If a little cleaning is good, a lot must be
better.” But with leather, over-wetting can create uneven drying, dull patches, or stiffnessespecially around the toe box where
the leather is shaped and creased. People who get the best results usually treat leather like hair: cleanse gently, don’t
overdo it, and always follow with a little conditioning so it stays flexible.
Scuffs are also misunderstood. Many scuffs look catastrophic until you condition and apply cream polishthen they fade into a
“lived-in” patina that actually looks good. The classic example: a toe scuff on brown shoes. If you scrub it aggressively, you
can remove pigment and make it worse. If you instead wipe the area clean, condition lightly, then use a matching cream polish,
the color often blends back in. It’s less “repair mission” and more “makeup touch-up.”
Then there’s over-conditioningthe shoe-care equivalent of moisturizing your face every hour because you once saw a dry spot.
People report shoes feeling overly soft, looking darker than expected, or picking up dust faster. The fix is usually simple:
brush regularly, condition less often, and let the leather tell you what it needs. If the shoe feels supple and looks healthy,
you don’t need to add more product just because you own it. (This is also a life lesson about buying six different conditioners
and using none of them responsibly.)
Finally, many people realize the real secret isn’t a magic cleanerit’s consistency. A quick brush after wearing leather shoes
prevents grime from becoming a permanent resident. Using shoe trees helps shoes dry in shape and reduces harsh creasing. And when
a deeper clean is needed, doing it calmly with light pressure and minimal moisture keeps leather looking sharp for years. Leather
rewards patience. It punishes chaos. Choose patience.
Conclusion
If you remember nothing else, remember this: clean gently, dry naturally, and condition when the leather needs it.
Use the quick clean for everyday upkeep, the deep clean for real grime and salt stains, and the conditioner + polish finish to
restore color, shine, and confidence. Your leather shoes don’t need perfectionthey need consistent, sensible care. And maybe
fewer surprise puddles.