Table of Contents >> Show >> Hide
- Quick Prep for Better Braids (and Fewer “Why Is It Doing That?” Moments)
- Method 1: Classic Center-Part Double French Braids (The “Most French Braid” French Braid)
- Method 2: Reverse French (Double Dutch/“Boxer Braids”) for a Raised, Sporty Look
- Method 3: Two Lace French Braids (Easy Face-Framing, Less Hand Gymnastics)
- Finishing Moves That Make Any Two-Braid Style Look Better
- Two French Braids FAQ (Because Your Hair Has Questions)
- Conclusion: Pick Your Two-Braid Mood
- Real-World Experiences and Lessons Learned (The Stuff People Don’t Tell You Until You’re Holding Three Strands and Panic)
Two French braids are the hairstyle equivalent of a good playlist: they work for school, sports, errands, parties, and
those “I overslept but I still want to look like I tried” mornings. The best part? Once you understand the hand
pattern, you can remix it into different lookstight and sporty, soft and romantic, or clean and classic.
This guide breaks down three reliable ways to do two French braids (with lots of “here’s why that
keeps happening” troubleshooting). You’ll learn:
- Method 1: Classic center-part double French braids (the timeless version)
- Method 2: Reverse French (double Dutch/“boxer braids”) for a raised, athletic look
- Method 3: Two lace French braids for an easier, face-framing vibe
Ready? Grab a comb, a couple elastics, and the confidence of someone who definitely knows what they’re doing (even if
you’re still negotiating with your hands).
Quick Prep for Better Braids (and Fewer “Why Is It Doing That?” Moments)
Tools you’ll actually use
- Rat-tail comb (for clean parts)
- 2–4 small elastics (clear or hair-colored)
- 2 clips/scrunchies (to park one side while you braid the other)
- Bobby pins (for layers or loose nape pieces)
- Optional: texture spray, light gel, edge control, or a smoothing cream
Prep steps that make everything easier
- Detangle like you mean it. Brush from ends upward. Knots turn braiding into an argument.
- Decide: sleek or lived-in? Freshly washed hair can be slippery; day-2 hair often grips better.
If your hair feels too smooth, add a tiny bit of texture spray or dry shampoo at the roots. - Make your part. For two braids, a clean middle part is the easiest to keep symmetrical.
Use the tail of the comb from forehead to nape. Don’t worry if it’s not laser-straighthumans are not rulers. - Split into two sections and clip one side away. This prevents “mystery hair” from sneaking into
the wrong braid.
Mini mindset shift: Your goal isn’t perfection; your goal is consistency. Even section sizes and
steady tension beat “perfect” technique every time.
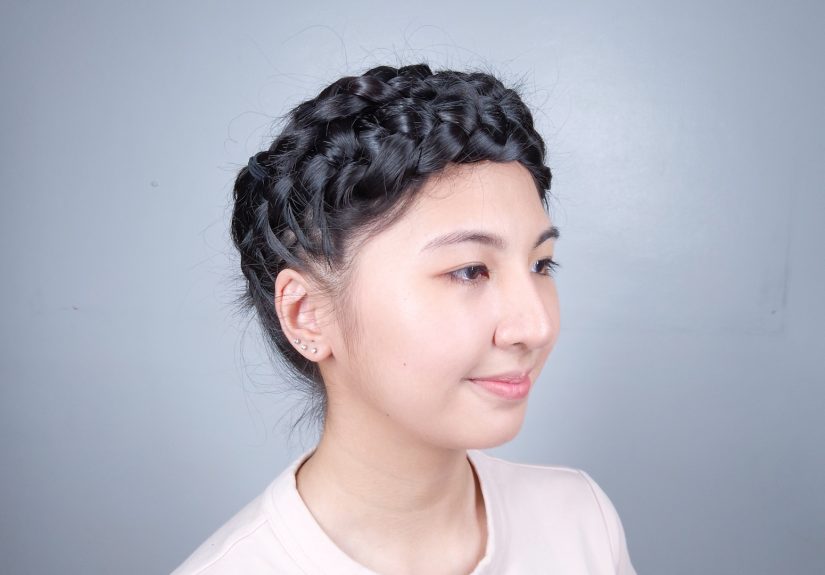
Method 1: Classic Center-Part Double French Braids (The “Most French Braid” French Braid)
This is the traditional version: the braid lies flatter to the head because each section crosses
over the middle as you add hair from both sides. It’s neat, timeless, and great for everyday wear.
Step-by-step: one side at a time
- Start at the front. On the un-clipped side, grab a small triangle section near the hairline
(roughly from your part to your temple). Split it into three even strands: left, middle, right. - Begin like a normal braid. Cross the right strand over the middle, then cross
the left strand over the middle. - Add hair (right side). Before the next right-over-middle move, pick up a small section of loose
hair from the right side (near the hairline/side of head) and add it into the right strand.
Now cross that bigger right strand over the middle. - Add hair (left side). Pick up a small section from the left side (closer to your part), add it to
the left strand, then cross left over the middle. - Repeat down the head. Keep adding hair evenly from both sides until you reach the nape of your neck.
- Finish the tail. Once there’s no more loose hair to add, continue a regular three-strand braid to
the ends and secure with an elastic. - Do the other side. Unclip the second section and repeat the same steps. Try to match your starting
point and the size of the first few added sections so the braids look like siblings, not distant cousins.
How to keep the two braids symmetrical
- Use “mirror checkpoints.” After 3–4 stitches, pause and compare: Are both braids sitting at the
same angle? If one is drifting backward, restart earlyfixing it later is like trying to straighten a picture frame
by pushing the wall. - Pick up equal amounts of hair. If one side looks chunkier, you’re probably grabbing bigger sections.
Aim for small, consistent pieces. - Keep tension steady, not brutal. Too tight = headaches and bumps. Too loose = braid “melts” fast.
Think “firm handshake,” not “arm-wrestling.”
Common issues (and quick fixes)
- Bumps near the scalp: You’re pulling one strand tighter than the others. After each stitch, gently
snug all three strands evenly before adding new hair. - Messy part line: Re-part with the comb tail, then smooth each section with a little water or
smoothing cream before you start. - Short layers popping out: Use a pea-sized amount of light gel on fingertips and “paint” flyaways
into the braid. Bobby pins at the nape are your secret agents.
Method 2: Reverse French (Double Dutch/“Boxer Braids”) for a Raised, Sporty Look
Dutch braids are often called “reverse French braids” because the pattern is the samethree strands, add hair as you
gobut instead of crossing sections over the middle, you cross them under. That makes
the braid sit on top of the hair, which looks bold, defined, and very “I might do cardio, or I might just look
like I do.”
The one rule that changes everything
French braid: cross over. Dutch braid: cross under.
Step-by-step: double Dutch braids
- Part and clip. Same prep as Method 1: clean part, clip one side.
- Start with three strands. Take a triangle section at the front and split into three.
- Begin under-crossing. Cross the right strand under the middle, then the left strand
under the middle. - Add hair, then cross under. Pick up a small section from the right side, add it to the right strand,
then cross that combined strand under the middle. - Repeat on the left. Pick up a small section from the left side, add it to the left strand, then
cross under the middle. - Keep it close to the scalp. Dutch braids look best when you braid “along the head” instead of
letting the strands float away from the scalp. - Finish and secure. Regular braid the tail and elastic it. Repeat on the other side.
How to get that clean “boxer braid” look (without a fight)
- Start with smaller sections. Big starting sections make it harder to control tension.
- Use your thumbs to feed hair in. When adding hair, scoop with the thumb and guide it into the outer
strand. This helps keep the braid tight and centered. - Keep your hands low. If you braid with your hands too far off your head, the braid loosens.
Keep your hands close to the scalp like you’re trying not to block your own view.
When to choose Method 2
- Sports/gym days: the raised braid stays put and holds hair securely.
- Thicker or curlier hair: definition looks amazing and the grip helps the braid last.
- You want volume: Dutch braids look naturally “bigger” because they’re elevated.
Method 3: Two Lace French Braids (Easy Face-Framing, Less Hand Gymnastics)
A lace braid is basically a French braid that only adds hair from one side each time. That makes it
simpler and faster, and it creates a pretty, face-framing braid that can blend into a ponytail, pigtails, buns, or a
half-up style. You’ll still end up with two braids, but with less “where do my fingers go now?” energy.
What “lace” means in practice
You’ll cross strands like a French braid (over the middle), but you’ll only add hair from the outer
edge (near your face/temple) while the inside edge (near the part) stays mostly “clean.”
Step-by-step: lace French braid pigtails
- Part and clip. Middle part is easiest.
- Start at the hairline. Take a small section near the forehead on one side and split into three.
- Do 1–2 normal stitches. Cross right over middle, left over middle.
- Add hair from the outer edge only. Before you cross the outer strand (the strand closest to your
temple/ear), pick up a small section of loose hair from that same outer edge and add it in. - Skip adding on the inner edge. When it’s time to cross the inner strand (closest to your part),
just cross it over the middle without adding hair. - Continue down. Keep feeding in from the outer edge until you reach behind the ear/nape area.
- Finish your braid. Continue a regular braid to the ends and secure.
- Repeat on the other side. Try to start at the same height and angle.
Why Method 3 is a favorite for beginners
- Less sectioning to manage. Adding hair from one side cuts the “two-sided scooping” challenge in half.
- It flatters most face shapes. The braid naturally frames the face and looks softer than super-tight
braids. - It’s flexible. You can stop early and turn both braids into ponytails, buns, or a half-up look.
Finishing Moves That Make Any Two-Braid Style Look Better
1) Pancake the braid (a.k.a. “make it look like you have more hair”)
Pancaking means gently tugging the outer loops of the braid to widen it. It instantly makes braids look fuller and
more intentionallike you did it on purpose, not like your hair did it while you were busy existing.
- Hold the braid tail firmly so you don’t loosen the whole thing.
- Start near the top of the braid and tug tiny pieces outward, one “stitch” at a time.
- Work downward slowly until you reach the ends.
Tip: Pancake both braids evenly so one doesn’t look like it’s wearing shoulder pads.
2) Lock it in for all-day wear
- For flyaways: smooth with a tiny bit of gel or hairspray on your fingertips (not a soaking wet cloud).
- For the nape: if little pieces escape, pin them under the braid with bobby pins crossed like an X.
- For slippery hair: add texture at the roots before you start and choose elastics with good grip.
3) Adjust for your hair type
- Fine hair: use texture spray, braid slightly tighter, and pancake gently for volume.
- Thick hair: take smaller add-in sections so the braid doesn’t get bulky too fast.
- Curly or coily hair: braid on stretched hair if you want a smoother look; use a leave-in conditioner
or styling cream for slip and control. Keep tension comfortable. - Layered hair: expect some pieces to pop outplan for pins or braid a little tighter near the top.
Two French Braids FAQ (Because Your Hair Has Questions)
“How do I do two braids on myself without my arms quitting?”
Use two mirrors (or a mirror plus your phone camera) so you can see the back. Also: take breaks. Braiding doesn’t
need to be an endurance sport.
“My braids look different on each side. Help.”
Totally normal. Most people have a “strong hand” side. Try starting both braids from the same exact point (same depth,
same angle), and keep your add-in sections consistent. Symmetry improves fast with practice.
“Can I do two French braids with short hair?”
Yesespecially if your hair is long enough to gather at least a small braid at the nape. You may end up with shorter
tails or need extra pins. Method 3 (lace braids) can be easier for shorter lengths.
“What if I want the braids to end as buns?”
Easy upgrade: after you reach the nape and finish each braid’s tail, twist the tail into a small bun and pin it. This
looks polished and keeps ends tucked away.
Conclusion: Pick Your Two-Braid Mood
If you want the classic look, go with Method 1. If you want bold, raised braids that hold through a
busy day, Method 2 is your best friend. If you want something softer and simpler (especially if you’re
still learning), Method 3 is the low-stress win.
The secret is repetition: the first time might feel awkward, the third time feels doable, and by the tenth time your
hands will start acting like they’ve attended braid school.
Real-World Experiences and Lessons Learned (The Stuff People Don’t Tell You Until You’re Holding Three Strands and Panic)
Let’s talk about what it actually feels like to learn two French braidsbecause tutorials are great, but real life is
you, a mirror, and hair that occasionally behaves like it has its own opinions.
1) The “arm fatigue” phase is realand temporary. Most beginners notice their arms get tired halfway
down the head, especially when braiding on themselves. The trick people swear by is taking micro-pauses: after each
add-in, hold the braid close to the scalp, relax your shoulders for two seconds, then continue. You don’t lose progress,
and your arms don’t stage a protest. Another common hack is braiding while seated with elbows supported (like resting
on a desk or vanity) so you’re not holding your arms in the air like you’re trying to signal airplanes.
2) The first braid is usually better than the second. This happens because you’re fresh on braid #1
and then your hands get tired or you rush braid #2. A practical way people fix this is by slowing down the start of the
second braid. If you match the first three stitches on both sides, the rest tends to follow. Some people even stop after
two stitches, check symmetry, and only then commit. It feels extra, but it saves you from the “one braid is a masterpiece,
the other is a cry for help” situation.
3) Section size is the make-or-break detail. People often report that their braid looks “lumpy” or
uneven, even when the pattern is correct. The usual cause is inconsistent add-in sections: one scoop is thick, the next
is tiny, and the braid starts looking like it’s walking with a limp. The fix is boring but effectivechoose a “default”
section size (about the width of your pinky or a small comb tooth section) and stick to it. When in doubt, go smaller.
Smaller sections look cleaner and give you more control.
4) Your hair texture changes the difficulty level. People with super straight, silky hair often say
the braid “slides” and loosens fast. Their best experience-based trick is adding grip before starting: a touch of dry
shampoo at the roots, a light texture spray, or even braiding on day-2 hair. Meanwhile, people with thick or curly hair
often say the braid holds well but can feel bulky quickly. Their trick is to take smaller add-in sections and keep the
braid path neat, so it doesn’t become a thick rope by the time it reaches the ear.
5) The nape is where confidence goes to get tested. The back of the neck is the spot where many people
notice bumps, loose pieces, or a braid that starts drifting sideways. A common solution is to change your hand position
at the nape: keep your hands closer to the head and angle the braid straight down instead of continuing the same diagonal
path you used near the ear. If little hairs escape at the nape (especially with layers), experienced braiders don’t
always “fix” itthey pin it. Two crossed bobby pins under the braid can clean it up fast and still look natural.
6) Pancaking is a confidence multiplierif you do it gently. A lot of people try pancaking and end up
loosening the braid too much, which can make it sag. The better approach (shared by folks who pancake regularly) is:
pancake only the outer loops, keep your tug small, and do both sides evenly. Pancaking is especially helpful when you
want your braids to look fuller for photos, events, or “I want it to look intentional” days.
7) The best “practice schedule” is sneaky. People who get good fast usually practice when it doesn’t
matterbefore showering, on a lazy weekend, or at night while watching a show. That removes the pressure of needing it
perfect. Over time, your fingers memorize the pattern. The braid becomes automatic, and the only thing you’re thinking
about is whether you want it tight and sporty (Method 2) or soft and face-framing (Method 3).
Bottom line: Almost everyone starts with uneven braids and a little confusion. The people who end up
with effortless-looking double braids aren’t “naturals”they just repeated the same motions enough times that their
hands stopped negotiating. If you can do a few stitches and keep going, you’re already learning the skill. The rest is
just practice… and maybe one good hair clip that doesn’t betray you.