Table of Contents >> Show >> Hide
- Why leveling matters (and why your washer is “walking”)
- Before you start: tools, safety, and a 60-second diagnosis
- Way 1: Adjust the leveling legs and lock them in
- Way 2: Shim or cup the feet for small floor problems
- Way 3: Create a level, rigid base when the floor is the villain
- After leveling: test it like you mean it
- Common “leveling” problems that aren’t actually leveling
- FAQ
- Real-Life Experiences: From the Laundry Trenches
- SEO Tags
A washing machine should wash clothes, not practice for a role in Stomp.
If your washer is wobbling, “walking,” or shaking the whole laundry room like it’s trying to escape,
the fix is often simple: get it level and stable so all four feet share the job.
Below are three practical, DIY-friendly ways to level a washing machinewhether your floor is only
a little uneven or it’s got a dramatic slope that makes marbles roll on their own.
Why leveling matters (and why your washer is “walking”)
During the spin cycle, a washer rotates a heavy, wet load at high speed. When the machine isn’t level,
one or more feet may not sit firmly on the floor. That creates a tiny teeter-totter effect that gets
amplified when the drum spinsleading to vibration, banging, rattling, and the classic “washer shuffle.”
Over time, excessive vibration can stress internal parts, increase noise, and even contribute to leaks
or premature wear. Leveling is less about perfection and more about stability:
the washer should feel planted, not springy or tippy.
Before you start: tools, safety, and a 60-second diagnosis
Tools you’ll actually use
- Bubble level (or a digital level). A small torpedo level is easy to place on the washer.
- Adjustable wrench or pliers (often needed for lock nuts and leveling legs).
- Wood block (a short 2×4 works) to support a corner while you adjust a foot.
- Flashlight (because laundry rooms are somehow always dim).
- Optional: rubber anti-vibration cups/pads or composite shims.
Safety first (because washers are heavier than they look)
- Unplug the washer if you’ll be moving it significantly.
- Don’t fully yank it out by the hosesgive them slack and avoid kinks.
- If the washer is stacked or on a pedestal, be extra careful: the center of gravity is higher.
- If you can’t move or tip it safely, recruit a helper. This is the rare DIY project where “buddy system” is genuinely smart.
The 60-second “rock test”
- With the washer in its normal spot, press down on each corner.
- Then try rocking it diagonally (front-left to rear-right, front-right to rear-left).
- If it teeters, at least one foot isn’t making firm contactor the floor beneath it is uneven or flexible.
Once you know it rocks, you’re ready for the fixes below. Start with Way 1because it’s the intended solution
and only move to Ways 2 or 3 if the floor is fighting you.
Way 1: Adjust the leveling legs and lock them in
Most washers have threaded leveling feet (legs) on the bottom corners. Some modelsespecially certain top-loaders
may have self-leveling rear legs that need to be “reset” by tilting the machine and setting it back down.
Either way, the goal is the same: all four feet firmly on the floor,
and the washer level front-to-back and side-to-side.
Step-by-step leveling (the reliable method)
-
Place the level on top. Start by checking side-to-side, then front-to-back.
For the clearest read, place the level near the front edge, then near the back edge. -
Stabilize the washer before chasing the bubble. If the washer rocks, fix the rocking first.
A washer that doesn’t wobble is usually quieteven if the bubble isn’t micrometer-perfect. -
Access the feet safely. Gently tip the washer slightly and brace it with a wood block,
or have a helper lift one corner just enough to take weight off the foot.
(You’re not trying to bench-press the washer; you’re just creating room to turn a leg.) -
Adjust one corner at a time. Extend the foot downward to raise that corner of the washer;
retract the foot upward to lower that corner.
Tip: Don’t guessturn the foot a little and watch what happens to the level. -
Recheck frequently. Small turns make a big difference.
After each adjustment, set the washer down and check rocking again. -
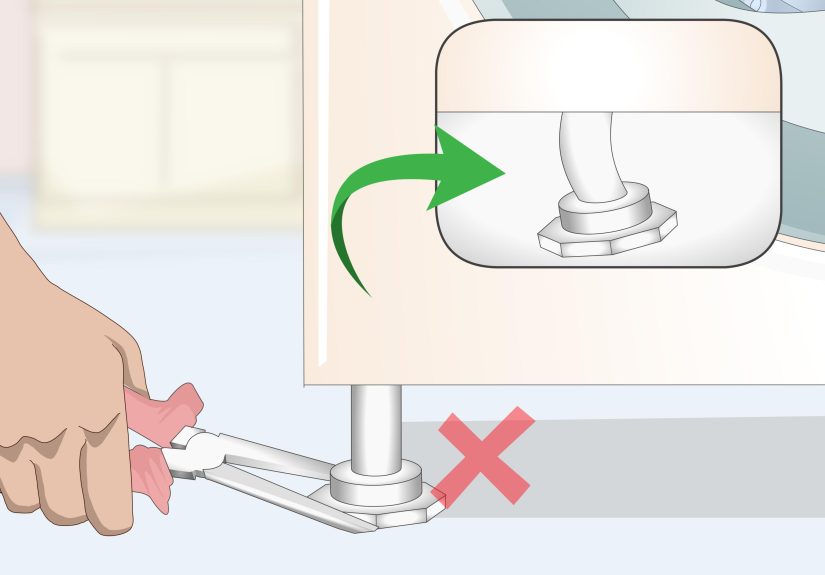
Tighten the lock nuts. Many washers have lock nuts on the leveling legs.
Once the washer is stable and level, snug each lock nut up against the washer base/cabinet
so vibration can’t “walk” the feet out of position.
Model-specific tips that save time
-
Self-leveling rear legs (common on some top-loaders):
You may need to tilt the washer forward a few inches so the rear legs lift, then set it back down to let them re-seat.
If your washer “mysteriously” gets wobbly after being moved, this reset often fixes it. -
Front-loaders and pedestals:
If the washer sits on a pedestal, make sure the washer is securely attached (and that the pedestal feet are level too).
A perfectly leveled washer on a crooked pedestal is still… a crooked washer. -
Keep it low:
The higher the feet extend, the easier it is for the washer to sway. Adjust only as much as needed for stability.
If Way 1 gets you stable but you still need “one more tiny bit” and the feet are maxed out,
that’s your sign to move to Way 2.
Way 2: Shim or cup the feet for small floor problems
Not every laundry room floor is perfectly flat. Tile grout lines, slightly sloped concrete, older wood subfloors,
and vinyl plank seams can all create tiny high/low spots. If the washer feet won’t adjust enoughor the washer
levels fine but still vibrates because a foot sits half on/half off a grout ridgeshims or rubber cups can help.
What to use (and what not to)
-
Rubber anti-vibration cups/pads: Great for reducing vibration transfer and giving feet a consistent surface.
Many are designed to sit under each foot. - Composite/plastic shims: More durable than wood in damp laundry rooms and less likely to compress over time.
- Avoid: soft foam that squishes like a flip-flop. Too much squish can increase wobble.
- Avoid long-term: untreated wood scraps. They can compress, rot, or slideespecially on smooth tile.
How to shim without playing “washer Jenga”
- Identify the problem corner. Use the rock test and the level. The corner that lifts easiest is usually the culprit.
-
Lift slightly and place the shim/cup. Tip the washer gently and slide the shim or rubber cup under the foot.
Keep your fingers out from under the washeruse the shim as a “push tool,” not a “finger trap.” -
Set it down and recheck stability. If it still rocks, adjust the leveling feet again (Way 1) to fine-tune.
The shim is the helper; the feet are the final dial. - Lock it in. Tighten any lock nuts on the feet once you’re happy with the result.
Shims and cups are especially helpful on uneven tile, older floors with mild sag, or laundry closets where you can’t easily
get tools around the back feet. If the washer still shakes even when it’s stable and level, the floor may be flexing under load.
That’s where Way 3 comes in.
Way 3: Create a level, rigid base when the floor is the villain
Sometimes the washer isn’t the problemthe floor is. If you can feel vibration across the room, or the washer is on an older,
springy wood floor (especially upstairs), you may need to give the washer a sturdier stage to perform on. A rigid base spreads
the load and can reduce flexing, which helps keep the washer stable during high-speed spin.
Option A: A plywood platform (simple and effective)
A common fix is placing a thick, rigid sheet of plywood beneath the washer to create a flatter, more uniform surface.
For best results, use sturdy plywood and keep the footprint large enough so all feet sit fully on it (no half-on edges).
If the floor is slightly sloped, you can shim the platform to level it, then level the washer on top using Way 1.
- Best for: slightly uneven floors, minor slope, small dips, or floors that flex.
- Pro tip: If possible, secure the plywood so it doesn’t shift over time.
- Reality check: This isn’t a fashion runway. The platform can be plain and still do its job perfectly.
Option B: Add vibration control without adding wobble
Anti-vibration mats and pads can reduce how much vibration transfers into the floor (and into your nerves).
The trick is choosing something firm enough to support the washer without acting like a trampoline.
Many homeowners do best with rubber cups under each foot or a thin, dense mat
designed for appliances, followed by careful leveling (Way 1).
Option C: Fix the floor (when you’re ready to go “full adult”)
If the laundry room floor is dramatically out of level, damaged, or flexing excessively, the most permanent fix is addressing
the flooring itselftightening subflooring, reinforcing joists, or leveling concrete. That’s beyond a quick adjustment,
but it’s worth considering if every washer you own turns into a percussion instrument.
If you suspect structural issues or you’re dealing with a stacked unit that feels unsafe, calling a pro is the sensible move.
After leveling: test it like you mean it
A washer can look level and still misbehave under spin. Testing confirms you didn’t just create a “beautifully leveled problem.”
Run this quick checklist:
- Rock test: No teetering corner-to-corner.
- Level check: Bubble centered side-to-side and front-to-back.
- Spin test: Run a rinse-and-spin or a short cycle with an average load. Listen for banging or walking.
- Recheck lock nuts: After the first successful run, verify the lock nuts are still snug.
Common “leveling” problems that aren’t actually leveling
If your washer is level and stable but still shakes violently, don’t keep cranking the feet like you’re tuning a guitar.
A few issues mimic leveling problems:
1) Shipping (transit) bolts still installed
This one is especially common on new front-load washers. Shipping bolts lock the drum in place for transport.
If they aren’t removed, the machine can shake aggressively. If your new washer feels unusually rigid (almost like the tub
has no “spring” when pushed), check the installation instructions and confirm the shipping bolts are removed.
2) Unbalanced loads
One bulky itemlike a comfortercan soak up water and create a lopsided, heavy mass that throws the spin cycle off.
Mix heavy and light items when possible, and pause the washer to redistribute if it starts thumping.
Leveling helps, but it can’t convince physics to take a day off.
3) Floor contact or cabinet contact
Sometimes the “vibration” is actually the washer tapping a wall, dryer, shelf, or drain pipe during spin.
Make sure there’s a little clearance around the machine and that hoses aren’t knocking against the back panel.
4) Worn suspension or shock absorbers
If the washer is level, the load is balanced, and it still shakes excessively, internal components like shocks or springs
may be worn. At that point, it’s often a repair question rather than a leveling question.
FAQ
How level is “level enough”?
If the washer doesn’t rock and the level is close to centered in both directions, you’re in good shape.
A perfectly centered bubble is great, but no wobble is the bigger win.
Do I need a special tool to level a washing machine?
Nope. A basic bubble level and an adjustable wrench handle most situations.
If your laundry room is tight, a small torpedo level and a compact wrench can make life easier.
How often should I re-level my washer?
Recheck leveling after moving the washer, after installing a pedestal, or if you notice new vibration.
Otherwise, a quick rock test every few months is plentythink of it as a two-second wellness check for your appliance.
Real-Life Experiences: From the Laundry Trenches
The first time I leveled a washing machine, I thought it would be a neat, five-minute “turn the feet and done” moment.
It was not. It was a sweaty, slightly ridiculous adventure that taught me three truths: washers are heavier than your confidence,
laundry rooms are designed by someone who hates elbows, and the “last quarter turn” is a myth invented to sell patience.
In one older rental, the washer lived on tile that looked flat until you put a level on itthen it revealed a subtle slope,
like the floor was quietly encouraging the machine to migrate toward the hallway. I adjusted the front feet until the bubble
was centered, patted myself on the back, and ran a spin cycle. The washer still clunked like a drummer warming up.
The surprise culprit wasn’t the bubble; it was that one rear foot wasn’t truly planted. The diagonal rock test caught it instantly.
Once I focused on eliminating the teeter (instead of obsessing over perfect level), the machine finally calmed down.
Another time, a friend’s front-loader was “walking” so much it looked like it was trying to leave a bad relationship.
The feet were adjusted correctly, lock nuts tight, bubble centeredyet it still shook the house. We eventually noticed the washer
was lightly bumping a shelf support during high spin. That tiny tap, repeated dozens of times per minute, sounded like a much bigger
mechanical problem. Two inches of clearance later, the “broken washer” magically turned back into a normal washer.
The most dramatic case was a second-floor laundry closet with a slightly springy wood floor. Leveling the feet helped, but the floor
flexed just enough that the washer would start to vibrate mid-spin, especially with towels. The fix wasn’t more foot-adjustingit was
giving the washer a better foundation. A sturdy plywood base (properly sized so every foot sat fully on it) made the washer feel
noticeably more planted. We then re-leveled the machine on top, tightened the lock nuts, and ran a test load. The difference wasn’t
subtle: fewer vibrations, less noise, and no more “washer shuffle.”
If you take anything from these laundry-room stories, let it be this: start with the feet, but don’t ignore the environment.
Floors slope, tiles have ridges, closets amplify noise, and a washer will happily broadcast any weakness in its setup.
Leveling isn’t glamorous, but once you’ve experienced a quiet spin cycle, you’ll wonder why you tolerated the old percussion concert
for so long.