Table of Contents >> Show >> Hide
- Before You Start: A Simple “Craft Smart” Game Plan
- Wreaths, Swags, and Wall Moments
- Advent Calendars, Tags, and Gift-Ready Details
- Ornaments and Tree Trimmings
- Trees, Forests, and Tabletop Scenes
- Cozy Decor and Display Crafts
- Bonus BHG-Style “Wow” Craft: Homemade Holiday Snow Globe
- Experience Notes: What It’s Really Like Making These Crafts
- Conclusion: Make It Merry, Make It Yours
If your holiday decorating style is “cozy, cheerful, and mildly overconfident,” welcome home. This guide rounds up
30 Better Homes & Gardens–inspired Christmas craft ideasthink wreaths, ornaments, tabletop scenes, and gift-ready details
with quick tips to help you nail the look without turning your living room into a glitter crime scene.
These projects lean into what BHG does best: approachable materials, big visual payoff, and that satisfying “I made this!”
feeling that makes you want to casually point at your mantel while guests are taking their coats off.
Before You Start: A Simple “Craft Smart” Game Plan
The secret to a holiday craft season you actually enjoy is not talentit’s pacing. Pick a mix of “fast wins”
(10–20 minutes), “weekend makers” (1–2 hours), and “drying-time divas” (anything involving paint, dough, or glue that needs patience).
A quick cheat sheet
| If you want… | Choose crafts like… | Best materials |
|---|---|---|
| High impact, low effort | Wreath upgrades, card displays, framed textiles | Ribbon, greenery, clothespins, frames |
| Kid-friendly fun | Salt dough, paper trees, mini ornaments | Flour, markers, paper, pipe cleaners |
| Modern, minimalist vibes | Wood bead wreath, font plates, simple tags | Wood beads, chipboard letters, thrift finds |
| “Guests will ask where you bought it” | Swag wreaths, mini holiday forest, frosted votives | Evergreen, berries, sisal rope, velvet ribbon |
- Pick a palette: Two main colors + one neutral keeps DIY décor looking intentional (not “craft store exploded”).
- Batch where possible: If you’re making one tag, you’re basically making twelve. Accept it. Embrace it.
- Build a “hot-glue landing zone”: Cardboard + parchment paper saves tables, sanity, and friendships.
Wreaths, Swags, and Wall Moments
1) DIY Poinsettia Wreath
Poinsettias are basically Christmas in plant form, so turning them into a wreath is a fast track to “holiday-ready.”
Use faux poinsettia stems (or craft your own blooms) and cluster them in a few bold groupings rather than circling the entire form.
- Pro tip: Keep the greenery visiblenegative space makes the red pop and looks more designer.
2) Mini Hoop Ornaments
Tiny embroidery hoops + sweater scraps = instant cozy. Stretch a cute knit pattern tight, trim the back, and add ribbon.
They’re part ornament, part mini wall art, and 100% “look what I rescued from the donation pile.”
- Pro tip: Choose knits with small patterns so they read clearly from across the room.
3) Ornament Wreath (with a handmade twist)
Upgrade a greenery wreath by wiring in a handful of statement ornamentspaint-drip, marbled, or glossy brights.
Think of it like holiday jewelry: a few great pieces beat a tangled pile.
- Pro tip: Add ornaments in odd-numbered clusters (3 or 5) for a balanced, “styled” look.
4) Framed Tea Towels
Vintage tea towels, grain sacks, or flour-sack prints can become budget-friendly holiday art. Frame them (or clip them to a frame backing),
then layer a few pieces together for a collected, gallery-wall feel.
- Pro tip: Mix sizesone larger print + two smaller pieces makes the display feel curated.
5) Sweater Garland, Star, and Stool Sleeves
This is the “cozy overload” set: turn old sweaters into a soft garland, a fabric-covered star, and even little sleeves for stools or vases.
It’s texture-forward décor that feels warm before you even light a candle.
- Pro tip: Stick to one sweater color family (creams, grays, reds) to keep it chic, not chaotic.
6) Faux-Knitted Vase Wraps
No knitting requiredjust sweater sleeves. Slide them over glass vases, fold the edge neatly, and add mini jingle bells at the cuff
for that subtle “I planned this” sound effect.
- Pro tip: Use clear vases underneath so stems and greenery still feel light and airy.
7) Felt Poinsettia Wreath
Felt poinsettias let you control color and styleclassic red, blush, even moody burgundy. Attach handmade flowers to a eucalyptus wreath
for a modern twist that still screams Christmas (politely).
- Pro tip: Mix flower sizes so the wreath has depth and movement.
8) White Berry Wreath
For a snowy, wintry look without actual snow (or frostbite), build a wreath around white berries and pale greenery.
It’s crisp, elegant, and plays nicely with both traditional and modern interiors.
- Pro tip: Add one unexpected texturepinecones, velvet ribbon, or dried citrusfor extra dimension.
9) Farmhouse Sign
A simple wood pallet sign with holiday colors can instantly anchor a shelf, entryway, or kitchen nook. Keep lettering clean,
add a small motif (tree, star, sprig), and let the wood grain do half the styling work.
- Pro tip: Lightly sand after painting for an intentionally weathered finish.
10) Ribbon Christmas Card Hanger
Make a tree shape on the wall using pushpins, then weave yarn or ribbon in a loose zigzag “branch” pattern. Clip holiday cards onto it.
It’s part décor, part memory wall, part “look how popular we are this year.”
- Pro tip: Use mini binder clips painted gold for a sleek, uniform look.
Advent Calendars, Tags, and Gift-Ready Details
11) Envelope Advent Calendar
Turn an empty frame into a countdown display by stringing wire or twine across it. Clip numbered envelopes with mini clothespins,
then tuck in candy, notes, or tiny surprises. It’s equal parts sweet and suspenseful.
- Pro tip: Keep envelope colors consistent so the “surprises” stand out, not the stationery aisle.
12) Tag-It Advent Calendar
Wrap foam core in linen, frame it, then pin decorative numbered tags in neat rows. This version is especially good if you love typography
and want a clean, modern countdown that still feels festive.
- Pro tip: Vary tag textureskraft paper, vellum, cardstockfor subtle visual interest.
13) Christmas Tags (needle-felted or layered)
Handmade tags instantly level up even the most basic gift bag. Cut felt into shapes, layer stars/trees/triangles, and stitch on names
or tiny patterns. They’re small, but they do big emotional work.
- Pro tip: Make a “tag kit” (felt scraps, embroidery thread, marker) and crank out a batch during a holiday movie.
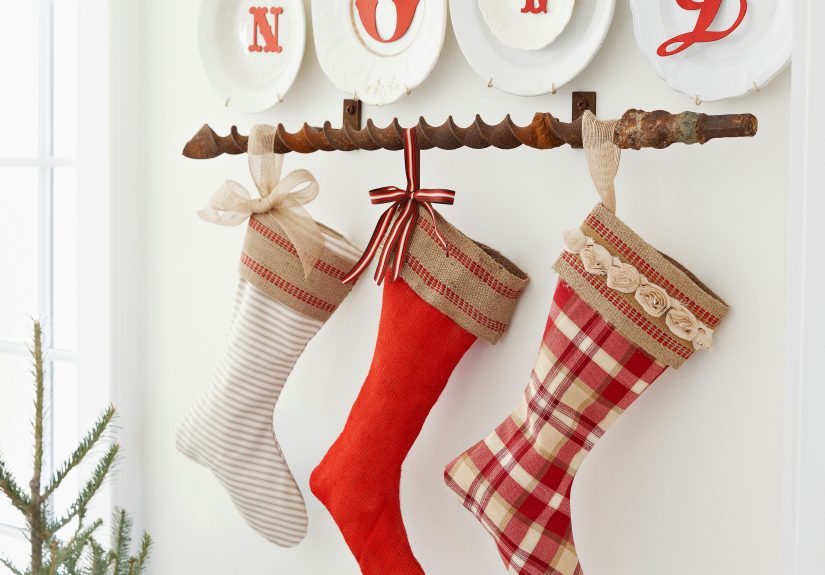
14) Festive-Font Plates
Thrifted plates become message décor when you glue on chipboard lettersNOEL, JOY, or even your family name.
Mix fonts and sizes for a playful, collected look that feels vintage, not fussy.
- Pro tip: A matte spray paint on the letters keeps them looking modern and intentional.
15) Cheerful Holiday Artwork (decoupage letters)
Decoupage wooden letters with holiday paper and display them on a windowsill or mantel. Spell a greeting, your last name, or a word
that matches your vibe (“CHEER” or “SNACKS” both work, honestly).
- Pro tip: Seal with a clear topcoat so the paper finish doesn’t wrinkle over time.
Ornaments and Tree Trimmings
16) Pinecone Gnome Ornaments
Pinecones become instant characters with felt hats, little beards, and a tiny nose (a pom-pom or dryer ball works great).
They’re whimsical without being overly preciousand they hide imperfect pinecones like a champ.
- Pro tip: Add a small loop of twine under the hat seam so it hangs cleanly.
17) 3D Moose and Reindeer Ornaments
These are modern, graphic, and surprisingly sculptural. Cut balsa wood shapes, paint a shield-like background, then assemble
so the animal looks like it’s leaping forward. Instant conversation piece.
- Pro tip: Keep paint colors limitedone bold + one neutral reads crisp and contemporary.
18) Mini Wreath Ornaments
Wrap pipe cleaners around a small wooden ring and finish with a felt bow. These look adorable on a tree,
tied onto stocking hooks, or used as napkin rings in a pinch.
- Pro tip: Metallic pipe cleaners catch light beautifullyperfect for low-effort sparkle.
19) Mini Wreath Ornaments (variation: color-blocked bows)
Make a second set with contrasting bow tails (think red tails with a cream bow). Group them together on one branch
for a “designed” cluster, like a mini ornament collection.
- Pro tip: Use hot glue sparinglytoo much can stiffen felt and make bows look bulky.
20) Salt-Dough Snowflake Ornaments
Classic, nostalgic, and endlessly customizable. Roll salt dough, cut snowflakes, poke a hole for ribbon, bake low and slow,
then decorate with marker, paint, or a dusting of glitter.
- Pro tip: Seal finished ornaments with a clear coat so they last beyond one season.
Trees, Forests, and Tabletop Scenes
21) Personalized Mini Tree (photo tree)
A small tree in a bucket becomes a memory maker when you clip on vintage photos, handwritten notes, and tiny tags.
Add mini lights and it becomes the sweetest little storytelling corner in your house.
- Pro tip: Print photos in a consistent tone (black-and-white or warm vintage) for a cohesive look.
22) Pallet Christmas Tree
Want a big “tree” moment without the needles? Cut pallet slats into a triangle, paint varied greens, and add hooks, knobs,
and clothespins for cards and ornaments. It’s part art, part organizer, part holiday flex.
- Pro tip: Sand edges wellsplinters are not part of the aesthetic.
23) Sweet Paper Tree (cupcake liners on glass)
Frame a glass panel and stick colorful cupcake liners to form a tree. The crimped edges add instant dimension,
and the whole thing feels delightfully retro.
- Pro tip: Use removable adhesive dots so you can rearrange (or “fix”) the tree shape without drama.
24) Mini Holiday Forest
Build tiny trees from untwisted sisal rope and wire, then plant them in the holes of a cribbage board. Add mini reindeer or moose,
and you’ve got a tabletop scene that looks like it belongs in a snowy storybook.
- Pro tip: Spray paint the animals one solid color (white, gold, or black) for a modern twist.
25) Cupcake-Liner Trees (foam cone version)
This one’s pure color therapy: cut cupcake liners into strips, pin them around a foam cone in overlapping layers,
and finish the top with a little swirl. It’s cheerful, bright, and strangely satisfying.
- Pro tip: Alternate patterns every other row so the tree reads “designed,” not random.
26) Crystallized Christmas Trees
Cover cardstock-wrapped foam cones with candy crystals for trees that sparkle like edible gemstones.
They’re whimsical centerpiecesespecially if you mix colors and group multiple cone sizes together.
- Pro tip: Patch gaps by placing crystals by handthis is the “detail work” that makes them look luxe.
Cozy Decor and Display Crafts
27) DIY Swag Wreath
A swag wreath is like a wreath’s stylish cousin who travels and owns a good coat. Start with a swag base and add eucalyptus,
berries, and ribbon. Great on doors, stair rails, and mantels.
- Pro tip: Keep your “heavy” elements low or off-center for a modern asymmetrical look.
28) White Berry Wreath (mantel-friendly styling)
If your mantel already has stockings, candles, and maybe a village scene, a white-berry wreath is the calm in the middle.
It adds winter brightness without competing for attention.
- Pro tip: Repeat one wreath element elsewhere (a matching ribbon, a few berries) to tie the whole room together.
29) Farmhouse Sign (paired with greenery)
Pair your sign with a small greenery sprig tied with ribbon. That tiny detail turns it from “craft project” into “styled vignette.”
It’s a simple move with a big payoff.
- Pro tip: Hang the sign slightly lower than you thinkeye-level placement feels more intentional.
30) Winter-Theme Votive Candles
Dress up plain votive holders with velvet ribbon and mini frosted pinecones. The result is elegant, wintery, and perfect for
centerpiecesor as host gifts that don’t look like you panic-crafted them at 11:47 p.m.
- Pro tip: Make a set of three in different heights for instant “tablescape” energy.
Bonus BHG-Style “Wow” Craft: Homemade Holiday Snow Globe
If you want one project that feels like a keepsake, make a snow globe. Use a clean jar, a waterproof figurine scene,
distilled water, a little glycerin to help “snow” fall slowly, and glitter (or faux snow). Seal the lid well,
then shake for instant magic.
- Pro tip: Dry-fit your scene firstif it looks crowded now, it’ll look chaotic once glitter joins the party.
Experience Notes: What It’s Really Like Making These Crafts
Holiday crafting looks perfectly serene online: a mug of cocoa, softly falling snow outside the window, and someone calmly tying a bow
while wearing a clean white sweater. In real life? It’s more like: you’re holding a glue gun in one hand, trying to find scissors with the other,
and negotiating with a child (or a fully grown adult) about why glitter does not belong in the dog’s fur.
Here’s the good news: the “messy middle” is part of what makes handmade holiday décor feel so special. Projects like salt-dough snowflakes
and cupcake-liner trees tend to create mini traditions because they’re repeatableevery year you can tweak the colors, add a new pattern,
or write the date on the back and watch your collection grow. If you’ve never tried it, adding a tiny year stamp or a quick signature is
one of those small things that becomes unexpectedly meaningful later.
A few reality-based lessons help these crafts go smoothly:
First, drying time is a liar. Dough ornaments might feel dry, but if you paint too soon, you’ll trap moisture and invite cracks.
The fix is simpleslow and steady baking, full cooling, and patience before sealing. Second, your first version is a prototype.
The first mini wreath ornament might look a little like a shiny bagel (still festive!), but by the third one your hands learn the shape and suddenly
you’re making them like you run an ornament factory.
If you’re crafting with friends or family, assign roles like a tiny holiday assembly line: one person cuts, another glues, another adds ribbon loops
and “finishing touches.” It sounds dramatic, but it turns chaos into teamworkand gives everyone a job that fits their comfort level.
(Translation: the person who hates glue can be “Ribbon Director,” which is absolutely a real title in the Christmas crafting economy.)
Storage is the other unsung hero. A lot of DIY décor gets tossed because it’s packed away poorly. Wrap fragile pieces, store paper trees flat,
and keep sets together in labeled bins. Your future self will feel like they found hidden treasure when next December rolls around and everything
is intact, organized, and ready to shine again.
Finally, remember that the best BHG-style homes don’t look magical because every item is perfectthey look magical because the details feel personal.
A photo mini tree, a card hanger full of notes, a handmade tag with a slightly crooked letter: that’s the stuff that makes your space feel like
it belongs to you. Perfection is optional. Warmth is the goal. And if anyone judges your glue strings, kindly point them toward the broom and invite
them to contribute.
Conclusion: Make It Merry, Make It Yours
These 30 Better Homes & Gardens Christmas craft ideas are designed to be flexible: swap colors, mix textures, and build your own
holiday “signature style.” Start with one wreath or one set of tags, then let your décor grow a little more handmade each year.
The best part isn’t just the finished lookit’s the stories attached to it.