Table of Contents >> Show >> Hide
- Before You Start: What a “Good” Dryer Vent Installation Looks Like
- Way 1: The Standard Hookup (Semi-Rigid Hose + Clamps)
- Way 2: The “Tight Space” Upgrade (Periscope/Offset Vent)
- Way 3: The “New Route” Install (Rigid Duct to a Wall Vent Hood)
- Way 4: The “Temporary/Indoor” Option (Indoor Vent Kit for Electric Dryers Only)
- How to Tell Your Dryer Vent Hose Is Installed Correctly
- Maintenance: The Part Everyone Forgets Until Something Feels “Off”
- Real-World Experience: of Lessons, Mistakes, and “Ohhh That’s Why” Moments
- Conclusion: Pick the Method That Matches Your Space (Then Make It Boring)
Installing a dryer vent hose sounds like one of those tasks that should come with a cape: you’re behind a heavy appliance, holding a floppy tube, trying not to kink it, while dust bunnies audition for a horror movie. But here’s the truth: a solid dryer vent installation is one of the simplest ways to improve drying performance, cut energy waste, and reduce fire risk.
The goal is straightforward: move hot, moist air (and the lint that tries to hitchhike) from your dryer to the outdoors through the shortest, smoothest, safest path possible. The “how” depends on your space, your dryer’s location, and how tight the squeeze is behind the machine. Below are four practical, real-world methodswritten in a clear, step-by-step styleso you can pick the approach that fits your setup without turning your laundry room into an obstacle course.
Before You Start: What a “Good” Dryer Vent Installation Looks Like
Key principles (the stuff that prevents headaches later)
- Use the right materials: Smooth, rigid metal duct is best for airflow and lint control. Semi-rigid metal transition duct is commonly used between the dryer and the wall connection.
- Avoid plastic or thin foil accordion-style ducts: They kink easily and can trap lint. Many codes and manufacturers discourage them for safety.
- Keep it short and simple: Long runs and lots of elbows reduce airflow. Many residential standards cap total developed length at 35 feet, with reductions for turns.
- Don’t use screws that stick into the duct: Protruding fasteners can snag lint and create clogs. Use clamps and foil tape instead.
- Always vent outdoors: Indoor vent kits note exceptions (usually electric dryers only), but venting moisture into the home can cause mold and other issues. Gas dryers must not vent indoors.
Tools and materials you’ll likely need
- Semi-rigid aluminum transition duct or rigid metal duct (4-inch diameter is typical)
- Two 4-inch worm-gear clamps (or manufacturer-approved vent clamps)
- UL-listed foil tape (not cloth “duct tape”)
- Screwdriver or nut driver
- Work gloves (sheet metal edges are not your friends)
- Vacuum and/or vent brush kit for cleanup
- Optional: periscope/offset vent kit for tight spaces
Safety checklist (quick but important)
- Unplug the dryer (and shut off gas if you have a gas dryer).
- Pull the dryer out carefullyavoid crushing the old vent line while moving it.
- Clean lint from the dryer outlet, floor area, and wall connection before reconnecting anything.
- Confirm the exterior vent hood opens freely and has a functioning damper (and no bird nest squatters).
Way 1: The Standard Hookup (Semi-Rigid Hose + Clamps)
This is the “most common, works in most homes” method: a semi-rigid metal vent hose runs from the dryer exhaust outlet to a wall (or floor) duct connection. It’s flexible enough to install, but sturdier and safer than flimsy foil accordion duct.
Step-by-step
- Measure the distance: With the dryer roughly in place (not fully pushed back), estimate the length needed with a gentle curveno sharp bends.
- Cut the duct (if needed): Semi-rigid duct can be trimmed with tin snips. Wear gloves; edges can be sharp.
- Attach to the wall/duct first: Slide a clamp over the duct end, push the duct onto the wall collar/duct outlet, then tighten the clamp until snug.
- Attach to the dryer outlet: Slide the second clamp over the other end, push onto the dryer exhaust outlet, and tighten.
- Seal joints with foil tape: Wrap foil tape around each connection seam to reduce leaks (especially if the fit isn’t perfect). Avoid cloth-backed duct tapeit fails in heat.
- Position and push back gently: Move the dryer back slowly while watching the hose. The duct should not crush, kink, or pull off.
Pro tips
- Stretch it smooth: Semi-rigid duct performs best when extended with minimal corrugation (less turbulence = better airflow).
- Aim for a “C” curve: Gentle curve good. Accordion pretzel bad.
- Check the outside: Run the dryer for a few minutes and confirm strong airflow at the exterior vent hood.
Way 2: The “Tight Space” Upgrade (Periscope/Offset Vent)
If your dryer sits close to the wall and you’ve got about as much room as a paperback book, a standard hose can kink the moment you push the dryer back. A periscope (offset) vent is a low-profile metal duct system designed for tight clearances. It’s one of the cleanest solutions for small laundry closets.
Best for
- Laundry closets
- Stacked units (where accessible)
- Any setup where the dryer needs to sit close to the wall
Step-by-step
- Measure clearance: Determine how much space you have between dryer and wall and choose an offset kit that matches your vent location.
- Dry-fit everything first: Assemble the periscope vent sections without sealing so you can confirm alignment.
- Connect the wall side: Attach the periscope end to the wall collar using a clamp or the kit’s recommended connection method.
- Connect the dryer side: Attach the other end to the dryer exhaust outlet.
- Seal seams: Use foil tape on joints according to the kit instructions. The goal is a snug, airtight path with no lint-leaking gaps.
- Push back slowly: The beauty of a periscope is that it stays rigid and low-profilestill, push the dryer back carefully to keep alignment.
Why this works so well
A periscope vent keeps airflow smoother than a crushed flexible hose. It also makes it easier to remove the dryer later for cleaning, because you’re not wrestling a kinked tube like it’s trying to escape.
Way 3: The “New Route” Install (Rigid Duct to a Wall Vent Hood)
Sometimes you’re not just replacing a hoseyou’re improving (or correcting) the entire vent path. Maybe the dryer was venting into a crawlspace (yikes), or the old route is too long, too twisty, or made of materials you don’t trust. This method involves running rigid metal duct to a proper exterior termination hood, then using a short transition duct to connect the dryer.
Best for
- Remodels or laundry room relocations
- Replacing unsafe duct material
- Improving airflow and reducing dry times
Step-by-step
- Plan the shortest route to outdoors: Fewer bends, fewer problems. Aim for straight runs where possible.
- Confirm code-friendly length: Many standards limit total developed length (often 35 feet), with reductions for elbows. If your route is long, consider re-routing or using the dryer manufacturer’s approved length table.
- Install rigid duct sections: Assemble duct with joints oriented in the direction of airflow so lint is less likely to snag at seams.
- Use foil tape on seams: Seal joints with foil tape; avoid screws that protrude into the duct interior.
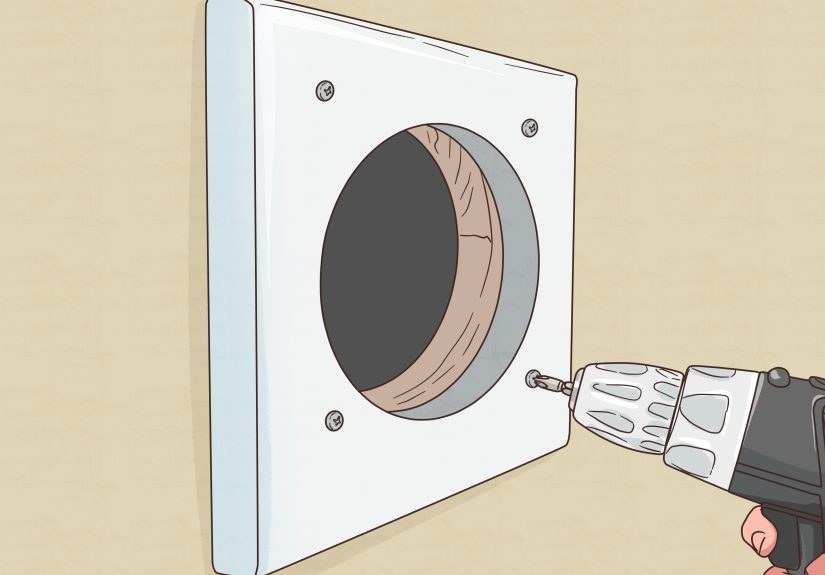
- Install the exterior vent hood: Use a proper dryer hood with a damper that opens when the dryer runs. Avoid screens that can clog with lint.
- Connect the dryer with a short transition duct: Use semi-rigid duct and clamps for the final connection between dryer and rigid duct stub-out.
- Test airflow: Run the dryer emphasized “air fluff” or low heat for a few minutes and check strong exhaust outside.
Common mistakes to avoid
- Too many elbows: Every turn adds resistance and increases lint buildup risk.
- Hidden flex duct in walls: Flexible ducting is hard to clean when concealed and can trap lint more easily than rigid duct.
- Using the wrong tape: Cloth duct tape dries out and fails. Use foil tape designed for HVAC/duct sealing.
Way 4: The “Temporary/Indoor” Option (Indoor Vent Kit for Electric Dryers Only)
Sometimes you’re in a situation where venting outdoors isn’t possibleapartment constraints, an interior laundry room, or a short-term setup during renovations. Indoor vent kits (often a box with a lint filter and water reservoir) exist for electric dryers in limited situations. But they come with trade-offs: they release moisture into the home and can contribute to condensation, odors, and mold if you’re not careful.
Important: Do not use an indoor vent kit with a gas dryer. Gas dryers need proper outdoor venting for combustion safety.
Best for
- Short-term use when outdoor venting is genuinely impossible
- Dry climates where extra humidity is less of a concern
Step-by-step (with extra caution)
- Confirm your dryer is electric: If you’re not sure, check the model label or manual. If it’s gas, stop here.
- Set the kit on a stable surface: Keep it close enough that your transition duct can connect without kinking.
- Connect the vent hose to the dryer outlet: Use a clamp, tighten snugly.
- Connect the other end to the indoor kit: Clamp it. Seal with foil tape if recommended by the kit.
- Maintain the kit religiously: Clean the lint filter after each use and refresh water (if your kit uses water). If you don’t, performance drops and the lint mess returns with friends.
- Control indoor humidity: Run a bathroom fan, dehumidifier, or HVAC, and watch for condensation signs.
When not to use it
- In humid climates with poor ventilation
- In homes with existing moisture problems
- Any time you notice condensation, musty smells, or slow drying (those are your warning sirens)
How to Tell Your Dryer Vent Hose Is Installed Correctly
Quick performance checks
- Dry times improve: Loads finish in a normal cycle instead of “two cycles and a pep talk.”
- Outside vent flap opens: You can see/feel steady airflow when the dryer runs.
- No hot, humid laundry room air: If your room feels like a tropical greenhouse, you may have leaks or a blockage.
- Minimal lint behind the dryer: Excess lint can indicate poor connections or duct leaks.
Red flags (fix these ASAP)
- Burning smell, excessive heat, or the dryer shutting off due to overheating
- Crushed or kinked duct behind the dryer
- Flimsy duct material that sags and traps lint
- Visible lint blowing around at connections
Maintenance: The Part Everyone Forgets Until Something Feels “Off”
Even a perfect dryer vent installation needs maintenance. Lint is persistent. It’s like glitter at a craft partyonce it’s in the system, it will find a way to stick around.
Simple habits that matter
- Clean the lint screen every load. (Yes, every load. Future-you will be grateful.)
- Inspect the exterior vent hood monthly. Make sure it opens and closes freely.
- Deep-clean the vent line at least yearly (more often if you do lots of laundry, have pets, or notice longer dry times).
Real-World Experience: of Lessons, Mistakes, and “Ohhh That’s Why” Moments
Let’s talk about what actually happens in real laundry rooms emphasizebecause in the wild, dryer vents don’t fail in dramatic movie explosions. They fail in slow, annoying ways: towels stop drying, the laundry room gets humid, lint accumulates in places lint has no business being, and you start blaming the dryer’s “attitude.”
The most common mistake people make is treating the vent hose like a decorative accessory. It is not décor. It’s a working exhaust system that needs airflow. I’ve seen hoses shoved into tight S-curves so severe they could qualify as modern sculpture. The dryer still ran, surebut drying times doubled. The homeowner thought the heating element was dying. Nope. The vent line was basically doing yoga poses behind the machine.
Another classic: the wrong tape. Regular gray cloth duct tape feels like it should solve everything. But behind a dryer, heat and moisture slowly wreck it. The tape dries, peels, and suddenly you’ve got a little lint-and-humidity leak machine. Foil tape isn’t glamorous, but it stays put and handles the conditions better. If you’ve ever pulled a dryer out and found a sad ribbon of duct tape dangling like a party streamer, you’ve met this problem.
Tight spaces are where people get tempted to “make it work” with flimsy foil ducting. It seems convenientuntil the dryer gets pushed back and the duct collapses. That single crush point becomes a lint collection zone. Over time, airflow drops, and the dryer runs hotter and longer. A periscope/offset vent is one of those upgrades that feels optional until you install it, then you wonder why you waited. The dryer can sit close to the wall without pinching the airflow, and pulling it out for cleaning becomes a five-minute task instead of an emotional event.
I’ve also noticed that people underestimate the exterior vent hood. You can build a perfect interior setup and still have problems if the outside termination is clogged, stuck shut, or blocked by a screen that catches lint. When someone says, “My dryer takes forever,” I want to check two places first: the transition duct behind the dryer and the exterior hood. Those two points cause a huge percentage of the everyday problems.
Finally, one lesson that always comes up: if your dryer suddenly starts taking longer, don’t just crank up the heat or run two cycles notedtreat it as a diagnostic clue. Longer dry times are often the earliest sign of restricted airflow. Fixing a vent issue early is usually cheap and easy; ignoring it is how small annoyances turn into bigger risks and higher energy bills.
Conclusion: Pick the Method That Matches Your Space (Then Make It Boring)
A great dryer vent installation is the opposite of exciting. It’s short, smooth, secure, and quietly effective. Whether you use the standard semi-rigid hookup, a tight-space periscope vent, a full rigid-duct route to a new exterior hood, or a carefully managed indoor kit for an electric dryer, the best result is the same: strong airflow, faster drying, and less lint hanging around like it pays rent.
If you take only one thing away, let it be this: airflow matters more than almost anything in dryer performance and safety. Keep the run short, avoid unnecessary turns, use metal ducting, seal it properly, and clean it regularly. Your clothes will dry faster, your dryer will last longer, and your laundry room will feel less like a sauna.