Table of Contents >> Show >> Hide
- Why Pushups Pick on Your Wrists
- Way #1: Fix Your Hand Setup and “Stack” Your Joints
- Way #2: Keep a More Neutral Wrist (Change the Tool, Not Your Ego)
- Way #3: Prep the Wrists Like You Mean It (Warm-Up + Mobility + Strength)
- Way #4: Scale the Pushup and Manage Load (Your Wrists AdaptIf You Let Them)
- Common Form Mistakes That Trigger Wrist Pain
- When Wrist Pain Is a Red Flag (Don’t “Tough It Out”)
- A Quick 7-Day “Wrist-Friendly Pushup” Plan
- Final Thoughts
- Extra: 4 Real-Life Experiences That Make Wrist-Friendly Pushups Stick (About )
- SEO Tags
Pushups are supposed to build your chest, shoulders, arms, and character. They are not supposed to make your wrists feel like they’ve filed a formal complaint with HR.
If your wrists hurt during pushups, you’re not “weak” or “broken.” You’re usually dealing with one (or more) of these very fixable issues:
too much wrist extension, too much load too soon, shaky alignment, or a wrist/forearm that hasn’t been trained for weight-bearing.
Below are four practical, wrist-friendly ways to keep pushups in your programwithout turning every set into a dramatic reading of “Ow… ow… OW.”
Along the way you’ll get form cues, equipment swaps, warm-ups, and a mini plan you can start today.
Why Pushups Pick on Your Wrists
In a classic pushup, your wrists are extended (bent back) while supporting a big chunk of your bodyweight. That position can increase joint stress and compress structures on the back side of the wrist,
especially if your hands drift forward, your shoulders collapse, or your weight dumps into the heel of your palm.
Wrist pain during pushups is also common when:
- Your shoulders and upper back aren’t doing their fair share, so the wrist gets “volunteered” for extra work.
- Your forearms fatigue early and your wrist alignment gets sloppy mid-set.
- You increased volume (reps, sets, frequency) faster than your tissues could adapt.
- You’re returning from an injury (sprain, tendinitis, nerve irritation) and the wrist isn’t ready for load-bearing.
The solution is not “never do pushups again.” The solution is to (1) stack your joints, (2) reduce painful angles, (3) prep the wrists, and (4) scale smartly so you build tolerance over time.
Way #1: Fix Your Hand Setup and “Stack” Your Joints
This is the cheapest fix because it costs $0 and about 30 seconds of attention. Most wrist pain during pushups comes from small setup errors that compound under load.
Think “good stacking”: wrist under shoulder, forearm vertical, and pressure spread across your handnot dumped into one unhappy corner.
Do this quick setup checklist
- Hands under shoulders. In your plank, your wrist crease should be roughly under your shoulder joint (not 4 inches in front like you’re reaching for the TV remote).
- Spread your fingers and grip the floor. Create a stable “tripod” through (a) the base of the thumb, (b) the base of the index finger, and (c) the heel of the palm.
Your fingers aren’t decorativethey’re your stabilizers. - Press the floor away. Instead of collapsing into your shoulders, push the ground like it owes you money.
This keeps the shoulder girdle active and reduces the “wrist takes all” scenario. - Micro-rotate your elbows back. Without flaring your elbows wide, let the elbow pits aim slightly forward and the elbows track roughly 30–45 degrees from your torso.
This often helps align the wrist, shoulder, and scapula into a stronger chain. - Try a tiny hand angle change. Many people feel better with fingers pointed forward or slightly turned out (not extreme).
If turning the hands out a few degrees reduces wrist strain, keep ityour wrists don’t get bonus points for suffering.
A “pain detective” test you can do immediately
Get into the top of a pushup and hold for 10 seconds. If your wrists ache, shift your body slightly back so your shoulders stack more directly over your wrists.
Then “grip the floor” and push the ground away. If pain drops noticeably, your technique (not your destiny) was the main culprit.
Bonus: film one set from the side. If your shoulders are in front of your wrists at the top, you’re asking the wrist to handle more torque than it signed up for.
Way #2: Keep a More Neutral Wrist (Change the Tool, Not Your Ego)
If your wrists hate being extended, stop forcing them into a deep back-bend and call it “discipline.” A neutral wrist position often feels dramatically better because it reduces the angle that creates stress.
The pushup is still a pushupyour chest doesn’t care whether your hands are flat, on handles, or on dumbbells. Your wrists definitely care.
Wrist-friendly options (pick one)
- Push-up handles or push-up bars. These keep your wrists closer to neutral while letting you train the same movement pattern.
- Hex dumbbells. Hold the handles like bars (make sure they won’t roll). Great in a pinch, but stability matterswobbly dumbbells are a wrist prank.
- Parallettes. Like push-up bars, but often higher and more stable. Great for wrists and also for deeper range of motion if your shoulders tolerate it.
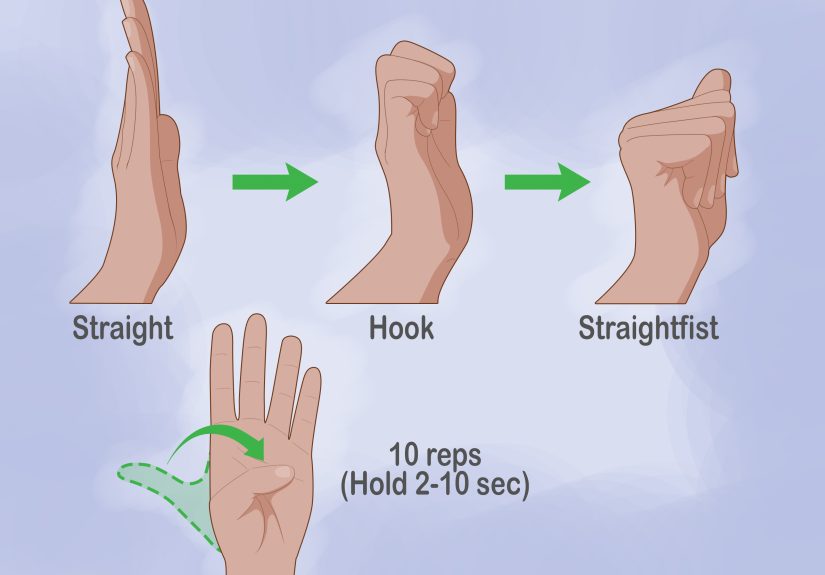
- Fists (knuckle pushups). Neutral wrist, simple setup. Use a soft mat and keep your knuckles stackedthis can be uncomfortable if your knuckles are sensitive.
- Incline surface + towel/wedge. Hands on a bench, counter, or sturdy table reduces load. A rolled towel under the heel of the palm can reduce extension angle.
How to choose the right swap
Use the option that lets you do pushups with no sharp pain and a stable hand position. Mild “stretchy” discomfort is different than a pinchy, stabbing, or zapping sensation.
If neutral-grip tools instantly feel better, keep them in your program while you build wrist and forearm capacity.
Pro tip: don’t treat these tools like “training wheels.” Treat them like “smart equipment.” Nobody calls a barbell a training wheelyou use it because it works.
Way #3: Prep the Wrists Like You Mean It (Warm-Up + Mobility + Strength)
If your wrists only experience load during pushups, they’re basically part-time employees being asked to work overtime.
A little prep can go a long wayespecially if you type all day, lift occasionally, and suddenly decide today is “100 pushups for vibes.”
The 4-minute wrist warm-up (before pushups)
- Wrist circles: 20 seconds each direction per wrist.
- Forearm flexor stretch: Arm straight, palm up, gently pull fingers down; hold 15–20 seconds each side.
- Forearm extensor stretch: Arm straight, palm down, gently pull hand toward you; hold 15–20 seconds each side.
- Quadruped wrist rocks: On all fours, hands under shoulders, gently rock forward/back 8–10 reps. Keep it controlled.
The goal is not to crank your wrists into a pretzel. The goal is to increase blood flow, explore range of motion, and “teach” your wrists that load-bearing is a normal, non-emergency event.
Light strengthening (2–3x/week) to build tolerance
Strengthening can help, but the keyword is light. Your wrists don’t need an ego-lifting competition. They need consistent, pain-free capacity building.
- Wrist extension/flexion with light dumbbell: 2 sets of 12–15 each direction.
- Pronation/supination: Hold a light dumbbell or hammer; rotate slowly, 2 sets of 10–12 per side.
- Grip endurance: Farmer carry with moderate weights, 2–3 short walks (20–40 seconds). Keep wrists neutral.
- Scapular pushups: In plank or incline, keep elbows locked and move shoulder blades only, 2 sets of 10–15.
A desk-friendly “micro routine” (for busy humans)
If you’re tied to a keyboard all day, try this once or twice daily:
10 wrist circles, 15-second flexor stretch, 15-second extensor stretch, then 10 slow open-close hand pumps.
It’s not magical. It’s just consistentand consistency is surprisingly good at fixing annoying body stuff.
Way #4: Scale the Pushup and Manage Load (Your Wrists AdaptIf You Let Them)
The fastest way to keep wrist pain around is to treat it like a pop-up ad: ignore it and click “continue” until it becomes your personality.
Most wrists hurt because the pushup load (angle + volume + frequency) is currently beyond capacity.
So we scale the pushup, build tolerance, then earn the harder version.
Scale options that still build strength
- Incline pushups: Hands on a bench/counter. Less bodyweight on the wrists.
- Knee pushups (done well): Maintain a straight line from knees to shoulders, not a hip-sagging worm situation.
- Tempo pushups: Lower for 3 seconds, pause 1 second, press up. Fewer reps needed, less chaos.
- Reduced range of motion: Use a yoga block/foam pad under chest to shorten depth temporarily.
A simple progression rule that protects your wrists
Keep your pushup work at a level where pain stays at 0–3 out of 10 during the movement and does not spike afterward.
If pain lingers or worsens over the next day, scale down (higher incline, fewer sets, neutral wrist tools).
Start with 2–3 pushup sessions per week, not daily marathons. Add either:
- 1–2 reps per set, or
- 1 extra set, or
- a slightly lower incline
…but only one change at a time for a week. Your wrists love slow, boring progress. Your ego can complain quietly in the corner.
Common Form Mistakes That Trigger Wrist Pain
- Hands too far forward (shoulders ahead of wrists = more stress).
- Collapsing into the heel of the palm instead of spreading pressure across the whole hand.
- Elbows flared hard with shoulders dumping forward.
- Rushing reps and losing alignment at the bottom.
- Doing pushups on a super squishy surface that makes your hands unstable.
When Wrist Pain Is a Red Flag (Don’t “Tough It Out”)
Some discomfort is just “new stress in a new position.” But certain symptoms are your cue to stop experimenting and get a professional opinion.
Consider medical evaluation if you have:
- pain with swelling that lasts more than a few days,
- sharp pain, visible deformity, or you can’t bear weight at all,
- numbness/tingling in the fingers (especially at night),
- weak grip or dropping objects,
- pain that keeps worsening despite scaling and rest.
The goal is to train for the long game. If your wrist is trying to tell you something important, listenthen you can get back to pushups with a plan instead of a prayer.
A Quick 7-Day “Wrist-Friendly Pushup” Plan
Here’s a simple week to reduce wrist irritation while building the habits that prevent it.
Adjust any step so it stays pain-free or very mild.
Day 1: Technique reset
- 4-minute wrist warm-up
- 3 rounds: 20–30 second high plank (hands under shoulders), rest 45 seconds
- 2 sets of 6–10 incline pushups OR pushup-handle pushups
Day 2: Mobility + light strength
- Wrist circles + flexor/extensor stretches
- 2 sets of 12–15 light wrist extensions/flexions
- 2 sets of 10 pronation/supination
Day 3: Pushup practice (easy)
- Warm-up
- 3 sets of 6–10 incline or neutral-wrist pushups, slow tempo
Day 4: Active rest
- Short walk, gentle stretching, no wrist loading
Day 5: Pushup practice (same or slightly harder)
- Warm-up
- 3–4 sets of 6–10 reps (add 1–2 reps per set OR slightly lower incline)
Day 6: Strength support
- Farmer carry 2–3 rounds of 20–40 seconds
- Scapular pushups 2 sets of 10–15 (incline if needed)
Day 7: Check-in and adjust
- If wrists feel better: repeat the week and progress slowly.
- If wrists feel the same: keep the same level for another week.
- If wrists feel worse: scale down and consider professional assessment.
Final Thoughts
Preventing wrist pain during pushups isn’t about finding one magic stretch or buying the world’s fanciest push-up handles (though handles can be pretty great).
It’s about building a strong chain: hands that distribute force, shoulders that stay active, wrists that gradually adapt to load, and programming that doesn’t jump from “zero” to “Marine boot camp.”
Start with the smallest change that makes pushups comfortableoften a hand-position tweak or a neutral-wrist toolthen add wrist prep and smart progression.
Your wrists will usually stop complaining once they realize you’re finally running the workout like an adult.
Extra: 4 Real-Life Experiences That Make Wrist-Friendly Pushups Stick (About )
1) The “I’ll just power through” phase usually backfires. Almost everyone starts here. You feel wrist pain, you tell yourself it’s normal, and you keep banging out reps.
The problem is that wrists don’t respond well to motivational speeches. In real life, the pain often creeps earlier into the set each week, and suddenly you’re avoiding pushups entirely.
The better move is boring but effective: reduce the angle (incline) or change the grip (handles) so you can keep training without aggravating the joint.
It feels like you’re taking a step backuntil you realize you’re actually taking the only step that lets you move forward.
2) Most wrist pain improves when your shoulders start “owning” the position. A common experience is this: you fix your wrist setup, but the pain still flares when you get tired.
That’s a clue your shoulder blades are checking out mid-set. The moment your shoulders collapse forward, your wrist gets stuck managing extra stress.
People who add scapular pushups, quality planks, and slow eccentrics often report that their wrists feel better even before they do any direct wrist work.
It’s not because the wrists got magically stronger overnightit’s because the load stopped dumping into them like a bad roommate leaving dishes in the sink.
3) Neutral-wrist tools feel “too easy”… until you realize they unlock consistency. Many folks try push-up bars or dumbbells and immediately feel relief.
Then they stop using them because “I should be able to do it on the floor.” That mindset is basically wrist pain fan fiction.
The real win is consistency: if handles let you train pushups 2–3 times per week without irritation, your pushing strength improves faster,
and you can slowly reintroduce flat-hand pushups later as a specific progressionwhen your wrists are actually ready.
In practice, “temporary tool” often becomes “best tool,” and that’s fine. Your joints don’t care about internet purity tests.
4) The biggest turning point is learning what “good discomfort” feels like. A mild stretch in the forearm, some heat in the muscles, or gentle pressure that stays under a 3/10?
Usually okay. A sharp pinch, electric zing, numbness, or pain that lingers and escalates later that day?
That’s the body saying, “Hey, not this version.”
People who get good at that distinction make faster progress because they stop gambling with their wrists.
They scale early, build capacity, and come back stronger. The result is not only fewer flare-upsit’s better pushup form, better training momentum,
and a lot less drama when it’s time to get on the floor and actually do the work.


![Veterans in Law - Service and Justice [Podcast]](https://2quotes.net/wp-content/uploads/2026/03/veterans-in-law-service-and-justice-podcast-SKUPnp9n-thumb.jpg)