Table of Contents >> Show >> Hide
- Before You Start: 3 Quick Prep Moves (So This Doesn’t Get Weird Later)
- At a Glance: Which Forwarding Method Should You Use?
- Way #1: Forward Hotmail (Outlook.com) Emails to Gmail
- Way #2: Forward iCloud Mail to Gmail (iCloud.com, Me.com, Mac.com)
- Way #3: Forward Yahoo Mail (and Similar Providers) to Gmail
- Way #4: Forward One Gmail Account to Another Gmail Account
- Way #5: Forward Using Rules (Outlook App / Apple Mail) or Your Domain Host
- Important 2026 Update: Don’t Confuse “Forwarding” with Gmail POP Fetching
- Organize Forwarded Mail in Gmail (So It Doesn’t Become Inbox Soup)
- Troubleshooting: When Forwarding Acts Like It Didn’t Get the Memo
- Security & Sanity Checklist (Read This Before You Forward Everything)
- Experiences From the Real World: What People Run Into After Forwarding to Gmail (Extra )
- Conclusion
Want every important email to land in one placewithout playing “which inbox did I use for that?” Gmail can be your home base,
but the cleanest setup usually starts outside Gmail: you forward mail from Hotmail/Outlook.com, iCloud, Yahoo, or your custom domain
directly into your Gmail inbox. Do it right and your life gets simpler. Do it wrong and you’ll spend a weekend arguing with verification codes
and spam filters like it’s a sport.
This guide walks through five reliable ways to forward emails to Gmail, with clear steps, real-world notes, and a few “learn from other people’s pain”
tips. You’ll also get a quick troubleshooting section (because email is allergic to being convenient).
Before You Start: 3 Quick Prep Moves (So This Doesn’t Get Weird Later)
- Pick your destination Gmail address. Use the one you’ll actually keep long-term.
- Decide if you need a copy kept at the original inbox. For work, legal, or “I don’t trust myself yet” reasons, keeping a copy is smart.
- Create a label plan in Gmail. Example: “Forwarded – iCloud” and “Forwarded – Outlook” so everything stays tidy.
At a Glance: Which Forwarding Method Should You Use?
| Method | Best for | Runs even when your computer is off? | Notes |
|---|---|---|---|
| 1) Outlook.com/Hotmail forwarding | Hotmail, Outlook.com, Live.com accounts | Yes | Simple toggle in web settings |
| 2) iCloud Mail forwarding | @icloud.com, @me.com, @mac.com | Yes | Set on iCloud.com; great for Apple ecosystem |
| 3) Yahoo (and similar) auto-forwarding | Yahoo/ISP mailboxes that support forwarding | Yes | Some accounts require a paid tier |
| 4) Gmail-to-Gmail forwarding (built-in) | Old Gmail to new Gmail, or selective forwarding | Yes | Great for a “new main inbox” move |
| 5) Client rules (Outlook app / Apple Mail) or domain host forwarding | When your provider won’t forward, or you need special routing | Depends | Client rules may need the app running; domain forwarding is always-on |
Way #1: Forward Hotmail (Outlook.com) Emails to Gmail
If your address ends in @hotmail.com, @outlook.com, or @live.com, you’re using Microsoft’s Outlook.com system.
The good news: forwarding is built in, and it’s one of the least dramatic setups on Earth. (Email doesn’t love being that calm, so enjoy it.)
Steps (Outlook.com on the web)
- Sign in to Outlook.com in a browser.
- Open Settings (gear icon).
- Go to Mail > Forwarding.
- Turn on Enable forwarding.
- Enter your Gmail address.
- (Optional) Select Keep a copy of forwarded messages.
- Click Save.
Example setup
Let’s say your bank still emails only your old Hotmail address. Turn on forwarding to Gmail and then in Gmail create a filter
that labels anything coming in from that “Forwarded – Outlook” stream as Finance. Congrats: your money stuff now lives in one inbox.
Quick caution for school/work accounts
If this is a managed Microsoft 365 account (school/work), forwarding might be restricted by admins. If the forwarding page looks “missing”
or refuses to save, that’s not youit’s policy.
Way #2: Forward iCloud Mail to Gmail (iCloud.com, Me.com, Mac.com)
iCloud Mail can forward automatically, and you set it at iCloud.com. This works well if you’re keeping your iCloud address for Apple services
but want your daily email life to happen in Gmail.
Steps (iCloud Mail on the web)
- Go to iCloud Mail in a browser and sign in.
- Open Mail Settings (settings icon).
- Select Settings, then find Mail Forwarding.
- Check Forward my email to.
- Enter your Gmail address as the forwarding destination.
- Save your changes.
Why iCloud forwarding is a smart move
- You keep Apple account continuity (purchases, device sign-ins, subscriptions).
- You centralize communication without telling everyone to memorize a new email address overnight.
- You can still reply from Gmail if you set up “Send mail as” later (optional, but useful).
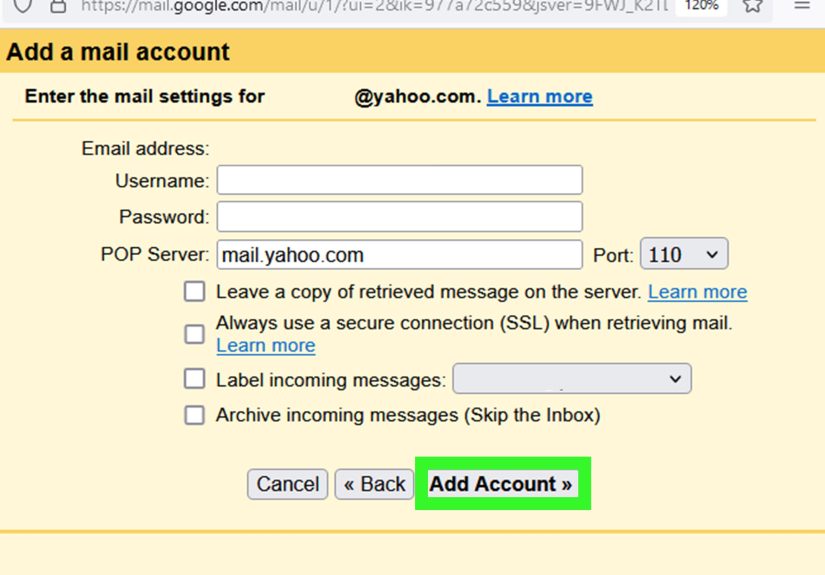
Way #3: Forward Yahoo Mail (and Similar Providers) to Gmail
Yahoo Mail supports auto-forwarding, but the exact availability can depend on which Yahoo experience you’re on and whether your account has the feature
enabled (some users may need a paid tier). The flow usually includes a verification stepbecause email providers are rightfully suspicious of anything
that tries to move your mail somewhere else.
Steps (New Yahoo Mail interface)
- Sign in to Yahoo Mail on a desktop browser.
- Open Settings (often under the gear or “More options”).
- Select Mailboxes.
- Choose your primary mailbox.
- Find Auto-forwarding, enter your Gmail address.
- Click Verify and follow the instructions sent to your Gmail inbox.
If you don’t see “Auto-forwarding”
Don’t panicthis is common. Some accounts won’t show forwarding until you’re on the right interface or plan. If your Yahoo account is older,
linked to an ISP, or you’re in a region where features differ, the setting may be unavailable or gated.
“More” providers that work similarly
Many providers put forwarding under “Settings,” “Mail,” “Rules,” or “Forwarding.” If you’re using an ISP email (the kind that came with internet service),
forwarding may exist but be buried. When you find it, the logic is usually the same: enable forwarding, enter Gmail, verify, save.
Way #4: Forward One Gmail Account to Another Gmail Account
This is the classic “I made a new Gmail and now I want to break up with my old one” move. Gmail has built-in forwarding, and you can forward everything
or only specific types of messages using filters.
Steps (Forward all mail from Old Gmail to New Gmail)
- Sign in to the Gmail account you want to forward from (the old one).
- Open Settings > See all settings.
- Go to Forwarding and POP/IMAP.
- Click Add a forwarding address and enter your new Gmail address.
- In the new Gmail inbox, open the confirmation email and approve forwarding.
- Back in the old Gmail settings, choose what happens to forwarded mail (keep in inbox, archive, delete, etc.).
- Save changes.
Forward only certain messages (the “selective sanity” option)
Want to forward only receipts, or only messages from a school? Use Gmail filters:
- In Gmail, open the search bar dropdown (filter options).
- Choose criteria (From, Subject contains, Has the words, etc.).
- Click Create filter.
- Select Forward it to and choose the forwarding address you’ve already verified.
- Save.
Example filter idea
Filter: Subject contains “receipt” OR From: [email protected] → Forward to your primary Gmail and apply label “Receipts.”
Result: your old inbox stops being a junk drawer and becomes a mail pipeline.
Way #5: Forward Using Rules (Outlook App / Apple Mail) or Your Domain Host
Sometimes forwarding isn’t available at the provider levelespecially with older accounts, certain ISP mailboxes, or locked-down workplace systems.
When that happens, you have two practical workarounds:
- A mail app rule (like Microsoft Outlook desktop or Apple Mail) to forward messages automatically.
- Forwarding at the domain/host level (if your email is tied to a custom domain like [email protected]).
Option A: Use a mail app rule (good for selective forwarding)
In Outlook (desktop), you can create a rule that forwards messages. The big “gotcha” is that desktop rules may require Outlook to be running,
depending on how your account is configured. If your rule is server-side (like rules created in Outlook on the web), it runs 24/7.
Basic Outlook rule pattern
- Condition: Apply to all incoming messages (or only from certain senders)
- Action: Forward/redirect to your Gmail address
- Optional: Keep a copy, move to a folder, or mark as read
Apple Mail rule pattern
- Condition: “From” contains X, or “Subject” contains Y
- Action: Forward to your Gmail address
- Optional: Move to mailbox “Forwarded” so your inbox stays clean
Option B: Forward at the domain/host level (best for custom domains)
If your email address is part of a domain you own, forwarding is often managed by your email host or domain dashboard. This is the “always-on” approach:
mail hits your domain, then routes to Gmail automatically. Great for business addresses, side projects, or anyone who wants a permanent address that isn’t tied
to a single provider forever.
The general steps look like this:
- Sign in to your email host/domain dashboard.
- Find Email settings (often “Forwards,” “Rules,” or “Forwarding”).
- Create a forward from your domain address to your Gmail address.
- Save changes and test by sending yourself a message.
Important 2026 Update: Don’t Confuse “Forwarding” with Gmail POP Fetching
Some people used Gmail’s old “Check mail from other accounts” feature to pull messages into Gmail via POP. Heads-up: Google has announced that Gmail will
stop supporting checking third-party mail through POP, and that option will no longer be available on computers starting in January 2026.
If you relied on that, switching to true forwarding (from the provider to Gmail) is the safer long-term fix.
Organize Forwarded Mail in Gmail (So It Doesn’t Become Inbox Soup)
Create labels for each source
- Forwarded – Outlook
- Forwarded – iCloud
- Forwarded – Yahoo
- Forwarded – Domain
Use filters to auto-label and skip the inbox (optional)
If forwarded messages clutter your main inbox, create filters that apply labels and optionally archive them. That way, the emails still land in Gmail,
but you only “see” them when you want to.
Troubleshooting: When Forwarding Acts Like It Didn’t Get the Memo
Problem: Verification email never arrives
- Check Gmail spam and “All Mail.”
- Wait a few minutes and resend verification if the provider allows it.
- Make sure you typed the Gmail address correctly (email typos are undefeated).
Problem: Some forwarded messages don’t show up (or get rejected)
This one can be surprisingly real: email authentication rules (like DMARC) can cause certain forwarded messages to fail or get blocked, especially when
senders publish strict policies and a forwarder modifies the message. If you notice patterns (specific brands, banks, newsletters), test by signing in to the
original mailbox and confirming the messages exist there.
Problem: Everything forwards… except the emails you actually care about
- Look for provider-side filters or “focused inbox” categories that might be sorting mail before forwarding.
- Make sure forwarding is enabled for the whole mailbox (not only a folder).
- If you used app rules, confirm the app is running (desktop rules can be picky).
Problem: Forwarded mail lands in Gmail but replies feel confusing
Forwarded messages often show you as the forwarder. If you reply, you may reply from Gmail instead of the original addressunless you set up “Send mail as”
for that old account. If you need replies to come from the old address (common for business), set that up intentionally.
Security & Sanity Checklist (Read This Before You Forward Everything)
- Don’t forward confidential work mail unless your employer allows it. (Policies exist because humans are creative.)
- Turn on 2-step verification on both the original account and Gmail.
- Audit forwarding rules twice a year. Old rules are how sensitive email ends up in the wrong place years later.
- Test with three messages: one plain text, one with an attachment, and one from a major sender (bank/newsletter).
Experiences From the Real World: What People Run Into After Forwarding to Gmail (Extra )
Forwarding email to Gmail sounds like a tidy life upgradeuntil you discover that email has the personality of a cat. It will cooperate when it feels like it,
and it will stare directly at you while ignoring your instructions. Here are the most common experiences people have after they set up forwarding from Hotmail,
iCloud, Yahoo, and other providers, plus what usually fixes the situation.
1) The “It worked instantly… and then stopped” moment. This often happens when the original provider requires re-verification, detects “unusual activity,”
or changes a security setting after a password update. People change a password (good!), and the forwarding connection quietly breaks (not good!). The fastest fix is
logging into the original mailbox, checking that forwarding is still enabled, and confirming no security prompts are waiting. Sometimes it’s not even dramaticjust a
toggled setting that needs to be saved again.
2) The “Why are only some emails missing?” mystery. This one feels personal because it’s never the coupons that go missingit’s the password reset,
the airline update, or the “we need you to sign this today” message. People usually discover that mail is being filtered before forwarding (focused inbox,
rules, or categories), or that certain senders don’t forward cleanly because of authentication checks. The best coping strategy is to run a week-long test:
forward everything, but keep a copy in the original inbox. If you see consistent gaps, you can decide whether to rely on forwarding for that provider or switch to
checking the original inbox occasionally for specific types of messages.
3) The “My Gmail inbox looks like a yard sale” phase. Consolidation is greatuntil every account dumps into one place with no labeling.
People tend to feel overwhelmed for a few days, then realize labels and filters are the secret sauce. The win is creating a label per source (“Forwarded – iCloud”)
and setting filters that auto-label or route low-priority mail out of the main inbox. Once that’s done, Gmail stops feeling like a flood and starts feeling like a dashboard.
4) The “Replying got awkward” scenario. A super common experience: you receive a forwarded email in Gmail, hit reply, and the recipient sees your Gmail
addressnot the old Hotmail/iCloud address they expect. People then wonder if forwarding “changed” their email identity. It didn’t; it just moved incoming mail.
If you need your replies to come from the original address, you typically set up sending from that address deliberately (and, for business situations, double-check
the account’s policies and security). Once people set that expectation“Gmail is where I read mail; my old address is where I’m still reachable”the confusion fades.
5) The “I can finally close an account… but I’m scared” feeling. Even when forwarding works perfectly, many people hesitate to abandon the old inbox.
A practical compromise is a “sunset” period: keep forwarding on, keep a copy in the original account, and check it once a week for a month. If nothing important is
being missed, confidence goes up. By the time the sunset ends, the old inbox feels less like a safety net and more like an unused storage closetstill there, but no longer
running your life.
Conclusion
Forwarding emails to Gmail is one of the easiest ways to simplify your digital lifeespecially if you’re juggling Hotmail/Outlook.com, iCloud, Yahoo, or a custom domain.
The best setup is usually provider-level forwarding (always-on, no laptop required), paired with Gmail labels and filters so everything stays organized. If your provider
can’t forward, rules in a mail app or forwarding at your domain host can fill the gap. Set it up carefully, test it, and you’ll spend a lot less time hunting for messages
and a lot more time ignoring newsletters with confidence.