Table of Contents >> Show >> Hide
- What Are Thumbprint Cookies, Exactly?
- Basic Thumbprint Cookies Recipe (Printable)
- Ingredient Notes That Actually Matter
- Jam Placement: Before Baking or After?
- Thumbprint Cookie Troubleshooting (Because Cookies Have Attitudes)
- Flavor Variations That Still Count as “Basic”
- Make-Ahead, Storage, and Freezing Tips
- FAQ: Quick Answers for Busy Bakers
- Extra Baker’s Notes: Real-World Experiences With Thumbprint Cookies (500+ Words)
- Conclusion: Your New Go-To Jam-Filled Cookie
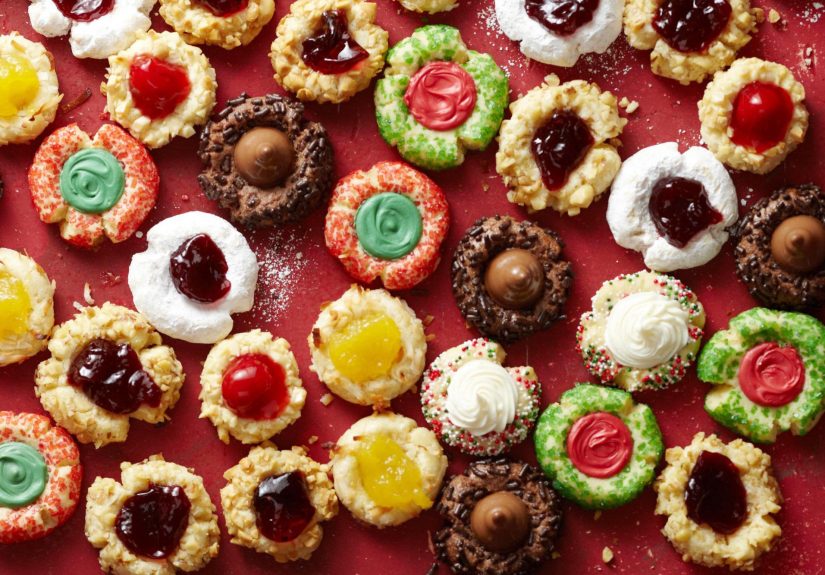
Thumbprint cookies are the baking equivalent of a tiny, edible high-five: buttery, tender, and proudly holding a jewel-toned blob of jam like it’s showing off a prized collection. They’re also one of the most customizable cookies on the planetsweet, simple dough; a little dip in sugar or nuts; then a “thumbprint” crater that’s basically a parking spot for raspberry, apricot, strawberry, or whatever preserve you’re currently obsessed with.
This guide gives you a truly basic thumbprint cookies recipe (the classic jam-filled kind), plus smart tips to prevent cracking, keep the centers defined, and make a cookie tray that looks like you definitely have your life together. (Even if you’re baking in pajama pants. No judgment. That’s tradition.)
What Are Thumbprint Cookies, Exactly?
Classic thumbprint cookies are small, buttery cookies shaped into balls, pressed in the center, and filled with jam or preserves. The dough often leans “shortbread-adjacent”rich with butter, lightly sweet, and designed to melt in your mouth while still being sturdy enough to hold a filling.
You’ll see a few popular styles across American kitchens:
- Jam-filled thumbprints (the classic): plain dough + jam in the center.
- Nut-coated thumbprints: dough balls dipped in egg white, then rolled in chopped walnuts/pecans/almonds before pressing.
- Soft “bakery-style” thumbprints: often include a little cornstarch or a touch of cream cheese for tenderness.
- Chocolate or caramel thumbprints: same idea, different delicious “parking spot” filling.
This article focuses on a dependable, basic version that you can dress up or keep simpleperfect for cookie exchanges, holiday tins, birthdays, and random Tuesdays that deserve better snacks.
Basic Thumbprint Cookies Recipe (Printable)
Yield, Time, and Texture
- Makes: about 28–32 cookies (1 tablespoon-size dough balls)
- Prep: 20 minutes
- Chill: 45–60 minutes (recommended)
- Bake: 12–14 minutes
- Texture: buttery and tender with a lightly crisp edge and soft center
Ingredients
- 1 cup (2 sticks) unsalted butter, softened
- 2/3 cup granulated sugar
- 1 large egg yolk (save the white if rolling in nuts)
- 2 teaspoons vanilla extract (or 1 teaspoon vanilla + 1/2 teaspoon almond extract)
- 1/2 teaspoon fine salt
- 2 cups all-purpose flour
- Optional, for extra tenderness: 1 tablespoon cornstarch
- 1/3 to 1/2 cup jam or preserves (raspberry, apricot, strawberry, cherrygo wild)
Optional Coatings (Choose One)
- 1/3 cup finely chopped nuts (walnuts, pecans, almonds)
- 1/3 cup coarse or sparkling sugar
- Plain (no coating)minimalist, still fabulous
Step-by-Step Instructions
- Cream the butter and sugar. In a large bowl, beat softened butter and sugar until light and fluffy, about 2–3 minutes. This step helps the cookies bake up tender instead of dense and sad.
- Add yolk, vanilla, and salt. Beat in the egg yolk, vanilla (and almond extract if using), and salt until smooth.
- Mix in the flour. Add flour (and cornstarch if using) and mix on low just until the dough comes together. Stop as soon as you don’t see dry flourovermixing makes cookies tougher than they need to be.
- Chill the dough. Cover and chill for 45–60 minutes. Chilling firms the butter so the cookies hold their shape and the thumbprints stay defined.
- Heat the oven. Preheat to 350°F. Line baking sheets with parchment paper (or a silicone mat).
- Portion and roll. Scoop about 1 tablespoon dough per cookie and roll into balls. If the dough cracks a lot while rolling, let it sit at room temp for 5 minutescold dough can be crumbly.
- Coat (optional). For nuts: lightly whisk the reserved egg white until foamy. Dip each dough ball in egg white, then roll in chopped nuts. For sugar: roll dough balls directly in coarse sugar.
- Make the thumbprint. Place dough balls 2 inches apart. Press an indentation in the center using your thumb, the rounded back of a 1/2 teaspoon measuring spoon, or a small melon baller. Aim for a deep well, but don’t press through the bottom.
- Fill with jam. Spoon about 1/2 teaspoon jam into each indentation. If your jam is too thick to behave, stir it well (or warm it for a few seconds) so it drops in neatly.
- Bake. Bake 12–14 minutes, until the edges are lightly golden. If the centers puff up, re-press the indent gently with a spoon right after baking while the cookies are still warm and cooperative.
- Cool. Cool on the baking sheet for 5–10 minutes, then transfer to a wire rack to cool completely. The jam sets as it coolsso try not to face-plant into one immediately. (Or do. You’re an adult. Probably.)
Ingredient Notes That Actually Matter
Butter: Softened, Not Melted
Softened butter creams with sugar to trap air, helping your cookies bake up lighter. Melted butter, on the other hand, tends to produce flatter cookies and can make the thumbprints lose definition. If your kitchen is warm, chilling the shaped dough balls for 10 minutes before baking is a great “insurance policy.”
Egg Yolk: Richness Without Puffiness
Using an egg yolk adds richness and tenderness without making the dough too wet. Many classic recipes rely on yolk (and sometimes save the white for nut coating) for that iconic, buttery crumb.
Jam vs. Preserves vs. Jelly
Any of them can workjust choose something thick enough to stay put. Seedless raspberry jam is the classic holiday cookie-tray star, but apricot preserves, strawberry jam, cherry preserves, and even orange marmalade are all great choices. If your jam is chunky, give it a quick stir so it spoons cleanly into the center.
Optional Cornstarch: The Tenderizer
A tablespoon of cornstarch can make the cookie slightly softer and more melt-in-your-mouthespecially helpful if you like a delicate, bakery-style bite. It’s optional, but it’s a nice trick if your thumbprints usually bake up a little too firm.
Jam Placement: Before Baking or After?
Both methods are common, and both can be delicious. Here’s how to choose:
Fill Before Baking (Classic and Easy)
- Pros: Fast workflow, jam sets into the cookie as it bakes, classic look.
- Cons: Very runny jams can bubble over if overfilled.
Fill Partway Through Baking (For Extra-Defined Centers)
- How: Bake cookies 7–8 minutes, remove, re-press indent gently, add jam, then finish baking.
- Why it helps: The edges have started setting, so the well stays deeper and prettier.
Fill After Baking (For Ultra-Fresh Jam Flavor)
- Pros: Jam stays brighter in flavor and color.
- Cons: You’ll want a thicker jam so it doesn’t slide around, and the filling won’t “bake in.”
For a basic thumbprint cookies recipe, filling before baking is totally reliableas long as you don’t overfill the center like you’re trying to build a jam volcano.
Thumbprint Cookie Troubleshooting (Because Cookies Have Attitudes)
Why Did My Dough Crack When I Pressed the Indent?
- Dough too cold: Let it sit 5–10 minutes before shaping and pressing.
- Not enough moisture: If it’s extremely crumbly, mix in 1 teaspoon milk at a time (up to 1 tablespoon) until it holds.
- Pressing too aggressively: Use a rounded spoon and press slowly. Thumbprints are not a grudge match.
Why Did My Thumbprints Spread Flat?
- Butter too warm: Chill the dough (and even the shaped balls) before baking.
- Too much sugar or under-measured flour: Spoon-and-level flour, don’t pack it.
- Hot baking sheet: Always start with a cool sheet for the next batch.
Why Did the Jam Leak Out?
- Indent too shallow: Make a deeper well (without breaking through).
- Overfilled centers: Stick with about 1/2 teaspoon jam per cookie.
- Jam too thin: Use thicker preserves, or stir and chill the jam briefly to firm it up.
Flavor Variations That Still Count as “Basic”
Think of the base dough as your cookie canvas. Here are easy upgrades that don’t require a culinary degree:
Classic Holiday Tray Trio
- Raspberry + almond: Add 1/2 teaspoon almond extract and use raspberry jam.
- Apricot + orange: Add 1 teaspoon orange zest and fill with apricot preserves.
- Strawberry + vanilla bean vibes: Use vanilla bean paste or extra vanilla, fill with strawberry jam.
Nut-Coated Thumbprints
Rolling in chopped nuts adds crunch and makes the cookies look like they came from a fancy bakery case. Walnuts and pecans are traditional, but finely chopped almonds are also greatespecially with apricot or cherry.
“Grown-Up” Fillings (Still Easy)
- Fig jam with a pinch of flaky salt
- Cherry preserves with a hint of cinnamon
- Orange marmalade with toasted almonds
Make-Ahead, Storage, and Freezing Tips
Make Ahead
- Dough: Refrigerate up to 3 days, tightly covered.
- Portioned balls: Roll into balls and chill covered for up to 24 hours before pressing/filling/baking.
Store
- Room temperature: Store in an airtight container for 3–5 days.
- Layering: Place parchment between layers so jam centers don’t smear and start a cookie soap opera.
Freeze
- Unbaked dough balls: Freeze on a tray, then store in a freezer bag up to 2 months. Thaw slightly, press, fill, bake.
- Baked cookies: Freeze in a single layer, then transfer to a container. Best within 1–2 months.
FAQ: Quick Answers for Busy Bakers
Can I use salted butter?
Yes, but reduce added salt to 1/4 teaspoon. Salt levels vary by brand, so taste expectations may shift slightly.
Do I need a mixer?
A hand mixer makes creaming easier, but you can use a sturdy spoon and some determination. Your forearm will feel like it did something productive, which is always nice.
What’s the best jam for thumbprint cookies?
Thick jams and preserves work best. Raspberry is the classic, but apricot and strawberry are cookie-tray royalty too. Choose flavors you’d happily eat by the spoonfulbecause, realistically, you might.
Extra Baker’s Notes: Real-World Experiences With Thumbprint Cookies (500+ Words)
If you’ve ever made thumbprint cookies and thought, “Why do these tiny dough balls have so much personality?”welcome. Thumbprints are famously simple, but they’re also the cookie most likely to teach you something on the fly. Here are a few real-world, been-there-baked-that lessons that tend to pop up when people make a basic thumbprint cookies recipe at home.
First, the dough temperature issue is not a myth. In many kitchens, butter goes from “softened” to “basically lotion” faster than you can say “preheat to 350.” If your cookies spread too much, it’s rarely because you’re cursedit’s usually because the dough warmed up while you were rolling and pressing. A practical routine is to shape a full tray of dough balls, then chill that tray for 10 minutes before you press the indent and fill. It’s a small pause that can make your jam-filled cookies look more like bakery gems and less like a delicious pancake situation.
Another common experience: the “cracks of doom.” Press your thumb into a slightly chilled dough ball and you might see the surface split. This is normaland fixable. Many bakers find that using a rounded measuring spoon instead of a thumb helps a lot. The pressure is more even, the well is neater, and you’re less likely to create stress fractures in the cookie dough. Also, if the dough feels like it’s crumbling instead of rolling smoothly, letting it sit at room temperature for five minutes can bring it back into the cooperative zone. Think of it like giving the dough a little pep talk. Or a tiny nap.
Jam behavior is its own subplot. Some jams are thick and polite. Others are runny and dramatic. If your jam wants to ooze, two strategies help: (1) use lessabout a half teaspoon is often enoughand (2) make the indentation deeper. The center should be a real “well,” not a gentle suggestion. A deep well plus modest jam filling usually prevents overflow, and the cookies stay cleaner for storage. And speaking of storage: if you’re making these for gifting, let the cookies cool completely before stacking them, and always use parchment between layers. Jam centers are cute, but they’re also sticky little paint palettes.
A surprisingly common “aha” moment happens when bakers try adding jam at different times. Fill-before-baking is classic, easy, and gives you that cozy, set-in-place look. But if you want extra-defined centersespecially for a holiday cookie tray where presentation mattersadding jam halfway through baking can feel like a cheat code. The cookie edges set first, you re-press the well, and the jam stays perched instead of spreading. It’s also a nice trick if your cookies tend to puff up and lose the indentation.
Finally, thumbprints are the cookie that makes people feel like they “have a signature.” Swap the jam flavor, roll in nuts or sparkling sugar, add citrus zest, or use almond extract and suddenly your basic recipe feels custom. Many bakers end up with a favorite comboraspberry + almond for classic holiday vibes, apricot + orange zest for something bright, or cherry preserves with a pinch of cinnamon for a cozy twist. Once you have the base technique down, you can make a tray where every cookie is a little different without doubling your work. That’s the magic: simple dough, endless personality, and a jam center that looks like it belongs on a festive postcard.
Conclusion: Your New Go-To Jam-Filled Cookie
A solid basic thumbprint cookies recipe is one of those kitchen skills that pays you back forever. It’s easy enough for a weeknight bake, pretty enough for a cookie exchange, and flexible enough to match whatever jam you’ve got in the fridge. Chill the dough, make a confident indentation, don’t overfill the jam, and you’ll end up with classic, buttery jam thumbprint cookies that disappear suspiciously fast.