Table of Contents >> Show >> Hide
- Why This Black and White Cookies Recipe Works
- Recipe Overview
- Ingredients for the Best Black and White Cookies
- How To Make Black and White Cookies
- Best Tips for Bakery-Style Black and White Cookies
- Common Mistakes to Avoid
- How To Store Black and White Cookies
- Serving Ideas
- Why Homemade Black and White Cookies Are Worth It
- Baking Notes and Real-Life Experience With Black and White Cookies
- Conclusion
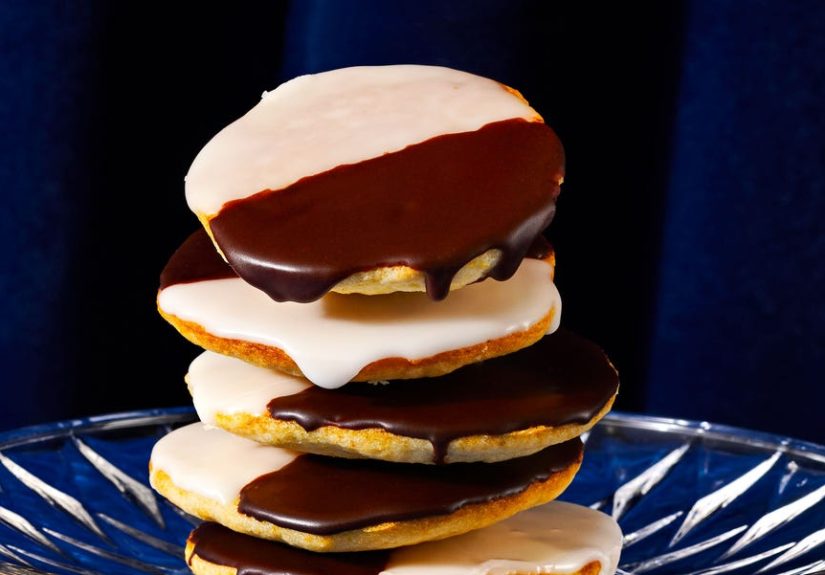
Black and white cookies are the dessert equivalent of refusing to choose sides. Vanilla? Yes. Chocolate? Also yes. Cookie? Technically. Tiny cake wearing a frosting tuxedo? Honestly, also yes. If you have ever stood in front of a bakery case staring at one of these glossy half-and-half beauties and thought, “I could totally make that at home,” the good news is you absolutely can. The even better news is that you do not need a New York deli, a pastry diploma, or the emotional resilience of someone who has folded fitted sheets without crying.
This guide gives you the best black and white cookies recipe for home bakers who want that classic look and that signature soft, cakey bite. The goal is simple: tender cookies with a gentle lemon-vanilla flavor, smooth vanilla icing on one side, rich chocolate icing on the other, and zero dry hockey pucks pretending to be dessert. Along the way, you will also learn how to keep the batter thick enough, how to get the glaze right, and how to avoid the common mistakes that turn bakery nostalgia into kitchen betrayal.
Why This Black and White Cookies Recipe Works
The best black and white cookies recipe should taste like the classic deli version, but it should also be practical for a home kitchen. That means no mystery ingredients, no fussy fondant drama, and no method that reads like a legal contract. This version uses a thick, scoopable batter, just enough lemon to brighten the cookie without making it taste like citrus cake, and a two-part icing that sets with a soft shine.
What makes these cookies special is their texture. They are not crisp like sugar cookies and not chewy like chocolate chip cookies. They live in that magical middle ground: soft, fluffy, tender, and a little sponge-like. In other words, they are perfect for a smooth glaze. The flat side of the cookie becomes your frosting canvas, while the rounded side remains the humble support beam doing the hard work underneath.
Recipe Overview
Yield
10 to 12 large cookies
Prep and Bake Time
About 25 minutes prep, 14 minutes bake time, plus cooling and icing-setting time
Texture and Flavor
Soft, cakey, lightly lemony, sweet but balanced, with vanilla and chocolate glaze
Ingredients for the Best Black and White Cookies
For the Cookies
- 2 cups all-purpose flour
- 1/2 teaspoon baking powder
- 1/4 teaspoon baking soda
- 1/2 teaspoon fine salt
- 10 tablespoons unsalted butter, softened
- 1 cup granulated sugar
- 1 large egg, room temperature
- 2 teaspoons pure vanilla extract
- 1 teaspoon finely grated lemon zest
- 1/3 cup buttermilk
- 2 tablespoons full-fat sour cream
For the Vanilla Icing
- 4 cups confectioners’ sugar, sifted
- 2 tablespoons light corn syrup
- 1 teaspoon vanilla extract
- 1 pinch salt
- 5 to 6 tablespoons hot water or warm milk
For the Chocolate Icing
- Half of the vanilla icing
- 2 tablespoons Dutch-process cocoa powder
- 1 ounce semisweet chocolate, melted
- 1 to 2 teaspoons hot water, only if needed
How To Make Black and White Cookies
1. Prep the oven and pans
Preheat your oven to 350°F. Line two baking sheets with parchment paper. This is not the moment to trust an old, moody pan with commitment issues.
2. Mix the dry ingredients
In a medium bowl, whisk together the flour, baking powder, baking soda, and salt. Set aside.
3. Cream the butter and sugar
In a large mixing bowl, beat the softened butter and sugar until light and creamy, about 2 minutes. Add the egg, vanilla, and lemon zest, then mix until smooth.
4. Add the dairy and flour
Mix the buttermilk and sour cream together in a small bowl. Add the dry ingredients to the butter mixture in three additions, alternating with the buttermilk mixture. Start and end with the dry ingredients. Mix on low speed just until combined.
The batter should be thick, somewhere between classic cookie dough and the world’s most ambitious muffin batter. If it looks loose and lazy, add 1 to 2 extra tablespoons of flour. Thick batter helps the cookies spread into wide, soft rounds instead of thin little identity crises.
5. Scoop and bake
Using a greased 1/4-cup measure or large cookie scoop, portion the batter onto the baking sheets, spacing the cookies about 3 to 4 inches apart. Bake for 13 to 15 minutes, or until the edges are set and the tops spring back lightly when touched.
Let the cookies cool on the pan for 5 minutes, then transfer them to a wire rack. Cool completely before icing. Completely means completely. Not “basically cool.” Not “cool enough if I believe in myself.” Completely.
6. Make the vanilla icing
In a medium bowl, whisk together the confectioners’ sugar, corn syrup, vanilla, salt, and 5 tablespoons hot water or warm milk. Keep whisking until smooth. Add a bit more liquid if needed. The icing should be thick but spreadable, like a glaze that knows how to hold a line.
7. Make the chocolate icing
Transfer about half the vanilla icing to a second bowl. Whisk in the cocoa powder and melted semisweet chocolate. If the chocolate side gets too thick, add a teaspoon of hot water at a time until smooth again.
8. Frost the flat side
Turn the cooled cookies flat-side up. Spread vanilla icing over one half of each cookie. Let it set for 10 to 15 minutes, then spread the chocolate icing on the other half. Using the flat side gives you the classic bakery look and keeps the glaze from sliding around like it just heard bad news.
9. Let them set
Leave the cookies at room temperature until the icing is set, about 30 to 60 minutes. Then try not to eat three in a row while pretending you are “just taste-testing for quality control.”
Best Tips for Bakery-Style Black and White Cookies
Keep the batter thick
This is one of the biggest secrets to a good result. If the batter is too loose, the cookies spread too much and bake flat. A thick batter creates the classic large, puffed, cakey base.
Use a little lemon, not a lemon parade
The lemon should brighten the cookie, not hijack it. Black and white cookies are not lemon cookies. That citrus note is background music, not the lead singer.
Ice the flat side
This matters more than people think. The flat side gives the glaze a smoother surface and helps create that sharp half-vanilla, half-chocolate look you expect from a proper New York black and white cookie.
Let the vanilla side set before adding the chocolate
Unless you are going for “abstract expressionist cookie,” give the first side a few minutes to firm up. It keeps the center line cleaner and prevents the two icings from smearing together.
Do not overbake
These cookies should stay soft. Once they go too long in the oven, they lose that plush, almost cake-like texture that makes them special.
Common Mistakes to Avoid
Mistake 1: Treating them like regular cookies. These are a different species. The batter is softer, the shape is larger, and the final texture should be cakey, not crisp.
Mistake 2: Using icing that is too thin. Thin glaze runs off and leaves sad, translucent patches. You want a frosting that spreads easily but still has body.
Mistake 3: Frosting warm cookies. Warm cookies melt the icing and ruin that polished deli-cookie finish.
Mistake 4: Skipping the rest time. The glaze needs time to set. That short wait makes a big difference in appearance, texture, and storage.
How To Store Black and White Cookies
These cookies are best the day they are made and still excellent on day two. Store them in an airtight container at room temperature for up to 3 days. If your kitchen is very warm, place parchment between layers so the icing does not stick. You can also freeze the unglazed cookies for up to 2 months, then thaw and ice when ready.
Serving Ideas
Serve black and white cookies with coffee, tea, cold milk, or after a deli-style lunch if you want the full classic experience. They also make a fun dessert for parties because they look cheerful, nostalgic, and a little dramatic. Basically, they are the theater kids of the cookie tray.
Why Homemade Black and White Cookies Are Worth It
Store-bought black and white cookies can be wonderful, but homemade ones have a special advantage: freshness. When you make them yourself, the cookie stays soft, the glaze tastes brighter, and you can control the sweetness, thickness, and size. You also get bragging rights, which are not technically edible but still deeply satisfying.
If you have been searching for how to make black and white cookies that taste classic without feeling overly complicated, this recipe hits the sweet spot. It delivers the iconic look, the familiar bakery flavor, and the kind of soft, tender crumb that makes people pause mid-bite and say, “Wait, you made these?” Yes. Yes, you did.
Baking Notes and Real-Life Experience With Black and White Cookies
The first time I made black and white cookies at home, I made the classic mistake of assuming they behaved like regular drop cookies. They do not. They are friendlier than macarons, less dramatic than croissants, and definitely less chaotic than a cheesecake with opinions, but they still demand that you understand what they are trying to be. Once I stopped treating them like standard cookies and started thinking of them as soft, deli-style cake cookies with a glaze wardrobe change, everything got much better.
The biggest lesson was batter consistency. On one batch, I got impatient, added the flour too casually, and ended up with scoopable batter that looked fine but spread too wide in the oven. The cookies still tasted good, but they came out flatter than the energy in a room after someone says, “So, who ate my leftovers?” The next batch was thicker, and the difference was immediate. The cookies puffed into the soft, broad rounds I wanted, with a better surface and a better crumb. That one change alone made the recipe feel dependable instead of lucky.
I also learned that a little lemon is not optional if you want that classic flavor. It should not scream. It should whisper. Without it, the cookies tasted sweet and soft, but they were missing that bakery-style brightness that makes black and white cookies taste distinct from frosted sugar cookies. Once I added lemon zest in a restrained amount, the whole thing made sense. Vanilla stayed the main character, chocolate kept its rich side of the story, and lemon acted like the supporting actor who quietly steals the scene.
The icing taught me patience, which is rude but useful. The vanilla glaze always seems like it needs more liquid right up until the second it absolutely does not. Add too much and it runs everywhere. Add just enough and it spreads into a beautiful glossy layer that sets into the exact finish you want. The chocolate side is even trickier because cocoa and melted chocolate can thicken fast. I started adding hot water literally one teaspoon at a time, which felt annoyingly careful in the moment and deeply wise later. That is usually how baking works: first it humbles you, then it rewards you.
Another small but important revelation was flipping the cookies and icing the flat side. The first time I skipped that step, I ended up frosting the rounded tops like a person with confidence but no map. The glaze looked messy, slid toward the edges, and made the cookies feel homemade in the wrong way. Once I switched to the flat side, everything looked more polished. The neat center line between vanilla and chocolate suddenly looked deli-worthy instead of “I did my best during a thunderstorm.”
As for serving them, black and white cookies are at their absolute best when fresh. Day one is soft, plush, and glorious. Day two is still very good. By day three, they are still enjoyable, but the magic starts to fade a little, which is honestly not a huge problem because leftovers rarely survive that long. These cookies disappear fast. People who claim they just want half will somehow keep returning for mysterious little “slivers” until an entire cookie has vanished by committee.
After making them multiple times, I get why they have endured for so long. They are nostalgic without being old-fashioned in a boring way. They are playful to look at, comforting to eat, and oddly satisfying to make. There is also something delightful about a dessert that refuses to choose between chocolate and vanilla. Black and white cookies are not trying to be trendy. They are simply doing what they have always done: showing up in a sharp two-tone coat and being deliciously unbothered.
Conclusion
If you want a dessert that feels charming, classic, and a little bit theatrical, this best black and white cookies recipe deserves a place in your baking rotation. The cookies are soft and cakey, the icing is rich without being heavy, and the whole thing looks far more impressive than the effort it requires. In other words, it is the kind of recipe that makes you look like you know exactly what you are doing, even if you are standing in your kitchen wearing flour on your elbow and wondering where your offset spatula went.
Make them for a weekend bake, a holiday tray, a brunch dessert, or just because your sweet tooth refuses to pick a side. When you know how to make black and white cookies the right way, you get a bakery classic at home, and that is a pretty excellent deal.