Table of Contents >> Show >> Hide
- What Blood Glucose Monitoring Actually Measures
- The Two Main Ways to Monitor: Fingerstick Meters vs CGMs
- How to Prepare for Blood Glucose Monitoring (So It’s Accurate)
- Step-by-Step: How to Check Blood Sugar With a Meter
- How a Blood Glucose Meter Works (The “Tiny Science Lab” Explanation)
- Continuous Glucose Monitoring: How It Works (And Why It Sometimes Disagrees)
- What’s a “Good” Number? Targets, Timing, and Context
- How to Use Your Results (Without Overreacting to Every Blip)
- Troubleshooting: Common Reasons Your Reading Seems “Wrong”
- Safety and Hygiene (Short, Important, and Non-Negotiable)
- Choosing Between a Meter and a CGM
- Mini FAQ
- Conclusion: Monitoring Isn’t About PerfectionIt’s About Power
- Experiences and Real-Life Routines (About )
Blood glucose monitoring sounds like something a lab coat would do to you, not something you’d do before breakfast in your pajamas.
But for millions of people, checking blood sugar is as normal as checking the weatherbecause it helps you plan your day, avoid surprises,
and make smarter choices about food, activity, and medication.
Think of your blood glucose number as a “dashboard gauge.” It’s not a grade. It’s not a moral judgment. It’s just informationuseful,
time-sensitive informationlike your car’s fuel light (except you can’t pull into a gas station and buy “more pancreas,” unfortunately).
Medical note: This article is for education only and can’t replace advice from a clinician. Targets and testing schedules vary by age,
diabetes type, pregnancy status, and medicationsso use your care plan as the final boss.
What Blood Glucose Monitoring Actually Measures
“Blood glucose” is the amount of sugar (glucose) in your blood at a given moment. Your body uses glucose for energy, and hormonesespecially
insulinhelp move glucose from the bloodstream into cells. When insulin isn’t made, doesn’t work well, or isn’t used correctly, glucose can
run too high or too low.
Monitoring gives you real-time feedback. It helps answer practical questions like:
- Did that breakfast keep me steady or send me on a roller coaster?
- Did that workout lower my glucose like I expected?
- Is my medication timing working, or do I need to talk to my clinician?
- Am I trending toward a low (hypoglycemia) or climbing high (hyperglycemia)?
The Two Main Ways to Monitor: Fingerstick Meters vs CGMs
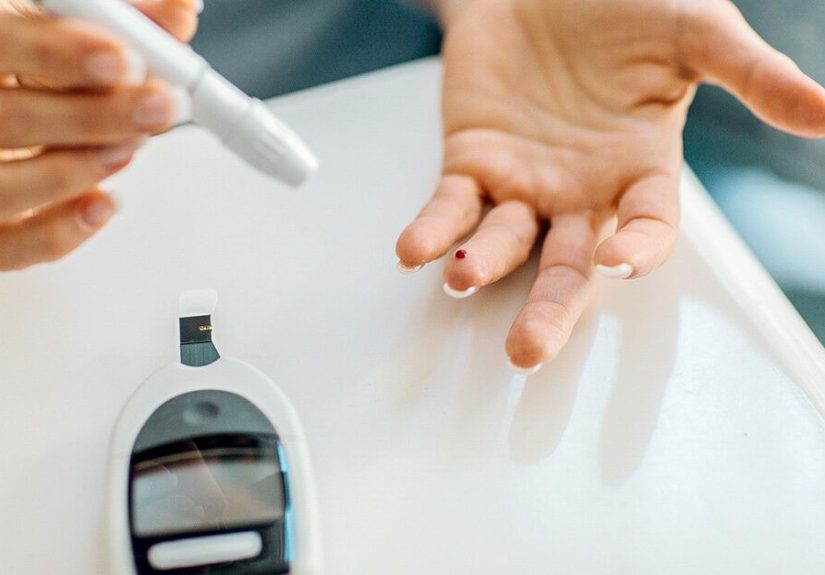
1) Fingerstick monitoring (blood glucose meters)
A traditional glucose meter uses a small drop of capillary blood (usually from your fingertip) to give a number in seconds. You test when it
mattersbefore meals, after meals, before driving, after exercise, or whenever symptoms feel “off,” depending on your plan.
2) Continuous glucose monitoring (CGM)
A CGM uses a tiny sensor inserted under the skin to estimate glucose continuously by measuring glucose in interstitial fluid (the fluid between
your cells). It updates frequently and often shows trend arrows and alerts, so you can see where glucose is goingnot just where it is.
Important detail: CGMs don’t measure blood directly, so readings can lag behind fingerstick blood glucose, especially when glucose is changing
quickly (like after eating or during exercise). That’s normaland it’s why “confirm with a fingerstick” is still a common safety rule when a CGM
number doesn’t match symptoms or seems suspicious.
How to Prepare for Blood Glucose Monitoring (So It’s Accurate)
Preparation isn’t fancyit’s mostly about avoiding the little mistakes that cause big confusion. Your goal is a clean sample, correct supplies,
and calm testing (yes, even if you’re doing it in a bathroom stall between classes or meetings).
What you’ll need for fingerstick testing
- Blood glucose meter
- Test strips made for that exact meter model
- Lancing device and fresh lancets
- Something to stop bleeding (tissue or cotton)
- A sharps container (or a puncture-resistant container approved for sharps where you live)
- Optional but helpful: control solution (for troubleshooting), a logbook/app, and spare batteries/charger
Prep checklist before you poke
- Wash and dry your hands. Food residue (like fruit sugar) can cause falsely high readings. Soap + water beats “I wiped my hand on my pants.”
- Warm your hands if they’re cold. Warm fingers usually bleed more easily and can make testing less annoying.
- Check your strips. Use unexpired strips, store them as instructed, and keep the container closed to protect them from moisture.
- Set up your meter first. Insert a strip and confirm the meter is ready so you’re not holding a blood drop like it’s a tiny, stressful jewel.
- Use a new lancet. Fresh lancets are sharper and typically hurt less than reusing a dull one (your fingertips deserve better).
Step-by-Step: How to Check Blood Sugar With a Meter
1) Get set up
Place your meter, strip container, lancing device, and tissue within reach. If your meter requires coding or setup (many modern ones do not),
follow the manufacturer directions.
2) Wash, dry, and pick a good finger
Wash hands with soap and water and dry thoroughly. Then choose the side of a fingertip rather than the center padmany people find
it’s less painful and still provides a good sample.
3) Insert the test strip
Insert a test strip into the meter. Most meters power on automatically and show a symbol indicating they’re ready for blood.
4) Lance and form a drop
Use the lancing device to prick the side of your fingertip. Let a small drop form. Avoid “milking” or aggressive squeezinggentle pressure is fine,
but heavy squeezing can dilute the sample with tissue fluid.
5) Apply blood correctly
Touch the edge of the test strip to the blood drop (don’t smear it like frosting). The strip will usually pull blood in by capillary action.
Keep the strip in place until the meter confirms it has enough blood.
6) Read, record, and respond (calmly)
Your meter will display a number in seconds. Record it with context: time, meal, exercise, stress, illness, and medication. One number is a snapshot;
patterns are the real story.
7) Dispose safely
Remove the strip and place used lancets/needles in a sharps container. Don’t toss loose lancets into regular trash. Future-you (and sanitation workers)
will thank you.
How a Blood Glucose Meter Works (The “Tiny Science Lab” Explanation)
The magic is in the test strip. Most strips use an enzyme (commonly glucose oxidase or glucose dehydrogenase) and electrodes. When blood hits the strip,
glucose reacts with the enzyme. That reaction produces an electrical signal (a tiny current). The meter measures the signal and converts itusing calibration
built into the systeminto a glucose concentration shown as mg/dL.
Because the meter is translating chemistry into a number, conditions can matter:
- Dirty hands can add extra sugar to the sample.
- Expired or poorly stored strips can behave unpredictably.
- Temperature and humidity can affect strip performance if supplies are left in extreme environments.
- Hematocrit (how concentrated your red blood cells are) can influence readings depending on the meter/strip design.
Continuous Glucose Monitoring: How It Works (And Why It Sometimes Disagrees)
What a CGM system includes
- Sensor: a small filament inserted under the skin to detect glucose in interstitial fluid
- Transmitter: sends data (often via Bluetooth) to a phone or receiver
- Receiver/app: displays the glucose estimate, trends, and alerts
Why CGM numbers can lag
Glucose moves from blood into interstitial fluid with a natural delay. When glucose is stable, the CGM and fingerstick often look similar. But during rapid
changesafter meals, during exercise, or after insulinthe CGM may “trail behind” the blood by several minutes.
When to confirm with a fingerstick
Many CGM systems and clinical guidance recommend using a fingerstick meter as backup when:
- Your symptoms don’t match the CGM reading (you feel low but CGM says you’re fine, or vice versa).
- The CGM shows an unexpected low/high you can’t explain.
- You suspect sensor error (for example, compression lows from lying on the sensor at night).
- You receive product safety alerts or recalls affecting your sensors.
What’s a “Good” Number? Targets, Timing, and Context
Targets depend on the person, but many U.S. references cite common goals for many non-pregnant adults with diabetes:
80–130 mg/dL before meals and less than 180 mg/dL about 1–2 hours after the start of a meal.
Your clinician may set different targets based on age, hypoglycemia risk, and overall health.
Timing options you’ll hear a lot
- Fasting: first thing in the morning before food
- Pre-meal: before breakfast/lunch/dinner
- Post-meal: usually 1–2 hours after starting a meal
- Bedtime: helps identify overnight trends
- Before driving / sports: safety checks when lows would be risky
Here’s the mindset that helps: you’re not hunting for a “perfect” number every time. You’re learning your patterns. A single high could be a weird day.
A repeating high after dinner is useful information you can act on.
How to Use Your Results (Without Overreacting to Every Blip)
Glucose changes with meals, exercise, stress, sleep, illness, hydration, and medications. The goal of monitoring is to connect cause and effect.
Consider keeping notes like:
- What you ate (especially carbs and meal timing)
- Activity (type, intensity, and timing)
- Medication/insulin dose and timing (if applicable)
- Stress, sleep, illness, or menstrual cycle changes
Pattern examples (because real life is messy)
Example A: You notice higher readings after a “healthy” smoothie. The fix might be portion size, added juice/honey, or pairing it with protein/fat.
Example B: You get low during afternoon practice. The pattern suggests adjusting snack timing, insulin timing (if used), or discussing exercise strategies with your care team.
Example C: Your CGM shows a steady rise overnight. That could be food timing, hormones, medication timing, or the dawn phenomenonworth discussing with a clinician if it repeats.
Troubleshooting: Common Reasons Your Reading Seems “Wrong”
Meter troubleshooting
- Hands weren’t clean: even small sugar residue can falsely elevate results.
- Not enough blood: some strips error out; others may under-read.
- Expired strips / container left open: moisture can ruin strip chemistry.
- Temperature extremes: supplies left in a hot car or freezing bag can lead to inaccurate readings.
- Technique issues: squeezing too hard, smearing blood, or using the wrong strip type.
CGM troubleshooting
- Lag time during rapid changes: the CGM may trail behind a fingerstick.
- Compression lows: pressure on the sensor (sleeping on it) can cause false low readings.
- Sensor warm-up / first day quirks: some people notice more variability early in a sensor session.
- Adhesive or placement problems: a loose sensor can cause noisy data.
If you consistently get strange results, use your meter’s control solution (if available), review the manufacturer instructions, and talk with your clinician.
You can also compare a meter reading taken at the same time as a lab blood test to check overall agreement.
Safety and Hygiene (Short, Important, and Non-Negotiable)
- Never share lancets, lancing devices, or needles.
- Use a new lancet each time when possible.
- Dispose of sharps in a puncture-resistant sharps container and follow local disposal rules.
- If you’re helping someone else test, follow infection-control guidance and hand hygiene practices.
Choosing Between a Meter and a CGM
The “best” option depends on your needs, budget, insurance, and medical plan.
- Meters are lower-cost and great for spot checks and confirmation testing.
- CGMs provide trends, alerts, and more dataespecially helpful for people using insulin or those with frequent lows/highs.
- Many people use both: CGM for trends + meter for backup and certain decisions.
Mini FAQ
Does fingerstick testing hurt?
It can sting, but technique helps. Use the side of the fingertip, adjust lancet depth to the shallowest setting that still works, and rotate fingers.
A fresh lancet usually hurts less than a reused one.
Can I use “alternate sites” like the forearm?
Some meters allow alternate sites, but fingertip blood often reflects rapid changes more quickly. If you suspect your glucose is changing fast, fingertip
testing may be more reliable.
What if my CGM says I’m low but I feel fine?
Confirm with a fingerstick if the number doesn’t match how you feel, and follow your care plan for how to treat suspected lows.
Conclusion: Monitoring Isn’t About PerfectionIt’s About Power
Blood glucose monitoring is a skill: you get better with practice. A meter shows you a snapshot; a CGM shows you the movie. Either way, the goal is the
sameturn numbers into insight. With good preparation (clean hands, good strips, solid technique) and a calm approach (patterns over panic), monitoring
becomes less of a chore and more like a helpful coach that doesn’t yell.
Experiences and Real-Life Routines (About )
If you ask people who monitor glucose regularly what surprised them most, you’ll rarely hear “the math.” You’ll hear “the situations.”
Because blood glucose isn’t checked in a quiet laboratory with soft lighting and harp music. It’s checked in cars, classrooms, offices, airports, and
grocery store aislesoften while someone nearby asks, “Is that a new kind of vape?” (No, Aunt Linda. It’s a glucose meter.)
Routine #1: The “morning truth serum.” Many people start with a fasting check or a quick glance at CGM trends. The goal isn’t to judge
yesterday’s dinnerit’s to understand the overnight story. Did glucose drift up? Did it dip low? Over time, morning data can reveal patterns tied to sleep,
late snacks, stress, or hormones. A simple habit that helps: keep supplies in one consistent spot so you’re not doing a scavenger hunt at 6 a.m.
Routine #2: The “food detective” approach. A lot of real-world learning happens when people pair a meal with a post-meal check. Not as a
punishmentmore like a science experiment. For example, someone might discover that a bowl of cereal sends them sky-high, but eggs with toast keeps them
steadier. Another person finds that the same meal behaves differently when they’re stressed or sleep-deprived. The experience isn’t “I failed.”
It’s “my body is a complicated creature and deserves a user manual.”
Routine #3: Exercise is a plot twist. Some people expect exercise to lower glucose every timeand then get confused when a hard workout
bumps it up temporarily (hello, stress hormones). Others find that light movement after mealslike a 10–15 minute walksmooths out spikes. Athletes and
active teens often develop a personal strategy: check before practice, keep fast carbs available, and watch for delayed lows later. The most repeated advice
from experienced folks is boring but true: “Test, don’t guessespecially with a new routine.”
Routine #4: CGM lifealerts, trends, and the occasional drama. People love trend arrows because they tell you whether you’re stable or
speeding toward a low/high. But CGMs can also create “alert fatigue,” especially at night. A common experience is learning which alerts are truly useful,
setting reasonable thresholds, and remembering that a CGM is an estimateso confirming with a fingerstick when something feels off is a confidence-builder,
not a setback.
Routine #5: Travel and school days. The experienced move is packing a “glucose kit” like it’s your phone charger: meter/strips, extra
lancets, quick carbs, backup batteries/charger, and a plan for safe disposal. People who’ve done this a while also keep spare supplies where they spend
timebackpack, locker, car, or a trusted adult’s officebecause the only thing worse than a low is a low plus “I forgot my stuff.”
Over time, monitoring becomes less emotional and more practical. The biggest shift many people describe is realizing the number is a tool, not a verdict.
It helps you make the next decision a little smarterand that’s the whole point.