Table of Contents >> Show >> Hide
- Why a Playhouse Room Divider Is the MVP of Kids’ Spaces
- Plan First: The 10-Minute “Measure Twice, Cry Never” Checklist
- Materials and Tools
- Build: A Folding “Castle” Playhouse Room Divider (Beginner-Friendly)
- Suggested dimensions (easy and customizable)
- Step 1: Cut your panels
- Step 2: Design your “playhouse” features
- Step 3: Cut windows and doors safely
- Step 4: Sand and soften every edge
- Step 5: Finish the edges (optional but worth it)
- Step 6: Paint (or stain) like a person who lives with kids
- Step 7: Attach the door cutout
- Step 8: Hinge the panels together
- Safety: Build It Like Kids Are Going to Do Kid Things
- Upgrades Kids Actually Use (Not Just the Ones That Look Cute on Pinterest)
- Cost, Time, and Difficulty
- FAQ
- Real-World Experience Notes ( of “What You’ll Learn the Hard Way”)
- Final Thoughts
If your home has one big room that’s doing the job of three (bedroom + playroom + “please don’t show this on Zoom”),
a room divider can feel like a tiny miracle. Now make it a playhouse room divider and suddenly you’ve built
privacy, pretend play, and parent sanity in one weekend project. No permits, no drywall dust apocalypse, and no
explaining to guests why your living room looks like a toy store sponsored by chaos.
In this guide, you’ll learn how to build a kid-friendly folding “castle/playhouse” divider (beginner-friendly),
plus smarter safety choiceslike how to reduce tip-over risk, pick low-odor finishes, and avoid materials that make
indoor air quality grumpy.
Why a Playhouse Room Divider Is the MVP of Kids’ Spaces
It divides the room without dividing your life
Traditional dividers give you a visual boundary. A playhouse divider gives you a boundary and a built-in
activity. It can separate a reading nook from a LEGO launchpad, or carve out a quiet “sleep zone” in a shared bedroom.
Bonus: it disguises messy play areas like a stage curtainexcept the “stagehands” are tiny humans who never learned
the meaning of “strike the set.”
It encourages independent play (a.k.a. you drink coffee while it’s still warm)
Windows, doors, and cutouts turn a simple panel into a puppet theater, storefront, castle wall, or spaceship airlock.
When kids can “own” a space, they often stay in it longerlike cats with cardboard boxes, but louder.
It’s flexible
A folding divider can open wide for playtime, fold tighter for bedtime, and tuck away when grandparents visit.
Unlike a permanent wall, it’s also renter-friendlier and easier to update as your child grows.
Plan First: The 10-Minute “Measure Twice, Cry Never” Checklist
- Where will it live? Mark the footprint on the floor with painter’s tape.
- Who is the divider for? Toddlers need lower windows and extra stability. Older kids want taller “walls” and more features.
- How tall should it be? A 48–54 inch height works well for many kids’ rooms; go taller only if you can add serious stability.
- How wide? A 3-panel folding screen typically spans 4–6 feet when opened.
- Will kids climb it? Assume “yes.” Design like you’re building for tiny parkour athletes.
Two common styles:
(1) a folding screen (portable, fast build), or (2) a semi-permanent pony wall / built-in divider (more carpentry,
but very sturdy). This article focuses on the folding playhouse divider, with notes for a more built-in approach.
Materials and Tools
Smart material picks for kid spaces
- 3/4-inch cabinet-grade plywood (birch is popular). Thicker panels hold hinge screws better and feel sturdier.
Look for panels labeled compliant with formaldehyde emission standards (often “TSCA Title VI”). - Optional edge banding (iron-on veneer or peel-and-stick) to cover raw plywood edges for a smoother, more finished feel.
- Hinges: 2″–2.5″ butt hinges work well for panels and small doors. Use enough hinges for stability.
- Fasteners: wood screws sized for your hinges; consider slightly longer screws if your plywood is thick enough.
- Finishes: low-odor, low/zero-VOC paints or water-based topcoats; choose products intended for interior use and allow full cure time.
- Wood glue (optional): helpful if you add trim or framing. Choose a low-odor, water-cleanup glue.
Tools
- Measuring tape, pencil, straightedge/square
- Jigsaw (for windows/door cutouts)
- Drill/driver + bits (including a bit for pilot holes)
- Sander or sanding block + sandpaper (120–220 grit)
- Safety gear: eye protection, hearing protection, and a dust mask/respirator for sanding
Pro tip: If you don’t have a jigsaw, you can simplify the design by painting “windows” and “castle details”
onto solid panels. It’s faster, safer, and still looks adorable.
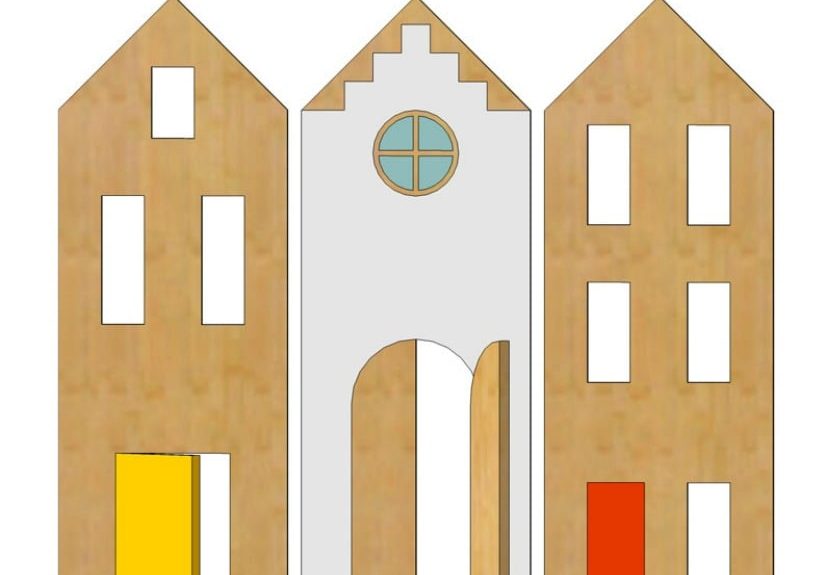
Build: A Folding “Castle” Playhouse Room Divider (Beginner-Friendly)
This plan is inspired by the classic three-panel folding divider approach: cut panels, add openings, sand everything smooth,
paint, and hinge it all together. The simplest version can be made from a single 4′ x 4′ sheet for a shorter divideror
scale up using a 4′ x 8′ sheet for taller panels.
Suggested dimensions (easy and customizable)
- Option A (compact): One 4′ x 4′ sheet cut into three panels, each about 16″ wide x 48″ tall.
- Option B (taller): One 4′ x 8′ sheet cut into three panels, each about 16″ wide x 60–72″ tall (requires careful stability planning).
For kids, the compact height often works best: it feels like a “little house,” it’s easier to move, and it reduces
the temptation to treat the divider as Mount Everest.
Step 1: Cut your panels
- Mark three equal panel widths (commonly 16″) along the sheet.
- Cut panels with a circular saw + straightedge guide, or have the store cut them if available.
- Label panels “Left / Middle / Right” so you keep your design consistent.
Step 2: Design your “playhouse” features
Use painter’s tape to sketch your windows, doors, and roofline before you commit. Popular cutouts:
- One door (cut on three sides so the bottom edge remains attached, then hinge the cutout back on).
- Two or three windows (square, arched, or “castle” style).
- A serving window (perfect for a pretend café or puppet shows).
Keep openings large enough for pretend play but not so big that you weaken the panel.
Leave at least 3–4 inches of wood around edges and between openings for strength.
Step 3: Cut windows and doors safely
- For rectangular openings, drill starter holes inside your lines at corners.
- Use a jigsaw to cut along the lines.
- Save the door cutoutthat piece becomes your little hinged door.
Step 4: Sand and soften every edge
This is the “boring” step that prevents the “my kid got a splinter” step. Sand all cut edges smooth, then soften corners:
round them slightly with sandpaper or a router round-over bit if you have one. Pay extra attention to window corners,
door edges, and panel topstiny hands explore everything.
Step 5: Finish the edges (optional but worth it)
Edge banding makes plywood feel like furniture instead of “construction project.” Iron-on veneer is popular:
apply it, trim it, then sand lightly. If that sounds like too much, you can also paint the edges carefully and call it
“modern minimalism.”
Step 6: Paint (or stain) like a person who lives with kids
Choose durable, cleanable finishes for a high-touch kid zone. Water-based paints often have easier cleanup and lower odor
during application. Let paint fully dry between coats, and plan cure time before heavy playbecause “dry to the touch”
and “immune to sticky fingers” are not the same thing.
Design idea: paint bricks, shingles, a mailbox, or a round “tower window.” You can also paint details that would be
annoying to cutlike crenellations on topbecause you deserve joy, not extra sanding.
Step 7: Attach the door cutout
- Test-fit the door cutout into its opening.
- Mount small hinges on the door edge and panel edge.
- Pre-drill pilot holes to prevent splitting and to keep hinge screws from stripping.
Step 8: Hinge the panels together
- Lay panels face-down in order (Left–Middle–Right) with small gaps between edges.
- Decide how you want it to fold (accordion-style is common).
- Mark hinge locationstypically 2–3 hinges per joint depending on height.
- Pre-drill pilot holes and attach hinges.
Stability note: Folding screens are more stable when slightly “zig-zagged,” not perfectly flat.
When you set it up, angle the panels so it stands confidentlylike it pays rent.
Safety: Build It Like Kids Are Going to Do Kid Things
1) Reduce tip-over risk
Tall or unstable furniture can tip and injure children. Treat your divider as climbable (because it will be).
Use one or more of these approaches:
- Keep it shorter (often the best solution).
- Add wider “feet” at the base (simple plywood outriggers or a base frame).
- Anchor strategically if the divider will live in one spot (for example, a discreet strap to a wall stud).
- Avoid top-heavy add-ons like heavy shelves on a freestanding screen unless you build a real base.
2) Watch pinch points and hinges
Hinges are wonderful, but they can also be tiny finger traps. Keep hinge barrels out of reach where practical,
use smooth hardware, and avoid designs where kids can slam panels together easily.
3) Choose healthier materials and finishes
Pressed wood products can emit formaldehyde. When possible, select compliant plywood/MDF labeled to meet modern emission
standards. For finishes, pick low-odor products, ventilate well during application, and give everything time to cure.
If your home is older (especially built before 1978), be cautious about sanding or disturbing old paint, which may create
hazardous dustkeep kids out of the work zone and clean thoroughly.
4) Dust control matters
Cutting and sanding creates fine dust. Work outside if you can, or use a shop vacuum with dust collection indoors.
Wear appropriate respiratory protection for dusty steps and clean up with vacuuming/wet wiping rather than dry sweeping.
Upgrades Kids Actually Use (Not Just the Ones That Look Cute on Pinterest)
Puppet theater / “storefront” window
Cut a larger pass-through window in the middle panel and paint a little “marquee” sign above it. Add a fabric curtain
(short and secureno long cords) for showtime.
Chalkboard or whiteboard zone
Paint one panel section with a chalkboard-style coating or mount a thin dry-erase board. It becomes a menu, a message board,
or a daily “today I am a dragon” announcement.
“Real” windows (without real glass)
Add acrylic (plexiglass) behind window cutouts for a bright, safe “indoor playhouse” look. Sand edges and secure it well
so it doesn’t rattle or flex.
Storage that doesn’t make it top-heavy
If you want storage, keep it low: shallow cubbies near the base or a low bench integrated into a panel.
High shelves on a folding screen can turn it into a wobble machine.
Cost, Time, and Difficulty
- Skill level: Beginner to intermediate (straight cuts + jigsaw work).
- Time: One weekend, plus cure time for paint/topcoat.
- Typical cost: Often around $75–$200 depending on plywood grade, hardware, and finishes.
The biggest cost variable is the sheet material. Cabinet-grade plywood costs more, but it cuts cleaner, holds screws better,
and looks like furniture instead of a school science project.
FAQ
Can I build this without cutting windows?
Absolutely. Paint faux windows and door outlines instead. You’ll still get the playhouse vibe, plus maximum strength and minimum
jigsaw drama.
Is MDF okay for a kids’ divider?
MDF can be smooth and paint beautifully, but it’s heavy and doesn’t love moisture. If you use it, prioritize stability,
seal it well, and consider a sturdier base.
What’s the safest finish for kid furniture?
Look for low-odor products for indoor use, follow label directions, ventilate, and allow full cure time. If your child is a
“chewer,” consider simpler finishes and avoid anything that off-gasses strongly. When in doubt, choose finishes marketed for
interior furniture and used commonly in home environments.
How do I keep it from tipping?
Use a shorter design, angle the panels in a zig-zag stance, add base feet, and consider discreet anchoring if it stays in
one location. If your child is in a climbing phase, treat stability like the main eventnot an optional upgrade.
Real-World Experience Notes ( of “What You’ll Learn the Hard Way”)
Here’s the honest truth: the first time you set up your playhouse room divider, your child will not admire your clean paint lines.
They will immediately test it the way a quality-control engineer tests a chair: by climbing, shaking, and yelling “LOOK!” while
you suddenly remember every physics lesson you ever ignored.
The most common lesson from real builds is that stability beats style. A divider that looks like a storybook castle
is adorable, but if it rocks when a kid leans on it, you’ll spend more time supervising the divider than supervising the childwhich
is an impressive failure of priorities. Builders who are happiest long-term usually do one of three things: keep the divider shorter,
add wider feet at the base, or place it where a discreet anchor strap can help. The divider doesn’t need to be bolted like a bridge,
but it should stand up to the everyday realities of kids using it as a wall, a stage, and occasionally a “secret door” escape route.
The second lesson is about hardware. Hinge screws can strip, especially on cheaper plywood with voids. People who pick
cabinet-grade plywood (or at least a better sheet) tend to have fewer “why is this hinge suddenly a decoration?” moments. Pilot holes are
not optional. Neither is a quick test-fit before final assembly. If a door cutout binds, sand it nowbecause a stuck door becomes a
frustration toy, and frustration toys are loud.
Then there’s the finish. In the wild, kids don’t treat painted surfaces gently. They treat them like interactive art:
they poke, scratch, sticker, peel, and occasionally attempt to “wash” them with something that is definitely not water. A durable topcoat
(when compatible with your paint) can help. So can choosing a washable paint for high-traffic interior surfaces. And the biggest finish
tip of all: give it time. Many DIYers rush cure time, bring the divider inside too soon, and discover that paint can imprint like soft
clay when pressed by small hands. Waiting is annoying, but repainting is more annoying.
Finally, the best “experience” advice is about how kids actually play. The features that get the most use are usually
simple: a serving window, a little door, and a spot for signs. The most elaborate add-ons sometimes become background scenery. If you want
the divider to stay relevant as your child grows, leave space for updatesswap out “castle” signage for a “bookshop,” add seasonal décor,
or repaint one panel when interests shift from princesses to astronauts to dinosaurs running a coffee stand. Yes, that is a real career path
in kid-world.
The payoff is real: a playhouse room divider often becomes a home’s “imagination headquarters.” It reduces visual clutter, creates structure
in shared spaces, and gives kids a place that feels like theirswithout you remodeling the whole room. And if it also makes your background
on video calls look less like a toy tornado, congratulations: you’ve built a divider that improves both childhood and adulthood.
Note: For publication, you may delete this comment.
Research sources consulted include major US home-improvement and safety guidance (CPSC, EPA, CDC/AAP),
plus reputable US DIY/home outlets (Remodelaholic, This Old House, HGTV, BobVila, BHG) and product makers
for material/finish specs (e.g., Titebond, Rockler, Minwax).