Table of Contents >> Show >> Hide
- What Cabinet Refacing Is (and What It Isn’t)
- Why DIY Cabinet Refacing Makes Sense
- Pick Your “New Cabinet Look” Before You Pick Up a Tool
- Tools and Supplies Checklist
- Before You Start: Cabinet Reality Check
- Step 1: Measure Like You Mean It
- Step 2: Prep the Workspace (and Your Sanity)
- Step 3: Remove Doors, Drawers, Hinges, and Hardware
- Step 4: Clean, Sand, and Repair the Cabinet Frames
- Step 5: Apply Veneer to Face Frames (Stiles and Rails)
- Step 6: Reface Exposed Cabinet Ends (Optional but High-Impact)
- Step 7: Edge Banding for Clean, Durable Edges
- Step 8: Install New Doors and Drawer Fronts
- Step 9: Add Trim, Toe-Kick Skins, and Crown (Optional Upgrades)
- Step 10: Finishing Touches and Cleanup
- Common DIY Cabinet Refacing Mistakes (and How to Avoid Them)
- DIY Cabinet Refacing Cost: What to Expect
- How Long Does DIY Cabinet Refacing Take?
- When You Should Hire a Pro Instead
- Real-World DIY Refacing Experiences (Lessons People Learn the Hard Way)
- Conclusion
Want your kitchen to look “new” without the full demolition drama (and without living off microwave noodles for a month)?
Cabinet refacing is the sweet spot between “I can’t stand these cabinets another day” and “I’m not trying to finance a small spaceship.”
Done right, DIY cabinet refacing can deliver a dramatic makeover by keeping the cabinet boxes and upgrading everything people actually see:
new doors, new drawer fronts, fresh veneer on the face frames, and updated hardware.
This guide walks you through how to reface kitchen cabinets step by steptools, materials, planning, and the
little gotchas that separate a magazine-worthy finish from “why is this one door… haunted?”
It’s in-depth, practical, and friendly to real-world DIYers (read: humans who sometimes measure twice and still cut once wrong).
What Cabinet Refacing Is (and What It Isn’t)
Cabinet refacing keeps your existing cabinet boxes (the “carcasses”) and refreshes the exterior surfaces.
Typically, you:
- Replace cabinet doors and drawer fronts
- Apply wood veneer or laminate to visible cabinet frames and ends
- Upgrade hinges, pulls/knobs, and often drawer slides
- Add finishing details like toe-kick skins, panels, trim, and crown molding (optional but powerful)
Refacing does not change your kitchen layout. If you hate where the cabinets are, refacing won’t magically move them.
And if the boxes are structurally failing (warped, water-damaged, loose joints), refacing is lipstick on a leaky boat.
The boxes need to be solid, square-ish, and worth saving.
Why DIY Cabinet Refacing Makes Sense
It’s a big visual upgrade with less disruption
Because the cabinet boxes stay put, you can often keep countertops, plumbing, and flooring intact.
Your kitchen remains usablemaybe a little chaotic, but functional.
It can save real money
Professional refacing often prices by linear foot and can run into the thousands, especially with custom doors, premium hardware,
and decorative extras. DIY refacing can cut out much of the labor cost, leaving you mainly paying for materials and tools.
(Translation: your wallet doesn’t need a support group afterward.)
Pick Your “New Cabinet Look” Before You Pick Up a Tool
Refacing is part design project, part precision craft. Make these decisions up front so you don’t end up choosing hardware at midnight
like it’s a reality show elimination round.
1) Door style
- Shaker (timeless, forgiving, works with most kitchens)
- Slab/flat panel (modern, shows alignment errorsmeasure carefully)
- Raised panel (traditional, adds depth and detail)
- Glass inserts (nice upgrade, also forces you to organize at least one cabinet)
2) Veneer or laminate for the cabinet frames/ends
You’ll cover the face frames (stiles and rails) and often the exposed cabinet ends. Common options:
- Wood veneer: beautiful, can be stained, requires careful application and trimming.
- Laminate/rigid thermofoil-style surfaces: durable, consistent color, great for modern looks.
- Pressure-sensitive (peel-and-stick) veneer: DIY-friendly, but prep and alignment still matter a lot.
3) Hinges & hardware
Many refacing projects upgrade to concealed “Euro” hinges (often soft-close) and modern pulls/knobs.
Decide your hardware style early because it affects drilling locations and door layout.
Tools and Supplies Checklist
You don’t need a full cabinet shop, but you do need the right basics. Here’s a practical list for DIY cabinet refacing.
Must-haves
- Tape measure (and a notepad for a measurement map)
- Screwdriver/drill + bits
- Orbital sander + sandpaper (often 120–220 grit range)
- Utility knife with fresh blades
- Straightedge/metal ruler
- Clamps (helpful for edge banding and trim)
- Wood filler (or a stronger filler for dents/chips)
- Degreaser/cleaner (kitchen cabinets are basically grease magnets)
Veneer-specific helpers (highly recommended)
- Veneer roller or J-roller for strong adhesion
- Veneer trimmer or flush-trim tool (or a sharp chisel + patience)
- Edge banding (for exposed plywood/MDF edges) + household iron (if using iron-on banding)
- Adhesive appropriate to your veneer type (contact cement, spray adhesive, or PSA veneer backing)
Safety gear (don’t skip)
- Eye protection
- Respirator or mask (especially with sanding and solvent-based adhesives)
- Gloves when handling adhesives
- Ventilation (open windows, fansyour future self will thank you)
Before You Start: Cabinet Reality Check
Take ten minutes to confirm refacing is the right move. Ask:
- Are the boxes solid? No sagging, major water damage, or joints falling apart.
- Are the face frames fairly flat? Veneer needs a smooth surface to bond long-term.
- Is the layout fine? Refacing upgrades appearance, not functionality or cabinet placement.
- Are doors/drawers the main problem? If yes, refacing is ideal.
Step 1: Measure Like You Mean It
Measuring is the backbone of cabinet refacing. Create a simple sketch of your kitchen cabinets and number every opening:
upper doors, lower doors, and each drawer front. Then record measurements next to the correct number.
This prevents the classic DIY mystery: “Where does this door go and why is it taller than my fridge?”
Door and drawer front measuring tips
- Measure width and height for each door and drawer front.
- Measure each openingdon’t assume symmetry.
- Note overlay type: full overlay, partial overlay, or inset (this affects sizing and hinge choice).
- Order a little extra veneer for mistakes and grain matching.
Step 2: Prep the Workspace (and Your Sanity)
DIY cabinet refacing is easier when you set up a clean work zone:
- Empty cabinets completely (yes, even the “miscellaneous cord drawer”).
- Cover countertops and floors with drop cloths or rosin paper.
- Set up a “door station” where doors can dry flat and undisturbed.
- Use painter’s tape labels so every door and drawer front returns to the right spot.
Step 3: Remove Doors, Drawers, Hinges, and Hardware
Remove doors, drawer fronts (if applicable), hinges, pulls/knobs, and any trim that will be replaced or re-covered.
Keep screws in labeled bagsfuture you doesn’t want to play “guess this screw” at 11:47 PM.
Step 4: Clean, Sand, and Repair the Cabinet Frames
Cabinets near the stove collect grease like it’s their hobby. Veneer and adhesive need clean, slightly roughened surfaces to bond well.
- Degrease: Use a strong cleaner, rinse lightly, and let dry fully.
- Scuff sand: You’re not removing everythingjust dulling the finish for better adhesion.
- Repair: Fill dents, chips, and deep scratches. Sand repairs smooth.
- Check flatness: Face frames should be smooth and reasonably even.
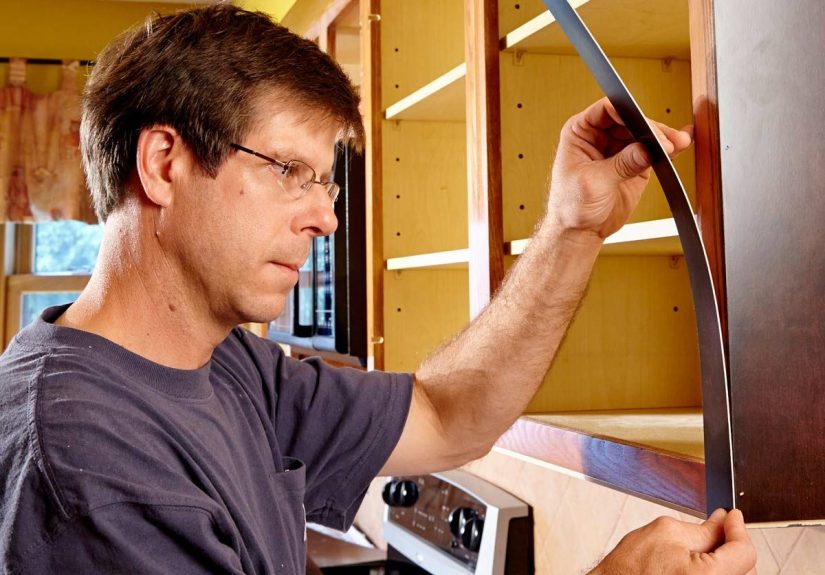
Step 5: Apply Veneer to Face Frames (Stiles and Rails)
This is the heart of DIY cabinet refacing. Take it slow. The goal is full contact, no bubbles, clean edges, and consistent grain direction.
Cutting strategy
- Cut veneer strips slightly oversized so you can trim flush after bonding.
- Apply veneer to stiles (vertical pieces) first, then rails (horizontal pieces).
- Keep grain direction consistent across a run of cabinets for a professional look.
Adhesive approach (choose one)
- Contact cement: Apply to both surfaces, allow proper tack time, then bond carefully (it grabs fast).
- Spray adhesive: Useful for certain panels and backingswork in a well-ventilated area.
- Pressure-sensitive veneer: Peel backing gradually and press firmly as you go.
Press, bond, and trim
- Align the veneer strip and begin bonding from one end.
- Use a roller to apply strong, even pressure across the entire strip.
- Trim the overhang with a veneer trimmer or sharp knife against a straightedge.
- Finish edges gentlyno tearing, no splintering, no rage-trimming.
Step 6: Reface Exposed Cabinet Ends (Optional but High-Impact)
If your cabinets have visible ends, they matter. A mismatched end panel can make a “new” kitchen feel unfinished.
You can:
- Apply veneer directly to the end panel (after cleaning and sanding), or
- Attach a thin, clean panel (like MDF or plywood) and veneer over it for a smoother base.
Step 7: Edge Banding for Clean, Durable Edges
Edge banding covers exposed plywood or MDF edges so they look finished and resist moisture.
Iron-on edge banding is common for DIY work:
- Cut banding slightly longer than the edge.
- Use a household iron (no steam) to activate the adhesive.
- Press firmly and let cool.
- Trim excess with an edge trimmer or sharp chisel/knife.
Step 8: Install New Doors and Drawer Fronts
This is the moment your kitchen starts looking “done.” Installing new doors and drawer fronts typically involves:
- Mounting hinges (often concealed) to doors
- Attaching hinge plates to face frames
- Hanging doors and adjusting alignment
- Installing drawer fronts with consistent reveals (the gaps between pieces)
Pro-looking alignment tips
- Start with upper cabinets, then move to lowers.
- Adjust hinges to achieve even gaps and level lines.
- Use spacers (or playing cards) to keep drawer gaps consistent while fastening.
- Install hardware with a template or jig so every pull lands in the same spot.
Step 9: Add Trim, Toe-Kick Skins, and Crown (Optional Upgrades)
Want that “high-end” vibe without buying high-end anything? Trim details help:
- Crown molding adds height and polish.
- Light valances hide under-cabinet lights and look custom.
- Toe-kick skins make the base area match the new look.
- End panels hide raw cabinet sides and create a furniture finish.
Step 10: Finishing Touches and Cleanup
Walk the kitchen like a picky inspector:
- Check for veneer seams, bubbles, and rough edges; press/repair before they worsen.
- Touch up trim caulk lines neatly (thin bead, smooth finish).
- Tighten hardware, adjust doors, and confirm drawers glide smoothly.
- Clean surfaces with a gentle cleaneravoid harsh solvents on new finishes.
Common DIY Cabinet Refacing Mistakes (and How to Avoid Them)
Mistake: Skipping deep cleaning
Adhesive doesn’t bond to grease. Degrease thoroughly, especially near cooking zones.
Mistake: Cutting veneer too tight
Cut slightly oversized and trim flush. Tight cuts lead to gaps, and gaps scream “DIY” louder than an unreturned rental sander.
Mistake: Veneer bubbles
Bubbles come from poor surface prep, uneven pressure, or rushing. Roll firmly and evenly.
If a small bubble appears, you can sometimes slit it carefully and press it down, depending on adhesive type.
Mistake: Misaligned hardware
Use a jig/template. Even a 1/8-inch drift becomes obvious across a row of drawers.
Mistake: Expecting refacing to fix bad cabinets
If the cabinet boxes are damaged, refacing won’t solve the real problem. Repair structural issues firstor consider replacement.
DIY Cabinet Refacing Cost: What to Expect
Costs vary based on door quality, veneer type, and how many extras you add (soft-close hinges, new drawer slides, crown molding, end panels).
A useful way to estimate is by linear feet of cabinetry.
DIY refacing generally costs far less than professional refacing because labor is the biggest line item you’re removing.
What drives cost up
- Custom door sizes and premium wood species
- High-end hardware and soft-close upgrades
- Lots of exposed ends, panels, or decorative trim
- Fixing cabinet box issues before refacing
How Long Does DIY Cabinet Refacing Take?
Most DIYers should plan for several days to a couple of weekends, depending on kitchen size and comfort level.
Veneer work and door alignment take timeand rushing is how you get “Door #7: the crooked legend.”
When You Should Hire a Pro Instead
DIY cabinet refacing is doable, but it’s not the easiest cabinet project. Consider professional help if:
- Your cabinet frames are warped, out of level, or damaged
- You need significant repairs, rebuilds, or reconfiguration
- You want specialty materials and flawless seams
- You don’t have a safe way to ventilate and manage adhesive fumes
Real-World DIY Refacing Experiences (Lessons People Learn the Hard Way)
The internet makes cabinet refacing look like a breezy afternoon craftlike you’ll slap on veneer, hang doors, and be sipping iced tea by dinner.
In real life, DIY cabinet refacing is more like a mini home-improvement marathon: rewarding, but full of plot twists.
Here are common experiences DIYers run into, plus what they do to fix them.
Experience #1: The “I measured… but did I?” moment.
Many DIYers start confident, take quick measurements, order doors, and then discover one cabinet opening is slightly different because the house settled,
the face frame isn’t perfectly square, or the previous owner “customized” something with enthusiasm and zero geometry.
The fix is boring but powerful: make a numbered measurement map, measure each opening individually, and record overlay style.
People who succeed tend to measure in the same way every time (width first, height second), double-check outliers, and order a little extra veneer.
When a measurement looks suspiciously perfect, it’s usually lying.
Experience #2: Veneer goes on fast… until it doesn’t.
The first few veneer strips often feel easy. Then you reach an inside corner, a stile with a tiny ding, or a cabinet next to an appliance where access is awkward.
That’s when bubbles show up, edges lift, or the strip lands 1/16 inch off and suddenly the seam is staring at you.
DIYers learn to slow down, dry-fit pieces, and use a roller like it’s their new best friend.
A common strategy is to start on a less visible run (like the far corner or a pantry side) to learn the “feel” of the adhesive and trimming tools.
By the time they hit the most visible cabinets, they’ve already made their mistakes where only the toaster can judge them.
Experience #3: Contact cement is powerful and unforgiving.
People love contact cement right up until they realize it’s basically “permanent commitment in a can.”
If you touch the veneer down in the wrong spot, it may not politely let you reposition it.
DIYers who get great results tend to use alignment helperslike spacing sticks or temporary guidesso the veneer lands exactly where intended.
They also pay attention to tack time and ventilation. If the cement is too wet, it slides; too dry, it grabs weirdly.
The win here is patience: let the adhesive reach the correct tack, then place carefully and press evenly.
Experience #4: Edge banding is small, fussy, and makes a big difference.
Edge banding sounds minoruntil you see a raw plywood edge next to your brand-new doors.
DIYers often learn that ironing on banding is easy, but trimming it cleanly is where craftsmanship shows.
The best results come from sharp tools, light passes, and trimming with the grain whenever possible.
If someone tries to rush with a dull blade, they can tear the banding and end up patching little “whoops” spots.
The lesson: slow trimming beats fast repairing every time.
Experience #5: Door alignment becomes a personality test.
Hanging doors is when many projects feel “almost finished,” which is exactly when impatience tries to move in.
New concealed hinges usually allow three-way adjustment, but you still have to dial them in:
up/down, left/right, in/out. DIYers often report that the last 10% of alignment takes 50% of the time.
The trick is to work methodically: set one reference door, align the next to it, then keep going in a logical sequence.
If you bounce around randomly, you can chase tiny gaps like they’re running away from you.
Once alignment is right and hardware is on, though, the kitchen suddenly looks transformedand that’s the payoff.
Experience #6: The final details are what make it look “pro.”
After the doors are on, some DIYers stopthen feel like something is still slightly off.
Often it’s missing trim, mismatched toe-kicks, or unfinished cabinet ends.
Adding a simple end panel, a clean toe-kick skin, and (if your style fits) crown molding can elevate the whole room.
These details don’t always cost much, but they make the refacing look intentional instead of “I changed the doors and hoped nobody noticed the rest.”
People who love their final result usually budget time for these finishing touchesand they don’t install hardware freehand without a template.
Conclusion
DIY cabinet refacing is one of the most satisfying kitchen upgrades because it’s high impact without requiring a full gut renovation.
If your cabinet boxes are in good shape and you like the layout, refacing can deliver a dramatic before-and-after:
new doors, crisp veneer, updated hardware, and a kitchen that feels refreshed (without the emotional damage of a full remodel).
Measure carefully, prep thoroughly, take your time with veneer and alignment, and you’ll end up with cabinets that look like they came with the house
in the best possible way.