Table of Contents >> Show >> Hide
- What Is the Camouflage Outdoor Wall Sconce?
- Core Specs to Know Before You Fall in Love
- Where Camouflage Works Best
- Designing the “Camouflage” Effect on Purpose
- Placement Guidelines That Keep Things Flattering (Not Spooky)
- Light Pollution, Neighbor-Friendliness, and “Please Don’t Make My Yard a Las Vegas Boulevard”
- Controls and “Set It and Forget It” Convenience
- Installation Notes: What to Plan for Before the Wall Is Open
- Styling Ideas: Making Camouflage Look Like It Was Always There
- Maintenance and Longevity: Keep the Glow, Lose the Grime
- Conclusion
- Real-World Experiences: What It’s Like Living With Camouflage (The Good, the “Oh Right,” and the Surprisingly Useful)
- SEO Tags
Some outdoor lights show up like they’re auditioning for a runway show. Others quietly do their job and let your home be the star.
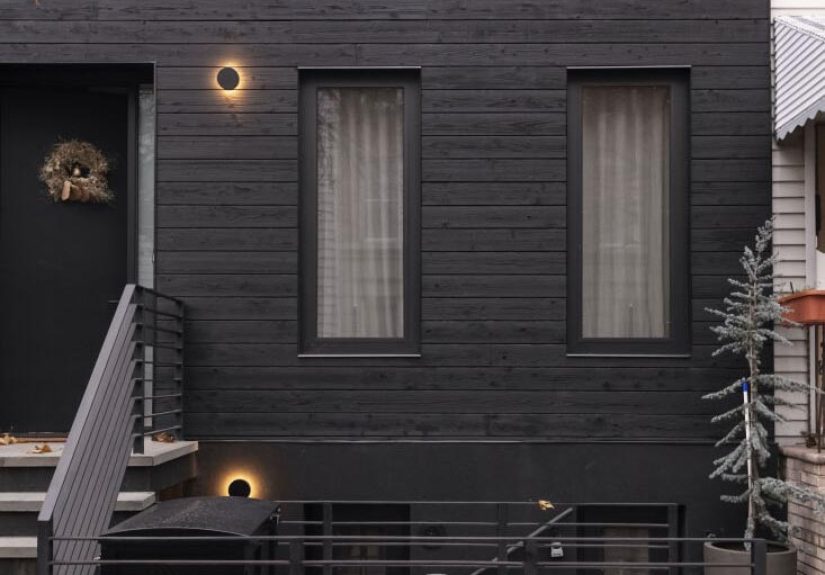
The Camouflage outdoor wall sconce belongs to the second categoryuntil you flip the switch. Then it throws a soft “eclipse”
halo on the wall that makes people pause mid-sentence and go, “Wait… where is that light coming from?”
In this guide, we’ll break down what “Camouflage” is (and why it’s not just a dramatic name), where it works best, how to choose the
right size and color temperature, and what to watch for in real installationswithout turning your exterior into a theme park.
Expect practical tips, a little design nerdiness, and exactly zero “just trust the vibes” advice.
What Is the Camouflage Outdoor Wall Sconce?
“Camouflage” is an ultra-slim, disc-shaped outdoor wall light designed to blend into its surroundings when it’s offand create an
indirect halo of light when it’s on. The idea is simple: instead of staring at a bulky fixture, you see architecture by day and a
controlled glow by night. It’s minimal, modern, and surprisingly forgiving on fussy facades where traditional lanterns can look
too “front-porch 2004.”
Why it’s called “Camouflage” (and why that matters)
The “camouflage” effect comes from the finish optionsthink painted tones and stone-like surfaces that visually merge with the wall.
When the light is off, the fixture recedes. When it’s on, the light reflects off the wall from behind the disc, creating an
“eclipse” ring that feels architectural rather than blinding.
Core Specs to Know Before You Fall in Love
Outdoor lighting is where looks and physics have to get along. Here are the specs that actually matter when you’re choosing a
Camouflage outdoor wall sconce (or planning for one).
Wet-location rating and IP65: your exterior’s insurance policy
If the fixture is going on an exterior wall that can see rain, mist, hose-splash, or wind-driven moisture, you want it rated for
wet locations. Camouflage is designed for outdoor wet locations and is commonly listed with an IP65 ratingmeaning
it’s protected against dust and water jets (the kind of weather your house gets, not the kind your submarine gets).
Integrated LED + efficiency
Camouflage uses an integrated LED light source, which typically means lower maintenance and no “which bulb did we buy last time?”
detective work. And generally speaking, LEDs are dramatically more energy-efficient than incandescent lighting, which matters when
you’re using multiple fixtures outdoors.
Color temperature: pick your glow like you pick your paint
Camouflage is commonly offered in warm options like 2700K (cozier, more “hospitality”) and 3000K
(still warm, a bit crisper). Here’s the vibe translation:
- 2700K: best for stone, wood, traditional landscaping, and “welcome home” warmth.
- 3000K: great for modern stucco, concrete, and cleaner contemporary palettes.
- Go warmer when possible: warm outdoor light tends to feel calmer and less harsh at night.
CRI and “what your home actually looks like at night”
CRI (Color Rendering Index) tells you how accurately colors show up under a light. A CRI around 80 is common for outdoor integrated LEDs
and is usually enough to keep your paint and landscaping from looking weirdly gray or overly blue. If you care about finishes and
materials (or you’ve ever argued about “is that beige or greige?”), CRI matters.
Where Camouflage Works Best
This fixture shines (politely) when you want light that feels built-in, not bolted-on. A few high-impact placements:
- Garden walls and courtyards: the halo effect reads like intentional architectural lighting.
- Walkways along a facade: helps define routes without blasting glare outward.
- Modern entries: especially when lantern-style fixtures would fight the architecture.
- Patios and terraces: creates ambient light that complements string lights instead of competing with them.
Where it’s not the best first pick
If your goal is “bright task lighting so I can find my keys, read package labels, and identify every spider on the porch,” Camouflage may
not be your only fixture. Its strength is indirect lightbeautiful and comfortable, but not a stadium spotlight.
Many homes do best with a layered approach: a sculptural ambient fixture (Camouflage) plus targeted task light where needed.
Designing the “Camouflage” Effect on Purpose
The magic trick only works if you help it. Here’s how to make the fixture truly disappear (until it glows).
1) Match the finish to the wall (or deliberately echo it)
A stone-like finish on stone, concrete on concrete, a neutral painted tone on stuccosimple choices that make the disc feel like part
of the architecture. If you can’t match perfectly, echo something nearby (planter tones, hardware finishes, or trim color) so it looks
intentional rather than “we tried.”
2) Use symmetry when the architecture wants it
On a broad wall, a pair of fixtures reads calm and high-end. On a narrow entry, one well-placed fixture can look more modern than two
squeezed-in sconces that feel like they’re elbowing each other for space.
3) Let the wall be your diffuser
Because the light reflects off the wall, the surface texture matters. Smooth stucco creates a cleaner halo; textured stone makes the
glow more organic and layered. If you’re lighting a feature wall, consider what you want to “reveal” at night: a subtle wash or a
dramatic texture moment.
Placement Guidelines That Keep Things Flattering (Not Spooky)
Even the best fixture can look wrong if it’s mounted too high, too low, or too close to trim. Here are practical rules of thumb that
are widely used for outdoor sconces and entry lighting:
Height: the classic 66–72 inch “eye-level” zone
A common guideline is to mount outdoor wall lights so the center of the fixture sits around 66–72 inches from the
finished floor/threshold. It tends to feel balanced, reduces glare, and keeps the light useful for real-life tasks like unlocking
doors.
Distance from the door trim: give it breathing room
Another practical guideline is leaving at least 6 inches between the edge of the door trim and the fixture, so it
doesn’t look crowded or interfere with sightlines.
Size relative to the door: don’t under-scale it
If you’ve ever seen a tiny exterior light floating next to a big front door, you know the problem. A common sizing approach:
- One fixture at a door: choose a fixture around 1/3 the door height.
- Two fixtures flanking a door: each fixture around 1/4 the door height.
Camouflage comes in multiple sizes, so you can choose a disc diameter that feels proportionalespecially on tall, modern entry doors.
Light Pollution, Neighbor-Friendliness, and “Please Don’t Make My Yard a Las Vegas Boulevard”
Outdoor lighting should improve safety and ambiance, not spill into bedrooms, glare into the street, or wash out the night sky.
A well-chosen Camouflage setup can support responsible lighting because it leans into indirect illumination and
controlled brightness.
The Five Principles approach (easy version)
A widely cited framework for responsible outdoor lighting is: make it useful, targeted,
low level, controlled, and warm-colored. In real life, that looks like:
- Light only what you need (entry + path), not the entire zip code.
- Keep brightness appropriateambient glow beats harsh glare for most residential spaces.
- Use controls (timers, motion sensors, smart schedules) so lights aren’t on “just because.”
- Choose warmer color temperatures (often 3000K or lower) for a calmer nighttime feel.
Controls and “Set It and Forget It” Convenience
If you want your exterior lighting to feel premium, give it a brain. The right control strategy can save energy and avoid the
all-night glow that screams “I forgot.”
- Dusk-to-dawn: great for entries where you always want some light after dark.
- Timer schedules: ideal for patios or courtyards (on during dinner hours, off late-night).
- Motion activation: best for side yards, gates, or areas where light is only needed sometimes.
- Dimming: if your setup supports it, dimming lets you run low ambient light and bump up only when needed.
Installation Notes: What to Plan for Before the Wall Is Open
Camouflage is typically surface-mounted, but it’s not a “stick it anywhere with two screws” situation if you want a clean result.
Plan for:
- Proper outdoor-rated electrical boxes and weatherproofing.
- Driver/power supply considerations (many systems use a remote driver; verify what your specific configuration requires).
- Location + wiring routes so you’re not improvising with drywall patches later.
- Safety: turn off the circuit, verify power is off, and hire a licensed electrician if you’re not comfortable.
Styling Ideas: Making Camouflage Look Like It Was Always There
Modern stucco + clean landscaping
Choose a neutral painted finish that blends with stucco. Use warm light (2700K–3000K) so the glow reads inviting instead of clinical.
Place along a walkway wall or near an entry where the halo can “frame” the approach.
Stone walls + courtyard drama
Stone-like finishes look especially natural here. The textured wall turns the halo into a layered washless “ring light,” more
“boutique hotel courtyard.”
Concrete + contemporary edges
If your exterior has concrete steps, planters, or architectural slabs, a concrete finish can feel like a continuation of the material
palette. Keep spacing intentional and avoid over-lighting; fewer fixtures with better placement usually wins.
Maintenance and Longevity: Keep the Glow, Lose the Grime
Outdoor fixtures live a hard life: dust, pollen, rain, irrigation spray, salty air in coastal zones, and whatever the local wildlife
decides is “art.” To keep Camouflage looking crisp:
- Rinse gently and wipe with a soft clothavoid abrasive cleaners that can dull finishes.
- Check seals and mounting annually, especially after storm seasons.
- If the wall surface is porous stone, keep the area around the fixture clean so the halo doesn’t highlight stains.
- Use controls to reduce runtime; fewer hours can mean a longer effective life for the system.
Conclusion
The Camouflage outdoor wall sconce is for people who want exterior lighting to feel architectural, not accessory-like. You get a slim,
low-profile fixture that visually recedes by day and creates a refined halo by nightespecially when paired with warm color temperatures,
thoughtful placement, and smart controls.
If you treat it like a design element (finish + proportion + spacing) rather than “just another porch light,” it can elevate an entry,
courtyard, or garden wall in a way that feels subtle, modern, and genuinely expensivewithout actually yelling about it.
Real-World Experiences: What It’s Like Living With Camouflage (The Good, the “Oh Right,” and the Surprisingly Useful)
Homeowners who choose a Camouflage-style outdoor wall sconce usually do it for one reason: they’re tired of fixtures that visually
dominate the facade. The first thing people tend to notice after installation is how “quiet” the wall looks during the day. On a stone
or textured stucco surface, the disc reads like part of the architecturealmost like a design detail you didn’t realize was lighting.
This is especially satisfying on modern homes where traditional lantern silhouettes can feel mismatched or overly decorative.
At night, the experience shifts. Instead of a visible bulb or a bright point source, you get a reflected halo that feels calmer on the
eyes. People often describe the glow as “soft but present,” which is exactly what you want for patios, courtyards, and approach paths.
It’s the kind of light that makes a space feel usable without turning every conversation into an interrogation. If you’ve ever stood
under a harsh porch light and felt like you were being asked to “state your name and business,” this is the opposite vibe.
One practical benefit that surprises people: indirect light can improve comfort for guests arriving at night. You can still see where
you’re going, but you’re less likely to get hit with glare when you look toward the door. When Camouflage is paired with a warm color
temperature (especially 2700K), it tends to flatter exterior materialswood looks richer, stone looks deeper, and plants look less
“flat.” The wall becomes a canvas, and the light reveals texture rather than washing everything out.
The biggest “oh right” moment is planning. Because many high-design outdoor fixtures use remote drivers or specific power-supply setups,
the best installs happen when someone thinks about wiring routes earlybefore the wall is sealed or before you’re forced into awkward
patchwork. Homeowners who plan ahead report cleaner results: the fixture sits exactly where it should, the wiring is tidy, and the
overall look stays minimalist instead of “minimalist with bonus conduit.”
Another real-life pattern: people often start with one fixture and then add a second (or third) once they see the effect. The halo is
more impactful when it’s repeated rhythmically along a walllike punctuation marks that guide you through space. But the sweet spot is
restraint. The most successful setups are typically fewer fixtures at lower output, often supported by timers or dimming so the lighting
feels intentional and doesn’t stay blazing until sunrise. The result is a home exterior that feels designed, calm, and welcominglike it
knows what it’s doing, but doesn’t need to brag.