Table of Contents >> Show >> Hide
- Quick Snapshot
- What Makes These Bars Work (A Little Delicious Food Science)
- Ingredients
- Equipment You’ll Want
- Step-by-Step: How to Make Chocolaty Caramel-Nut S'more Bars
- Flavor & Texture Tips (So You Don’t End Up With “Campfire Chaos Bars”)
- Variations: Make This Caramel S'mores Bars Recipe Yours
- Make-Ahead, Storage, and Freezing
- Serving Ideas
- FAQ
- of “Real Life” Experiences and Little Moments With These Bars
- Conclusion
- SEO Tags
If you love s’mores but don’t love smelling like a campfire for the next 48 hours, these Chocolaty Caramel-Nut S’more Bars are your new best friend. They’ve got the big three (graham + chocolate + marshmallow), plus a caramel layer that makes each bite taste like it’s wearing a cozy sweater. Add crunchy nuts on top and suddenly your “simple dessert bars” are acting like they’ve got VIP access.
This recipe is also a small miracle of practicality: no sticks, no smoke, no bug spray, and no friend insisting, “My marshmallow is supposed to be black.” You can make these in a pan, feed a crowd, and still have time to pretend you made them “just because.” (We support this kind of harmless deception.)
Quick Snapshot
- Yield: About 24 bars (9×13-inch pan)
- Prep time: ~25–30 minutes
- Bake time: ~25–30 minutes total (plus cooling)
- Difficulty: Easy, with one rule: don’t take your eyes off the marshmallows near the end
- Best for: Parties, potlucks, bake sales, “I need chocolate” emergencies
What Makes These Bars Work (A Little Delicious Food Science)
A good s’mores bar recipe is all about contrast: crisp base, gooey center, toasty top. Here’s how this version nails it:
- Cookie/graham crust: Butter binds crumbs together; baking sets the base so it doesn’t crumble into an emotional support pile.
- Caramel layer: Melted caramel (often with a splash of cream) turns into a chewy, sliceable layer that stays soft but not soupy once cooled.
- Mini marshmallows + chocolate chips + nuts: Minis toast faster and cover the surface evenly; chips add pockets of chocolate; nuts keep the sweetness from becoming a one-note sugar choir.
Ingredients
For the Crust
- 2 cups finely crushed graham crackers or chocolate wafer cookies (your call)
- 1/2 cup (1 stick) unsalted butter, melted (up to 3/4 cup if your crumbs are very dry)
- 2 tablespoons granulated sugar (optional, especially if using plain graham crumbs)
- Pinch of salt (highly recommended)
For the Caramel Layer
- 11 oz caramel baking bits or 14 oz soft caramels, unwrapped
- 1/4 cup heavy cream (use up to 1/3 cup if melting wrapped caramels)
- 1/2 teaspoon vanilla extract (optional but cozy)
- 1/4 teaspoon flaky sea salt (optional, for salted-caramel energy)
For the S’mores Topping
- 2 to 2 1/2 cups mini marshmallows
- 1 cup chocolate chips (semi-sweet or milk chocolate)
- 1 to 1 1/2 cups chopped mixed nuts (pecans, almonds, walnuts, peanutswhatever you like)
Optional “Make It Extra” Add-Ins
- 1–2 tablespoons cocoa powder mixed into the crust for a darker chocolate base
- 1/2 cup toffee bits (because caramel’s fun cousin showed up)
- 1/2 teaspoon espresso powder (not coffee-flavoredjust deeper chocolate)
Equipment You’ll Want
- 9×13-inch baking pan
- Parchment paper (for easy lift-and-slice)
- Saucepan or microwave-safe bowl (for caramel)
- Rubber spatula
- Measuring cups/spoons
Step-by-Step: How to Make Chocolaty Caramel-Nut S’more Bars
1) Prep the Pan (This Is Your Future Self’s Favorite Step)
- Preheat oven to 325°F.
- Line a 9×13-inch pan with parchment paper, leaving overhang on the long sides. Lightly butter or spray the parchment (especially corners).
2) Make and Bake the Crust
- In a bowl, combine crushed crumbs, melted butter, sugar (if using), and a pinch of salt. Mix until the texture looks like wet sand that’s ready to commit.
- Press firmly into the bottom of the pan. Use the bottom of a measuring cup to pack it tight. (A loose crust is basically a crumble waiting to happen.)
- Bake for 12–15 minutes, until set and lightly fragrant.
- Let cool for 5 minutes while you make the caramel.
3) Melt the Caramel
You have two good options: stovetop (more control) or microwave (faster, but watch closely).
Stovetop method:
- In a small saucepan over low heat, combine caramels/caramel bits and cream.
- Stir constantly until smooth and pourable. Low heat is keycaramel scorches when ignored.
- Stir in vanilla and flaky salt (if using).
Microwave method:
- Combine caramel and cream in a microwave-safe bowl.
- Heat in 20–30 second bursts, stirring each time, until smooth.
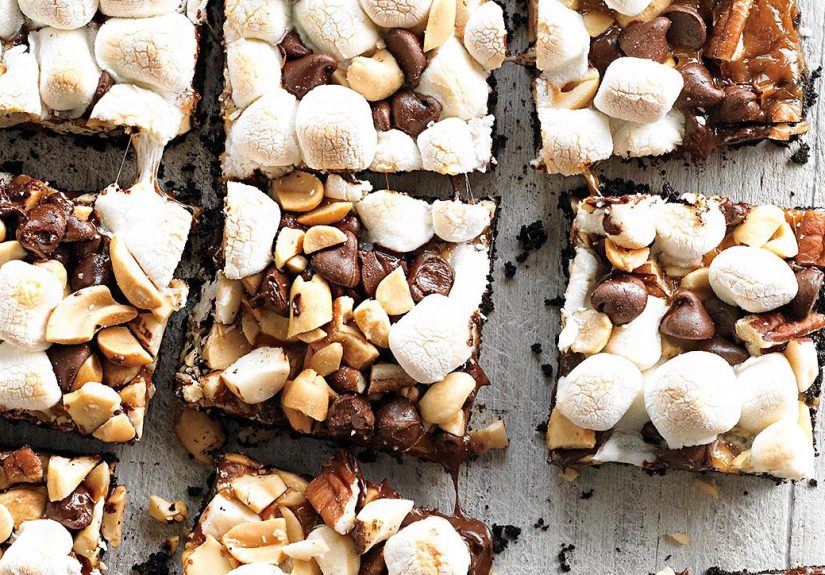
4) Build the Layers
- Pour warm caramel over the baked crust and spread into an even layer.
- Immediately sprinkle on mini marshmallows, chocolate chips, and chopped nuts.
- Gently press the topping down just a bit so it “sticks” to the caramel. Don’t mash itthis isn’t a stress ball.
5) Bake Until Gooey, Then Toast (If You Want That Campfire Vibe)
- Bake for 12–15 minutes until the caramel is bubbling at the edges and marshmallows puff.
- For a toasted top: switch oven to broil and broil for 30–90 seconds, watching like it’s the season finale. Marshmallows go from golden to “I have regrets” fast.
- Remove and place pan on a rack to cool completely.
6) Cool Completely, Then Slice Like a Pro
Here’s the truth: warm bars are delicious… and also impossible to cut neatly. Let them cool at room temperature, then chill for 30–60 minutes for clean slices. Lift the slab out using parchment and cut on a board.
Clean-cut tips:
- Use a large sharp knife.
- Wipe the blade between cuts (warm water + dry works well).
- Cut straight downavoid sawing through marshmallows like you’re logging.
Flavor & Texture Tips (So You Don’t End Up With “Campfire Chaos Bars”)
Caramel: Chewy, Not Cement
- If your caramel looks too thick to spread, add 1–2 teaspoons more cream and warm gently.
- If it’s too runny, it may need another minute of gentle heat to thickenor you simply need more cooling time.
- A pinch of salt keeps the sweetness balanced. Salt isn’t “making it salty”; it’s making it better.
Marshmallows: Golden, Not Gone
- Broiler tip: keep the pan on the middle rack and don’t walk away. Not even “just to check one thing.”
- Want more even toasting? Use mini marshmallows in a tight layer instead of big ones.
Nuts: Make Them Taste Like Nuts (Not Like Packing Peanuts)
- If your nuts are raw, toast them briefly in a dry skillet before chopping for a deeper, sweeter crunch.
- Try a mix: pecans for buttery flavor + almonds for snap is a great combo.
Variations: Make This Caramel S’mores Bars Recipe Yours
1) Salted Dark Chocolate Version
Use dark chocolate chips and finish with a light shower of flaky sea salt. The result is sweet, bold, and suspiciously adult (but still fun).
2) Peanut Butter “Campfire Candy” Bars
Add 1/3 cup peanut butter chips alongside the chocolate chips, or drizzle melted peanut butter over the finished bars. Sweet-salty perfection.
3) Pretzel Crunch Swap
Replace 1/2 cup of crumbs with crushed pretzels. It’s like your s’mores discovered a salty snack aisle and never left.
4) Gluten-Free Option
Use gluten-free graham-style crackers or cookies for the crust. Everything else is naturally gluten-free, but always check labels on caramels and chips.
Make-Ahead, Storage, and Freezing
- Room temp: Store in an airtight container for 2–3 days. Place parchment between layers.
- Fridge: Up to 1 week. Bring to room temp before serving for best texture.
- Freezer: Wrap bars individually and freeze up to 3 months. Thaw overnight in the fridge or on the counter for a couple hours.
Serving Ideas
- Warm slightly and serve with vanilla ice cream (a very reasonable life choice).
- Cut into small squares for dessert plattersthese are rich, so “tiny but mighty” works.
- Pack in lunchboxes as a surprise treat (and accept your inevitable hero status).
FAQ
Can I use jarred caramel sauce instead of melting caramels?
You can, but choose a thick caramel sauce meant for baking. Thin ice-cream caramel can seep into the crust and make slicing messy. If you go this route, use less and chill longer.
Can I use marshmallow creme instead of mini marshmallows?
Yesspread a thin layer over the caramel, then sprinkle nuts and chocolate on top. You may lose some of the classic “puffy” look, but the goo factor will be strong.
Why did my crust fall apart?
Usually it’s either not enough butter or not enough pressing. Pack the crumbs firmly and let the bars cool completely before lifting and cutting.
How do I avoid burned marshmallows?
Broil briefly and watch constantly. If you’re nervous, skip broilingbaking alone will still give you a gooey top.
of “Real Life” Experiences and Little Moments With These Bars
Making Chocolaty Caramel-Nut S’more Bars tends to come with a handful of extremely relatable kitchen momentsthe kind that make you laugh later, ideally while eating the evidence.
First, there’s the crumb-crushing phase. You start out calm and confident, then five minutes later you’re shaking a zip-top bag like it owes you money. If you’ve ever discovered one stubborn graham corner that refuses to become a crumb, congratulations: you’ve met the “final boss cracker.” The good news is that perfection isn’t required. A few slightly bigger bits actually make the crust more interesting, like tiny crunchy surprises that say, “Hello, I’m texture.”
Then comes caramel. Caramel has a personality: it’s sweet, it’s dramatic, and it demands attention. The second you stop stirring to read a text message, caramel takes that as a personal insult and starts sticking to the pan like it’s trying to move in permanently. The trick is to keep the heat low and your stirring steady. If you do get a few stubborn lumps, don’t panicgentle heat and patience usually coax them into smoothness. Worst case? You call it “rustic caramel” and act like you meant to do that.
Next, the topping goes on, and this is where the bars start to feel like a choose-your-own-adventure. Some people go heavy on chocolate chips, others go wild with nuts, and someone in every family insists that “marshmallow is the main food group.” (They are not wrong; they are simply passionate.) The fun part is that the topping is forgiving. If you sprinkle unevenly, it still bakes into something delicious. These bars don’t judge your geometry.
The most intense experience is the broiler moment. The broiler is basically a tiny dragon that lives in your oven. One second the marshmallows are pale and fluffy, the next second they’re bronzed like they just got back from a beach vacation, and thenif you blinkthey’re smoky little caps of charcoal. Watching the pan is non-negotiable. This is not the time to “quickly” refill your water, check on the dog, or scroll “just one video.” Stand there proudly like a marshmallow lifeguard.
Finally, there’s cooling and cuttingaka the patience test. Warm bars smell incredible, and your brain will try to convince you that slicing early is a bold, innovative move. It’s not. Early slicing is how you get delicious rubble. The real satisfaction comes after chilling: you lift the whole slab out, cut smooth squares, and suddenly your kitchen looks like a bake shop display. That first clean slice feels like winning a tiny domestic award.
And honestly, the best “experience” with these bars is how they travel through social situations. Bring them to a gathering and you’ll hear a lot of “Waitwhat’s in these?” followed by “Can I take one home?” followed by “Do you have the recipe?” It’s the kind of dessert that makes people talk with their mouths full in a way that feels totally acceptable, because it’s s’mores. S’mores are exempt from polite behavior. That’s just science.
Conclusion
These Chocolaty Caramel-Nut S’more Bars bring the cozy, gooey joy of classic s’mores into an easy, sliceable dessert bar that works year-round. With a buttery crumb crust, a chewy caramel layer, and a toasty top loaded with chocolate, marshmallows, and nuts, they’re built for sharingthough no one will blame you for “quality control.” Make them once, and you’ll start volunteering to bring dessert on purpose.