Table of Contents >> Show >> Hide
- Meet Måurice: The Luncheonette That Launched a Garland Crush
- Why Botanical Garlands Are So Popular Right Now
- What You’ll Need for a Måurice-Inspired Botanical Garland
- Step-by-Step: How to Make an Artful Botanical Garland
- Styling Ideas: From Café Ceiling to Cozy Home
- Tips for Long-Lasting Botanical Garlands
- Safety, Pets, and Allergies
- Real-Life Experiences with a Måurice-Inspired Botanical Garland
- Bringing a Bit of Portland Home
If you’ve ever walked into a beautifully styled café, stared at the decor, and thought, “Honestly, I could live here,” you already understand the magic of Måurice in Portland, Oregon. This tiny Norwegian– and French-inspired pastry luncheonette is all white walls, delicate pastries, and one irresistible detail: an artful botanical garland strung overhead, like a floating poem made of leaves and petals.
Thanks to that now-iconic Remodelista feature, the garland has become a quiet star of the spaceand a perfect DIY project for anyone who loves nature, design, and a little bit of whimsy. In this guide, we’ll walk through how to recreate a Måurice-inspired botanical garland at home: what to use, how to assemble it, how to hang it, and how to tweak it for holidays, parties, or everyday beauty.
Good news: you don’t need to be a florist. You just need some foliage, simple tools, and a willingness to sweep up the occasional leaf.
Meet Måurice: The Luncheonette That Launched a Garland Crush
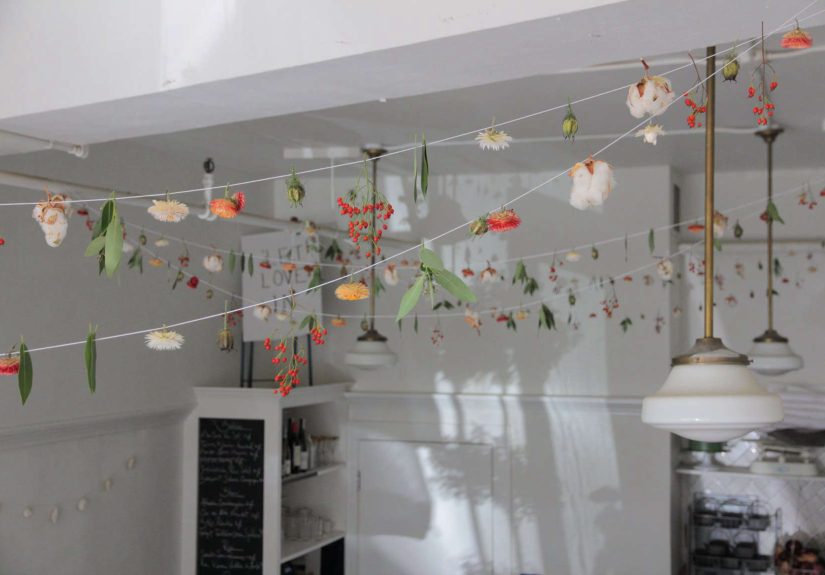
Måurice is a modern pastry luncheonette in downtown Portland, Oregon, known for its Scandinavian–French menu, delicate desserts, and bright, mostly white interior. Instead of heavy decor, the café leans on natural light, pale surfaces, and small artistic toucheslike the botanical garland that hangs loosely across the ceiling in gentle, imperfect swoops.
This garland isn’t the stiff, symmetrical greenery you see in hotel lobbies. It looks relaxed and improvisational: dried seedheads, fragile leaves, small flowers, and herbs, strung together so each piece feels like it still remembers the garden, field, or forest it came from. The charm comes from how casual it looks, as if someone just kept adding little treasures over time.
That “perfectly imperfect” energy is exactly what we’re going for in this DIY.
Why Botanical Garlands Are So Popular Right Now
Botanical garlands have quietly become a favorite among stylists, florists, and home decor lovers. They’re:
- Lightweight and airy: They add presence without visually crowding a small space.
- Seasonal and sustainable: You can make them from foraged or garden-cut branches, herbs, and dried flowers.
- Ridiculously versatile: Dress up a café ceiling, a dining room wall, a headboard, a mantel, or a doorway.
- Budget-friendly: Especially if you source greenery from your yard, neighborhood trees (respectfully!), or leftover bouquets.
Unlike evergreen holiday garlands that feel specific to December, a botanical garland made with mixed foliage and dried elements can work year-round. The Måurice version leans more art piece than Christmas decorationand that’s your inspiration here.
What You’ll Need for a Måurice-Inspired Botanical Garland
Think of this garland as a collage in 3D. You’ll mix a few backbone botanicals with lighter, more delicate accents.
Botanicals to Consider
You don’t need these exact ingredients, but here are good options that dry well and hold their shape:
- Base greenery: Eucalyptus, olive branches, fir or cedar tips, bay, or other flexible branches.
- Textural bits: Seedheads (like poppy pods or nigella), grasses, wheat, lavender, or statice.
- Dried flowers: Strawflower, gomphrena, yarrow, hydrangea florets, or small roses.
- Herbs: Rosemary, thyme, or sage add scent and subtle movement.
- Found elements: Twigs, small feathers, curled bark, or dried leaves with interesting color.
Keep the scale small to medium. Oversized flowers will weigh the garland down and look clunky. The Måurice aesthetic is delicate, almost sketch-like, not bulky or swag-heavy.
Tools and Supplies
- Natural twine, strong cotton string, or thin jute (this will be your main garland line).
- Florist’s wire (22–24 gauge) or clear fishing line for attaching botanicals.
- Scissors or pruning shears.
- Large needle (if you’re threading individual leaves or seedheads).
- Command hooks, small cup hooks, or nails for hanging.
- Step ladder or sturdy stool for installation.
Optional but helpful: a clothing rack, curtain rod, or two chairs and a broom handle to suspend your twine while you work. It’s much easier than building the whole thing on the floor.
Step-by-Step: How to Make an Artful Botanical Garland
Step 1: Forage and Prep Your Foliage
Gather more than you think you’ll need. Once you start building, the garland has a way of “eating” botanicals.
- Cut stems into short pieces, about 4–8 inches long.
- Strip off extra leaves near the bottom so you have a clean stem or base to wire.
- If using fresh greenery you want to dry in place, let it sit in a cool, dry space for a few hours first to reduce excess moisture.
After prepping, group stems loosely by type. You’ll mix these like colors on a painter’s palette.
Step 2: Make Mini Bundles
Instead of wiring every single stem individually (aka the path to madness), make tiny bundles:
- Take 3–5 stems in your handmaybe a sprig of eucalyptus, a seedhead, and a small flower.
- Wrap florist’s wire tightly around the base a few times.
- Leave a 2–3 inch tail of wire; you’ll use this to attach the bundle to the main twine.
Alternate the ingredients in each bundle so your garland never looks too uniform. Some bundles can be mostly greenery, others mostly dried flowers, some mostly grasses.
Step 3: Build the Garland Backbone
Measure the length of the area where you’ll hang your garland and add at least 1–2 feet extra so you can create gentle dips. Cut your twine to size.
- Secure one end of the twine temporarily (clipped to a chair or taped to a wall).
- Starting from one end, attach your first bundle by twisting its wire tail around the twine.
- Angle the bundle so it points in the same direction all along the garland (left to right, for example).
- Overlap the next bundle slightly over the base of the first, covering the wire and twine.
Continue this process along the length of the twine. Don’t make it too dense; the Måurice look is more airy than full. Let some bare twine peek through, and don’t worry about perfect spacing.
Step 4: Add “Floating” Elements
To echo the whimsical, almost mobile-like feel of the café garland, add a few elements that hang a bit lower:
- Use separate short pieces of thread or fishing line to tie individual leaves, seedpods, or flowers at varying heights from the main twine.
- Let these hang like little pendants or charms, especially toward the center of each swoop.
This gives your garland movement and dimension, especially when air or people move through the space.
Step 5: Hang Your Garland Like a Pro
Now for the slightly nerve-wracking but very satisfying part: getting it up on the wall or ceiling.
- Install removable hooks or cup hooks where you want each high point of the garland to be. Typically you’ll have 2–4 hooks depending on the length.
- Hook the twine onto each point, adjusting the dips until the curves look relaxed and intentional.
- Step back frequently and check the overall shape. Tiny adjustments make a big difference.
If any section looks heavy, snip off a bundle or two. If it looks sparse, wire on a few additional botanicals directly in place.
Styling Ideas: From Café Ceiling to Cozy Home
Once you’ve made one botanical garland, you’ll start seeing places to put them everywhere. A few ideas:
- Over a dining table: Create a soft, low swoop above the center of the table for intimate dinners.
- Across a big blank wall: Let the garland frame art, a mirror, or a simple cluster of framed photos.
- Around a doorway: Drape it asymmetrically so one side dips lower than the other.
- Above a bed or sofa: Instant softness, especially in minimalist or all-white spaces.
- Party backdrop: Hang multiple garlands in parallel lines for a layered, photo-ready wall.
To stay true to the Måurice vibe, keep the color palette muted and natural: soft greens, straw tones, dried whites, a few gentle browns or blush tones. Think “Nordic pastry shop,” not “Las Vegas flower explosion.”
Tips for Long-Lasting Botanical Garlands
A garland made from dried or drying botanicals can last weeks or even months if you treat it kindly. A few tips:
- Choose sturdy materials: Seedheads, herbs, and small-petaled blooms tend to dry better than big, fleshy flowers.
- Avoid direct sunlight: Sun will bleach your garland faster. A bit of fading is charming, but full-on crispy beige may not be your goal.
- Keep away from moisture: Bathrooms, over-stove areas, or very humid spaces can encourage mold or droopiness.
- Dust gently: Use a soft brush or a hairdryer on a cool, low setting to blow off dust now and then.
- Retire gracefully: When it starts shedding more than your houseplants, thank it for its service and compost what you can.
Safety, Pets, and Allergies
Before you go wild with foraging, do a quick safety check:
- If you have pets, avoid plants known to be toxic to cats and dogs (like lilies, eucalyptus in large quantities, or certain berries).
- If anyone in the household has strong pollen or fragrance allergies, lean hard into fully dried botanicals and low-scent materials.
- Skip anything you can’t positively identify. “Mysterious berry cluster from unknown shrub” is not a great decor decision.
When in doubt, ask a local nursery or florist to help you choose safe, durable stems.
Real-Life Experiences with a Måurice-Inspired Botanical Garland
On paper, this project looks simple: gather plants, wire them to string, hang overhead. In real life, there are a few charming realities worth sharingconsider this the “things I wish I knew before climbing a ladder with a fistful of eucalyptus” section.
Perfection Is the Enemy of a Good Garland
The first time many people attempt a botanical garland, they try to make each bundle perfectly symmetrical. The result? Something that looks more like a stiff holiday swag than the light, wandering line that made Måurice’s ceiling so memorable.
Let yourself make “mistakes.” A slightly longer stem here, a random seedhead therethat looseness brings the garland to life. One of the best compliments you can get is, “Did you buy that from a florist?” and the second best is, “It looks like it’s just grown there.” Both come from embracing irregularity.
Gravity Will Edit Your Work
Another surprise: a garland looks very different lying flat than hanging up. Bundles that seemed perfectly balanced on the table suddenly swing forward or twist once they’re suspended. That’s normal.
Plan for a “second pass” after hanging. Bring your scissors and extra wire up the ladder. Adjust, twist, snip, and add right on the spot. Think of this as sculpting in mid-air rather than failing at crafting.
Seasonal Swaps Keep It Fresh
One of the joys of a botanical garland is how easily you can update it. Once the basic structure is in place, you can tuck in seasonal accents:
- In fall, add tiny branches with colorful leaves or dried grasses.
- In winter, tuck in a few evergreen sprigs or cinnamon sticks.
- In spring, use small dried blossoms or pressed flowers.
- In summer, go big on herbsrosemary, thyme, or lavender.
Over time, your garland becomes a sort of living (well, technically dried) journal of the seasons in your life and your neighborhood.
Hosting with a Botanical Ceiling
There’s something special about guests walking into a space and looking up. A ceiling garland has a quiet, cinematic effect: it pulls the eye up, softens hard architectural lines, and creates a sense of being “inside” something, like a canopy.
People tend to stand under it, take photos, and ask questions about how you made it. It’s a built-in conversation starter, especially if you can say, “Oh, that little dried grass? I picked it on a walk last weekend,” or “Those seedpods used to be part of a birthday bouquet.” The garland subtly shifts your space from generic to deeply personal.
Learning to See Your Neighborhood Differently
Once you start looking for garland materials, you’ll never see your surroundings the same way again. A tree you’ve walked past a hundred times becomes a source of elegantly curved branches. A neglected corner of the garden becomes a treasure trove of dried stems with beautiful structure.
This is very much in the spirit of the Måurice garland: it feels like someone edited together small, overlooked details of nature and turned them into a quiet, overhead art piece. The more you practice, the more your eye will tune into shapes, silhouettes, and textures rather than just color.
Accepting the “Perfectly Temporary” Nature of It All
Unlike a framed print or a piece of furniture, a botanical garland is intentionally temporary. It will fade, dry further, and eventually shed. That’s part of its charm. You’re bringing a little bit of the outside world in and letting it run its course.
There’s something surprisingly calming about that. Instead of fighting the aging process of your decor, you anticipate it. You rework, refresh, or restart the garland when it feels right. The project becomes a gentle practice: you go for a walk, gather a few things, make something beautiful, live with it for a while, then let it go.
Channeling the Måurice Mood at Home
Even if you’ve never visited Portland, you can still channel the mood of that tiny luncheonette: bright light, simple surfaces, thoughtful details. The garland is a shortcut to that feeling. Hang it over a white dining table, pair it with simple ceramics, candles, and pastries, and you’re halfway to your own mini café moment.
You may not have the same pastries (although, honestly, you couldyou’re clearly a DIY person), but the spirit of the space is easy to borrow: minimal, artful, seasonal, and just a little bit dreamy.
Bringing a Bit of Portland Home
A botanical garland inspired by Måurice and Remodelista isn’t just a craft project. It’s a way to slow down, notice the details in your environment, and turn everyday botanicals into a long, delicate line of art. Whether you hang it across a ceiling, drape it over a doorway, or let it float above your dining table, it adds a quiet, poetic layer to your home.
You don’t need a florist’s shop or a design degree. You just need some string, a handful of stems, and a willingness to experiment. Before long, you’ll be the person your friends call when they say, “Hey, can you help me make one of those beautiful garland things?”and you’ll know exactly where to start.