Table of Contents >> Show >> Hide
- What Is Hobnail Glass, Exactly?
- Why This DIY Works So Well
- Supplies for a DIY Blue Hobnail Glass Vase
- How to Make a DIY Blue Hobnail Glass Vase
- Best Paint Finishes for This Project
- Common Mistakes to Avoid
- How to Style a Blue Hobnail Glass Vase
- Can You Use It With Fresh Flowers?
- How This DIY Fits Today’s Decor Trends
- Experience and Lessons Learned From Making a DIY Blue Hobnail Glass Vase
- Conclusion
- SEO Tags
If you have ever wandered through a thrift store, spotted a bumpy little vase with vintage charm, and thought, “Well, hello there, fancy grandmother energy,” you already understand the appeal of hobnail glass. A DIY blue hobnail glass vase takes that old-school texture and gives it a fresh, cheerful twist. It feels part cottagecore, part vintage shop treasure, part “I made this for five bucks and now I’m emotionally attached.”
This project is simple enough for a weekend craft session but stylish enough to look like something you hunted down at an antique mall after three iced coffees and a lot of determination. Better yet, it is customizable. You can go soft powder blue, moody cobalt, or a milky sky-blue finish that nods to classic milk glass without copying it outright. The result is a textured vase that looks layered, collected, and surprisingly expensive.
In this guide, you’ll learn what hobnail glass is, what supplies work best, how to create the raised dot texture, how to paint the vase for a clean finish, and how to avoid the little mistakes that turn a charming DIY into a lumpy blue regret. We will also cover styling ideas, durability tips, and real-world crafting lessons so your finished vase looks intentional rather than “I panic-glued pearls to a jar at midnight.”
What Is Hobnail Glass, Exactly?
Hobnail glass is known for its raised, evenly spaced bumps that add texture and a classic vintage look. It is especially associated with milk glass and midcentury decorative pieces, which is why hobnail vases feel so nostalgic and collectible. The pattern is tactile, a little playful, and excellent at catching light, which explains why decorators keep circling back to it. Some trends leave the room quietly. Hobnail keeps strolling back in wearing pearls.
A blue version works especially well because it softens the texture and gives the piece a breezy, coastal-meets-vintage feel. White hobnail can read traditional and sweet; blue hobnail feels fresh, airy, and versatile. It can live happily on a mantel, bookshelf, coffee table, bedside table, or dining centerpiece without looking like it got lost on the way to your grandmother’s china cabinet.
Why This DIY Works So Well
The beauty of a DIY blue hobnail glass vase is that it borrows from several proven decorating tricks at once. First, texture makes plain objects more interesting. Second, painted glass can transform a cheap vessel into something that looks curated. Third, blue is one of those decorating colors that somehow behaves like a neutral when styled well. It plays nicely with white flowers, greenery, warm wood, brass, black accents, and even other glassware.
This project also gives you flexibility. You can start with a thrifted vase, a dollar-store glass cylinder, a bud vase, a jar, or even an oddly shaped vessel that needs a second chance. As long as the base glass is clean and smooth, you can build the hobnail effect on top. Translation: the ugly vase in the back of your cabinet may finally get its redemption arc.
Supplies for a DIY Blue Hobnail Glass Vase
Core materials
- Clear glass vase
- Flat-back half pearls, pearl stickers, or small half beads
- Strong craft adhesive or all-purpose glue suitable for glass
- Blue spray paint or glass paint
- Rubbing alcohol or glass-safe cleaner
- Cotton pads or lint-free cloth
- Painter’s tape, if you want a clean rim or color-blocked design
- Cardboard or drop cloth to protect your work area
Optional but helpful
- Disposable gloves
- Tweezers for bead placement
- Primer labeled for slick surfaces, if your chosen paint requires it
- Clear sealer, if recommended by your paint manufacturer
- A small ruler or flexible measuring tape for even spacing
If you want the easiest route, use a clear vase, individually separated half pearls, and a blue gloss or satin spray paint made for craft or multi-surface use. That combo gives you the classic raised texture with a smoother final finish and less drama than trying to hand-paint every dot one by one. We love creativity, but we also love preserving our sanity.
How to Make a DIY Blue Hobnail Glass Vase
Step 1: Clean the vase like you mean it
Before you glue or paint anything, wash the vase with warm soapy water and remove all labels, residue, and mystery stickiness from its past life. Once dry, wipe it down with rubbing alcohol to remove oils and fingerprints. This step matters more than crafters want to admit. Paint hates grime. Glue hates residue. Skipping prep is how projects become character-building exercises.
Step 2: Plan your dot pattern
Lay out the half pearls in rows, rings, or a staggered pattern before gluing. Traditional hobnail looks best when the bumps are evenly spaced, so do not freestyle unless you are deliberately going for “abstract goblin chic.” A simple grid, diagonal lattice, or horizontal banded pattern usually looks polished. On a rounded vase, start in the center and work outward so the pattern stays balanced.
Step 3: Glue the pearls in place
Add small dots of adhesive to the back of each pearl or directly onto the glass, then press the pearls on one at a time. Work in sections. Let the glue set fully before painting. If you rush this stage, the beads may slide, tilt, or cluster together like they are gossiping. Charming in theory, less charming in the final vase.
For a more authentic hobnail look, keep the dots close enough to feel intentional but not so packed that the surface loses definition. The beauty of hobnail is that every bump gets its own moment.
Step 4: Tape off any areas you want to keep clear
If you want a clean glass rim, a translucent band, or a two-tone design, use painter’s tape before painting. A clear top inch can look especially pretty on modern versions of this project because it lets the shape of the original glass show through.
Step 5: Paint in light, even coats
Place the vase on cardboard in a well-ventilated area and apply the paint in multiple light coats rather than one heavy coat. This helps prevent drips, keeps the raised texture visible, and gives you a cleaner finish. Hold the can at a consistent distance and spray with a smooth, sweeping motion. Rotate the vase between coats so the color wraps evenly around the pearls and the glass.
For a classic look, choose a glossy robin’s egg blue or powder blue. For a richer vintage feel, use a deeper cornflower or cobalt-inspired tone. If you want a faux milk-glass vibe, look for a soft opaque blue rather than a transparent stained-glass effect.
Step 6: Let it dry fully and cure properly
Dry-to-the-touch does not mean ready for styling. Let the vase sit long enough for the finish to harden according to the paint label. That means patience, which is rude but necessary. If you add flowers too soon or start tapping the surface to “see if it’s done,” you risk fingerprints, dents, or peeling around the raised dots.
Best Paint Finishes for This Project
The paint you choose changes the personality of the vase.
Gloss blue
This is the closest to classic decorative glass. Gloss highlights the rounded hobnail texture and gives the vase a polished, almost ceramic-like finish.
Satin blue
Satin is a little more understated and modern. It still shows texture well but feels softer and less shiny.
Chalky or matte blue
Matte can look beautiful if you want a more coastal or cottage style, but it may mute the glassy effect. It leans more “vintage pottery look” than “retro glass look.”
Translucent glass paint
This is ideal if you want sunlight to glow through the vase. It creates a different effect than traditional milk glass, but it can be gorgeous on a windowsill or shelf.
Common Mistakes to Avoid
- Using too much glue: Excess glue can ooze around the pearls and create a messy final texture.
- Skipping surface prep: Dirty glass leads to poor adhesion and flaky paint.
- Spraying too heavily: Thick coats can drip and obscure the hobnail pattern.
- Choosing the wrong beads: Oversized pearls can make the vase look cartoonish instead of vintage-inspired.
- Handling it too soon: Cure time matters. Your impatience is not a sealing method.
How to Style a Blue Hobnail Glass Vase
Once finished, this vase becomes one of those magical decor pieces that works almost anywhere.
On a dining table
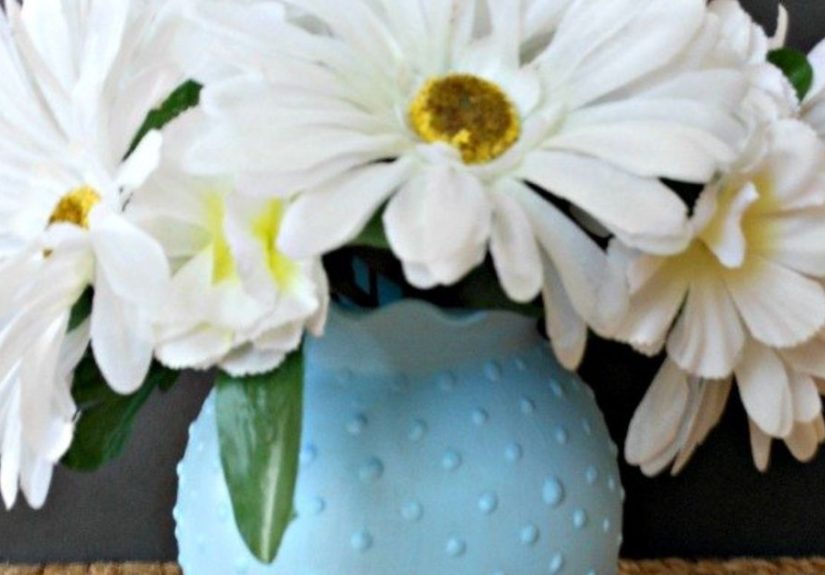
Fill it with white tulips, daisies, or hydrangeas for a crisp spring centerpiece. Blue hobnail glass pairs beautifully with natural wood, white dishes, and woven placemats.
On a mantel
Use one larger vase with eucalyptus stems or cluster two or three smaller bud vases at different heights. The raised texture helps each piece stand out, even when the arrangement is minimal.
On open shelving
Style it with stacked books, framed art, candles, and other vintage-inspired objects. The blue adds color without screaming for attention.
In a bathroom or bedroom
A small version makes a sweet container for faux stems, cotton branches, or even makeup brushes if you keep the interior unpainted and the exterior finish well cured.
Can You Use It With Fresh Flowers?
Yes, as long as the vase remains watertight and the finish is fully cured. In general, keeping the decorative work on the outside of the vase is the simplest approach for a functional flower vessel. If you are ever unsure about your paint’s long-term durability with water exposure, use the vase for dried stems or place a smaller glass insert inside. That gives you the pretty look without risking a finish meltdown halfway through peony season.
How This DIY Fits Today’s Decor Trends
A DIY blue hobnail glass vase checks several style boxes without trying too hard. It taps into vintage decor, thrifted home accents, handmade charm, color drenching, and tactile surfaces. It also fits nicely with cottage, farmhouse, grandmillennial, coastal, eclectic, and even modern traditional interiors. That is a lot of design passports for one humble vase.
It is also a smart project for people who want custom decor without custom-store pricing. Retail versions of textured vases can get surprisingly expensive, especially when they lean into a vintage-inspired shape or color. Making your own lets you control the scale, color, finish, and overall vibe.
Experience and Lessons Learned From Making a DIY Blue Hobnail Glass Vase
The first thing you notice when making a DIY blue hobnail glass vase is that this is one of those deceptively easy crafts. On paper, it sounds laughably simple: glue little bumps to a vase, paint it blue, admire yourself. In reality, it becomes a tiny masterclass in patience, spacing, and resisting the urge to rush a finish just because it already looks cute from six feet away.
One of the biggest lessons is that prep work does not just help the project; it practically determines the project. A vase that looks clean can still be holding on to sticker residue, oil, or dust, and all of that interferes with paint and glue. Once the surface is actually clean, everything else gets easier. The pearls grip better, the paint goes on more evenly, and the final result looks intentional instead of patchy.
Another real-world discovery is that bead size matters more than most people expect. Very large half pearls can make the vase look more playful than polished. Very tiny beads can disappear once paint is applied. Medium-size pearls usually hit the sweet spot, giving enough dimension to create that recognizable hobnail texture while still feeling elegant. It is a bit like seasoning food: too little and nothing happens, too much and suddenly everyone is having a strong opinion.
Color choice also changes everything. A pale powder blue tends to feel airy and vintage. A richer blue can look bolder and more dramatic, especially in glossy finishes. The fun part is seeing how the exact same vase shape can swing from cottagey to moody just by changing the shade. That is part of what makes this project so satisfying. You are not just copying a look; you are directing it.
Then there is the drying process, also known as the humbling chapter. Many DIY projects look “done” before they are truly durable. This one definitely falls into that category. The vase may seem ready long before the finish has properly cured, but handling it too soon can leave fingerprints, scuffs, or flattened spots around the raised details. The project quietly teaches the ancient and difficult craft of leaving things alone.
Perhaps the best experience-related takeaway is how effective this makeover is on inexpensive materials. A plain thrifted vase, dollar-store glass, or leftover jar can end up looking layered, boutique-like, and charmingly vintage. It is the kind of transformation that makes you start side-eyeing every clear glass container in your house and wondering whether it, too, could have a glamorous second act.
In the end, a DIY blue hobnail glass vase is not just a craft project. It is a reminder that texture, color, and a little patience can turn ordinary objects into decor with personality. And honestly, that may be the greatest hobby of all: taking something forgettable and making it fabulous.
Conclusion
A DIY blue hobnail glass vase is one of those rare projects that is affordable, beginner-friendly, and stylish enough to keep around for years. It captures the vintage charm of classic hobnail glass while letting you choose a color that feels fresher and more personal. With a clean glass base, evenly placed pearls, the right paint, and enough drying time, you can create a textured vase that looks thoughtful rather than homemade in the “bless this mess” sense.
Whether you use it for fresh flowers, faux stems, or shelf styling, this project proves that good decor does not have to start expensive. Sometimes it starts with a plain vase, a handful of tiny bumps, and the radical belief that spray paint can solve more problems than it probably should.