Table of Contents >> Show >> Hide
- Why a Paneled Wall Treatment Looks So Good
- Choose the Right Style Before You Cut Anything
- Best Rooms for a DIY Elegant Paneled Wall Treatment
- Tools and Materials You’ll Likely Need
- How to Plan the Layout Like a Pro
- Step-by-Step: How to Install an Elegant Paneled Wall Treatment
- How to Make It Look More Expensive
- Common Mistakes to Avoid
- Color Ideas for an Elegant Paneled Wall
- Is a DIY Paneled Wall Treatment Worth It?
- Real-Life Experience: What a DIY Elegant Paneled Wall Treatment Actually Feels Like
- Conclusion
Plain drywall does its job, sure. It stands there. It is wall-shaped. It holds up your framed art and silently asks for nothing. But if you want a room to feel polished, custom, and just a little smug about it, an elegant paneled wall treatment can work wonders. It adds structure, rhythm, and architectural charm without requiring you to buy a historic townhouse or develop a sudden passion for crown molding terminology.
The beauty of a DIY paneled wall treatment is that it can look expensive without behaving expensive. With the right layout, the right trim profile, and a little patience during prep, you can create a wall that feels tailored instead of trendy. Whether you love classic picture-frame molding, a refined board-and-batten look, or a full-height grid that gives library vibes on a regular-person budget, this project can dramatically elevate a bedroom, dining room, hallway, entryway, or home office.
In this guide, we’ll walk through how to plan, install, and finish a DIY elegant paneled wall treatment so it looks intentional, balanced, and beautifully integrated into your home. We’ll also cover style choices, material options, paint ideas, common mistakes, and the very real experience of going from “I can totally do this in a weekend” to “Why am I emotionally invested in trim spacing?”
Why a Paneled Wall Treatment Looks So Good
Paneled walls do something paint alone can’t: they create depth. Even a subtle trim design breaks up a flat surface and gives the eye something to follow. That visual structure can make a room feel taller, more formal, more layered, or simply more finished. In design terms, wall paneling adds architectural interest. In normal-human terms, it makes the room look like somebody had a plan.
Elegant paneling is especially effective because it can flex across styles. In a traditional room, it reads timeless and tailored. In a modern room, especially when everything is painted one color, it feels clean and sculptural. In a small room, it can add texture without the visual noise of a wallpaper print. In a larger room, it can help empty walls feel intentional instead of awkwardly blank.
Another reason this project is so popular is versatility. You can install paneling on the lower third of a wall for a classic wainscoting effect, go higher for a dramatic statement, or take it floor to ceiling for a more custom millwork look. You can paint the molding and wall the same color for subtle sophistication or use contrasting finishes for extra dimension.
Choose the Right Style Before You Cut Anything
Picture-Frame Molding
This is the go-to style for an elegant paneled wall treatment. Narrow molding is applied directly to drywall to create rectangular or square “frames.” The look is polished, formal, and surprisingly beginner-friendly if your wall is smooth and your measurements are consistent. It works beautifully in bedrooms behind a headboard, in dining rooms, and along hallways that need a little dignity.
Board and Batten
Board and batten usually has a slightly more relaxed, structured feel. Traditionally, it features wider vertical elements and horizontal rails, often installed on the lower portion of the wall. Depending on your trim choices and paint color, it can lean farmhouse, transitional, or quietly upscale. Use slimmer battens and restrained spacing if you want it to feel elegant rather than rustic.
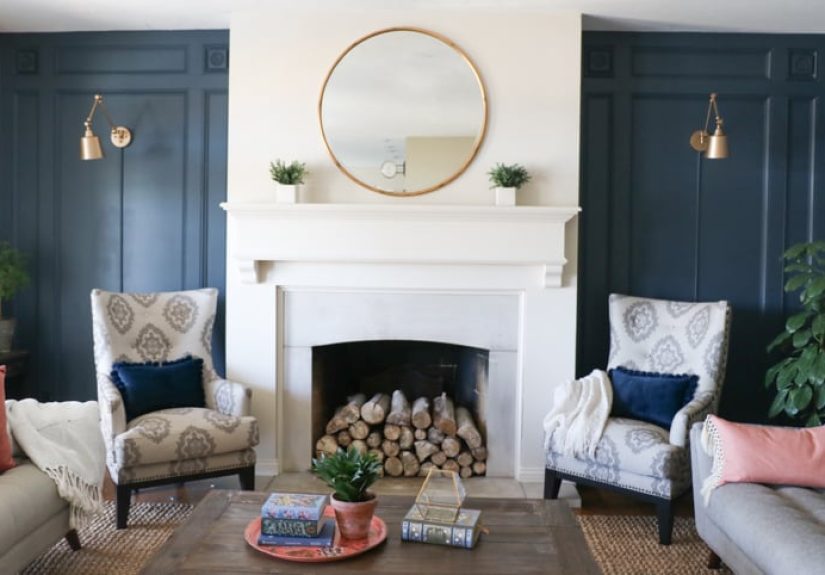
Full-Height Grid or Library Style
This version runs higher up the wall and often uses repeated boxes or panels to create a more immersive, room-defining effect. It looks especially good in studies, offices, reading corners, and living rooms where you want a custom-built mood. Deep paint colors can make this style feel rich and dramatic, while pale neutrals keep it soft and airy.
Best Rooms for a DIY Elegant Paneled Wall Treatment
Not every wall needs a makeover. Sometimes the best results come from choosing one strategic surface and letting it do the heavy lifting.
- Bedroom: A paneled wall behind the bed creates a high-end headboard effect without buying a giant upholstered monster.
- Dining room: Paneling adds formality and pairs beautifully with sconces, mirrors, and art.
- Entryway: It instantly makes the house feel more welcoming and intentional.
- Hallway: Long, plain walls benefit from repeated shapes and trim rhythm.
- Home office: Paneling adds professionalism, which is helpful when your desk is three feet from your laundry basket.
- Mudroom or bathroom: Lower-wall treatments can add charm and function, especially with durable paint.
Tools and Materials You’ll Likely Need
Your exact shopping list depends on the style you choose, but most DIY paneled wall treatment projects use the same basic cast of characters:
- MDF or primed molding/trim boards
- Tape measure
- Laser level or long spirit level
- Miter saw
- Brad nailer and finish nails
- Construction adhesive
- Stud finder
- Caulk and caulk gun
- Wood filler or spackle
- Sandpaper
- Primer
- Interior paint
- Painter’s tape and drop cloths
If your walls are heavily textured, add wall prep supplies to the list. Elegant paneling looks best on a relatively smooth surface. Texture and decorative trim are not sworn enemies, but they do argue constantly.
How to Plan the Layout Like a Pro
The secret to a high-end result is not expensive trim. It is layout. A mediocre molding profile with excellent spacing will usually look better than a fancy profile slapped onto a wall with odd gaps and mismatched boxes.
Start by measuring the full width and height of the wall. Then subtract the dimensions of any existing baseboard, crown molding, chair rail, window trim, or door casing that will affect your design. Sketch the wall and decide where the panels should begin and end. If you’re doing picture-frame molding, think in terms of equal visual margins rather than random rectangles.
A good rule is to keep panel widths and heights visually balanced. You do not need mathematical perfection, but you do need consistency. Repeated boxes should feel intentional, and the outer margins should not look like leftover scraps of space. Sometimes it’s worth making the center panels slightly wider so the overall pattern looks balanced from a distance.
Before cutting trim, mock up the design with painter’s tape. This step saves frustration, helps you catch awkward spacing near outlets or windows, and gives you a chance to stand back and ask the important question: “Does this look elegant, or does it look like I got overly excited in the trim aisle?”
Step-by-Step: How to Install an Elegant Paneled Wall Treatment
1. Prep the Wall
Remove outlet covers, patch dents, clean the wall, and lightly sand rough areas. If you’re replacing or removing existing baseboards, do that first. A clean, smooth, stable surface gives your trim a better bond and a cleaner final look.
2. Mark Studs and Reference Lines
Use a stud finder and mark stud locations above the future panel area so you can still see them after installation starts. Then use a laser level or long level to mark your horizontal guide lines. This matters because walls, floors, and ceilings are often not perfectly straight. Your layout must follow level and plumb lines, not your house’s little opinions.
3. Install the Main Horizontal Elements
If your design includes a top rail, chair rail, or horizontal molding line, install those first. These pieces establish the structure of the design. Check each section for level before fastening. Use adhesive and brad nails, and try to hit studs where possible for added stability.
4. Cut and Dry-Fit the Vertical and Frame Pieces
Measure carefully, cut slowly, and dry-fit every piece before you nail it up. Mitered corners should meet cleanly. Slight wall irregularities are normal, so small adjustments are part of the process, not a sign that the universe hates your project.
5. Attach the Trim
Apply a thin bead of construction adhesive to the back of each piece, then nail it into place. Work methodically. Finish one section completely before bouncing around the wall. That keeps the pattern aligned and helps you spot any measurement drift before it becomes a decorative crisis.
6. Fill, Caulk, and Sand
This is the step that separates “DIY” from “custom-looking DIY.” Fill nail holes with wood filler or spackle. Caulk every seam where trim meets wall. Once dry, sand everything smooth. When painted, those tiny seams disappear, and the whole wall starts reading as one integrated architectural feature rather than a collection of boards with ambition.
7. Prime and Paint
Prime raw or cut edges thoroughly, especially if you’re using MDF. Those edges love to drink paint and then act offended when the finish looks rough. After priming, paint the wall and trim. Many elegant paneled wall treatments look best when everything is the same color, because the shadow lines from the molding create the dimension. Soft white, warm greige, taupe, dusty blue, olive, charcoal, and deep green are all strong choices depending on your room and lighting.
How to Make It Look More Expensive
If your goal is elegance, not just decoration, a few design choices matter a lot.
- Keep the spacing consistent. Uneven boxes instantly read as amateur.
- Use a restrained trim profile. Simple molding often looks more timeless than overly ornate trim.
- Paint wall and trim the same color. This creates a cohesive, designer-style effect.
- Choose the right sheen. Eggshell or satin can work well for walls, while trim and lower wainscoting often benefit from a more durable sheen.
- Center the design around furniture or focal points. In a bedroom, align paneling with the bed. In a dining room, think about the table and light fixture.
- Let breathing room exist. Not every inch of wall needs trim. Negative space is part of the elegance.
Common Mistakes to Avoid
Skipping the mockup: Tape layouts may feel fussy, but they’re much cheaper than regretting permanent molding.
Ignoring wall texture: Fancy trim on a bumpy wall can look messy unless the texture is handled first.
Forgetting outlets and switches: Plan around them early so they do not slice awkwardly through your panel pattern.
Rushing the finish work: Caulk, filler, and sanding are where the magic happens. This is not the part to “just eyeball.”
Using too many styles at once: A paneled wall treatment should support the room, not audition as six different Pinterest boards.
Color Ideas for an Elegant Paneled Wall
If you want a soft, classic look, try creamy white, warm beige, mushroom, pale gray-green, or light taupe. For a moodier approach, deep navy, charcoal, forest green, or smoky blue can make trim details feel rich and cocooning. In a modern room, color drenching the wall, trim, and even adjacent built-ins in one shade can look incredibly sophisticated.
You can also use finish contrast instead of color contrast. For example, painting the wall in an eggshell finish and the molding in a slightly shinier satin or semi-gloss can subtly define the panels without changing the hue. It is the interior-design version of whispering instead of shouting, and it usually ages better.
Is a DIY Paneled Wall Treatment Worth It?
Absolutely, if you want maximum visual impact for a relatively manageable investment. Compared with many room upgrades, this project offers an unusually strong return in perceived value. It changes how a room feels, not just how it looks in photos. And unlike trendy decor that may age out quickly, classic wall paneling has staying power when the proportions are right and the finish is clean.
It also scales well. You can start with one wall in a bedroom, then carry the idea into a hallway, dining room, or office later. Once you understand layout, trimming, and finishing, the next project gets much easier. Also, you will begin looking at every blank wall in your house like it has untapped potential, which is either inspiring or dangerous depending on your budget.
Real-Life Experience: What a DIY Elegant Paneled Wall Treatment Actually Feels Like
The real experience of building a DIY elegant paneled wall treatment is a mix of confidence, doubt, math, sawdust, and one oddly satisfying moment when the caulk finally makes everything look expensive. At the beginning, the wall seems simple. It is just a wall. Then you start measuring, and suddenly you are negotiating with outlets, baseboards, door casings, and the shocking discovery that your “straight” ceiling has been freelancing for years.
The first emotional phase is excitement. You sketch a design, pick a paint color, and imagine your boring room turning into a magazine-worthy space by Sunday afternoon. Then comes the planning phase, where you realize the difference between “pretty rectangles” and “balanced panel proportions” is not accidental. You begin measuring the same span three times, then again just to be sure, then once more because you no longer trust yourself or tape measures in general.
Once the first trim piece goes up level and snug, the project becomes thrilling. You can finally see the design. That one piece has the power to make the whole wall feel possible. But somewhere around the sixth cut, you learn that walls are rarely perfect, corners are sneaky, and trim has a special talent for revealing tiny mistakes. This is the part where patience becomes more important than skill. The elegant look does not come from speed. It comes from slowing down enough to correct little things before they become big visible things.
Then there is the surprisingly dramatic stage known as finishing. Filling nail holes feels minor. Caulking sounds boring. Sanding is nobody’s dream hobby. But this is where the transformation happens. Before finishing, the wall looks like a project. After finishing, it starts to look like architecture. Seams disappear. Joints soften. The whole design becomes cohesive. Paint then seals the deal. Once everything is one color, your eye stops seeing separate boards and starts seeing intentional paneling.
What many DIYers remember most is not the cutting or nailing. It is the moment they step back after the final coat dries. The room feels quieter, more polished, and more complete. Furniture suddenly looks better against the wall. Lamps feel warmer. Art hangs more confidently. Even a modest room can feel elevated because the wall treatment introduces depth and order.
Another common experience is realizing that elegance often comes from restraint. The best paneled walls are not always the busiest or most ornate. Sometimes the prettiest result comes from simple molding, generous spacing, and a beautiful paint color used consistently. That lesson tends to stick. After one successful paneled wall, many people become less interested in flashy upgrades and more interested in proportion, finish, and thoughtful detail.
And yes, there is also cleanup, touch-up paint, and the moment you find dried caulk on your elbow for no clear reason. That is part of the romance. In the end, a DIY elegant paneled wall treatment is not just about making a room prettier. It is about learning how much difference careful planning and finish work can make. It teaches you to notice lines, balance, texture, and light. It also teaches you that a nail gun is fun, but a laser level is the real adult luxury.
Conclusion
A DIY elegant paneled wall treatment is one of the smartest ways to add architectural character without taking on a full renovation. With good planning, balanced spacing, careful installation, and a polished paint finish, you can transform a flat wall into a focal point that feels timeless and tailored. The trick is not overcomplicating it. Choose a style that suits your room, keep the proportions clean, and give the finishing work the time it deserves. Do that, and your wall will stop being background scenery and start acting like the main character it was always meant to be.