Table of Contents >> Show >> Hide
- Why this project works (aka: bottled magic with science vibes)
- Materials and tools
- Pick your style: 3 easy versions
- Step-by-step tutorial: DIY Glitter Fairy Mason Jar Light
- Step 1: Clean the jar like you mean it
- Step 2: Decide where the glitter finish goes
- Step 3: Make your glitter “fairy dust paint”
- Step 4: Paint the inside of the jar (the “swirl method”)
- Step 5 (optional): Add “fairy snow” frosting on the outside
- Step 6 (optional): Add a fairy silhouette or mini scene
- Step 7: Dry time (the hardest part)
- Step 8: Add the lights
- Step 9: Finish the jar like a tiny masterpiece
- Customization ideas (so your jar doesn’t look like everyone else’s jar)
- Troubleshooting (because glitter has opinions)
- Where to use your glitter fairy mason jar light
- Wrap-up: the easiest way to make a room feel magical
- Bonus: of real-world “maker experiences” (what you’ll notice after you build one)
Some DIY projects are practical. Some are pretty. And then there are the ones that make you stare at a jar on your shelf like it’s a tiny, glittery portal to a woodland rave.
This DIY glitter fairy mason jar light falls proudly into that last category.
The idea is simple: take a mason jar, add a dreamy glitter finish, tuck in safe, battery-powered LEDs, and suddenly you’ve got a glowing night light that looks like it should come with a tiny lease agreement for resident fairies.
Better yet, you can customize it for a bedroom nightstand, a party centerpiece, a dorm shelf, or a “my vibe is cozy chaos” corner of your living room.
Why this project works (aka: bottled magic with science vibes)
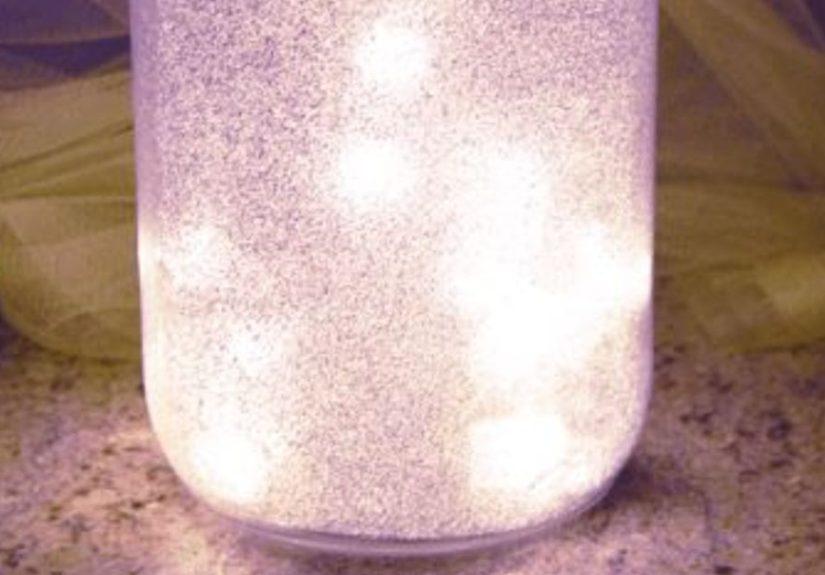
A mason jar is basically a light diffuser wearing overalls. When you add glitter and a translucent coating, the jar scatters light in a way that looks soft, sparkly, and a little mysterious.
LEDs bounce around the glass and shimmer off the glitter so the glow feels fuller than the tiny lights inside.
The real secret is layers: a lightly textured or tinted interior finish + a warm LED glow + optional silhouettes (like a fairy, moon, or stars).
Layered light looks expensive. Your receipt will say otherwise.
Materials and tools
You don’t need a craft room the size of a small airport. You need a jar, some sparkle, and a willingness to get glitter in places glitter has no business being.
Core supplies
- Mason jar (any size; wide-mouth is easiest to work with)
- Battery-powered micro LED fairy lights (copper wire “string” style) or a battery LED tealight
- Mod Podge (gloss, satin, or “sparkle” if you want extra shimmer)
- Fine glitter (iridescent or holographic looks the most “fairy dust”)
- Foam brush or soft paintbrush
- Rubbing alcohol and a paper towel (for cleaning the jar)
Optional “make it extra” upgrades
- Food coloring (one or two drops for a tinted glow)
- Epsom salt (for a frosted, snowy texture on the outside)
- Vinyl sticker or printed silhouette (fairy, stars, crescent moon, forest scene)
- Moss, faux flowers, tiny pinecones, beads, or pearl confetti (for the base)
- Twine or ribbon (because jars love accessories)
- Hot glue gun (helpful, but not mandatory)
Safety notes (short, sweet, important)
- Use LED lights (battery fairy lights or LED tealights). Avoid open flames inside jars.
- If using hot glue, get a “grown-up helper” vibe going and protect your fingers.
- Glass jars can breakplace your finished jar where it won’t get knocked over.
Pick your style: 3 easy versions
All three styles look magical. Choose based on your patience level and how dramatic you want your jar’s “fairy origin story” to be.
Style A: Classic Glitter-Coat Fairy Jar (most popular)
A translucent glitter layer inside the jar + fairy lights inside. It glows like a firefly party.
Style B: Frosted “Fairy Snow” Jar (extra cozy)
Frosted texture outside the jar + lights inside. Think “winter fairy cabin” energy, even in July.
Style C: Silhouette Story Jar (most “wow” for photos)
Add a fairy or forest silhouette inside the jar so the light creates a scene. This one gets compliments like it pays rent.
Step-by-step tutorial: DIY Glitter Fairy Mason Jar Light
Step 1: Clean the jar like you mean it
Wash and dry the jar, then wipe the inside (and outside) with rubbing alcohol.
Any oil or residue can cause streaks, and streaks are the enemy of “ethereal glow.”
Step 2: Decide where the glitter finish goes
Here’s the quick rule:
- Inside coating = smoother outside, easier to wipe clean, sparkle looks “embedded.”
- Outside coating = more texture, more “frosted lantern” vibes, but it can feel rough to the touch.
If you’re gifting it or using it in a bedroom, an inside glitter coat is usually the easiest and neatest.
Step 3: Make your glitter “fairy dust paint”
In a small bowl, mix:
- 2–3 tablespoons Mod Podge
- 1–2 teaspoons fine glitter (start small; you can always add more)
- Optional: 1–2 drops food coloring for a tinted glow
Stir slowly. Fast stirring = bubbles. Bubbles = weird cloudy spots. Your fairies didn’t ask for that.
Step 4: Paint the inside of the jar (the “swirl method”)
- Use a foam brush to paint a thin layer of your glitter mixture inside the jar.
- Turn the jar as you go, like you’re rotating a tiny disco globe.
- If you see thick drips, brush them outthick coats dry cloudy.
Want more sparkle? Do two thin coats instead of one thick one. Let the first coat dry before adding the second.
Step 5 (optional): Add “fairy snow” frosting on the outside
If you want the frosted look, do this once the inside coat is fully dry:
- Brush Mod Podge on the outside of the jar in a medium-thin layer.
- Roll the jar in Epsom salt on a plate, or sprinkle salt over it while turning.
- Patch any bare spots with a little more Mod Podge + salt.
- Let it dry completely.
This creates a “sparkly snow” texture that looks unreal when lit from within.
Step 6 (optional): Add a fairy silhouette or mini scene
If you’re doing the story-jar look, place a silhouette before inserting the lights:
- Vinyl sticker method: Stick it on the outside for a crisp outline.
- Inside scene method: Attach a small cutout to the inside using a thin layer of Mod Podge.
Pro tip: put the silhouette on the side that will face outward most often. Yes, jars deserve a “good side.”
Step 7: Dry time (the hardest part)
Let the jar dry until it’s not tacky. Depending on humidity and how thick your coat is, this can take a few hours.
If you can, let it cure overnight for the cleanest finish.
Step 8: Add the lights
You’ve got two easy lighting options:
Option 1: Micro LED fairy lights (best glow)
- Coil the wire lights loosely so they fill the jar from bottom to top.
- Hide the battery pack behind décor (moss, beads) or tape it under the lid if it fits.
- Turn the lights on and adjust the coil until the glow looks even.
Option 2: LED tealight in the lid (fastest build)
- Set the LED tealight on the inside of the lid (or attach it with a little removable tape).
- Screw the lid on and flip the jar upright.
This creates a soft, centered glowperfect for bedside use.
Step 9: Finish the jar like a tiny masterpiece
- Wrap twine or ribbon around the neck.
- Add a tag: “Fairy LanternDo Not Disturb Residents.”
- Cluster multiple jars together for a “glow garden” effect.
Customization ideas (so your jar doesn’t look like everyone else’s jar)
Color themes that always look good
- Moonlight: clear + silver glitter + cool white LEDs
- Warm fairy cottage: champagne glitter + warm white LEDs
- Mermaid glass: teal tint + iridescent glitter + pearl confetti
- Galaxy jar: navy tint + holographic glitter + tiny star sequins
Seasonal spins
- Spring: faux blossoms + pastel tint
- Summer: “firefly jar” vibe with warm LEDs and minimal frosting
- Fall: amber tint + copper wire lights + tiny leaf charm on twine
- Winter: Epsom salt frosting + white glitter + pine sprig accents
Troubleshooting (because glitter has opinions)
My jar looks streaky
That usually means oil residue or a coat that was too thick. Clean well with rubbing alcohol and do thinner layers next time.
Two thin coats beat one gloopy coat every single day of the week.
My glitter clumped
Fine glitter mixes more smoothly than chunky glitter. If you love chunky sparkle, use it lightly and let fine glitter do the “base coat” work.
My jar looks cloudy
Cloudiness often comes from trapped bubbles or heavy Mod Podge application. Stir slowly, apply thinly, and give it enough dry time.
My lights look dim
Try fresh batteries, choose a warmer LED tone, or reduce how heavy your glitter coat is. The more opaque the coating, the more it blocks light.
Where to use your glitter fairy mason jar light
- Night light: soft glow for a bedside table
- Desk décor: cozy lighting for studying or journaling
- Party centerpiece: cluster 3–5 jars at different heights
- Gift idea: pair it with a note that says “Handle with wonder.”
- Outdoor vibe (covered area): use battery LEDs and keep the jar dry
Wrap-up: the easiest way to make a room feel magical
A DIY glitter fairy mason jar light is proof that “home décor” can be equal parts craft, mood, and tiny bit of mischief.
You don’t need special skillsjust a jar, a few supplies, and the courage to accept that glitter will be part of your life now.
Make one. Then make another. Then suddenly you have a whole shelf of glowing jars and you’re casually explaining to guests,
“Oh these? Just my fairy lantern collection.” Like that’s a normal sentence. (It is now.)
Bonus: of real-world “maker experiences” (what you’ll notice after you build one)
Here’s the funny thing about a glitter fairy jar: the instructions are straightforward, but the experience of making one is where the magic really happens.
The first time you switch on the lights, there’s usually a pauselike your brain needs a second to accept that you just made a tiny glowing lantern with craft glue and determination.
It’s a “wait… I did that?” moment, and it hits even harder if you built it from leftover supplies.
Most DIYers notice that glitter behaves differently depending on the room lighting. In bright daylight, the jar looks like a cute craft object with sparkle.
But at night (or in a dim corner), the jar suddenly looks like it’s holding a little weather system of shimmering light.
Warm white LEDs tend to make the glitter look softer and more “storybook,” while cooler LEDs make it look crisp and icyalmost like starlight.
People often end up preferring warm white for bedrooms and cool white for holiday décor or winter themes.
Another common experience: you’ll realize that less glitter can look more expensive.
A heavy coat can block light and turn the glow into a dull blur. A lighter coatespecially with fine iridescent glitterlets the LEDs do their job and gives you that “floating sparkle” effect.
Many crafters end up doing a second jar right away because the first one teaches you what your eyes actually like: soft shimmer, bright twinkle, or full-on blizzard.
If you add a silhouette (fairy, moon, stars), the jar becomes a mini storytelling prop.
People often place it where the silhouette faces outward, then rotate it later like it’s a tiny stage set.
It’s surprisingly satisfying to turn the jar and watch the scene changealmost like flipping pages in a picture book, except the pages glow.
If you’re making this with kids, this is usually the part where they start naming the fairy, assigning it a job, and insisting it needs a snack.
Practical note: you’ll probably discover that the battery pack is the real boss of the design.
If it’s too bulky, you’ll want to hide it under moss, beads, or a little “nest” of décor at the bottom.
If the pack fits in the lid area, the jar looks cleaner and more like a boutique lantern.
The good news is that most people don’t notice the battery pack once the jar is glowingyour eyes go straight to the sparkle and the warm light.
Finally, there’s the “unexpected benefit” experience: these jars often become a calming, cozy ritual.
People turn them on during homework, reading, journaling, or winding down.
It’s not just decorationit’s atmosphere on demand.
And yes, you may catch yourself leaving it on “just because it looks nice,” which is basically the highest compliment a DIY project can get.