Table of Contents >> Show >> Hide
- Why DIY Home Decor Works (Even If You’re “Not Crafty”)
- Before You Start: The 10-Minute “Don’t Regret This Later” Checklist
- DIY Home Decor Projects That Actually Change a Room
- 1) Build a Gallery Wall That Looks Curated (Not Chaotic)
- 2) Add Picture Ledges for Flexible, “Swap-Whenever” Styling
- 3) Floating Shelves That Don’t Look Like an Afterthought
- 4) Renter-Friendly Removable Wallpaper Accent Wall
- 5) Peel-and-Stick Tile: Easy Backsplash Energy (With Smart Placement)
- 6) Paint Projects: The Upgrade With the Highest Return on Effort
- 7) Thrifted Frame Makeover: Cheap Frames, Expensive Vibes
- 8) Upcycle “Small Stuff” for Big Texture: Jars, Vases, Candle Containers
- 9) Fabric Hacks: No-Sew Pillows and the Famous Sink Skirt
- 10) Botanical Wall Decor: Dried Flower Panels (Not Your Grandma’s Potpourri)
- Tools and Supplies That Pay for Themselves
- Common DIY Home Decor Mistakes (And How to Avoid Them)
- Safety Notes (Because Cute Decor Shouldn’t Be Dangerous)
- Wrap-Up: Your Home, But Better
- of Real-World DIY Home Decor “Experience” (The Kind You Actually Learn From)
If your home is feeling a little “meh,” you don’t need a full renovation or a celebrity designer named something like Chad Worthington IV. You need two things: (1) a plan and (2) the confidence to make a small mess on purpose. DIY home decor is the sweet spot where personality meets practicalitywhere a blank wall becomes a gallery, a thrifted frame becomes “vintage chic,” and a $20 weekend project makes your space look like you definitely have your life together. (Even if your “before” photo was taken five minutes after you stepped over laundry.)
The best part? The most impactful DIY decor projects aren’t the complicated ones. They’re the projects that make your home feel intentional: better scale, better lighting, better texture, better function. Below is an in-depth, real-world guide to DIY home decor with beginner-friendly projects, practical tips, and a few “learn from my mistakes” momentsso you can upgrade your space without upgrading your stress level.
Why DIY Home Decor Works (Even If You’re “Not Crafty”)
DIY home decor isn’t about being perfect. It’s about creating a home that fits how you actually live. The biggest wins usually come from one of these:
- High impact, low commitment: peel-and-stick wallpaper, picture ledges, fabric hacks, removable hooks.
- Budget-smart upgrades: thrift flips, frame makeovers, upcycling jars, scrap wood art.
- Function disguised as style: shelves that store, hooks that organize, a sink skirt that hides “ugly-but-necessary.”
- Personalization: art, photos, collections, travel findsyour home shouldn’t look like a furniture catalog’s waiting room.
Before You Start: The 10-Minute “Don’t Regret This Later” Checklist
Most DIY disasters aren’t caused by a lack of talent. They’re caused by skipping the boring steps: measuring, cleaning, prepping, and thinking one move ahead. Here’s the quick checklist that prevents the classic “Why is it crooked?” spiral.
- Pick a goal: Cozy? Brighter? More storage? More personality? Choose one primary outcome.
- Measure first, vibe second: Your eyes love symmetry. Your tape measure loves reality.
- Test in the real lighting: Paint and wallpaper look different at 9 a.m. vs. 9 p.m. under warm bulbs.
- Decide your “anchor”: One focal point per area (a gallery wall, an accent wall, a statement shelf) keeps things from feeling cluttered.
- Plan for removal if needed: Renters and commitment-phobes deserve pretty walls too.
DIY Home Decor Projects That Actually Change a Room
These ideas are popular for a reason: they deliver visible results without requiring a workshop full of tools or a three-day emotional journey. Each project includes practical tips so you can get a “wow” finishnot a “well, it’s…done” finish.
1) Build a Gallery Wall That Looks Curated (Not Chaotic)
A gallery wall is the fastest way to add personalityif it’s planned. The trick is to decide whether you want a grid (clean, modern) or a salon-style mix (eclectic, layered). Either can work; the “wrong” look usually happens when spacing and scale are accidental.
- Start with a focal piece: one larger frame or bold art print anchors the arrangement.
- Mock it up first: use painter’s tape, paper templates, or lay frames on the floor to test the layout.
- Hang at eye level: a reliable guideline is placing the center of the grouping around eye height, then adjusting for furniture below.
- Keep spacing consistent: roughly 2 inches between frames looks intentional and tidy.
- Mix textures, not chaos: photos + prints + one small object (like a mini weaving) can add depth without clutter.
Pro move: If you’re filling space affordably, frame decorative paper, postcards, or your own photos, then unify it with a consistent color palette (black-and-white photos, warm neutrals, or one accent color repeated).
2) Add Picture Ledges for Flexible, “Swap-Whenever” Styling
Picture ledges (a.k.a. shallow wall shelves) are a cheat code for people who like to redecorate seasonallyor just can’t commit to where art should live forever. You can layer frames, lean art, add a small plant, and rotate items without making new wall holes every time your mood changes.
- Use studs (when possible): shelves hold weight; drywall alone has limits.
- Layer for depth: bigger frames in back, smaller in front, one sculptural object to break up rectangles.
- Repeat materials: if the shelf is wood, repeat wood tones elsewhere (frames, bowls, candle holders).
3) Floating Shelves That Don’t Look Like an Afterthought
Floating shelves can look high-end or “landlord special,” depending on styling and placement. The secret is to avoid the overstuffed look and to choose a layout that fits the wall’s proportions. A single long shelf can calm a busy wall; a cluster of smaller shelves adds energy.
- Plan the height: keep shelves usable (not so high you need a ladder for your own bookshelf).
- Style with negative space: leave breathing room; every inch doesn’t need a trinket.
- Balance objects: stack books horizontally, add a plant, then one personal item (photo, souvenir).
4) Renter-Friendly Removable Wallpaper Accent Wall
Peel-and-stick wallpaper is a big visual payoff for a relatively small effortwhen you prep properly. The “removable” part varies by brand and wall condition, so treat it like a friendly but unpredictable houseguest: welcome, but plan ahead.
- Clean the wall first: dust and oils reduce adhesion (and invite bubbles).
- Measure and mark a straight старт line: if the first panel is crooked, the rest will follow like loyal ducks.
- Work slowly: smooth with a squeegee or credit card wrapped in a soft cloth.
- Test a small patch: especially on freshly painted or delicate walls.
Design tip: If a full wall feels loud, try wallpapering the back of a bookcase, a closet nook, or a single panel area framed by trim (instant “custom built-in” energy).
5) Peel-and-Stick Tile: Easy Backsplash Energy (With Smart Placement)
Peel-and-stick tile can transform kitchens, laundry corners, and bar areasfast. But it’s not magic armor. Heat and high moisture can shorten its lifespan, especially near stoves or steamy zones if the product isn’t designed for it.
- Choose the right material: look for products rated for the location (kitchen, bathroom, or floor).
- Prep matters: clean, dry, smooth surfaces help adhesion and reduce edge lift.
- Cut carefully: measure twice, cut once…then measure again because DIY does what it wants.
6) Paint Projects: The Upgrade With the Highest Return on Effort
Paint is the ultimate “new room” button. You can do a full room, a feature wall, trim refresh, or even a painted border around art for a custom look. The key to a pro finish is patience: prep, tape, and don’t rush drying times.
- Paint in a smart order: ceiling first, then walls, then trim helps reduce drips and rework.
- Use sample swatches: your lighting changes everything.
- Try color-blocking: a half wall, arch, or geometric shape can add structure to a plain room.
7) Thrifted Frame Makeover: Cheap Frames, Expensive Vibes
Frames are the easiest way to make budget art look intentional. A quick spray paint refresh can unify mismatched thrift frames, and suddenly your wall looks “collected,” not “random.”
- Spray paint for speed: thin coats prevent drips and preserve details.
- Unify with one finish: matte black, warm white, or metallic gold can pull a whole wall together.
- Upgrade with mats: a simple mat makes prints look more premium.
8) Upcycle “Small Stuff” for Big Texture: Jars, Vases, Candle Containers
If your shelves feel flat, you probably need texture. Upcycled glass jars can become vases, utensil holders, bathroom organizers, or mini terrariums. The visual win is in repetition: a few matching containers make a space feel tidy and styled.
- Label-less looks cleaner: soak and remove labels for an instant upgrade.
- Group in threes: varying heights looks styled (and not like you forgot to put things away).
- Add natural elements: dried stems, eucalyptus, or branches bring life without clutter.
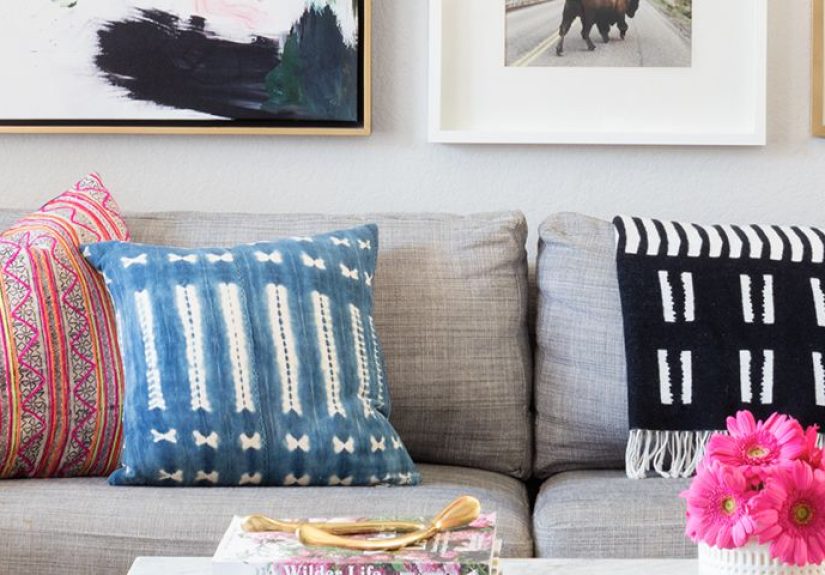
9) Fabric Hacks: No-Sew Pillows and the Famous Sink Skirt
Fabric adds warmth faster than almost anything. If your room feels “hard” (lots of flat surfaces), pillows, curtains, and soft panels create instant comfort. No sewing required if you use fabric tape, iron-on hem, or clever folding.
- No-sew pillow cover: wrap fabric like a present, tuck tightly, and secure with hidden fabric tape.
- Sink skirt: use hook-and-loop tape to attach a curtain panel under a sink to hide supplies (and other life realities).
- Bonus: a removable skirt is renter-friendly and easy to swap seasonally.
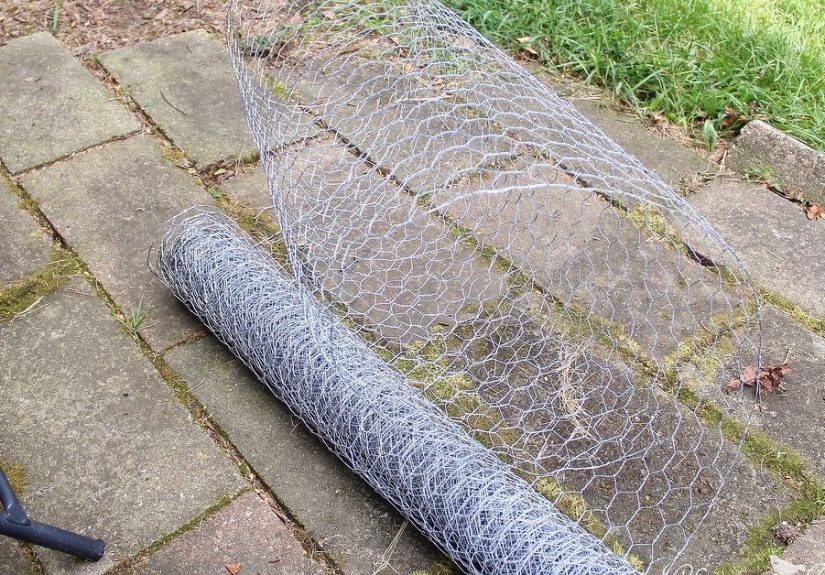
10) Botanical Wall Decor: Dried Flower Panels (Not Your Grandma’s Potpourri)
Dried flower panels are a fresh, modern way to add color and textureespecially for spring and summer. The beauty is that the flowers can be swapped as seasons change, so the decor evolves instead of collecting dust forever.
- Choose sturdy dried stems: lavender, eucalyptus, baby’s breath, and small roses hold their shape well.
- Avoid direct sun: it helps preserve color longer.
- Use a grid base: wire mesh makes arranging and rearranging easier.
Tools and Supplies That Pay for Themselves
You don’t need a garage workshop. You need a small “starter kit” that prevents crooked shelves, bubbly wallpaper, and the classic DIY moment where you whisper, “Why is it doing that?”
- Painter’s tape (layout planning and crisp lines)
- Level (or a reliable phone app in a pinch)
- Stud finder (especially for shelves and heavier decor)
- Measuring tape (the adult version of “trust issues”)
- Sandpaper + spackle (small wall fixes make a huge difference)
- Microfiber cloth + mild cleaner (adhesion depends on it)
Common DIY Home Decor Mistakes (And How to Avoid Them)
- Hanging art too high: Aim for eye-level centering and adjust based on furniture height. If it feels like your art is trying to escape through the ceiling, it probably is.
- Skipping prep: Dirty walls and unpatched holes ruin finishes. Ten minutes of prep saves hours of regret.
- Over-accessorizing: If every surface has “something,” nothing stands out. Leave negative space on shelves.
- Ignoring scale: Tiny art over a big sofa looks lost. Go larger or group pieces to match the furniture width.
- Following viral hacks blindly: Trends can be fun, but safety, prep, and proper materials matter more than speed.
Safety Notes (Because Cute Decor Shouldn’t Be Dangerous)
DIY home decor is usually low-risk, but a few upgrades involve tools, weight, or materials that deserve respect. Use appropriate anchors, confirm load limits, ventilate when painting or using adhesives, and wear eye protection when cutting. If a project touches wiring or plumbing and you’re unsure, it’s smart to consult a licensed professional.
Wrap-Up: Your Home, But Better
DIY home decor isn’t about copying a perfect room online. It’s about making your space work for you: more beautiful, more functional, and more “this feels like me.” Start with one anchor projectgallery wall, shelves, accent wall, or a fabric upgradethen build from there. Small wins add up fast, and suddenly your home feels refreshed without feeling replaced.
of Real-World DIY Home Decor “Experience” (The Kind You Actually Learn From)
There’s a special kind of confidence that shows up right before a DIY project begins. It’s the moment you stare at a blank wall and think, “This will take, like, an hour.” That confidence is charming. It is also frequently incorrect.
A very common DIY home decor storyline goes like this: you buy peel-and-stick wallpaper because it looks easy online, and because the word “peel” implies “effortless” while the word “stick” implies “done.” Then you get home and discover the secret third word: align. Suddenly you’re holding a giant floppy sheet that wants to attach itself to everything except the wall, and you learn the first lesson DIYers repeat forever: prep and a straight starting line are the whole game. Cleaning the wall feels boring until the day you don’t do it and your corners start lifting like they’re trying to audition for a haunted house.
Another classic learning moment: hanging pictures. You can have the most beautiful frames, the most meaningful photos, and the most sophisticated taste… and it will still look “off” if everything is hung too high. People often discover the “eye level” guideline after they’ve already made two extra holes. The good news is that a gallery wall is forgivingespecially when you plan with paper templates or painter’s tape first. The emotional difference between “I planned this” and “I kept moving it” is enormous.
Then there’s shelvingspecifically, the moment you realize a floating shelf needs real support. Many DIYers learn the joy of a stud finder right after they learn the sorrow of a shelf that’s slowly tilting forward like it’s exhausted from holding your decor decisions. The fix isn’t complicated, but the lesson sticks: weight + leverage + drywall = math you can’t ignore.
One of the most satisfying “I can’t believe I made that” experiences comes from thrift flips. A mismatched frame collection can go from random to cohesive with one spray paint color. It’s a small project with a big psychological payoff: suddenly you’re not just decoratingyou’re curating. And you start seeing your home differently. That candle jar isn’t trash; it’s a vase. That scrap wood isn’t clutter; it’s wall art. That curtain panel isn’t just a curtain; it’s a sink skirt that hides everything you don’t want to explain to guests.
The best part is that DIY home decor builds momentum. You do one project, then notice another small “meh” corner, and realize you don’t need permission to improve your space. You just need a plan, a measuring tape, and enough humor to accept that the first try is sometimes the “practice version.” The home you want isn’t one massive renovation away. It’s a few smart, doable upgrades away and they start the moment you decide your walls deserve better than “blank.”