Table of Contents >> Show >> Hide
Are you tired of the chaotic mess of scattered Legos all over your home? If you’re looking for a fun and functional solution, then the DIY Lego Head Organizer might just be the answer you’ve been searching for! This creative project combines the playful nature of Legos with an organized, aesthetically pleasing storage system. In this guide, we’ll walk you through how to create your own Lego head organizer that not only keeps your Legos tidy but also adds a touch of charm to your home decor.
Why You Need a DIY Lego Head Organizer
Let’s face it – Legos are a beloved toy in many households, but they can quickly turn into a nightmare when they’re scattered all over the floor. If you’re a parent, you know the pain of stepping on a stray Lego piece. If you’re a Lego enthusiast, you probably have a growing collection that could use some organization. That’s where the DIY Lego Head Organizer comes in. This fun, functional project is the perfect way to store your Legos while adding a bit of flair to any room.
What You Will Need
- Lego heads (or yellow plastic containers shaped like Lego heads) – these are the core of your organizer
- Plastic storage bins or small containers for sorting Legos by color or size
- Hot glue gun and glue sticks
- Paint (optional, for personalization)
- Labels (optional, for easy identification)
- Scissors (for cutting labels, if needed)
Step-by-Step Guide: How to Build Your Lego Head Organizer
Step 1: Gather Your Materials
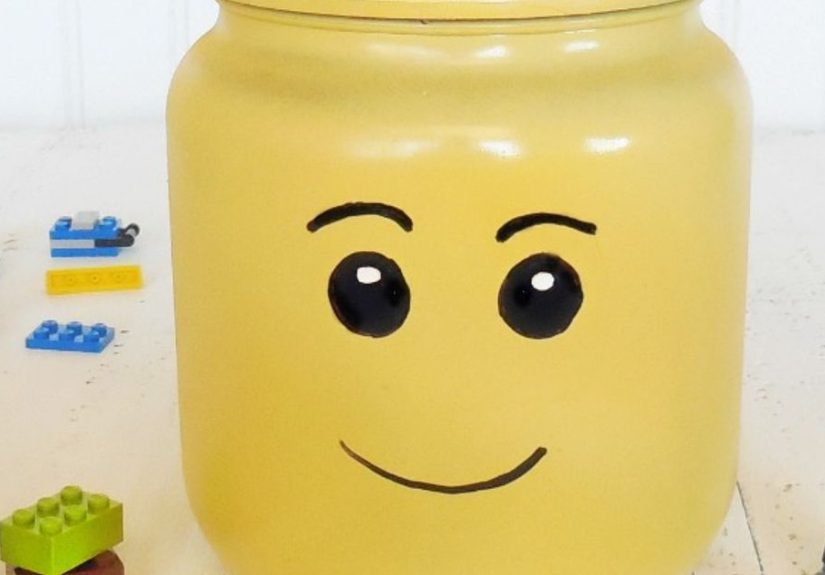
The first step is to collect all the necessary materials. You can either purchase plastic Lego head containers from toy stores or craft stores, or you can use existing Lego heads if you have extra. These yellow containers will serve as the ‘head’ of your organizer, adding both a playful touch and functional storage. You can also find storage bins that are already shaped like Lego heads online or at local stores.
Step 2: Sort Your Legos
Before you start building your organizer, it’s helpful to sort your Legos by color, size, or type. This will make it easier to organize them later on. If you don’t have time to sort every single piece, just categorize them roughly into a few larger groups (e.g., bricks, plates, and special pieces).
Step 3: Arrange the Containers
Now comes the fun part – arranging your Lego head containers! You can arrange them in a variety of ways depending on your space and preferences. For a playful touch, consider stacking the Lego heads on a shelf or arranging them in a line along a wall. If you’re limited on space, you could use them as a centerpiece on a table or desk.
Step 4: Attach the Containers
Once you’re happy with the arrangement, it’s time to glue the containers together to create a stable and functional storage unit. Using a hot glue gun, carefully attach the bottom of each container to the next, ensuring they’re securely stuck together. Be careful not to use too much glue, as you don’t want it to spill out and create a mess. If you want to make the organizer more versatile, you can leave some containers unattached so that they can be moved around independently.
Step 5: Add Labels
If you want to keep your Lego pieces well-organized, labels are a great idea. Using small tags or labels, mark each container according to the type of Legos it holds (e.g., “Red Bricks,” “Minifigs,” or “Wheels”). This will help you quickly locate the pieces you need when building your next Lego masterpiece. You can also paint the labels directly onto the containers for a more personalized look.
Step 6: Customize the Design (Optional)
If you want to add a little extra flair to your Lego head organizer, consider customizing the design. You can paint the outside of the containers in various colors or patterns to match the decor of your room. Some people even add Lego decals or stickers to give it a more authentic look. The possibilities are endless!
Benefits of a DIY Lego Head Organizer
There are numerous benefits to creating your own Lego Head Organizer, both in terms of functionality and creativity:
- Organization: Keep your Legos sorted and easy to find, preventing the dreaded Lego mess.
- Creativity: Customize the organizer with paint and labels to make it uniquely yours.
- Space-Saving: Stackable and compact, this organizer can fit in small spaces while offering large storage capacity.
- Fun Factor: Add a playful element to your home decor while keeping things neat and tidy.
How to Use Your Lego Head Organizer
Once you’ve completed your DIY Lego Head Organizer, it’s time to start using it! Depending on your Lego collection, you can use the containers for a variety of purposes:
- Sorting by Color: If you prefer to organize your Legos by color, allocate different Lego heads for each color group.
- Sorting by Size: Another option is to sort your pieces by size, such as small bricks, large plates, or specialty pieces.
- Minifigure Storage: Use a few containers to keep your mini-figures and accessories organized for easy access.
- Portable Storage: If you’re traveling with your Legos, the containers are easy to take with you and prevent pieces from spilling out.
Final Thoughts: Why a DIY Lego Head Organizer Is Worth the Effort
The DIY Lego Head Organizer is a fun, practical, and creative project that’s perfect for anyone with a Lego collection. Whether you’re a parent trying to manage the mess or a Lego enthusiast looking for a stylish way to store your pieces, this organizer is sure to add value to your space. Plus, it’s a great conversation starter for guests who appreciate clever DIY projects.
Personal Experience with DIY Lego Head Organizer
Building a Lego Head Organizer has been one of the most enjoyable and rewarding projects I’ve done recently. Not only did it solve the issue of Lego chaos in my home, but it also added a whimsical touch to the room. I particularly enjoyed customizing the containers with fun designs and colors, which made the whole project feel more personalized. I can now easily find the pieces I need, and the Lego heads have become a playful part of my home decor. It’s also been a hit with my kids – they love helping organize their Legos and getting creative with their own labeling system!
Overall, this DIY Lego Head Organizer has not only improved the organization of our toys but has also provided a fun bonding experience for the whole family. If you have a Lego collection that’s in need of some organization, I highly recommend giving this project a try. It’s simple, inexpensive, and – most importantly – fun!
Conclusion
If you’re looking for a fun and practical way to organize your Legos, the DIY Lego Head Organizer is a great option. This project allows you to get creative while providing a stylish and functional solution to the ever-growing Lego mess. So, gather your materials and start building your own Lego head organizer today!
Happy building!