Table of Contents >> Show >> Hide
- What Is a Dollar Store Frame Terrarium (and Why Is It So Addictive)?
- Before You Build: Choose Your Terrarium “Type”
- Dollar Store Shopping List: What to Buy (and What to Skip)
- Materials & Tools You’ll Need
- How to Build a Picture Frame Terrarium (Step-by-Step)
- Terrarium Layers That Make Sense (Without Overcomplicating It)
- Plant Picks That Actually Thrive in Frame Terrariums
- Light & Placement: Don’t Cook Your Plants
- Watering & Maintenance (a.k.a. How to Not Raise Mold)
- Common Mistakes (So You Can Learn From Other People’s Chaos)
- Budget Breakdown (Because “Dollar Store” Should Mean Something)
- FAQ
- Conclusion: Your Mini Glass Garden, on a Budget
- Real-World Experiences: What It’s Like to Build (and Live With) a Dollar Store Frame Terrarium
There are two kinds of people in this world: (1) the ones who casually own a gorgeous glass terrarium that looks like it belongs in a fancy boutique, and
(2) the rest of us, who would like that vibe but also enjoy paying rent.
Enter the dollar store frame terrarium: a mini glass garden made from inexpensive picture frames that can look shockingly high-end once it’s assembled,
planted, and placed somewhere you can admire it like the responsible adult you absolutely are.
It’s part DIY, part plant science, and part “please don’t let me grow mold.”
In this guide, you’ll learn how to build a picture frame terrarium step-by-step, which plants actually thrive inside a glass box, and how to maintain it without turning
it into a swamp (or a desert). We’ll also cover smart shortcuts, common mistakes, and a longer “real-world experience” section at the endbecause the first build always
teaches you something, usually involving glue.
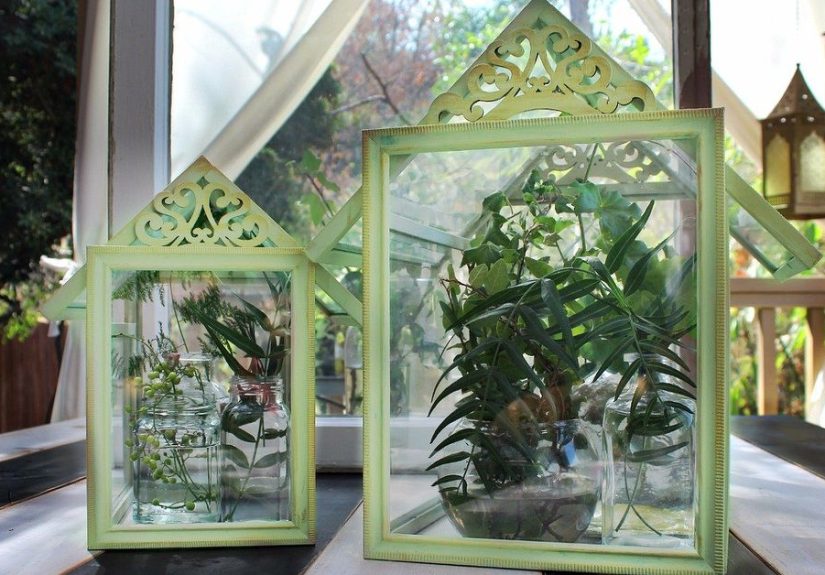
What Is a Dollar Store Frame Terrarium (and Why Is It So Addictive)?
A frame terrarium is essentially a small glass container (often shaped like a house or box) built from picture frames. You remove the frame backs, keep the glass,
and connect the frames into a structure. The result: a clear, bright “display case” for plantslike a tiny greenhouse that shows off every leaf.
The dollar store twist is simple: you use low-cost frames as your building blocks. Since frames come in matching sizes and styles, you can create clean angles and
modern lines without buying a pricey pre-made terrarium.
Before You Build: Choose Your Terrarium “Type”
The biggest decision isn’t frame color. It’s humidity. Your plant choicesand your long-term successdepend on whether your terrarium will be
open, mostly open, or closed.
Open terrarium
Has no lid (or you keep it permanently vented). Best for succulents and cacti that hate humid air and prefer the soil to dry between waterings.
Think: bright light, low moisture, and “water me only after you double-check.”
Closed terrarium
Has a lid that stays shut most of the time. Best for humidity-loving plants like mosses, small ferns, and fittonia (nerve plant).
A closed terrarium recycles moisture via evaporation and condensation, so it can need very little watering once balanced.
“Styled open” (my favorite for frame builds)
Looks like a greenhouse, but isn’t airtight. Many picture frame terrariums end up here naturally because tiny gaps provide airflow.
This is great news if you want fewer mold dramas and more forgiving care.
Dollar Store Shopping List: What to Buy (and What to Skip)
What works well
- Matching picture frames (glass included, backs removable)
- Small decorative stones (for top dressing and aesthetics)
- Mini tools (tweezers, craft brushes, small scoopscraft aisle MVPs)
- Seasonal decor (tiny figurines if you want a whimsical landscape)
- Clear containers (optional: for mixing soil or holding gravel/charcoal)
What to be careful with
- Super lightweight frames: Easy to glue, but can flex. If you want a sturdier terrarium, choose frames with a slightly thicker build.
- Painted/metallic finishes: Pretty, but sealants and paint must fully cure before living plants move in (no one wants “Eau de Fumes” inside a glass box).
- Fake moss: Looks cute, does nothing for plant health. Fine as decor, not as a functional layer.
Materials & Tools You’ll Need
Your build can be as simple or as “I own a workshop now” as you want. Here are three practical build levels:
Level 1: Quick & cute (best for decorative, lighter builds)
- 5–6 picture frames (4 sides + base, optional lid)
- High-temp hot glue gun + glue sticks
- Painter’s tape or clamps (helpful “extra hands”)
- Razor blade/scraper for removing labels and gunk
Level 2: Sturdier (recommended if you want longevity)
- Clear silicone adhesive/sealant (fully cured before planting)
- Optional: small L-brackets or corner braces
- Optional: a small hinge set if you want a functioning lid
Level 3: “Looks store-bought” (if you love a crisp finish)
- Metallic tape (copper/foil tape) for a “glasshouse” aesthetic
- Fine-grit sandpaper (softening sharp frame edges)
- Glass-safe cleaner and microfiber cloth
How to Build a Picture Frame Terrarium (Step-by-Step)
Step 1: Pick a simple shape
The easiest beginner build is a box: four sides plus a base. A “greenhouse roof” looks adorable but adds angles and alignment headaches.
Start box-shaped, then graduate to a roof once you’ve earned your DIY badge.
Step 2: Prep the frames
- Remove backs, inserts, and anything not glass.
- Clean the glass thoroughly (fingerprints show forever in terrariums).
- Check for chips and sharp edges. If needed, lightly sand frame edges and work carefully.
Step 3: Dry-fit the walls
Stand your four wall frames in a rectangle. Use painter’s tape to hold corners temporarily.
This is the “measure twice” moment that prevents the “why is this leaning like a sad pyramid” moment.
Step 4: Attach the walls
Hot glue method: Run a bead of hot glue along each corner seam (inside and outside if you can do it neatly).
Work one corner at a time so everything stays aligned.
Silicone method: Apply a thin bead on seams, press together, tape in place, and let it cure fully per label instructions.
Silicone usually creates a stronger, more water-resistant seam than hot glueideal if you’ll keep humidity higher.
Step 5: Add the base
Place the assembled “wall box” on top of your base frame (glass facing inward).
Glue or silicone along the bottom seams. This is where sturdiness mattersyour soil and stones have weight.
Step 6: Decide on a lid (optional)
You can:
(a) leave it open,
(b) rest a frame on top as a loose lid,
or (c) attach a hinged lid.
If you’re planting succulents, choose open or vented. If you’re planting mosses/ferns, a lid helpsbut avoid “sealed forever” unless you’re ready to manage condensation.
Step 7: Let adhesives cure before planting
If you used silicone or any industrial adhesive, make sure it’s fully cured before plants go in. In a closed container, lingering fumes can stress plants.
Also: it’s hard to look like a plant genius when your terrarium smells like a hardware store.
Terrarium Layers That Make Sense (Without Overcomplicating It)
You’ve probably heard the classic terrarium “layer cake”: stones, charcoal, moss, soil. It’s popular because it’s simple and works for many builds.
But here’s the honest truth: no layer setup can save you from chronic overwatering.
Your watering habits and plant selection matter more than any gravel you buy.
A practical layering approach for frame terrariums
- Drainage layer (optional but common): Small gravel or pebbles, about 1–2 inches depending on container height.
- Charcoal layer: A thin layer of horticultural/activated charcoal to help with freshness and odors (especially in closed setups).
- Barrier layer: Sheet moss or sphagnum to keep soil from sifting down.
- Soil layer: The right soil for your plants (details below).
- Top dressing: Decorative gravel or sand to reduce splashing and keep the surface neat.
So what’s the “right” soil?
- For succulents/cacti: Cactus/succulent mix, ideally amended with extra perlite or pumice for faster drainage.
- For closed/humidity lovers: A light, well-draining indoor potting mix (not heavy garden soil), often with added orchid bark for airflow.
Plant Picks That Actually Thrive in Frame Terrariums
Best plants for open frame terrariums
- Haworthia (compact, tolerant, great “starter succulent”)
- Gasteria (slow-growing and forgiving)
- Small aloe varieties (give them room; they get confident)
- Mini cacti (only if your terrarium stays truly dry and bright)
Tip: If your frame terrarium has a lid, keep it open for succulents. Closed humidity is basically their villain origin story.
Best plants for closed (or mostly closed) frame terrariums
- Fittonia (nerve plant) (colorful, loves humidity, stays small)
- Moss (great ground cover, gives the “forest floor” look)
- Mini ferns (choose slower growers)
- Peperomia (many varieties handle terrarium life well)
Light & Placement: Don’t Cook Your Plants
Terrariums love bright, indirect light. Direct sun through glass can overheat fastespecially in a frame terrarium that acts like a mini greenhouse.
If you’ve ever left a water bottle in a hot car, you understand the vibe.
- Best: Near a bright window with filtered light (sheer curtain helps).
- Avoid: Harsh afternoon sun blasting directly onto glass.
- Alternative: A small grow light if your home is more “cozy cave” than “sunny loft.”
Watering & Maintenance (a.k.a. How to Not Raise Mold)
Open terrariums (succulents)
Water only when the soil is fully dry. In many homes, that can mean every couple of weeks or even lessespecially in cooler months.
Use a small squeeze bottle or baster to water the soil, not the leaves.
Closed terrariums (humidity lovers)
Start with a light watering/mist, then watch the glass. A little condensation can be normal; constant heavy fog is a sign you went too far.
If the glass is soaked for days, open the lid to vent and rebalance.
Quick “read the room” checklist
- Too wet: persistent foggy glass, mushy stems, funky smell
- Too dry: plants droop (humidity plants), soil pulls away from sides
- Just right: plants look perky, glass mostly clear, soil lightly moist (closed) or dry between waterings (open)
Common Mistakes (So You Can Learn From Other People’s Chaos)
1) Building a sealed terrarium… then planting succulents
Succulents want airflow and dry-down time. If your terrarium traps humidity, they’ll sulk, stretch, or rot. Keep it open or choose different plants.
2) Thinking a drainage layer “fixes” overwatering
Drainage layers can help create a reservoir space, but they do not magically pull water away from roots if the soil stays saturated.
The fix is always: less water, better soil structure, and appropriate plants.
3) Using heavy garden soil
Garden soil compacts and stays wet. Use a light potting mix (or cactus mix for succulents). Your terrarium isn’t a backyarddon’t treat it like one.
4) Putting it in direct sun
Glass + sun = plant soup. Choose bright indirect light for long-term happiness.
Budget Breakdown (Because “Dollar Store” Should Mean Something)
| Item | Estimated Cost | Notes |
|---|---|---|
| 5–6 picture frames | $6–$12 | Depends on store and size |
| Adhesive (hot glue or silicone) | $3–$10 | Silicone costs more, lasts longer |
| Gravel/charcoal/moss | $5–$15 | Charcoal is often the priciest layer |
| Plants | $10–$30 | Small plants are worth paying for |
A truly nice frame terrarium often lands around $25–$50 depending on plants and toolsbut it can still look like a $120 decor piece.
That’s the whole scam (the legal, satisfying kind).
FAQ
Do I really need activated charcoal?
It’s commonly used to help keep terrariums fresher, especially in closed builds where airflow is limited. But it’s not a magical requirement.
If you skip it, be extra careful with moisture and keep things clean.
Can I use hot glue only?
Yes for many decorative buildsespecially lighter frames and open terrariums. For higher humidity or long-term durability, silicone or stronger adhesives usually hold up better.
What if my glass fogs up all the time?
That’s a moisture imbalance. Open the lid, vent for a few hours, and reduce watering going forward. Persistent fog often means “too wet.”
Conclusion: Your Mini Glass Garden, on a Budget
Dollar store frame terrariums are the rare DIY that checks every box: affordable, stylish, customizable, and actually fun to build.
The secret to success is simple: match plants to humidity, use light soil, water with restraint, and give your terrarium bright indirect light.
Build it once and you’ll start eyeing every empty shelf like it’s a potential greenhouse district.
Don’t fight it. You’re a terrarium person now.
Real-World Experiences: What It’s Like to Build (and Live With) a Dollar Store Frame Terrarium
Here’s what tends to happen the first time you build a frame terrariumbased on the very predictable patterns of DIYers everywhere (and the laws of physics, which are famously unromantic).
First, you’ll underestimate how much glass shows everything. The tiniest smear becomes a permanent “modern art” feature once sunlight hits it. Clean the panes
like you’re prepping a museum exhibit. Then clean them again because you absolutely touched the inside while “just adjusting” a corner seam.
Next comes the glue reality check. Hot glue is fast and satisfyinglike a craft version of instant noodlesbut it can form thick seams if you rush.
The fix most people land on is a two-part strategy: use hot glue to “tack” the structure in place, then reinforce inside seams with a neater adhesive if needed.
If you go the silicone route from the start, you’ll learn patience… or at least practice the illusion of patience while staring at curing seams and whispering,
“Please hold. Please hold.”
Planting is where confidence spikes, then immediately humbles itself. The first layout looks perfectuntil you add soil and realize plants have roots, and roots take space,
and suddenly your “balanced composition” turns into three plants leaning like they’re trying to hear gossip. That’s normal. The best trick is to start with fewer plants,
leave breathing room, and treat negative space like it’s part of the design (because it is).
The most common ongoing experience is learning the difference between “moist” and “wet” in a closed environment. Many first-timers overwater because
the container looks dry from the outside. Then, two days later, the glass fogs up like a sauna and the terrarium smells… ambitious. The correction is usually easy:
vent it, wipe excess condensation, and wait. In closed or mostly closed terrariums, waiting is a legitimate care technique.
If you build an open terrarium for succulents, the experience flips: you’ll be tempted to water “just a little,” often. But succulents prefer the soil to dry out,
and they’re happiest when you forget about them for a bit. Many DIYers end up loving open frame terrariums because they look like glasshouse decor but behave more like
a normal planterless fog management, fewer surprises, and a much lower chance of accidentally growing a science fair.
Finally, the unexpected joy: these terrariums become conversation magnets. People notice them. Guests lean in. Someone always asks, “Did you buy that?”
And you get to say, casually, “Oh this? I made it from dollar store frames,” while your brain does a victory lap in tiny circles.