Table of Contents >> Show >> Hide
- Why Individual Cobblers Are the Move
- What You’ll Need
- Easy Individual Cherry Cobbler Recipe (Step-by-Step)
- Cherry Options (Fresh vs Frozen vs Canned)
- How to Pit Cherries Without Fancy Gadgets
- Make It Your Way (Fun Variations)
- Serving Ideas (A.K.A. The Part Where Ice Cream Happens)
- Storage and Reheating
- Troubleshooting (Because Cobbler Has Opinions)
- FAQ
- of Real-Life Cobbler Experiences (A Love Letter to Small Desserts)
- Neat Conclusion
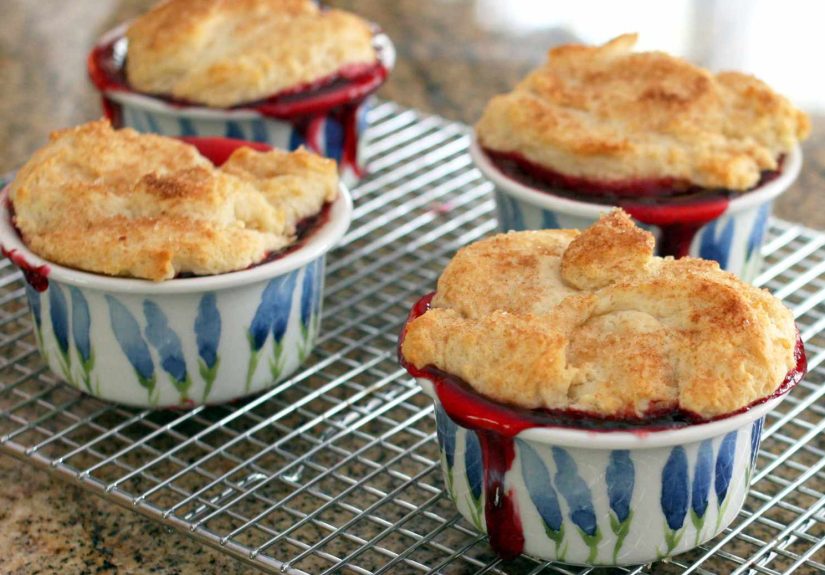
Some desserts are dramatic. Layered. Frosted. Structured like tiny edible architecture. This is not that dessert. This is the “I want something warm, jammy, and buttery in under an hour” dessertserved in its own little ramekin so nobody has to negotiate slices like it’s a holiday family meeting.
This easy individual cherry cobbler recipe makes four personal-size cobblers with a bright cherry filling and a soft, golden biscuit topping that’s rustic in the best waylike it wore flannel to dinner and somehow pulled it off. Use fresh, frozen, or even canned cherries. No judgment. The goal is happiness, not perfection.
Why Individual Cobblers Are the Move
- Built-in portion control (or at least built-in portion suggestion).
- Faster baking than a big pan, and more crispy edges per square inch.
- Customizable: one with almond extract, one without; one extra-sugary on top; one “accidentally” double-served.
- Less mess: ramekins corral the bubbling fruit like tiny delicious fences.
What You’ll Need
Equipment
- 4 oven-safe ramekins (6–8 oz each)
- 1 rimmed baking sheet (for stability and spill insurance)
- Mixing bowls, whisk, spoon
- Cherry pitter (optional) or a DIY method (we’ll talk)
Ingredients for the Cherry Filling
- 2 1/2 cups cherries, pitted (fresh or frozen; see notes below)
- 1/3 cup granulated sugar (adjust to taste)
- 1 1/2 tablespoons cornstarch
- 1 tablespoon lemon juice
- 1/2 teaspoon vanilla extract
- 1/8 teaspoon fine salt
- Optional but iconic: 1/4 teaspoon almond extract
- Optional: 1/4 teaspoon cinnamon (for cozy vibes)
Ingredients for the Quick Drop-Biscuit Topping
- 1 cup all-purpose flour
- 2 tablespoons granulated sugar
- 1 1/2 teaspoons baking powder
- 1/4 teaspoon fine salt
- 4 tablespoons cold unsalted butter, cut into small cubes
- 1/2 cup cold milk or buttermilk
- Optional: 1/2 teaspoon vanilla extract
- For the top: 1–2 teaspoons coarse sugar (or regular sugar)
Easy Individual Cherry Cobbler Recipe (Step-by-Step)
1) Preheat and prep
- Preheat your oven to 375°F.
- Place the ramekins on a rimmed baking sheet.
- Lightly butter or spray the inside of each ramekin (especially if you want them to release cleanly).
2) Make the cherry filling
- In a medium bowl, stir together cherries, sugar, cornstarch, lemon juice, vanilla, salt, and (if using) almond extract and cinnamon.
- Let the mixture sit for 5 minutes. This helps the sugar pull out some juices so the cornstarch can do its thickening job.
- Divide the cherry mixture evenly among the 4 ramekins (about 3/4 full).
3) Make the topping (no fancy biscuit diploma required)
- In a bowl, whisk together flour, sugar, baking powder, and salt.
- Add cold butter cubes. Use your fingertips or a fork to rub/cut butter into the flour until the mix looks like coarse crumbs with some pea-size bits (those bits = flaky magic).
- Pour in cold milk (and vanilla, if using). Stir gently just until no dry flour remains. Do not overmixthis is cobbler, not a bicep workout.
4) Assemble
- Spoon the topping over the cherries. You can do one big “cloud” per ramekin or a few smaller dollops. Leave a couple gaps so steam can escape and juices can bubble up dramatically like a dessert fountain.
- Sprinkle the tops with coarse sugar for a sparkly crunch.
5) Bake
- Bake at 375°F for 25–32 minutes, or until the topping is golden and the cherry filling is bubbling at the edges.
- Let cool for 10 minutes. The filling thickens as it coolseat immediately if you love lava, or wait a bit if you’d prefer “jammy” over “volcanic.”
Cherry Options (Fresh vs Frozen vs Canned)
Fresh cherries
Fresh cherries give you a bright, juicy filling and peak “I totally have my life together” energy. Sweet dark cherries are classic, but tart cherries (if you can find them) make a punchier cobbler. If using very sweet cherries, reduce sugar slightly.
Frozen cherries
Frozen cherries are a weeknight superhero: already pitted, available year-round, and reliably flavorful. Use them straight from frozen (no need to thaw), but add an extra 1/2 tablespoon cornstarch if your brand tends to release a lot of juice. Baking time may run a few minutes longer.
Canned cherries or cherry pie filling
If you’re using cherry pie filling, the sweetness is already doing the most. For four ramekins, you’ll typically use about 1 can (around 21 oz). Skip the sugar and cornstarch, add lemon juice to brighten, and proceed with topping and baking. It’s not “cheating.” It’s “efficient joy.”
How to Pit Cherries Without Fancy Gadgets
If you have a cherry pitter, congratulationsyou’re living in the future. If you don’t, here are a few surprisingly effective options:
- Paper clip method: Unbend a sturdy paper clip, hook out the pit from the stem end.
- Straw or chopstick method: Push the pit through by bracing the cherry over a small bottle opening.
- Knife method: Slice around the pit, twist halves apart, and pull the pit out carefully.
Pro tip: wear an apron or dark shirt. Cherries have the staining ambition of a toddler with a marker.
Make It Your Way (Fun Variations)
1) Almond-cherry bakery vibe
Add almond extract to the filling, then scatter a few sliced almonds on top during the last 8 minutes of baking.
2) Lemon-loud and proud
Add 1 teaspoon lemon zest to the filling and swap vanilla for a tiny splash of lemon extract in the topping.
3) Brown sugar + cinnamon cozy mode
Replace 1 tablespoon of the topping sugar with brown sugar and add 1/4 teaspoon cinnamon.
4) “Crisp-ish” topping
For more crunch, sprinkle 1 tablespoon rolled oats mixed with 1 teaspoon brown sugar on each ramekin before baking. It’s cobbler wearing a crisp hat. Nobody complains.
Serving Ideas (A.K.A. The Part Where Ice Cream Happens)
- Vanilla ice cream (classic, undefeated)
- Whipped cream with a pinch of salt (trust me)
- Greek yogurt + honey (breakfast cosplay)
- Crème fraîche if you want fancy-tangy balance
Storage and Reheating
- Fridge: Cover and refrigerate up to 3 days.
- Reheat: Warm in a 350°F oven for 10–15 minutes, or microwave in short bursts (the oven keeps the topping nicer).
- Make-ahead tip: Mix dry topping ingredients and cut in butter ahead of time. Keep chilled. Add milk right before baking.
Troubleshooting (Because Cobbler Has Opinions)
My filling is runny
Likely needs more thickener or a longer cool-down. Next time, add a little more cornstarch, especially with frozen cherries, and let the cobblers rest 10–15 minutes before digging in.
My topping is pale
Move the baking sheet to a higher rack for the last few minutes, or give it an extra 3–5 minutes. Sugar on top also helps browning.
My topping is tough
Overmixing is usually the culprit. Stir just until combined and stop the second you think, “Maybe one more stir?” That’s the trap.
FAQ
Can I make this gluten-free?
Yesuse a reliable 1:1 gluten-free baking flour blend in the topping. Texture can vary by brand, so keep the dough slightly thicker (you may need a splash less milk).
Can I scale this for two?
Absolutely. Halve everything and bake in two ramekins. Or make four and become mysteriously popular with anyone within spoon distance.
Is cobbler supposed to be biscuit-y or cake-y?
Both exist in the wild. This version leans biscuit-tender on top, with the fruit doing the saucy work underneath. If you prefer a more cake-like top, you can swap to a simple batterbut the drop-biscuit topping is the fastest path to “bakery cozy.”
of Real-Life Cobbler Experiences (A Love Letter to Small Desserts)
The first time I made individual cherry cobblers, it wasn’t because I was feeling elegant or organized. It was because I didn’t want to do math. Specifically, I didn’t want to do the “How big should I cut the servings so everyone feels treated fairly?” math. If you’ve ever served dessert to a group of peoplefriends, family, roommates, or the emotionally invested neighbor who “just happened to stop by”you know that slicing can get weirdly political.
Individual ramekins remove the negotiations. Each person gets a warm, bubbling cobbler of their own, like the dessert equivalent of assigned seating. And the best part? They look fancy without you having to become fancy. You can wear sweatpants. You can be tired. You can be running on vibes. The ramekin doesn’t care. It still makes you look like you planned this on purpose.
I’ve tested this recipe in a few situations that should probably be documented for science: movie night, rainy Sunday, “I forgot I promised dessert”, and the classic “I bought cherries because they looked cute and now they’re getting soft” scenario. Ramekin cobblers are especially perfect for the last one, because cherries have a narrow window between “summer jewel” and “why is this sticky?” The cobbler is basically a rescue mission with butter on top.
The funniest part is how quickly people develop opinions about toppings. One friend loves a thick blanket of biscuit doughso I pile it on for them, extra rustic, extra dramatic. Another friend claims they “don’t like sweet desserts,” which is adorable, so theirs gets extra lemon and less sugar, plus a spoonful of yogurt on top. Then there’s the person who wants the edgesthe crispy, golden bits where butter meets heat and becomes a tiny caramelized miracle. Individual ramekins are basically all edges, so everyone wins.
I’ve also learned that frozen cherries are an underrated secret weapon. They’re already pitted, which means you skip the phase where you’re hunched over a bowl, looking like you’re doing delicate surgery on fruit while cherry juice quietly redecorates your countertops. With frozen cherries, you pour, stir, top, bakedone. It feels like getting away with something.
And finally: the ice cream moment. Serving a warm cobbler with cold ice cream is not just deliciousit’s theatrical. The scoop hits the hot topping, melts into the cracks, and suddenly you’ve got vanilla rivers flowing into cherry jam. People go quiet for a second. That’s how you know you nailed it. Not because it looks perfect (it won’tand that’s the point), but because it tastes like comfort with a little sparkle.
Neat Conclusion
This easy individual cherry cobbler recipe is proof that you don’t need a pastry degree or a full-size baking dish to make something that feels special. A simple cherry filling, a quick drop-biscuit topping, and a hot oven do the heavy lifting. Bake them for a weeknight treat, serve them for guests, or keep one “for later” (sure) and reheat it when you want dessert that hugs back.