Table of Contents >> Show >> Hide
- Why edging is worth the weekend
- Before you choose a border, ask yourself these 5 questions
- Quick prep: the “do this once and thank yourself later” checklist
- 13 easy ideas for landscape borders
- 1) Iron scroll edging for instant “estate vibes”
- 2) Stone borders for a natural, timeless edge
- 3) Pound-in steel edging for clean modern lines
- 4) Picket-style edging for charm without commitment
- 5) Faux stone panels for the “real stone look, less effort” crowd
- 6) Flexible wood edging for a warm, natural outline
- 7) Scalloped concrete edgers for classic curb appeal
- 8) Faux brick edging for the brick look with fewer backaches
- 9) Interlocking steel edging for a long-lasting “stays put” border
- 10) Landscape timbers for sturdy, budget-friendly structure
- 11) Recycled rubber edging for a softer, kid- and pet-friendly border
- 12) Corrugated metal edging for rustic texture and toughness
- 13) Plastic edging (including deeper grass barriers) for practical control
- Maintenance: keep your border sharp (without making it your entire personality)
- Real-world experiences and lessons people learn the hard way (so you don’t have to)
- Conclusion: pick a border that looks good and behaves even better
If your mulch has a habit of “going walkabout” after every rainstorm, or your lawn keeps trying to audition for a role
in your flower bed, you don’t need a bigger yardyou need a better edge.
Landscape borders (aka garden bed edging, lawn edging, flower bed bordersyour yard’s version of a bouncer)
create a crisp line between “plants live here” and “grass, stay in your lane.” The bonus: edging can make even a
modest garden look intentional, like you meant to do it that way all along.
Why edging is worth the weekend
A clean landscape border is more than a pretty outline. It helps keep mulch, gravel, and soil where you put it,
discourages turf from creeping into beds, and makes mowing and trimming faster (because you’re not constantly
“finding the edge” with a string trimmer). Edging also adds structure, which is basically curb appeal’s love language.
Before you choose a border, ask yourself these 5 questions
1) What problem are you actually solving?
Containing mulch? Holding back gravel? Stopping grass roots? Defining a walkway? Different goals favor different
edging materials. A decorative fence border might look adorablebut it won’t stop aggressive turf the way a deeper
barrier can.
2) Straight lines or swoopy curves?
Curves look natural and are forgiving. Hard angles feel formal and modern. Flexible materials (metal strips, roll
edging, many plastics) handle curves best; individual units (brick, stone, concrete) can curve too, but need more
patience and fitting.
3) How much maintenance can you tolerate?
Some borders are “set it and forget it.” Others are “set it and re-set it after the first freeze-thaw cycle.” Be
honest with Future You.
4) Do you want a mowing strip?
If you place brick, stone, or concrete so a mower wheel can ride on it, you reduce trimming. It’s one of those small
yard upgrades that feels like a cheat code.
5) What’s your soil and weather like?
Rocky soil fights stakes. Sandy soil shifts. Heavy clay holds shape but can heave with freeze-thaw. Choose a border
that matches your conditions, not just your Pinterest board.
Quick prep: the “do this once and thank yourself later” checklist
- Mark your line with a garden hose or spray paint. Step back and check the shape from the street.
- Cut the edge with a flat spade along the line (this is where the crisp look begins).
- Dig a shallow trench for most hard edging so it sits stable and doesn’t wobble.
- Create a base (often sand) for brick/pavers/stone so pieces sit level and resist shifting.
- Install, level, and connect sections tightly so gaps don’t invite weeds and wandering grass.
- Backfill and tamp soil/mulch on the bed side for stability, then clean up the lawn side.
13 easy ideas for landscape borders
Below are 13 practical, good-looking garden edging ideas inspired by popular DIY-friendly approachesranging from
classic to modern to “my yard is rustic on purpose.”
1) Iron scroll edging for instant “estate vibes”
Decorative iron panels add a formal, finished look without needing a full fence. They’re great around foundation
plantings, shrub borders, and beds where you want height and style. Look for powder-coated metal to resist rust and
choose designs with sturdy stakes so panels don’t lean after a storm.
Best for: cottage gardens, front beds, “I want it to look fancy by lunch” projects.
Watch-outs: thin stakes can wiggle loose in very sandy soiltamp firmly and consider longer spikes.
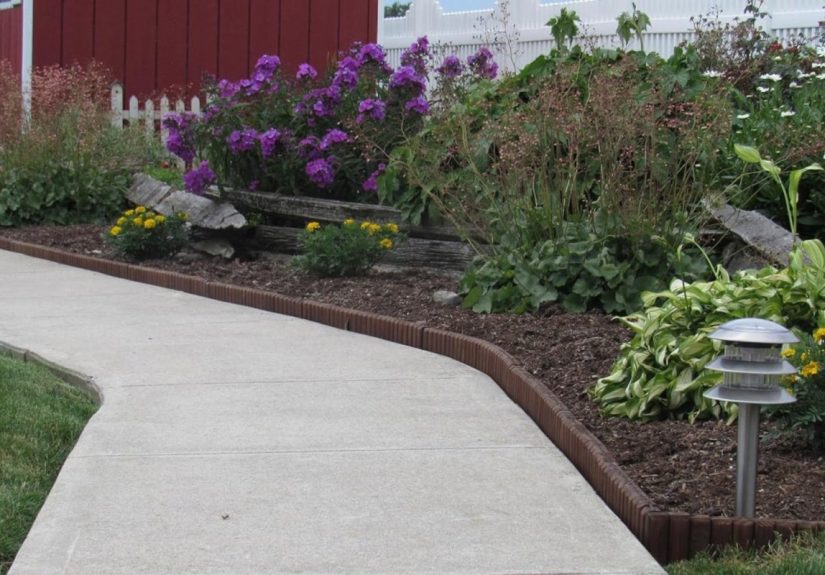
2) Stone borders for a natural, timeless edge
Stone edging looks like it’s always belonged there. You can use natural stone, tumbled rock, or stone-look concrete
units. The trick is consistency: pick one style and repeat it so your border looks intentional instead of like a
geologic garage sale.
Best for: perennial beds, tree rings, paths, and slopes where you want weight and stability.
Install tip: set stones slightly into the soil so they lock in place and don’t migrate.
3) Pound-in steel edging for clean modern lines
If you love a crisp edge and hate visual clutter, steel edging is your minimalist dream. Pound-in panels (often
weathering steel) can create smooth curves or sharp lines, and the thin profile almost disappearsyour plants become
the star, not the border.
Best for: modern landscapes, gravel paths, and beds you want to mow cleanly against.
Watch-outs: in very rocky soil, pre-cut a shallow groove to avoid bending or kinking.
4) Picket-style edging for charm without commitment
Picket edging gives you that classic fence look in short sectionsperfect for framing a flower bed or guiding the
eye along a walkway. Many versions are lightweight and stake in with little to no digging, making them a popular
“afternoon upgrade.”
Best for: small front beds, kids’ garden plots, and landscapes leaning traditional.
Watch-outs: lighter borders are decorative more than defensivedon’t expect them to stop determined turf.
5) Faux stone panels for the “real stone look, less effort” crowd
Faux stone edging (often resin) can mimic stacked rock while installing like puzzle pieces. It’s an easy way to add
texture, especially in beds where you want a softer, natural style without hauling heavy stone.
Best for: curved beds, DIYers who want a noticeable upgrade fast.
Install tip: assemble on the ground first to preview the curve and avoid awkward gaps.
6) Flexible wood edging for a warm, natural outline
Flexible wood or wood-look borders can bend around curves and blend with organic planting styles. They’re great when
you want definition but don’t want the hard, formal vibe of brick or metal.
Best for: informal beds, woodland gardens, and areas where you want a softer border presence.
Watch-outs: anything wood-based still needs smart placementkeep it from sitting in constant soggy soil.
7) Scalloped concrete edgers for classic curb appeal
Scalloped concrete edging is a longtime favorite because it’s affordable, durable, and instantly recognizable as a
“finished landscape.” It’s available in multiple colors and shapes, so you can go subtle or bold.
Best for: straight runs along lawns, foundation beds, and tidy borders around shrubs.
Install tip: level matterstake time on the base so scallops don’t look like a roller coaster.
8) Faux brick edging for the brick look with fewer backaches
Love the traditional brick border but not the cutting, leveling, and heavy lifting? Faux brick systems recreate the
pattern in lighter materials that stake in. You get the vibe of brick edging with the effort of… well, not brick.
Best for: quick makeovers, rental-friendly upgrades (if you can remove it later), decorative borders.
Watch-outs: lighter borders can pop up if the soil heavesresetting may be part of the deal.
9) Interlocking steel edging for a long-lasting “stays put” border
Interlocking steel systems join into a continuous border, which helps prevent shifting over time. They’re great for
both curves and straight edges, and they hold up well against string trimmers and mower bumps.
Best for: permanent bed lines, gravel containment, and crisp borders around modern plantings.
Install tip: align and lock sections before final tamping so the top edge stays smooth.
10) Landscape timbers for sturdy, budget-friendly structure
Landscape timbers are basically the “work boots” of garden borders. They can edge beds, frame raised areas, and
create a clear separation between lawn and planting. They’re often used when you want a border that also adds a bit
of height and structure.
Best for: larger beds, veggie garden outlines, and simple retaining-style edges.
Watch-outs: avoid older railroad ties or questionable reclaimed wood near plantsuse materials meant for landscape use.
11) Recycled rubber edging for a softer, kid- and pet-friendly border
Rubber edging is flexible, durable, and less likely to crack than some rigid materials. It can be a practical choice
where you want a forgiving edge that’s still substantial enough to outline a bed.
Best for: play-adjacent landscaping, curved bed lines, and homeowners who want an eco-minded option.
Install tip: stake it firmly and check alignment as you goflexibility is great, but it can drift during install.
12) Corrugated metal edging for rustic texture and toughness
Corrugated metal adds instant farmhouse energy. It’s durable, handles weather well, and creates a crisp border with
a textured look. Use it sparingly for impactlike edging one feature bed or lining a pathso it feels like a design
choice, not leftover roofing.
Best for: rustic or industrial landscapes, raised beds, and bold statement borders.
Watch-outs: ensure edges are finished or positioned safely so you’re not brushing against sharp metal.
13) Plastic edging (including deeper grass barriers) for practical control
Plastic edging is popular because it’s affordable and flexible. Deeper plastic barriers can also help slow grass
invasion, making them a practical choice for gardeners battling aggressive lawns. Some systems are “no-dig,” while
others benefit from a shallow trench for stability and a cleaner top line.
Best for: long curves, budget projects, and beds where grass creep is the main enemy.
Install tip: the cleaner your prep line, the better plastic edging looksmost “wavy edging” is really “wavy trench.”
Maintenance: keep your border sharp (without making it your entire personality)
- Do a seasonal walk-by: look for lifted sections, gaps, and settling after heavy rain or winter.
- Control grass creep early: the sooner you cut it back, the less it becomes a yearly wrestling match.
- Refresh mulch thoughtfully: avoid piling mulch over the borderit hides the edge and encourages spillover.
- Re-level where needed: a few minutes with a mallet and a level can restore the “pro” look.
Real-world experiences and lessons people learn the hard way (so you don’t have to)
Here’s what tends to happen when real homeowners and DIYers actually install landscape bordersespecially the first
time. These aren’t horror stories, exactly. More like “character-building moments,” which is a polite way of saying
you’ll probably learn something you didn’t expect.
Lesson #1: The line looks different from the driveway than it does up close. Many people mark a bed
with a hose, stand right over it, nod approvingly… and then realize from the street that the curve looks like a
squiggle. The fix is simple: after marking, step back to view the bed line from the angles you’ll see most often.
If the border is in the front yard, check it from the sidewalk and the road. A tiny tweak in the curve can make the
whole landscape feel calmer and more “designed.”
Lesson #2: Most edging problems are really prep problems. When borders shift, wobble, or look uneven,
the culprit is usually the base. DIYers often rush the trench, skip leveling, or try to “make it work” over rocks
and roots. Then the border settles and the top edge waves like it’s at a parade. Spending extra time on a stable
trench and base makes almost every edging type look better, from scalloped concrete to faux stone panels.
Lesson #3: Grass is persistentlike a door-to-door salesperson who won’t take a hint. People are often
surprised how quickly turf creeps toward beds. That’s why many gardeners treat edging as an annual tune-up, even if
the border itself is permanent. If your bed line feels like it’s shrinking, you’re not imagining it. Turf can move
steadily toward beds, so a periodic edge refresh keeps the border crisp and prevents plants from feeling “crowded in.”
Lesson #4: Your favorite border might change once your plants grow. New beds look roomy. Two years
later, perennials sprawl, shrubs fill out, and suddenly that cute little picket border is buried under foliage.
Many experienced gardeners recommend holding off on super-permanent edging until you see how the bed evolves.
Flexible borders (or easily adjusted ones) are great during the “figuring it out” phaseespecially for perennial beds
that expand over time.
Lesson #5: The “best” edging is the one that matches your lifestyle. If you love neat lines and mow
weekly, steel or interlocking metal can be incredibly satisfying. If you prefer a softer, cottage feel and don’t want
hard lines everywhere, stone or wood-look edging might blend better. If you want fast results on a budget, plastic
edging can be perfectly fineas long as you install it carefully and accept that you may need to reset a section now
and then.
Lesson #6: A small detail can make the whole yard feel upgraded. This is the sneaky magic of edging:
it’s a relatively small project with an outsized visual payoff. People often report that once one bed has a clean
border, the rest of the yard suddenly looks “unfinished.” (Congratulationsyou’ve unlocked the desire to edge
everything.) The good news: you can tackle edging in phases. Start with the most visible bed, get the look right, and
repeat the same border style elsewhere for a cohesive landscape.
Conclusion: pick a border that looks good and behaves even better
The best landscape borders do two jobs at once: they make your beds look sharp and they reduce the everyday mess of
mulch drift, grass creep, and fuzzy bed lines. Whether you go with classic stone, sleek metal, easy plastic, or
decorative fence panels, the winning move is consistent prep and a border style that matches how you actually use
your yard. Choose one bed, edge it well, and enjoy the rare DIY feeling of “Wow… that immediately looks better.”