Table of Contents >> Show >> Hide
- Why Electroplating and 3D Printing Are a Perfect Pair for Prop Makers
- The Star Wars Prop Example That Got Makers Talking
- How Electroplating Works on a 3D-Printed (Non-Metal) Prop
- What Electroplating Adds Beyond Looks
- Common Mistakes That Keep a Plated Prop From Looking Amazing
- Safety Matters More Than Shine
- DIY or Outsource? A Practical Decision Guide
- Final Thoughts: Why This Technique Feels So Cinematic
- Experience Notes From Makers: What This Process Feels Like in Real Life (Extended Section)
If you’ve ever finished a 3D-printed prop, held it under a bright light, and immediately spotted every layer line you thought you had “definitely” sanded out… welcome to the club. Prop making is a glorious mix of creativity, patience, and lying to yourself about how much sanding remains.
But here’s the good news: electroplating can take a plastic 3D print from “nice fan project” to “wait, is that metal?” In the prop-building world, that’s a huge leap. And when the prop is something inspired by Star Wars, the transformation feels especially dramatic. A resin print that looks a little toy-like can become a reflective, weightier-looking, screen-worthy piece with a metallic finish that catches light beautifully.
This article breaks down how electroplating helps 3D-printed props shine, why it works so well for sci-fi replicas, what the real workflow looks like, and what makers should know before trying it at home. We’ll also cover the part people tend to skip in flashy videos: safety, cleanup, and realistic expectations. (Spoiler: electroplating is amazing, but it will absolutely expose every tiny scratch you left behind.)
Why Electroplating and 3D Printing Are a Perfect Pair for Prop Makers
3D printing gives prop builders speed, design freedom, and easy iteration. You can scale a model, split it into sections, reprint failed parts, and experiment without machining aluminum in your garage like a movie studio wizard. But raw printsespecially FDM printsusually need significant finishing before they look premium.
That’s where electroplating comes in. In simple terms, electroplating deposits a thin metal layer onto a part using an electrical current in a chemical bath. For prop makers, that metal layer can create a more convincing metallic look, improve surface feel, and add durability to high-touch areas. Decorative finishes are the obvious benefit, but conductivity and stiffness can also matter for certain functional builds.
Even better, the workflow plays nicely with the strengths of 3D printing:
- Complex geometry: greebles, grooves, vents, and sci-fi details that would be expensive to machine.
- Fast iteration: reprint one section instead of remaking an entire prop.
- Material flexibility: resin prints for smoother starting surfaces, or FDM prints if you’re willing to do more prep.
- Hybrid results: lightweight printed cores with a metallic exterior look.
In other words, 3D printing builds the shape; electroplating sells the illusion.
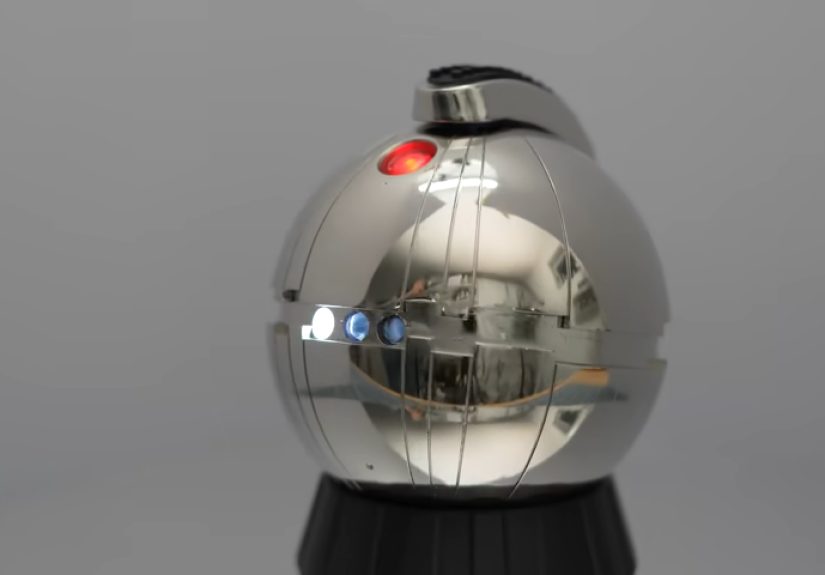
The Star Wars Prop Example That Got Makers Talking
A great example of this workflow in action is the widely shared build of a 3D-printed Star Wars-inspired thermal detonator prop. The maker started with a resin print (smart move for smoother surfaces), cleaned and cured the parts, then sanded and polished them before applying a conductive copper paint. After that, the parts were plated in copper, polished, and finished with a nickel layer to achieve the shiny silver look. The final assembly even included lighting electronics for extra visual effect.
Why did that build resonate so much with prop fans? Because it demonstrated something many first-time builders don’t realize: the “magic” wasn’t just the plating bath. The real magic was the finishing discipline before platingsurface prep, masking, polishing, and patience. Electroplating didn’t hide sloppy work; it rewarded careful work.
That’s the big lesson. Electroplating is less like a magic filter and more like a high-definition camera for your craftsmanship. It makes good prep look incredible and bad prep look… very detailed.
How Electroplating Works on a 3D-Printed (Non-Metal) Prop
Electroplating traditionally works on conductive materials. Most 3D-printed props (resin, PLA, ABS, nylon) are not conductive. So the process for prop builders usually involves creating a conductive surface first, then plating metal onto that surface.
1) Start With the Best Surface You Can Print
If your goal is a chrome-like or polished metal look, resin printing often gives you a head start because the layer lines are finer and the surface is smoother than typical FDM prints. That said, FDM can still workjust budget more time for filler, sanding, and surfacing.
For prop parts with cylindrical shapes, domed caps, and smooth grips (common in sci-fi designs), the print orientation matters almost as much as the printer type. Place visible surfaces where support marks are minimal, and split parts strategically so seams land in natural design breaks.
2) Clean, Cure, and Prep Like a Maniac
This stage determines whether your final finish looks premium or “garage science experiment.” A typical prep flow includes:
- Cleaning off uncured resin or print residue
- Post-curing (for resin parts)
- Removing supports and nubs
- Progressive sanding (coarse to fine grits)
- Spot-filling defects, seams, or pinholes
- Final polishing before conductive coating
Yes, it’s tedious. No, there is no shortcut that beats careful sanding. If your prop has visible scratches before plating, those scratches may remain visible after platingsometimes even more visible because reflective finishes highlight surface defects.
3) Add a Conductive Layer
Because the printed part itself doesn’t conduct electricity, makers often apply a conductive coating such as copper-based conductive paint (sometimes via airbrush for more control). Graphite-based conductive coatings are also used in some workflows, but copper paint is popular when the next step is copper plating.
This coating needs to be even and continuous. Missed spots can become dead zones where plating doesn’t build properly. Masking also matters here: if you have threaded sections, mating surfaces, or snap fits, keep conductive coating (and later plating) off those areas unless you’ve intentionally designed tolerance for extra thickness.
4) Copper Plate for Build and Smoothness
Copper is often used as the first plated layer because it can build nicely, polish well, and create a great foundation for later layers. In hobby and small-shop workflows, the part is connected to a power source and submerged in a copper plating bath. Current, bath chemistry, temperature, agitation, and time all affect the result.
For a prop piece, copper plating can do more than just make it conductive or metallic-lookingit can help create a finish that becomes dramatically better after polishing. Think of copper as the “workhorse layer” that gets you closer to that luxurious sheen.
5) Nickel Plate for the Silver Look
If the goal is a bright silver appearance (like many sci-fi props, greeblies, and “imperial hardware” vibes), nickel plating is a common top layer. Nickel can provide a shiny, chrome-like visual effect and a harder surface feel than a painted metallic finish.
This is one reason plated props look so convincing on camera and in person: the light behavior is different from metallic paint. Paint can look great, but real metal plating tends to reflect highlights more naturally.
6) Polish, Protect, and Weather (If Desired)
After plating, prop makers usually polish the surface to refine gloss and remove haze. At this point, you have a creative decision to make:
- Factory fresh: mirror-bright, polished finish
- Used universe: scuffs, grime washes, edge wear, and patina
- Display piece: bright finish plus clear protective handling strategy (gloves, stand, limited touch)
Ironically, once builders achieve a beautiful mirror finish, many then spend hours making it look battle-worn. Prop making is a wonderfully strange hobby.
What Electroplating Adds Beyond Looks
The headline benefit is appearance, but electroplating can also add practical value depending on the build:
Durability and Wear Resistance
Plated surfaces can better handle light handling and repeated contact than many painted finishes. If your prop has buttons, clips, or sections that get touched during cosplay or demos, plating may hold up better than a standard paint-only finish (though no finish is invincible).
Perceived Quality and Realistic Weight Feel
Even when the part remains mostly plastic, the metallic surface changes how people perceive it. The sound, touch, and reflectivity create a “premium” impression that tricks the brain into reading the object as more metal-like.
Functional Possibilities
Outside props, electroplated printed parts are used in engineering and prototyping when conductivity or specialized surfaces are useful. That broader industrial use case is part of why the method has become more respected among serious makers, not just cosplay enthusiasts.
Common Mistakes That Keep a Plated Prop From Looking Amazing
1) Treating Plating Like a Scratch Filler
Electroplating is not body filler. It can build thickness, but it generally won’t “erase” poor surface prep the way beginners hope. Start smooth.
2) Ignoring Tolerances
Plating adds thickness. If two parts fit perfectly before plating, they may no longer fit after plating. Mask mating surfaces or design extra tolerance into the model.
3) Inconsistent Conductive Coating
Patchy conductive paint can lead to uneven deposition, dull spots, or incomplete plating. Uniformity matters.
4) Rushing the Polish Stages
Most mirror-like results come from repeated cycles of plate → polish → inspect. If you rush the polishing, the finish often looks cloudy or “almost there” (the most frustrating finish category).
5) Forgetting the Final Use Case
A convention prop, a shelf display, and a film close-up hero prop are different jobs. Build and finish accordingly. Sometimes a durable metallic paint plus clear coat is smarter than plating. Sometimes plating is absolutely worth it.
Safety Matters More Than Shine
Electroplating can involve corrosive chemicals, toxic compounds, fumes, and waste disposal issues. This is not a “kitchen table with a snack nearby” type of project. If you’re exploring plating at home, treat it like a real chemical processbecause it is.
Key Safety Basics
- Work in a well-ventilated area appropriate for chemical use (not a closed bedroom workshop).
- Use PPE matched to the chemicals in your specific bath and coatings (gloves, eye protection, protective clothing, and respiratory protection if required by the process/SDS).
- Read the SDS for every chemical product you use, including conductive coatings, cleaners, acids, and plating solutions.
- Never improvise containers, mixing methods, or electrical connections.
- Keep chemicals labeled, sealed, and away from children, pets, and food prep areas.
Chromium-related plating processes deserve especially serious caution. Occupational safety agencies highlight chrome plating as a source of exposure concerns, and hexavalent chromium compounds are treated as particularly hazardous in workplace safety guidance. Even if a hobbyist setup is small, “small” doesn’t mean harmless.
Disposal is another big deal. Leftover chemicals, contaminated rinses, and related materials may qualify for special handling depending on local rules. Don’t pour plating chemicals down the drain because your sink “looks emotionally prepared.” Check local household hazardous waste collection guidance and disposal requirements.
When Outsourcing Is the Smart Move
If your goal is a high-end finish on a hero propand you don’t want to manage chemical handling, ventilation, waste, and process tuningoutsourcing plating to a specialist can be the better option. Many builders do the print prep themselves and then send parts out for metallization/plating. That hybrid approach can deliver stunning results while reducing risk.
DIY or Outsource? A Practical Decision Guide
DIY Electroplating Makes Sense If…
- You enjoy process experimentation and finishing work
- You can set up a safe, controlled workspace
- You’re building multiple props and want repeatable skills
- You accept that early attempts may be practice pieces
Outsourcing Makes Sense If…
- You need a premium finish quickly
- You’re building a one-off hero prop
- You lack safe chemical handling space
- You want industrial consistency on visible parts
There’s no shame in outsourcing. In prop making, the win condition is the final resultnot proving you suffered the most while sanding.
Final Thoughts: Why This Technique Feels So Cinematic
Electroplating makes 3D-printed props shine because it combines the best of both worlds: digital precision and old-school finishing craft. You can print complex sci-fi geometry in plastic, then transform it with metal deposition and polishing into something that looks far more expensive than it is. That leapfrom printed shell to convincing “metal” propis why this technique keeps showing up in maker communities.
For Star Wars-style builds in particular, electroplating is almost unfairly effective. The universe is full of metallic textures, industrial hardware aesthetics, and reflective details that look better when they’re actually metal-coated rather than simply painted silver. If you’re willing to put in the prep work and respect the safety side, electroplating can produce jaw-dropping results.
Just remember the golden rule: the plating bath is not the hero. Your sanding arm is.
Experience Notes From Makers: What This Process Feels Like in Real Life (Extended Section)
One of the most relatable experiences builders report with projects like a plated sci-fi detonator, blaster part, or control knob is that the first “wow” moment happens before the metal bath. It happens when the print is finally sanded smooth enough that it starts reflecting light evenly. Up to that point, the project can feel like endless correction: remove supports, fill nicks, sand seams, repeat. The part often looks worse before it looks better, and many beginners get discouraged right there.
Then the conductive coat goes on, and suddenly the piece starts looking intentional. Not finishedjust promising. Builders often describe this stage as the emotional turning point. You can finally imagine the final prop. It no longer looks like a raw print; it looks like a component.
Another common experience is learning that rotation, positioning, and patience affect the plating result more than expected. New makers tend to think, “If it’s in the bath and connected to power, I’m done.” But the finish quality can depend on how evenly the surface is exposed, whether edges plate faster than recesses, and how carefully current and time are managed. This is where the process starts feeling less like a craft tutorial and more like a cooking recipe you actually have to watch while it’s on the stove.
Polishing after the copper layer is also a major reality check. Makers often expect the metal deposition itself to create a perfect mirror. In practice, the polish is where the finish “wakes up.” A part can look only pretty good straight out of plating, then become dramatically better after careful polishing. This is why experienced builders budget more finishing time than beginners think is necessary.
There’s also a funny psychological effect: once the prop looks convincingly metallic, people start handling it differently. Builders report that friends pick it up more carefully, assume it weighs more than it does, and react with genuine surprise when they learn it started as a print. That reaction is part of the reward. The object crosses an invisible line from “DIY print” to “display-worthy prop.”
Of course, not every experience is glamorous. Many makers also mention minor defects that only become visible under strong light: tiny scratches, soft spots in polishing, or a seam line that was “probably fine” until the metal finish made it obvious from across the room. That can be frustrating, but it’s also educational. Every plated build becomes a feedback loop for better modeling, print orientation, and finishing strategy on the next project.
Finally, experienced prop builders often say the biggest benefit of trying electroplating once is not just the single finished itemit’s the upgraded eye for surfaces. After one plating project, you start noticing reflections, scratch direction, edge transitions, and tolerance zones on every future prop build, even painted ones. In that sense, electroplating doesn’t just make one 3D-printed Star Wars prop shine. It makes the maker sharper.