Table of Contents >> Show >> Hide
- Why Orchid Pots Are Their Own Weird Little Category
- Orchid Pot Anatomy: What Actually Matters
- Materials 101: Plastic, Clay, Ceramic, Baskets, and More
- Picking the Right Pot for Common Orchid Types
- Size Matters (and Smaller Usually Wins)
- Orchid Pot + Potting Mix: A Two-Person Dance
- Drainage Without a Mess: Trays, Saucers, and Slip-Potting
- When to Repot (and When to Leave Well Enough Alone)
- Step-by-Step: Moving to a New Orchid Pot
- Common Orchid Pot Mistakes (So You Can Skip the Drama)
- FAQ: Quick Answers About Orchid Pots
- Conclusion: The Best Orchid Pot Is the One That Matches Your Reality
- Grower Experiences: Lessons from Real Orchid Pot Experiments
- SEO Tags
Orchid people are a special kind of optimistic. We willingly bring home a plant that naturally grows clinging to trees, breathing humid air, and living its best “no soil, no problem” life… and then we try to raise it in a pot on a windowsill. The good news: orchids are not actually here to ruin your confidence. You just need the right orchid pot (and a few habits that keep roots from turning into soup).
This guide breaks down what makes an orchid pot different, which materials work best in real homes, how to pick the right size, and what “extra holes” are really doing. By the end, you’ll know exactly what to buy (or DIY), how to use it, and why your orchid’s roots are the real decision-makers.
Why Orchid Pots Are Their Own Weird Little Category
Most common houseplants are fine with roots that stay moderately moist in a traditional soil mix. Many popular orchids (especially the ones sold everywhere: Phalaenopsis, a.k.a. moth orchids) are epiphytesplants that grow attached to bark or branches in nature. Their roots are designed to grab onto surfaces, get drenched by rain, and then dry quickly while still receiving plenty of oxygen.
That’s why orchid pots obsess over two things: drainage and airflow. If water hangs around too long, oxygen drops, and roots suffocate. If roots can’t breathe, the plant can’t drink properly, and the whole system spirals into the classic orchid tragedy: limp leaves, rotted roots, and you muttering, “But I only watered it out of love!”
Orchid Pot Anatomy: What Actually Matters
Drainage (aka “Please Don’t Marinate My Roots”)
A true orchid pot lets water run through quickly and completely. One tiny hole in the bottom is better than nothing, but multiple drainage holes are usually better because they reduce stagnant wet zones in the center of the potting mix. Orchids want a cycle: soak, drain, dry slightly, repeat.
Airflow and Side Vents
Many orchid pots have side slits or holes. These vents increase oxygen around the root zone and help the potting medium dry more evenly. Side vents can be a game-changer in humid climates (or for heavy-waterers), but they can also make you water more often in dry indoor air. In other words: vents are greatif you match them to your environment.
Stability and Weight
Orchids can be top-heavy, especially while blooming. A lightweight plastic pot might tip if the plant leans toward light, or if a flower spike is doing its dramatic “look at me” thing. Heavier materials (like clay) can add ballast. Alternatively, you can place a lightweight inner pot inside a heavier decorative outer pot for stability.
Visibility (Clear Pots Aren’t Just a Trend)
Clear plastic orchid pots let you monitor roots and moisture without guesswork. Healthy roots are often firm and can appear green when hydrated and silvery when dry (varies by orchid and conditions). Clear pots also help you spot problems earlylike a soggy center, decomposing media, or roots that are calling it quits.
Pot Shape and Height
Some orchids prefer deeper pots; others do better in shallower, wider containers. A pot that matches the plant’s growth habit helps roots settle naturally and keeps the plant stable. A mismatched pot can force awkward root bends, create wet pockets, or encourage wobbling that snaps new root tips.
Materials 101: Plastic, Clay, Ceramic, Baskets, and More
Clear Plastic Orchid Pots
Clear plastic is popular for good reasons: it’s lightweight, affordable, easy to clean, and it gives you visibility into root health. Many clear orchid pots come with extra holes or side slits to boost airflow. If you’re learning orchid care, clear plastic can shorten the learning curve because it shows you what’s happening instead of making you “interpret vibes.”
One trade-off: clear pots can encourage algae growth inside if the pot gets lots of light and stays consistently damp. Algae is usually more of a cosmetic issue than a plant health crisis, but it can be a clue that conditions are staying too wet.
Opaque Plastic Pots
Opaque plastic behaves similarly to clear plastic but without the root visibility. It can be a good choice for growers who already know their watering rhythm or who prefer a cleaner look. If the pot doesn’t have enough holes, you can often add more (carefully) with a drill or a heated tool designed for plastic.
Terra-Cotta / Clay Pots
Unfinished clay is porous, meaning it “breathes” and helps the potting mix dry faster. That can be excellent for orchids that hate staying wetespecially in humid environments or for people who tend to overwater. Clay also adds stability.
The downside: clay can dry too fast in arid homes or during winter heating season. Also, roots can cling to clay, making repotting trickier. If you love clay, consider soaking the potting mix well before potting and plan repotting with patience (and maybe a pep talk for both you and the plant).
Glazed Ceramic Pots and Decorative Cachepots
Many decorative ceramic orchid containers are designed to look great on a tablebut not all of them are designed to drain. The safest approach is to use a functional inner pot (plastic or slotted) and place it inside the decorative outer pot. This “double pot” setup can look stylish and still keep roots healthyjust remember to empty any water that collects in the outer pot.
Wooden Baskets, Net Pots, and Slatted Containers
Basket-style containers create maximum airflow and mimic how many orchids grow in nature. They can be fantastic in greenhouses, bright bathrooms, or humid climates. Indoors, they can dry quicklysometimes too quicklyso they often work best for growers who water frequently or maintain higher humidity.
Glass Containers: Pretty, Risky
Glass vases and closed containers look amazing, but they’re risky for orchids if there’s no drainage. Without a way for water to exit, the bottom stays wet, oxygen drops, and root rot becomes a frequent guest. If you love the glass look, use it as a cachepot (outer container) with a proper draining inner pot.
Picking the Right Pot for Common Orchid Types
Phalaenopsis (Moth Orchids)
Phalaenopsis are the poster child for clear pots because their thick roots and moisture needs are easy to read through plastic. They typically do well in a pot that fits the root mass snugly with a chunky, airy medium (often bark-based). A pot with multiple drainage holesand optionally side ventshelps prevent the “wet core” problem that leads to rot.
Cattleya and Other Sympodial Orchids
Many sympodial orchids (like Cattleya types) appreciate very airy conditions around the roots. Slotted pots, clay pots, or basket-style containers can work wellespecially with chunkier media. These orchids often hate breaking down, soggy mixes, so the container choice should help the mix dry evenly and stay oxygen-rich.
Dendrobium and Oncidium Types
These orchids can vary by species and hybrid, but a common theme is: they like airflow and a pot that doesn’t stay wet for ages. They often do well in well-draining pots with bark-based mixes. Because canes or spikes can make the plant lopsided, stability (either a heavier pot or a cachepot setup) can save your orchid from taking a dive.
Paphiopedilum (Slipper Orchids)
Many Paphiopedilum are more terrestrial-leaning than epiphytes and may prefer slightly more moisture retention than a typical moth orchid. That doesn’t mean “wet,” it means “evenly moist with plenty of air.” A pot with good drainage is still essential, but you may choose fewer side vents or a slightly less open container than you would for a super-airy epiphyteespecially in dry homes.
Cymbidium
Cymbidiums are often grown in more traditional potting approaches than many epiphytes, but they still require excellent drainage. They can become large, so a sturdy pot and a stable setup matter. Their potting mix and container choice should support strong root growth without waterlogging.
Size Matters (and Smaller Usually Wins)
The most common pot mistake is choosing a container that’s too large “so it has room to grow.” For orchids, extra room often equals extra wet mixand extra wet mix equals unhappy roots. In many cases, the best orchid pot is only slightly larger than the existing root mass. Think “snug but not cramped,” not “new apartment with a guest bedroom.”
A practical guideline many growers use: move up about 1–2 inches in diameter at most when repotting, unless you’ve removed significant dead roots and actually need a smaller pot. The goal is to support the plant while keeping the root zone airy and manageable.
Orchid Pot + Potting Mix: A Two-Person Dance
You can’t choose an orchid pot in isolation. The container and the potting medium work as a team:
- Chunky bark mixes drain fast and hold lots of airgreat for many epiphytes, especially in pots that already drain well.
- Sphagnum moss can hold more moisture, which can help in very dry homesbut it can also stay wet too long in poorly ventilated pots.
- As media breaks down over time, it holds more water and less air. That’s one reason repotting matters: you’re not just changing pots, you’re restoring airflow.
Your environment is the tiebreaker. In a humid sunroom, you might pair a clay or slotted pot with chunky bark. In a dry apartment with winter heating, you might choose a plastic pot (possibly with fewer side vents) and a mix that doesn’t dry in a single afternoon.
Drainage Without a Mess: Trays, Saucers, and Slip-Potting
Orchid pots drain a lotby designso plan for it:
- Water over a sink and let the pot drain completely before returning it to its spot.
- Use a drip tray, but never let the pot sit in standing water.
- Slip-potting (inner plastic pot inside a decorative outer pot) can look great and can add stability. Just empty the outer pot after watering so roots don’t sit in a hidden puddle.
When to Repot (and When to Leave Well Enough Alone)
Repotting isn’t a punishment. It’s maintenancelike changing air filters, but for roots. Many growers repot on a cycle of about every 1–3 years, depending on the medium and how quickly it breaks down. Bark mixes commonly need refreshing around the time they begin to decompose and compact; sphagnum moss often needs replacement sooner because it can compress and stay wet longer.
Signs it’s time to repot include:
- Potting mix that looks broken down, dusty, or stays wet much longer than it used to
- Roots escaping aggressively or pushing the plant up and out
- A sour smell or consistent sogginess (often a sign of old, decomposing media)
- The plant wobbles because the root system no longer anchors well
Timing tip: repotting is often easiest when the orchid is starting new root growth (commonly after blooming for many types). Avoid repotting during peak bloom if you canunless the plant’s health is at risk.
Step-by-Step: Moving to a New Orchid Pot
- Prep the new pot and medium. Choose a pot with excellent drainage. If using bark, pre-moisten or soak it so it hydrates evenly.
- Remove the orchid gently. Ease the plant out. If roots cling to the pot, work slowly. (If it’s clay and the roots are welded on, patience is your best tool.)
- Clear old media and inspect roots. Healthy roots are typically firm. Remove dead, mushy, or hollow roots with clean snips.
- Position the plant correctly. Keep the crown (where leaves meet) appropriately above the medium to reduce rot risk.
- Add medium without packing it like concrete. Fill around roots, tapping the pot to settle. You want support, but also air pockets.
- Stabilize if needed. Use stakes or clips so new roots can establish without the plant rocking back and forth.
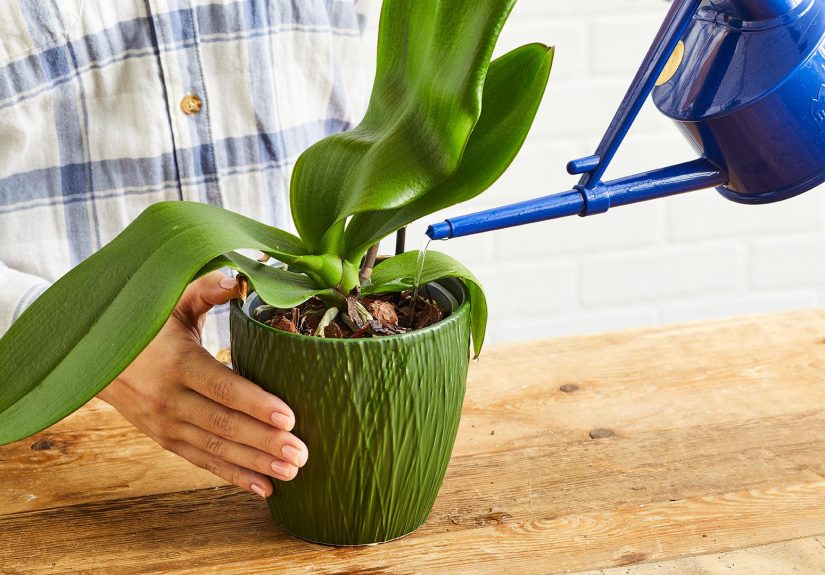
- Water smartly afterward. Lightly water to settle the medium, then adjust to your normal routine. If you trimmed many roots, go easy at first and let the plant recover.
Common Orchid Pot Mistakes (So You Can Skip the Drama)
- No drainage holes. Orchids and “no-drainage chic” rarely live happily ever after.
- Overpotting. Bigger pot = more wet medium = higher rot risk.
- Ignoring airflow. A dense mix in a low-drainage pot is basically a root suffocation simulator.
- Letting the pot sit in water. Drainage only works if you let the pot actually drain.
- Keeping broken-down media too long. Old mix holds water and loses oxygenrepotting restores balance.
- Choosing a pot for looks only. Make it pretty with a cachepot, not with a plant-unfriendly container.
FAQ: Quick Answers About Orchid Pots
Do orchids like tight pots?
Many do. A snug pot helps the medium dry predictably and keeps roots oxygenated. “Slightly snug” is the goaldon’t crush roots, but don’t give them a swimming pool.
Can I use a regular plant pot for an orchid?
Yes, if it drains extremely well. Many growers successfully use standard plastic or clay pots, sometimes with added holes. The bigger requirement is drainage and an appropriate orchid medium.
Are side holes required?
Not always. Side vents can improve airflow and drying. In dry homes, they can also make you water more often. Bottom drainage is non-negotiable; side vents are a useful upgrade when conditions support them.
What’s the easiest “upgrade” if my orchid pot isn’t great?
Add drainage and airflow. Many people switch to a slotted inner pot and place it inside a decorative outer pot. That gives you the best of both worlds: function and style.
Conclusion: The Best Orchid Pot Is the One That Matches Your Reality
Orchid pots aren’t magical. They’re just tools that help you recreate what orchid roots want: quick drainage, lots of oxygen, and a predictable wet-to-dry rhythm. Choose a pot based on your orchid type, your home’s humidity, and how you actually water (not how you swear you water).
When in doubt, go smaller, prioritize drainage, and remember: orchids don’t need luxury. They need breathable, practical housing. Think “well-designed studio apartment,” not “mansion with an indoor pool.”
Grower Experiences: Lessons from Real Orchid Pot Experiments
Orchid pots are one of those topics where everyone has a storyusually because they tried something that looked gorgeous and then spent two months wondering why the plant started pouting. Here are a few real-world scenarios growers commonly run into, plus what those experiences teach.
1) The “Cute Ceramic Cup With Zero Holes” Phase. Someone receives a moth orchid in a decorative ceramic container with no drainage. It’s adorable. It’s also secretly a bathtub. The orchid looks fine for a while because it came with healthy roots. Then leaves soften, flowers fade fast, and the potting mix smells… not fresh. The lesson: if you want the look, use a draining inner pot inside the ceramic cachepot. Water at the sink, let it drain fully, and never let water collect at the bottom like it’s paying rent.
2) The Clear Pot “Aha!” Moment. A beginner switches to a clear plastic orchid pot with lots of drainage holes. Suddenly, watering becomes less mystical. They can see when the center is still damp, when roots have dried, and whether the mix is breaking down. This often reduces overwatering because the grower no longer has to guess. The lesson: visibility is a skill amplifier. If you’re learning, clear pots are like training wheelsbut the cool kind you don’t have to hide.
3) The Clay Pot in a Dry Apartment Surprise. A grower moves an orchid into an unfinished clay pot to “increase airflow.” In a humid climate, it’s a win. In a winter-heated apartment, it becomes a dehydration speedrun. The plant needs water more often, and if the grower keeps their old schedule, roots dry too hard between waterings. The lesson: clay is excellent, but only if your environment and routine can support faster drying. If your home air feels like toast, plastic may be kinderor you may need a less vented setup.
4) Overpotting: The Most Well-Intentioned Mistake. The orchid looks crowded, so someone moves it into a much larger pot. The outer layer dries, but the center stays wet for days. Roots in the core decline first, then the plant stops growing, then it struggles to bloom. The lesson: orchids generally prefer a pot that closely matches the root mass. If your orchid is “crowded,” it may actually be comfortable. Increase pot size modestly, not dramatically.
5) Vented Pots and the “Why Am I Watering So Much?” Reality Check. A grower upgrades to a heavily slotted pot with side vents, expecting instant improvement. The roots do get more airbut the medium also dries faster. If they love frequent watering, the orchid thrives. If they travel often or forget, the orchid sulks. The lesson: the best orchid pot is the one that matches your lifestyle. High airflow setups are fantasticif you’re present enough to keep up.
6) The Algae Panic That Didn’t Need to Be a Panic. In clear pots, green algae can show up on the inside walls. Many growers worry it’s harming the orchid. Usually, algae is more of a sign that the pot stays moist and receives lightconditions algae enjoys. The lesson: algae is a data point. If roots are healthy and the orchid is growing, it’s mostly cosmetic. If the pot is always wet, treat algae as a reminder to review drainage, airflow, and watering frequency.
The common thread in all these experiences is simple: orchid pots are about controlling moisture and oxygennot chasing a perfect aesthetic. Once you match the pot to your space and habits, orchids stop feeling “fussy” and start acting like what they really are: resilient plants with very opinionated roots.