Table of Contents >> Show >> Hide
- What “Perfect Hash Browns” Actually Means
- Choose the Right Potato (Yes, It Matters)
- The Science-y Part (In Plain English): Water Is the Enemy
- The Foolproof Method: Classic Diner-Style Shredded Hash Browns
- What You’ll Need
- Step 1: Shred (Fast), Then Rinse
- Step 2: Dry Until You Think It’s EnoughThen Dry More
- Step 3 (Optional but Powerful): A Short Par-Cook
- Step 4: Season Strategically
- Step 5: Pan + Heat + Fat (The Holy Trinity)
- Step 6: Press, Don’t Stir
- Step 7: Flip Like You Mean It
- Step 8: Drain Correctly (So They Stay Crisp)
- Three Pro-Level Upgrades (Choose Your Adventure)
- Troubleshooting: Why Hash Browns Fail (and How to Fix Them)
- Hash Browns for a Crowd (Without Becoming the Short-Order Cook)
- Quick FAQ
- Conclusion: The Hash Brown Checklist That Never Lies
- Kitchen Experiences: The Real-Life Stuff No One Mentions (Extra )
Hash browns look like the easiest breakfast side on Earth: shred potato, toss in a pan, become a brunch hero. And yetsomehowmany of us end up with a pale, steamy pile of “warm potato confetti” that tastes like regret. The good news: perfect hash browns aren’t a mystery. They’re a system.
Across American test kitchens and diner-style recipes, the same truth shows up again and again: crispiness is mostly about moisture management, plus a couple of non-negotiables like the right potato, the right pan heat, and the confidence to stop poking them every 12 seconds.
What “Perfect Hash Browns” Actually Means
Let’s define the target so your skillet knows what it’s doing:
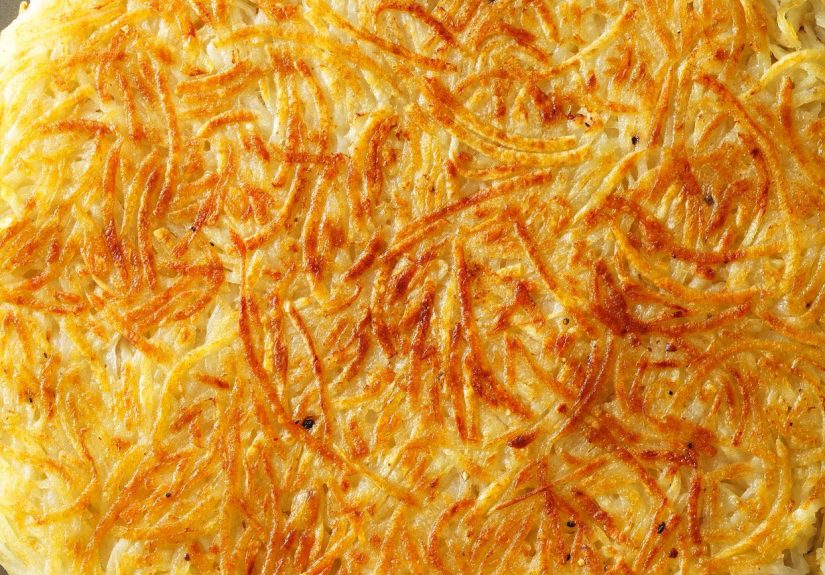
- Deep golden, lacy crust (not just “tan”).
- Tender interior that’s cooked through, not raw in the middle.
- Distinct potato shreds that crisp and fuse into a cohesive cake.
- Not greasythe fat helps brown and crisp, but the end result should feel clean, not soggy.
Choose the Right Potato (Yes, It Matters)
If you want diner-style, shredded hash browns, start with russet (Idaho-style) potatoes. They’re high-starch and relatively low-moisture, which is exactly what you want for browning and structure. Waxy potatoes (like red potatoes) tend to hold more moisture and brown less aggressivelygreat for potato salad, less great for that shattery breakfast crunch.
There’s one exception worth knowing: if you love a creamier interior (think rösti-adjacent), you can use pre-cooked and chilled Yukon Golds and grate them after cooling. That method trades a little lacy crisp for a richer centerand it’s a fantastic “make-ahead” approach.
The Science-y Part (In Plain English): Water Is the Enemy
Browning needs high heat at the surface. But water boils at 212°F. If your potatoes are wet, the pan spends its energy turning water into steam instead of building a crust. Translation: wet potatoes don’t fry; they steam. Steamed potatoes are delicious… in a different recipe. Hash browns want to be fried.
Coarse Shreds Beat Fine Shreds
Use the large holes on a box grater or a coarse shredding disk. Fine shreds cling to moisture and pack too tightly, which encourages gumminess and uneven browning. Coarse shreds create air gapstiny highways for steam to escape.
Rinse (or Soak) to Remove Surface StarchThen Dry Like You Mean It
Most diner-style hash brown methods recommend rinsing the shreds in cold water until the water runs mostly clear. That washes away loose surface starch that can turn gluey on the outside before the inside cooks. But here’s the deal: rinsing only helps if you fully dry afterward. Otherwise you just upgraded from “potato moisture” to “potato moisture plus extra water,” which is not a glow-up.
If you’ve ever made latkes, you may have heard the opposite: “don’t rinse, keep the starch.” That’s a different goal. Latkes often use binder (egg/flour) and want a batter-like cohesion. Shredded hash browns want clean shreds + serious dryness + patient frying.
The Foolproof Method: Classic Diner-Style Shredded Hash Browns
What You’ll Need
- 2 medium russet potatoes (about 1 to 1½ pounds total)
- Kosher salt
- Black pepper
- Neutral oil (canola/vegetable/avocado) and a little butter (optional but delicious)
- Optional: a pinch of onion powder or grated onion (for classic diner vibes)
Step 1: Shred (Fast), Then Rinse
- Peel potatoes (or leave a little skin on for rustic points).
- Shred on the large holes of a box grater into a bowl.
- Cover shreds with cold water, swish aggressively, then drain. Repeat once or twice until the water is noticeably clearer.
Step 2: Dry Until You Think It’s EnoughThen Dry More
Drain the potatoes well, then transfer them to a clean kitchen towel (or strong paper towels). Twist and squeeze hard. If you have a salad spinner, spin first, then towel-squeeze. You’re aiming for shreds that feel dry and slightly rough, not slick and wet.
Pro move: after the first squeeze, toss the shreds to expose wetter bits, then squeeze again. The difference between “good” and “perfect” is usually the second squeeze.
Step 3 (Optional but Powerful): A Short Par-Cook
If you want faster browning and a more reliable cooked-through center, microwave the dried shreds for about 1½ to 2 minutes, then spread them out for a minute so steam can escape. This jump-starts the interior so your crust doesn’t have to wait forever.
Step 4: Season Strategically
Season with salt and pepper after drying. If you salt too early, the potatoes release more water, and you’ll be right back where you startedwringing out sadness. If you want onion flavor, add a tiny pinch of onion powder or a teaspoon of finely grated onion (and then squeeze once more).
Step 5: Pan + Heat + Fat (The Holy Trinity)
Use a large skilletcast iron is fantastic, but a good nonstick works too. Heat over medium-high until hot. Add enough neutral oil to coat the pan generously. When the oil shimmers, add a tablespoon of butter if you want that classic diner flavor. (Butter brings taste; oil brings higher-heat insurance.)
Step 6: Press, Don’t Stir
- Add potatoes in an even layerabout ⅓ to ½ inch thick. Don’t mound them.
- Press into a flat “potato pancake” with a spatula.
- Now the hardest step: do not touch for 6 to 8 minutes.
Peek once by lifting an edge. You’re looking for deep golden brown, not “slightly blonde.” If it’s pale, give it more time. Crispness is a contract: you pay with patience, and the skillet pays you back with crunch.
Step 7: Flip Like You Mean It
Flip in one piece if possible. If it breaks, don’t panicjust flip in sections. Press again. Cook the second side about 4 to 6 minutes until equally golden.
Step 8: Drain Correctly (So They Stay Crisp)
Transfer to a wire rack or paper towels. A rack is best because it lets steam escape instead of pooling underneath. Season with a final pinch of salt while hot.
Three Pro-Level Upgrades (Choose Your Adventure)
1) The “Make-Ahead” Hash Brown: Boil, Chill, Grate, Fry
Want hash browns without shredding raw potatoes at 7 a.m.? Boil whole potatoes until just tender, chill them, then grate and fry. Cooling firms them up, and the interior tends to be creamy while the outside crisps fast. It’s also a slick way to use leftover boiled potatoes from last night’s dinner.
2) The “Extra-Crisp Insurance” Trick: Add a Touch of Potato Starch
After rinsing, some cooks save the starchy sediment from the bottom of the bowl (let the water sit, then pour off). Toss a teaspoon of that starch back into the dried shreds. It helps bind and crisp without turning heavy. If you’re not saving potato starch, a tiny pinch of cornstarch can mimic the effectdon’t overdo it.
3) The Waffle Iron Method: Crisp on Both Sides at Once
If you own a waffle iron, you own a crisping machine. Squeeze-dry your shreds, lightly oil the iron, press potatoes in, and cook until deeply golden. It’s fast, hands-off, and aggressively crunchy. Perfect for people who struggle with flipping a potato pancake before coffee.
Troubleshooting: Why Hash Browns Fail (and How to Fix Them)
“They’re soggy.”
- Cause: Too wet, pan not hot enough, or overcrowded pan.
- Fix: Rinse/soak quickly, then squeeze twice. Preheat oil until shimmering. Cook in batches.
“They’re brown outside but raw inside.”
- Cause: Layer too thick or heat too high.
- Fix: Keep thickness at ⅓–½ inch. Use the microwave par-cook. Lower heat slightly and cook longer.
“They stick to the pan.”
- Cause: Not enough fat, pan not properly heated, or you tried to flip too early.
- Fix: More oil, fully preheated pan, and don’t flip until a crust forms (it releases when ready).
“They turned gray.”
- Cause: Oxidation from shredded potatoes sitting too long.
- Fix: Shred directly into water, or cook soon after shredding.
Hash Browns for a Crowd (Without Becoming the Short-Order Cook)
If you’re feeding more than two people, the skillet method can feel like running a tiny breakfast restaurant out of your own kitchen. Two strategies help:
- Batch and hold: Keep finished hash browns on a wire rack in a 200°F oven while you cook the next batch.
- Use “formats”: Make smaller patties instead of one giant cake; they flip easier and cook more evenly.
Frozen shredded hash browns can also be a legit shortcut for a crowd. The key remains the same: spread in a thin layer, add a little fat, and avoid piling them up so hot air (or oven heat) can crisp the surface.
Quick FAQ
Should I rinse hash browns or not?
For shredded diner-style hash browns: rinsing helps remove excess surface starch that can make the texture gummy. But rinsing only works if you dry thoroughly afterward.
What’s the best fat to use?
Neutral oil for frying performance, plus a little butter for flavor. Bacon fat is also delicious, but it can dominate the potato flavor.
How do I know when to flip?
When the bottom is deep golden and the hash brown releases more easily from the pan. If it clings, it’s still building crustwait.
Conclusion: The Hash Brown Checklist That Never Lies
Perfect hash browns aren’t about secret ingredientsthey’re about repeatable habits: pick russets, shred coarse, rinse if you like, dry like your crunch depends on it (because it does), heat the pan properly, use enough fat, press into a thin layer, and give them the one thing most breakfast foods crave: space and silence.
Do that, and you’ll get the kind of crisp, golden hash browns that make eggs taste more eggy, coffee taste more hopeful, and weekend mornings feel like they’re wearing a cozy diner sweater.
Kitchen Experiences: The Real-Life Stuff No One Mentions (Extra )
Here’s the funny thing about hash browns: they teach you cooking confidence in the most low-stakes, high-reward way possible. Almost everyone’s first attempt has the same plot twistyou think you’re doing nothing wrong, and then you lift the spatula to find a damp, pale mat that looks like it just got out of a pool. That’s not failure; that’s your first lesson in moisture.
A lot of home cooks have a “hash brown moment” when they finally realize the towel squeeze isn’t a cute suggestionit’s the job. You squeeze once, you feel proud, you toss the potatoes in the pan… and then you notice a little puddle forming in the bowl you left behind. That puddle is the crunch you didn’t get. The second squeeze is where the magic starts, and once you’ve experienced the difference, you never go back. It’s like discovering your headphones were only halfway plugged in the whole timesuddenly everything has bass.
Then there’s the “don’t touch them” phase, which is basically a personal growth exercise disguised as breakfast. The pan is sizzling, you’re hovering, and every instinct says, “Stir! Fix! Improve!” Hash browns respond best to the opposite. Leave them alone long enough to form a crust, and they actually become easier to flip. Move them too soon, and they shred into loose strands that brown unevenly. Plenty of people learn this the hard way once: a frantic spatula ballet followed by the acceptance that hash browns do not reward nervous energy.
Another common experience: you make hash browns for friends or family, and suddenly everyone has an opinion about potatoes. Someone wants extra onion. Someone claims butter is the only way. Someone says their diner uses “a secret seasoning.” The truth is, once your texture is nailed, the add-ins become fun instead of stressful. You can fold in a little grated onion for that classic short-order aroma, dust with smoked paprika for a subtle edge, or keep them plain and let hot sauce do the talking. Texture first, personality second.
And if you’ve ever tried to cook hash browns for a crowd, you’ve probably lived through the “why is my pan suddenly tiny?” crisis. The trick is learning to treat hash browns like pancakes: cook in batches, keep them warm on a rack, and stop trying to cram everyone’s portion into one skillet. Once you accept batches as normal, the whole process gets calmerand your hash browns get crispier. The payoff is worth it: when you finally plate a golden, crunchy slab and it audibly crackles under the fork, you feel like you could run a diner for exactly twelve minutes. Which, honestly, is the perfect amount of diner for most of us.