Table of Contents >> Show >> Hide
- What Bass Intonation Actually Means
- What You Need Before You Start
- How to Adjust Intonation on Bass: 9 Steps
- Step 1: Put on Fresh Strings or Make Sure Your Current Set Is Stable
- Step 2: Tune the Bass to Pitch
- Step 3: Check Relief and Action Before Touching the Saddles
- Step 4: Hold the Bass in Playing Position
- Step 5: Use the 12th Fret as Your Main Checkpoint
- Step 6: Decide Whether the String Is Sharp or Flat
- Step 7: Move the Saddle in the Correct Direction
- Step 8: Retune the String and Repeat
- Step 9: Play-Test Across the Neck
- Common Mistakes When Adjusting Bass Intonation
- When to Take Your Bass to a Tech
- Conclusion
- Real-World Experiences Bass Players Usually Have While Adjusting Intonation
If your bass sounds great on the open strings but turns into a grumpy, slightly haunted appliance the moment you play above the fifth fret, your intonation is probably off. The good news is that bass intonation is not black magic. It is mostly a matter of patience, a decent tuner, a screwdriver, and the emotional strength to tune the same string 47 times.
When your bass is properly intonated, notes stay more in tune all the way up the neck. Chords sound cleaner, octaves stop arguing with each other, and your recordings no longer make you wonder whether the problem is your ears, your amp, or the moon. In this guide, you will learn exactly how to adjust intonation on bass in nine practical steps, plus the common mistakes that derail the process and the real-world experiences bass players usually have along the way.
What Bass Intonation Actually Means
Intonation is the accuracy of pitch across the fretboard. A bass can be perfectly tuned when played open and still sound wrong at the 12th fret, 7th fret, or higher up the neck. That happens because intonation is not just about tuning the open string. It is about whether the string length is set correctly so fretted notes land where they should.
On most electric basses, intonation is adjusted at the bridge saddles. Moving a saddle changes the speaking length of the string. A longer string lowers the fretted pitch a little. A shorter string raises it a little. Tiny movement, big difference. Bass setup is full of these tiny movement, big drama moments.
What You Need Before You Start
You do not need a full repair bench or a wizard robe. You do need a few basics:
- A reliable chromatic tuner, preferably a pedal tuner or strobe-style tuner
- The correct screwdriver or hex tool for your bridge
- A fresh or at least stable set of strings
- A clean, well-lit space
- Five to twenty minutes, depending on whether your bass cooperates
One important note before we get into the steps: intonation should not be the first setup adjustment you make. Neck relief, string height, and string gauge all affect intonation. If you changed strings, lowered the action, or tweaked the truss rod recently, intonation comes after those changes, not before. Otherwise, you are building a house on a trampoline.
How to Adjust Intonation on Bass: 9 Steps
Step 1: Put on Fresh Strings or Make Sure Your Current Set Is Stable
Old, corroded, kinked, or half-dead strings are terrible candidates for intonation work. They do not vibrate consistently, and they can fool even a good tuner. If your strings are ancient enough to qualify for museum funding, replace them first.
If you install new strings, stretch them gently and tune them up a few times so they settle in. Bass strings, especially heavier gauges and low B strings, can take a little time to stop drifting. Trying to set intonation on brand-new, unstable strings is like drawing a straight line on a moving bus.
Step 2: Tune the Bass to Pitch
Tune every string to the exact pitch you plan to use. For a standard 4-string bass, that is E, A, D, G. For a 5-string, add low B. For alternate tunings, use the tuning you actually play. Intonation is not a one-size-fits-all setting. If you set it in standard tuning and then drop everything down later, the results will not be as accurate.
Tune carefully and always bring the note up to pitch from below rather than dropping down to it. That helps the string settle more consistently. Then check all strings again, because basses enjoy reminding us that one string’s tension can nudge the others a little out of place.
Step 3: Check Relief and Action Before Touching the Saddles
This step gets skipped all the time, and it is one reason players think intonation is mysterious. It is not mysterious. It is just connected to everything else.
If the neck relief is way off or the action is unusually high, fretting a note stretches the string sharp. You can chase the saddle around forever and still never get the bass to behave. So make sure the neck is reasonably straight for your preferred setup and that the action is where you want it. Intonation is one of the final setup refinements, not the opening scene.
Step 4: Hold the Bass in Playing Position
This sounds minor, but it matters. Gravity, playing pressure, and how the bass sits can slightly affect the reading. If possible, check intonation with the instrument in the same position you would normally play it, not flat on a table like it is awaiting surgery on a reality show.
Use a normal plucking attack too. If you hit the string like you are trying to defeat it in combat, the note may read sharp. A medium, consistent touch gives the tuner a cleaner signal and gives you a more useful result.
Step 5: Use the 12th Fret as Your Main Checkpoint
The most common way to set bass intonation is to compare the 12th-fret harmonic with the fretted 12th-fret note, or in some cases the open string with the fretted 12th-fret note. The 12th fret marks the midpoint of the string and gives you the clearest octave reference.
Pluck the harmonic at the 12th fret and make sure it is in tune. Then fret the string at the 12th fret with normal pressure and check that reading. If the fretted note matches the harmonic, that string’s intonation is correct. If not, the saddle needs to move.
If your bass is wildly out, you can also do a rough starting point by measuring scale length from the nut to the 12th fret and doubling it, then setting the saddle around that length. That does not finish the job, but it can stop you from starting in another postal code.
Step 6: Decide Whether the String Is Sharp or Flat
This is the moment of truth. Compare the fretted 12th-fret note to the harmonic or tuned open note.
- If the fretted note is sharp, the string length is too short.
- If the fretted note is flat, the string length is too long.
This is where many people reverse the adjustment and accidentally make things worse. So here is the easy memory trick: sharp means make the string longer; flat means make the string shorter.
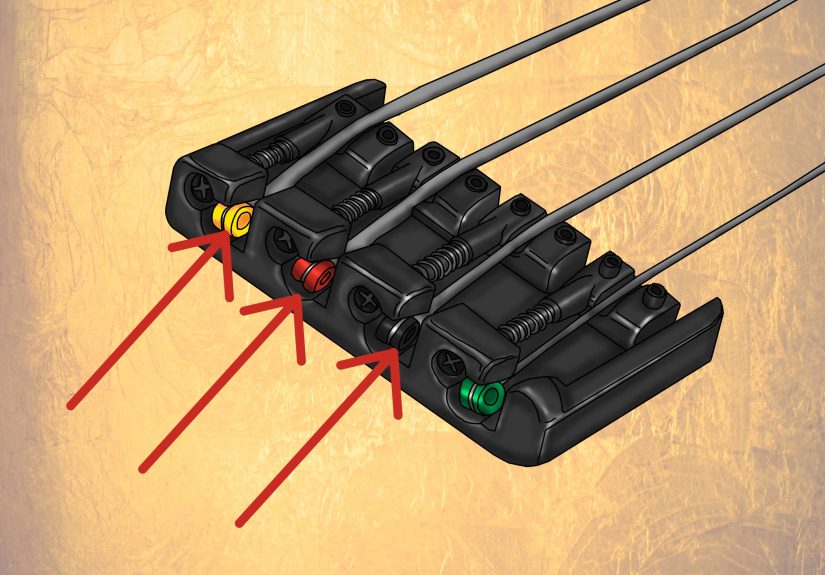
Step 7: Move the Saddle in the Correct Direction
Now adjust the saddle for that string.
- If the fretted note is sharp, move the saddle back, away from the neck.
- If the fretted note is flat, move the saddle forward, toward the neck.
Make small adjustments. Tiny ones. Microscopic ones. The bass does not need you to get dramatic with the screwdriver. A little movement can shift the reading more than you expect, especially on the thinner strings.
Some bridges use Phillips screws, some use flathead screws, and some use hex hardware. Use the correct tool and avoid stripping anything. Nothing ruins a peaceful setup session faster than turning a simple adjustment into a hardware rescue mission.
Step 8: Retune the String and Repeat
After every saddle movement, retune the open string. This is not optional. Moving the saddle changes tension slightly, so checking the 12th fret again without retuning gives you a bad reading.
Retune, recheck the harmonic, recheck the fretted note, then adjust again if needed. Repeat until the fretted 12th-fret note matches as closely as possible. Then move to the next string. Work one string at a time and keep your patience intact. The E string may take two tries. The G string may take six and a personal pep talk.
Step 9: Play-Test Across the Neck
Once all strings are intonated, do not stop at the tuner. Actually play the bass. Check octaves, unison lines, chords if you use them, and notes around the 5th, 7th, 12th, and higher frets. Your tuner is essential, but your ears still get a vote.
If the bass reads well at the 12th fret but still feels off everywhere else, look at the bigger setup picture. Nut slot height, worn frets, neck issues, old strings, excessive finger pressure, or a saddle that has run out of travel may be part of the story. At that point, a professional setup may save you time, frustration, and new vocabulary.
Common Mistakes When Adjusting Bass Intonation
Skipping Basic Setup Work
Intonation is not a magic fix for high action, poor relief, or a neck that moved after a weather change. If those things are off, correct them first.
Using Dead Strings
Old strings can intonate poorly even when the bridge is set correctly. If the bass refuses to behave, the strings may be the real villains.
Plucking Too Hard While Checking Pitch
A really aggressive attack can make a note read sharp. Use a consistent, normal touch when checking with the tuner.
Forgetting to Retune After Every Adjustment
This is one of the biggest reasons beginners get lost. Move saddle, retune, recheck. Every single time.
Expecting Perfect Physics From a Fretted Instrument
A bass can be set up extremely well, but fretted instruments live in the real world, not a math fantasy. You are aiming for excellent practical intonation, not celestial perfection.
When to Take Your Bass to a Tech
DIY bass intonation is absolutely reasonable on most modern basses with adjustable saddles. But there are times when a pro should step in. Get help if the saddle is already at the end of its travel, the neck looks twisted, the frets are uneven, the nut is clearly too high, or the bass still plays out of tune after careful setup work. None of those problems are fixed by endlessly moving one brave little saddle back and forth.
Conclusion
Learning how to adjust intonation on bass is one of the most useful setup skills a player can have. It makes your instrument sound more professional, feel more trustworthy, and record more cleanly. More importantly, it removes that sneaky frustration of wondering why your bass sounds wrong when your tuner swears everything is fine.
The process is simple once you understand the logic: use stable strings, tune accurately, compare the 12th-fret reference to the fretted note, then lengthen the string if the fretted note is sharp and shorten it if it is flat. Repeat patiently, test with your ears, and remember that the goal is a bass that sounds musical across the neck, not just a tuner that looks pleased with itself.
Real-World Experiences Bass Players Usually Have While Adjusting Intonation
One of the most common experiences bass players report is the moment of confusion when the open string is perfectly in tune, but the octave at the 12th fret sounds just a little sour. At first, that feels unfair. You tuned the thing. You did your part. But that is usually the lightbulb moment where intonation starts to make sense. Many players only discover how much intonation matters after recording a bass line with lots of octaves or playing with keyboards, where pitch problems have nowhere to hide. Suddenly the bass is not “kind of off.” It is obviously off.
Another very common experience is realizing that new strings change everything. A player may fight the bridge for half an hour, get nowhere, then throw on a fresh set and solve the problem in ten minutes. That is not superstition. Bass strings wear unevenly, collect grime, and lose consistency over time. Old strings can make you feel like you forgot how screwdrivers work. Fresh strings often reveal that the bass was not cursed after all.
Many players also learn the hard way that action and intonation are best friends who refuse to live separately. Someone lowers the saddles because they want a faster feel, then notices fretted notes going sharp and starts adjusting intonation right away. The results improve a little, but not enough. Only later do they realize the neck relief changed too, or the action became low enough that their normal playing attack started pulling notes around. Bass setup has a way of teaching humility in layers.
There is also the classic “wrong direction” episode. Nearly every player has done it at least once. The fretted note reads sharp, the saddle gets moved the wrong way, the note gets even sharper, and for a brief moment the laws of the universe appear broken. After that happens once or twice, the lesson sticks forever: sharp means longer, flat means shorter. It becomes one of those tiny pieces of knowledge that makes you feel oddly powerful in a hardware-store kind of way.
Players with 5-string basses often mention that the low B can be the most stubborn string in the room. It may need more time to settle, more careful tuning, and more patience with the tuner response. That does not mean the bass is defective. It just means lower frequencies can be fussier, and a heavy string sometimes behaves like it wants a written invitation to cooperate.
Probably the most satisfying experience, though, is the first full play-test after getting the setup right. Notes above the 7th fret stop sounding suspicious. Octaves lock in. Chords bloom instead of wobble. The whole instrument feels calmer, tighter, and more expensive, even though you did not buy anything new. That is why intonation work is worth learning. It is not glamorous, and nobody writes songs about adjusting saddle screws, but it is one of those behind-the-scenes skills that makes a bass feel truly dialed in.