Table of Contents >> Show >> Hide
- What the Strike Plate Does (and Why Your Door Is Mad at It)
- Before You Touch the Strike Plate: Do a 60-Second Diagnosis
- Tools and Supplies (Pick Your Adventure)
- Fix Order Matters: Start Here (It’s Faster Than You Think)
- Fix #1: Tighten the hinges first (even if you “know” it’s the strike plate)
- Fix #2: Try a micro-adjustment by loosening the strike plate screws
- Fix #3: File the strike plate opening (the 5-minute “just a little bit” fix)
- Fix #4: Adjust the strike plate tab (when the door latches, but only if you body-check it)
- When You Actually Need to Move the Strike Plate
- Special Cases (Because Doors Love Plot Twists)
- Common Mistakes That Make the Problem Worse
- Quick Troubleshooting Cheat Sheet
- Real-World Experience: What It’s Like Fixing a Door That Won’t Latch (and What You Learn)
- Conclusion
A door that won’t latch is basically your house saying, “I’d like to be dramatic today.”
Sometimes it’s a tiny alignment issue. Sometimes it’s your door frame slowly auditioning for a “settling” documentary.
The good news: in most homes, the fix is quick, cheap, and doesn’t require an exorcismjust a screwdriver, a little patience,
and the willingness to do the “open-close-open-close” ritual about 37 times.
This guide walks you through how to adjust a strike plate (that metal plate on the door jamb) so the latch actually clicks like it’s supposed to.
We’ll start with the simplest fixes, then move to “okay, now we’re doing light carpentry” solutions.
Along the way, you’ll learn how to diagnose what’s really wrongbecause moving the strike plate when the hinges are the real culprit is like
changing your smoke detector batteries to fix your Wi-Fi.
What the Strike Plate Does (and Why Your Door Is Mad at It)
When you close a door, the spring-loaded latch bolt (the angled metal piece on the door edge) is supposed to slide into the hole in the strike plate.
If that hole is too high, too low, too far in, too far out, or just slightly off, the latch hits metal instead of entering the opening.
The result: the door won’t stay shut unless you slam it like you’re ending an argument in a movie.
Before You Touch the Strike Plate: Do a 60-Second Diagnosis
Step 1: Confirm it’s an alignment issue (not a broken latch)
- Test the latch with the door open: Turn the knob and release. The latch should spring out smoothly.
- Press the latch with your thumb: It should move in and spring back without sticking.
- If it feels gritty, slow, or reluctant, clean around it and add a small amount of dry lubricant (graphite) or a light spray lubricant.
If it still sticks, the latch mechanism may be worn.
Step 2: Find where the latch is hitting
The easiest way is the “lipstick test” (yes, we’re borrowing makeup for constructionrespectfully).
Put painter’s tape on the strike plate. Dab lipstick, chalk, or a marker on the latch bolt’s tip.
Close the door gently and turn the knob. Open the door and look at the mark on the tape.
- Mark is above the strike hole: the latch is too high (or the strike hole is too low).
- Mark is below the strike hole: the latch is too low (often hinge sag).
- Mark is toward the room side / outside edge: the strike plate may be too far in or out.
Step 3: Check for hinge sag (the sneaky cause)
If the latch is hitting low, the door may have sagged. Look at the gaps (“reveal”) around the door:
a bigger gap at the top latch side and a tighter gap at the bottom latch side often points to hinge issues.
Try lifting the door slightly by the knob. If it moves upward, your hinges are probably loose.
Tools and Supplies (Pick Your Adventure)
- Screwdriver or drill/driver
- Painter’s tape + lipstick/chalk/marker (for the alignment mark)
- Metal file (flat file is ideal)
- Utility knife
- Chisel + hammer (for wood mortise adjustments)
- Wood glue + wood toothpicks or a wooden dowel (for filling stripped holes)
- Wood filler (optional)
- 2–3 inch screws (for hinge reinforcement, especially on exterior doors)
- Thin cardboard/plastic hinge shims (optional)
- Safety glasses (because eyes are useful)
Fix Order Matters: Start Here (It’s Faster Than You Think)
Fix #1: Tighten the hinges first (even if you “know” it’s the strike plate)
- Open the door and tighten every hinge screw on the door and jamb side.
- If a screw spins without tightening, pull it out, add wood glue and a few toothpicks into the hole, and reinstall the screw.
- For doors that sag, replace one screw in the top hinge (jamb side) with a 2–3 inch screw that bites into the framing.
This often pulls the door back into alignment without touching the strike plate.
Why this works: a sagging door changes the latch height. You can “chase” that sag forever by moving the strike plate again and again.
Fix the sag, and the strike plate magically becomes innocent.
Fix #2: Try a micro-adjustment by loosening the strike plate screws
If the latch is only slightly off, you may be able to shift the strike plate without removing it.
- Loosen (don’t remove) the strike plate screws about a turn or two.
- Gently nudge the plate in the direction you need.
- Hold it in place while tightening the screws back down.
- Test the latch. Repeat if needed.
If your strike plate holes are round (not slotted), this trick may not give you much movementbut it’s worth trying before you graduate to chisels.
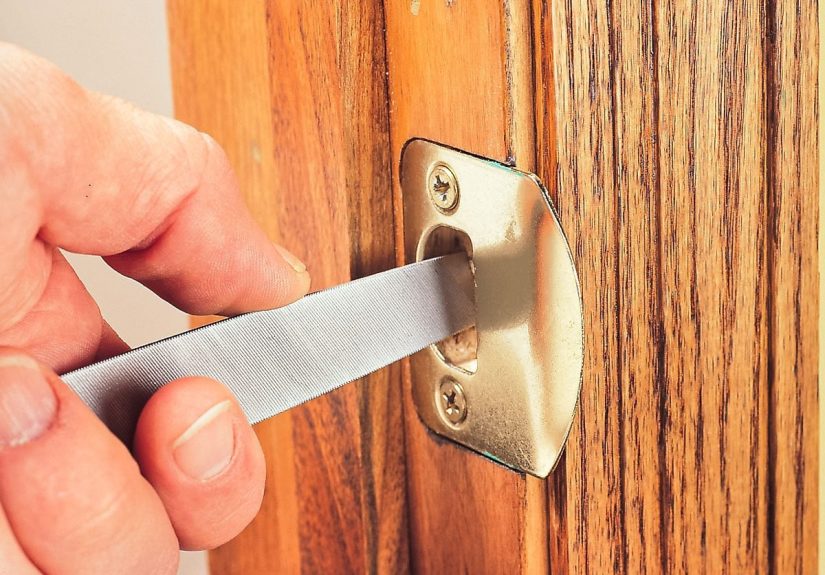
Fix #3: File the strike plate opening (the 5-minute “just a little bit” fix)
When the latch hits the edge of the strike hole by a small amount, filing is often the cleanest solution.
You’re basically widening the opening in the direction the latch wants to golike making a doorway for a stubborn toddler.
- Remove the strike plate (optional but easier).
- Use a flat metal file to enlarge the strike opening only where needed.
- File a little, reinstall, test. Repeat. (You can’t un-file metal. Trust me.)
Pro tip: If you file a lot, touch up sharp edges so the latch doesn’t get chewed up over time.
Fix #4: Adjust the strike plate tab (when the door latches, but only if you body-check it)
Many strike plates have a small lip/tab that the latch slides over. If the door closes but doesn’t “click” unless you push hard,
that tab may need a slight bend.
- To tighten the latch feel: gently bend the tab inward (toward the stop molding) so the latch catches sooner.
- To loosen it: bend it outward slightly.
Go gently. You’re persuading metal, not forging a sword.
When You Actually Need to Move the Strike Plate
If the latch is missing the strike opening by more than a small amount (or filing would turn your strike plate into abstract art),
it’s time to reposition the plate.
Step-by-step: Reposition the strike plate the right way
- Mark the correct position: Do the tape-and-lipstick test again and draw a clear pencil line where the latch wants to enter.
- Remove the strike plate: Back out the screws and set the plate aside.
- Fill the old screw holes:
- Fast method: wood glue + toothpicks (or a thin dowel). Tap them in, let dry, trim flush.
- Neat method: wood filler. Let it cure fully and sand flush.
- Shift the plate and trace: Hold the strike plate in the new position. Trace the outline and the latch opening.
Make sure the latch hole lines up with your mark. - Adjust the mortise (the recessed pocket in the jamb):
If the plate needs to move up/down, you’ll likely need to chisel the mortise slightly so the plate sits flush.
Chisel shallowly and test-fit often. - Open up the wood behind the strike hole if needed: Sometimes the metal hole is fine, but the wood pocket behind it is too tight.
Chisel the pocket so the latch can fully enter. - Drill pilot holes: This prevents splitting and helps screws go in straight.
- Install the strike plate: Screw it down snugly and test the latch.
- Fine-tune: If it’s close but not perfect, do small filing rather than moving the plate again.
How far should you move it?
Move it only as far as necessary for a clean latch. A tiny shift (even 1/16 inch) can be the difference between
“click” and “I guess I live in a haunted house now.”
Special Cases (Because Doors Love Plot Twists)
If the door sticks in humid weather and won’t latch
Seasonal swelling can push the door just enough to throw alignment off.
If it latches fine in winter but not in summer, your best long-term fix might be:
- Tighten/adjust hinges and use longer screws for stability.
- Lightly sand or plane rubbing spots (confirm with a rub mark first).
- Use strike plate filing as a small seasonal “buffer,” but don’t oversize the hole so much that the latch rattles.
If the latch lines up, but the door still won’t stay closed
- Check the latch bolt: if it’s worn, it may not extend fully.
- Make sure the strike pocket in the wood is deep enough for full latch travel.
- Confirm the door stop (the trim the door closes against) isn’t preventing the door from closing far enough.
If this is an exterior door (security matters)
Don’t treat exterior doors like interior doors. Use longer screws for strike plates and hinges so they bite into framing, not just trim wood.
Consider a reinforced strike plate if your current one is thin or the jamb wood is chewed up.
A “repair kit” style strike plate can also cover old damage and give you fresh mounting holes.
Common Mistakes That Make the Problem Worse
- Over-filing the strike plate: A giant hole can cause rattling, poor latching, and reduced security.
- Moving the plate without fixing loose hinges: The door will sag again and you’ll be back here next week.
- Skipping pilot holes: Screws wander, wood splits, alignment suffers.
- Not checking the wood pocket behind the metal plate: The latch needs space behind the strike plate, not just a metal opening.
- Using short screws in soft, worn wood: If the jamb holes are stripped, the plate will drift over time.
Quick Troubleshooting Cheat Sheet
- Latch hits above hole: plate likely needs to go up (or door needs hinge adjustment).
- Latch hits below hole: door likely sagging; tighten hinges, consider long screw in top hinge.
- Latch hits the face of the plate: file the metal opening, or move plate slightly.
- Door closes but won’t “click” unless pushed: adjust/bend the strike tab or deepen the pocket.
Real-World Experience: What It’s Like Fixing a Door That Won’t Latch (and What You Learn)
The first time you fix a stubborn door, you expect a cinematic moment: one perfect twist of the screwdriver andclickproblem solved.
What actually happens is more like: tighten a hinge, test, tighten a different hinge, test, whisper “why are you like this,” test again,
and then finally realize your strike plate is off by the thickness of a potato chip.
One of the most common “aha” moments is discovering that the strike plate isn’t always the villain.
I’ve seen doors that wouldn’t latch because one top hinge screw had stripped out just enough to let the door sag.
The strike hole looked “wrong,” so the temptation was to start chiseling the jamb. But a single longer screw into the framing pulled the door up and in,
and suddenly the latch lined up like it was never a problem. It’s the home repair version of realizing your phone wasn’t brokenyou were just on airplane mode.
Another real-world lesson: doors tell on themselves if you let them. The lipstick-and-tape trick feels silly until you try it.
Without a mark, you’re guessing: “Is it high? low? is the latch hitting metal or wood? am I imagining things?”
With a mark, the door is basically handing you a report card: “You are 1/8 inch too low. Fix it.”
It also prevents the classic DIY spiral where you move the strike plate the wrong way, then “correct” it three more times,
and end up with a jamb that looks like it lost a fight with a beaver.
Filing the strike plate is another surprisingly satisfying experienceif you do it slowly. The temptation is to go full speed and remove a lot of metal,
because you’re so close and you just want the door to shut. But metal filing rewards patience. A couple of strokes, reinstall, test.
When you finally hear that clean click, it feels like your house just exhaled. Bonus: you didn’t have to repaint anything, patch wood, or explain new tool purchases.
Moving the strike plate, on the other hand, is where you learn to respect “small measurements.” Shifting something 1/16 inch can feel like nothing,
but it can completely change how the latch meets the opening. The best results come from treating it like tailoring, not demolition:
fill old holes properly, drill pilot holes, chisel only what you must, and keep test-fitting.
There’s a quiet confidence that comes from doing this neatlybecause the door doesn’t just latch; it latches smoothly, quietly, and consistently.
It’s the difference between a door that says “I’m fine” and a door that says “I’m fine!!!” with tears in its eyes.
The most practical lesson? Most door problems are really “house movement” problems. Humidity swells wood.
Buildings settle. Hinges loosen. A door that latched perfectly last year can decide to become unreliable in the summer.
Once you’ve fixed one door, you start noticing patterns: a slightly uneven gap, a latch that rubs on one side,
or a knob that needs a tiny lift to catch. And then you realize: you didn’t just fix a dooryou learned a repeatable diagnostic skill.
That’s a rare win in DIY, where so many projects are one-time battles.
Finally, there’s the emotional experience of fixing the door that won’t latch at the worst possible time.
You’ll notice it when you’re carrying groceries, trying to put a baby down, hosting guests, or sneaking a midnight snack like a raccoon with a mortgage.
After you fix it, the house feels calmer. The door closes gently. No slamming. No shoulder-checking.
And every time it clicks, you get a tiny moment of satisfactionlike your home is saying, “Okay, we’re cool now.”
Conclusion
Adjusting a strike plate is one of those DIY fixes that looks mysterious until you realize it’s just alignment and small corrections.
Start by tightening hinges and marking where the latch hits. If it’s barely off, filing the strike opening might be all you need.
If it’s clearly misaligned, reposition the strike plate properly: fill old holes, shift carefully, and adjust the mortise so everything sits flush.
Do it slowly, test often, and aim for that smooth, satisfying clickthe sound of a door doing its job and not auditioning for a drama series.