Table of Contents >> Show >> Hide
- What Is Block Printing?
- Why Beginners Love Block Printing
- Block Printing Supplies for Beginners
- How to Design for a Good First Print
- Step-by-Step: How to Block Print
- Paper vs. Fabric Block Printing
- Common Block Printing Mistakes and How to Fix Them
- Easy Beginner Block Print Ideas
- How to Get Better at Block Printing Fast
- Beginner Experiences: What Block Printing Really Feels Like the First Few Times
- Conclusion
Block printing is one of those crafts that looks impressively artsy but secretly loves beginners. You do not need a giant studio, a mysterious apron covered in centuries of ink, or the temperament of a tortured genius. You need a design, a block, some ink, and a willingness to accept that your first print may look a little “handmade.” That is not failure. That is character.
If you have ever wanted to make your own cards, art prints, wrapping paper, tea towels, or fabric patterns, block printing is a wonderfully practical place to start. It blends drawing, carving, and printing into one satisfying process. Better yet, it teaches you to simplify your design, notice texture, and enjoy the magic moment when you lift the paper and finally see the result. That reveal never gets old.
This beginner-friendly guide explains what block printing is, what supplies you actually need, how to make your first print step by step, and how to avoid the common mistakes that turn enthusiasm into muttered complaints. By the end, you will know how to block print with more confidence and a lot less guesswork.
What Is Block Printing?
Block printing is a relief printmaking method. In plain English, that means you carve away the parts you do not want to print, roll ink onto the raised surface that remains, and press it onto paper or fabric. The carved-out areas stay blank, while the raised areas transfer the image.
Traditional block printing often uses wood, but beginners usually start with softer materials such as linoleum, rubber carving blocks, or soft printing foam. These surfaces are easier to cut and more forgiving when your hand is still learning how much pressure to use. That is why beginner block printing feels accessible: the process is old-school, but the entry point is refreshingly modern.
There are several kinds of relief printing, including woodcut, linocut, and stamp-style block printing. For beginners, the easiest route is usually a simple lino or soft rubber block print in one color. It keeps the process manageable while still looking stylish and handmade in the best way.
Why Beginners Love Block Printing
There is a reason block printing for beginners has become so popular. First, it does not require a printing press. You can print by hand using a baren, a wooden spoon, or steady pressure from your palms. Second, the supplies can be modest. Third, once you carve one block, you can print it again and again on paper, tags, cards, gift wrap, notebook covers, and even some fabrics.
It is also a craft with a lovely balance of control and surprise. You can plan your design carefully, but every print still has a little variation. That small unpredictability is part of the charm. In a world obsessed with polished perfection, block printing proudly says, “Actually, I like a little personality.”
Block Printing Supplies for Beginners
The Basic Starter List
- A soft carving block, linoleum block, or rubber block
- Carving tools or gouges
- A pencil and paper for sketching
- Tracing paper if you want to transfer a design
- A brayer, which is the small roller used to spread ink
- Block printing ink
- An inking tray, acrylic sheet, or smooth disposable surface
- Paper or fabric
- A baren, wooden spoon, or other burnishing tool
- Newsprint, scrap paper, or newspaper to protect your table
Choosing the Right Block
If you are just learning how to block print, start with a soft carving block. It is easier on your hands and less intimidating than traditional linoleum. Harder materials can create beautiful detail, but they are less friendly when you are still figuring out how to guide the cutter without launching it into orbit.
Choosing the Right Ink
Use block printing ink, not regular acrylic paint. This matters. Acrylic paint dries too quickly and does not transfer the same way. Water-soluble block printing ink is great for paper and easy cleanup. If you want to print on fabric, use a fabric-specific block printing ink and follow the product instructions, because paper ink and fabric ink do not always behave the same way.
How to Design for a Good First Print
Beginners often make the same first mistake: choosing a design that is way too complicated. Tiny lettering, delicate facial expressions, and a forest of microscopic leaves may sound fun until you are hunched over the block wondering why you did this to yourself.
Start with bold shapes, strong contrast, and simple lines. Think leaves, florals, geometric patterns, stars, birds, mushrooms, fruit, houses, moons, or abstract motifs. If your design includes text, remember that block prints reverse when printed. So yes, letters must be transferred backward unless you enjoy making mysterious mirrored messages.
A good beginner design has three qualities: clear shapes, enough open space to carve comfortably, and a strong silhouette. Black-and-white thinking helps here. Ask yourself: what will be inked, and what will stay blank?
Step-by-Step: How to Block Print
Step 1: Sketch Your Design
Draw your design on paper first. Keep it simple and high contrast. Refine it until the shapes feel balanced. If you are using words, reverse them before transferring the design.
Step 2: Transfer the Design to the Block
You can draw directly onto the block with pencil, trace the design, or transfer it using graphite on the back of your paper. Some artists also flip an image digitally before printing it out. The goal is simple: make sure the block shows the reversed version of the image you want in the final print.
Step 3: Carve the Negative Space
Now for the satisfying part. Use your carving tool to remove the areas that should stay white or unprinted. Always carve away from your hands and fingers. Go slowly. You are not trying to speed-run printmaking. Begin with larger areas, then move into details.
Different blades create different marks. Narrow V-shaped gouges make thin lines, while wider U-shaped gouges remove broader areas. If you are unsure, test each blade on a scrap block first. That tiny test can save you from carving a giant accidental canyon through your design.
Step 4: Roll Out the Ink
Place a small amount of block printing ink on your tray and roll it out with the brayer until it forms a thin, even layer. You are looking for smooth coverage, not a swamp. Too much ink fills detail and causes blurry prints. Too little ink creates weak, patchy results.
Step 5: Ink the Block
Roll the brayer over the block evenly. The raised surface should be coated, while the carved grooves should stay mostly ink-free. If the ink starts collecting in the carved lines, you have probably used too much.
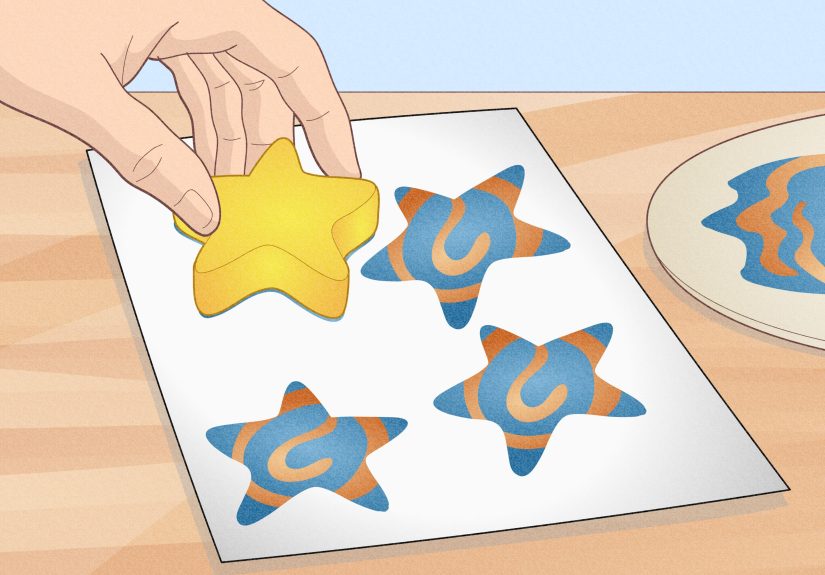
Step 6: Make the Print
Place your paper or fabric carefully over the inked block. Press evenly using a baren, spoon, or your hands. Rub the back in circular motions, paying attention to edges and corners. Then peel the paper up slowly from one side and enjoy the dramatic reveal like the artist you are.
Step 7: Let It Dry
Drying time depends on the ink and surface. Paper prints may dry fairly quickly, while fabric projects may need extra curing time. Do not stack fresh prints unless you enjoy accidental abstract collaborations.
Paper vs. Fabric Block Printing
Printing on paper is usually the easiest place to begin. It is affordable, easy to test, and ideal for learning pressure, ink amount, and registration. Smooth paper often captures detail better than heavily textured paper, especially when you are still practicing.
Fabric block printing is exciting because it turns your art into something functional, but it asks a little more from you. You need fabric ink, a stable surface, and fabric that is prepared correctly. Cotton and linen are popular choices. Wash and iron the fabric first so you are printing on a clean, smooth surface rather than on invisible laundry drama.
If you plan to make tea towels, tote bags, napkins, or pillow covers, test your ink on scrap fabric first. Some inks need curing, some need heat setting, and some are designed to air cure. Read the label carefully. Your future self, holding a still-lovely printed tote, will appreciate the effort.
Common Block Printing Mistakes and How to Fix Them
Too Much Ink
If your print looks smudgy or the details disappear, you probably overloaded the brayer. Roll out less ink and aim for a thin, tacky layer.
Too Little Pressure
If the print looks pale or incomplete, you may not have pressed firmly enough. Increase pressure gradually and evenly, especially around the edges.
Overly Complex Designs
If you chose a design with microscopic details, simplify it. Bold shapes make stronger first prints and teach the process more effectively.
Unsafe Carving
Always carve away from yourself, keep fingers out of the tool’s path, and work on a stable surface. Printmaking should be exciting, not dramatic.
Forgetting the Mirror Image
This is the classic beginner surprise. Your print is reversed from the block. Plan for that, especially with text and directional designs.
Easy Beginner Block Print Ideas
- Simple leaf or botanical motifs
- Geometric patterns for wrapping paper
- Fruit slices or mushrooms for greeting cards
- Moon and stars for art prints
- Repeating floral stamps for tea towels
- Initials or monograms for gift tags
- Abstract stripes, dots, and texture patterns
One of the smartest ways to learn is to carve a small stamp-sized design first. Repeat it multiple times on one sheet of paper. This helps you practice consistency, spacing, and pressure without committing to a large block.
How to Get Better at Block Printing Fast
Practice tiny projects instead of one grand masterpiece. Keep a test sheet nearby and label what you change each time: more pressure, less ink, different paper, different carving depth. That turns every “mistake” into useful data instead of a reason to sigh dramatically at your craft table.
It also helps to save your early prints. Not because they will all be stunning, but because comparison is motivating. After a few sessions, you will start to notice cleaner lines, better ink coverage, and more thoughtful designs. That progress feels excellent.
Beginner Experiences: What Block Printing Really Feels Like the First Few Times
The first experience most beginners have with block printing is surprise. Not at the concept, because the concept seems straightforward enough, but at how physical the process feels. Drawing is mostly wrist and fingers. Block printing involves your whole upper body. You sketch, brace the block, control the carving tool, roll out the ink, lean into the pressure, and then hold your breath for the reveal. It is part art class, part tiny upper-body workout, and part suspense movie.
Many beginners also discover that their first carved block looks much better after printing than it does while they are making it. During carving, it can feel oddly crude. The lines seem too simple. The shapes feel too chunky. You may be tempted to keep carving and “improving” it until you accidentally remove the very thing that made the design strong. Then you print it once and realize the boldness was the magic all along. This is a common and valuable lesson: block printing rewards clarity more than fussiness.
Another frequent beginner experience is learning that ink has opinions. You may think you are the boss, but the ink would like a word. Too much ink and the print becomes blurry. Too little and it looks faint. Uneven rolling creates patchiness. A rushed hand makes a smudge. The good news is that this learning curve is normal. After a handful of prints, most beginners start recognizing the sweet spot by sight and sound. Yes, sound. The brayer begins to make a soft tacky whisper when the ink layer is right, and once you hear it, you feel weirdly powerful.
Beginners also tend to remember their first successful reveal with almost ridiculous affection. Lifting the paper and seeing a crisp print underneath is deeply satisfying. It feels handmade in the best possible way. Even when the result is not perfect, it often has more personality than something polished by machine. That is one reason so many people stick with relief printmaking. It offers proof that small imperfections can make something feel more alive.
There is also a mental shift that happens after the first session or two. At first, many people approach block printing like a craft they want to control completely. Soon, they begin to enjoy the collaboration between intention and accident. A slightly uneven edge, a visible texture in the ink, or a faint variation between prints can become part of the aesthetic. Instead of fighting every handmade quality, beginners begin to use those qualities on purpose.
Finally, one of the best experiences related to learning how to block print is discovering how many directions it can go next. A first block becomes a greeting card. Then maybe a repeat pattern. Then printed fabric. Then holiday tags. Then custom stationery. Then suddenly you are saving scraps of paper because they would be “great for test prints,” which is how you know the hobby has officially moved in and unpacked its bags.
Conclusion
Learning how to block print is not about producing museum-worthy masterpieces on day one. It is about understanding the relief printing process, choosing the right beginner supplies, building confidence with simple designs, and enjoying the hands-on rhythm of carving, inking, and printing. Start small, keep your shapes bold, use the correct ink, and give yourself permission to learn through repetition.
If your first print is a little imperfect, congratulations: you are doing real block printing. With a few tools and some practice, you can create handmade paper goods, fabric projects, and original art that feel personal, tactile, and unmistakably yours.