Table of Contents >> Show >> Hide
- Before You Start: Make Sure Wood Is the Right Choice
- Quick Table of Contents
- Step 1: Check Codes, Permits, and Utilities
- Step 2: Plan the Wall and Calculate Materials
- Step 3: Choose the Right Wood and Fasteners
- Step 4: Mark the Layout and Set Grade Lines
- Step 5: Dig the Trench
- Step 6: Build a Compacted Gravel Base
- Step 7: Set and Pin the First Course
- Step 8: Stack Courses with Staggered Joints and Batter
- Step 9: Install Drainage Behind the Wall
- Step 10: Add Deadmen/Tiebacks for Strength
- Step 11: Backfill, Cap, and Finish Grading
- Step 12: Protect, Landscape, and Maintain
- Common Mistakes (So You Don’t Star in a “DIY Fail” Montage)
- FAQ: Quick Answers DIYers Actually Need
- Conclusion
- Real-World Experiences: What I Wish I’d Known (An Extra of Lessons)
Building a wood retaining wall is one of those yard projects that looks simpleuntil you realize you’re basically negotiating with gravity, dirt, and water (and water always thinks it’s the boss). The good news: for a low-to-moderate landscape timber retaining wall, you can absolutely get a pro-looking result with careful planning, solid base prep, and a drainage setup that would make a rainstorm sigh and move along.
This guide walks you through a 12-step process to build a wood retaining wall that helps prevent erosion, creates usable flat space, and doesn’t turn into a leaning “modern art installation” after the first wet season.
Before You Start: Make Sure Wood Is the Right Choice
Wood retaining walls are awesome for garden terraces, play areas, and small slope fixes. They’re also more forgiving to DIYers than poured concrete (no offense to concrete, but it’s not known for second chances).
Keep your DIY wall in the “smart zone”
- Height matters. Many DIY timber walls are best kept under about 4 feet unless engineered.
- Water matters more. Most retaining wall failures trace back to poor drainagewater adds weight and pressure behind the wall.
- Soil matters. Expansive clay, high groundwater, and soft/loose fill can require a different design or a pro.
Tools & materials (typical)
Tools: shovel, rake, level (2–6 ft), string line + stakes, hand tamper/plate compactor, drill + long bit, circular saw, impact driver, sledgehammer, wheelbarrow, PPE (gloves, eye protection).
Materials: pressure-treated landscape timbers (often 6×6 or 8-foot timbers), crushed stone (often 3/4-inch), landscape filter fabric, 4-inch perforated drain pipe + fittings, rebar stakes/spikes, exterior-rated structural screws/spikes, wood preservative for cut ends, topsoil + mulch.
Quick Table of Contents
- Step 1: Check codes, permits, and utilities
- Step 2: Plan the wall and calculate materials
- Step 3: Choose the right wood and fasteners
- Step 4: Mark the layout and set grade lines
- Step 5: Dig the trench
- Step 6: Build a compacted gravel base
- Step 7: Set and pin the first course
- Step 8: Stack courses with staggered joints and batter
- Step 9: Install drainage behind the wall
- Step 10: Add deadmen/tiebacks for strength
- Step 11: Backfill, cap, and finish grading
- Step 12: Protect, landscape, and maintain
Step 1: Check Codes, Permits, and Utilities
Start here, because nothing ruins a weekend like discovering your “cute little wall project” needs a permit, engineering, or a surprise meeting with the gas line.
- Call utility locating (811 in the U.S.). Do it before any digging, even if you “think it’s clear.”
- Check permit thresholds and rules. Many areas require permits above certain heights, or if the wall supports extra loads (driveways, structures, fences, etc.).
- Know your “retained height.” Some jurisdictions measure from the bottom of footing to top of wall, not just the visible face.
- When in doubt: call your local building department. It’s faster than rebuilding.
Step 2: Plan the Wall and Calculate Materials
Good walls start with good math. (Don’t worryyard math is mostly “how many trips to the store will I regret?”)
Plan the basics
- Length: measure the run of the wall.
- Height: measure the grade change you’re holding back (the “retained height”).
- Terracing: if the slope is tall, consider multiple shorter walls instead of one towering wall of doom.
- Drainage outlet: decide where water can exit (“daylight”) downhill.
Material planning tips
- Timbers: estimate courses by dividing wall height by timber thickness (e.g., 6 inches per course for a 6×6 timber, minus what’s buried).
- Crushed stone: you’ll need it for the base and behind the wall for drainage backfill.
- Fabric: filter fabric helps keep soil from clogging your gravel and drain pipe.
- Rebar/spikes and screws: plan plentyhardware is cheaper than wall failure.
Step 3: Choose the Right Wood and Fasteners
Your wall will touch soil and moisture constantly. Translation: untreated wood will rot like a banana in a hot car.
Wood choices that actually belong in the ground
- Pressure-treated, ground-contact rated lumber/timbers are the standard choice.
- Naturally rot-resistant species (like cedar/redwood) can work for short decorative walls, but lifespan varies and costs can climb fast.
- Avoid old creosote railroad ties for residential landscape projectsespecially near gardens or play areas.
Fasteners: don’t cheap out
- Use hot-dip galvanized or stainless hardware rated for pressure-treated lumber.
- Plan on structural screws or spikes designed for exterior/ground-contact conditions.
- Seal cut ends with a wood preservative, because fresh cuts are basically open doors for decay.
Step 4: Mark the Layout and Set Grade Lines
Set stakes along the wall line and run a tight string line. This string is your boss nowlisten to it more than your “eyeballing” instincts.
- Use the string line to keep the wall straight (or smoothly curved if you’re designing a curve).
- Mark the front face of the wall and identify where the first course will sit.
- For sloped yards, plan on “stepping” the wall: sections of the base at different elevations so the top stays neat.
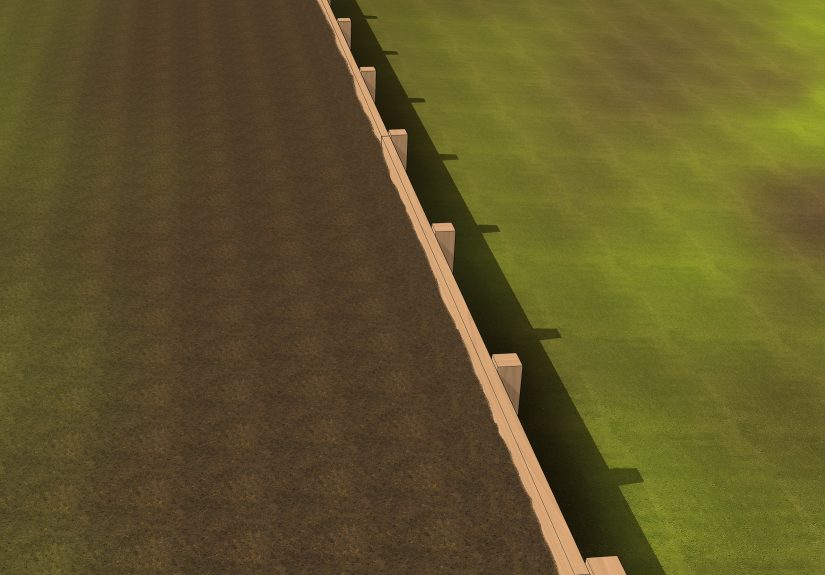
Step 5: Dig the Trench
This is the workout portion of the program. Hydrate. Stretch. Consider bribing a friend with pizza.
- Dig a trench along the layout. A common DIY approach is around 6 inches deep for the base area, plus room for gravel.
- Make the trench wide enough for the timber depth and a little working room.
- Remove roots, soft soil, and anything squishy. If the ground feels like a sponge, fix that before you build.
Step 6: Build a Compacted Gravel Base
If your retaining wall has a secret identity, it’s “Base Preparation.” A wall is only as good as what it sits on.
- Compact the trench bottom with a hand tamper or plate compactor.
- Add crushed stone (often 3/4-inch) in layers.
- Compact each layer until it feels solid underfoot.
- Check for levelyour first course must be level, because gravity doesn’t negotiate.
Step 7: Set and Pin the First Course
The first course is the foundation. Take your time here, because “fix it later” gets expensive fast.
- Set the first timber(s) on the compacted base.
- Check level front-to-back and side-to-side.
- Pre-drill holes and drive rebar stakes/spikes through the timber into the ground to anchor it.
- Cut timbers as neededand treat cut ends with preservative.
Pro tip: If your first course is perfect, the rest of the wall feels like assembling sturdy, heavy “yard LEGO.” If it’s not perfect, everything becomes a philosophical lesson about regret.
Step 8: Stack Courses with Staggered Joints and Batter
Now you build upwardcarefully, consistently, and with a tiny bit of paranoia (the healthy DIY kind).
Stacking rules that keep walls from looking like they’re melting
- Stagger joints between courses (avoid lining up seams vertically).
- Fasten each course to the one below using exterior-rated structural screws/spikes.
- Build in batter (a slight lean into the hillside). This helps the wall resist pressure.
- Check alignment often with a level.
Example batter guideline
A common rule of thumb is leaning the wall into the slope about 1 inch for every 12 inches of wall height. That’s subtle, but it adds stability and helps the wall fight back when the soil gets heavy and wet.
Step 9: Install Drainage Behind the Wall
Drainage is not an “extra.” It’s the difference between a retaining wall and a future pile of expensive lumber doing a slow-motion collapse.
A simple drainage setup that works
- Line the back side behind the wall with filter fabric (think of it as a bouncer that keeps fine soil from clogging your gravel).
- Add a zone of drainage gravel behind the wall.
- Place a 4-inch perforated drain pipe at the base behind the wall, sloped so it can drain to daylight.
- Cover the pipe with more gravel.
- Wrap/overlap fabric over the gravel so soil stays out of the drainage layer.
Reality check: wet soil pushes harder. That’s why drainage isn’t just “nice,” it’s structural.
Step 10: Add Deadmen/Tiebacks for Strength
When walls get taller, they need help resisting the pressure behind them. That’s where deadmen anchors (tiebacks) come inwooden braces buried into the hillside that lock the wall into undisturbed soil.
How to add deadmen (typical approach)
- After a few courses (often around the third course), dig T-shaped trenches into the slope behind the wall.
- Create T-shaped anchors from short timber lengths.
- Set the deadmen so they extend back into the hillside and connect flush to the wall.
- Fasten them to the wall and pin them into the soil with rebar.
- Repeat along the wallcommonly every 6–8 feet for longer walls.
If your wall is approaching the “serious height” zone (or supporting a driveway/structure), it’s smart to get an engineer involved. Think of it as buying expertise so your wall doesn’t buy itself a gravity-powered exit plan.
Step 11: Backfill, Cap, and Finish Grading
Backfilling isn’t just dumping soil behind the wall. It’s placing material in layers so it compacts and drains properly.
Backfill like you mean it
- Backfill in lifts (layers), compacting as you go.
- Keep the drainage zone behind the wall filled with gravel where planned.
- Top the final layer with soil for planting, but don’t bury wood that shouldn’t be buried.
- Grade the yard so surface water flows away from the wall, not into it.
Cap course (optional but recommended)
A cap course (top timbers) helps the wall look finished and can help shed water. Fasten it well. A loose top timber is basically a wobble board for adults.
Step 12: Protect, Landscape, and Maintain
Congratsyou built a wood retaining wall. Now help it live a long, dignified life.
Maintenance checklist
- Inspect yearly: look for bulging, leaning, loose timbers, or rot.
- Keep outlets clear: make sure the drain pipe can actually drain.
- Re-treat exposed cut ends every few years if needed.
- Control water: downspouts and runoff should be directed away from the wall.
Common Mistakes (So You Don’t Star in a “DIY Fail” Montage)
- Skipping drainage: the #1 reason walls fail.
- No compacted base: settling leads to leaning, gaps, and fastener stress.
- Using the wrong wood: not ground-contact rated = early rot.
- Weak hardware: cheap fasteners corrode or snap under load.
- Building too tall without engineering: taller walls need real design, not vibes.
- No batter/tiebacks: the wall has less resistance to pressure.
FAQ: Quick Answers DIYers Actually Need
How long does a wood retaining wall last?
Lifespan depends on wood type, treatment rating, drainage quality, and climate. A well-built wall with ground-contact-rated pressure-treated timbers and good drainage can last many years; a wall built with questionable wood and no drainage might start failing surprisingly fast.
Can I build a wood retaining wall on clay soil?
You can, but clay holds water and increases pressure behind the wall. That means drainage becomes even more critical, and you may need a wider gravel zone, careful grading, and possibly professional guidance for taller walls.
Do I need deadmen anchors for every wall?
Not always. Short walls may not require tiebacks, but as height increases, deadmen become a smart reinforcement strategyespecially as you approach the 4-foot range and beyond.
Conclusion
A wood retaining wall is a classic, practical upgrade that can transform a sloped yard into usable spaceif you respect the physics. Build on a compacted gravel base, install real drainage, use ground-contact-rated materials, and add tiebacks when needed. Do it right once, and your wall will stay put through storms, seasons, and the inevitable moment when someone leans on it and says, “Wow, this feels solid.”
Real-World Experiences: What I Wish I’d Known (An Extra of Lessons)
The first time you build a wood retaining wall, it’s tempting to focus on the “wall” partstack timbers, drive rebar, call it a day. But the real project is everything you don’t see: the base, the drainage, and the way you manage water after the wall is done.
One of the biggest eye-openers is how much time the trench and base consume. You think you’re signing up for “a weekend project,” then you meet the reality of digging a straight trench that stays consistent, hits undisturbed soil, and doesn’t turn into a wavy mess. The base is where patience pays off. When the gravel is compacted properly, the first course sits like it belongs there. When it isn’t, you end up playing an exhausting game of “lift, adjust, re-level, repeat,” and somehow the timber gets heavier each time you touch it. (Science has not explained this phenomenon, but every DIYer has experienced it.)
Another lesson: drainage is not just about adding a pipeit’s about giving water an easy path that stays open over time. Filter fabric feels like a minor detail until you imagine soil washing into your gravel layer like powdered sugar into a shag carpet. If you keep the gravel zone clean and the pipe sloped to daylight, you’re quietly preventing the most common reason walls fail: water pressure building up behind the structure. After a hard rain, it’s oddly satisfying to see water actually exit where you planned it to go. It’s the DIY equivalent of your phone battery lasting all daysmall miracle, huge relief.
Fasteners matter more than most people expect. Pressure-treated lumber is tough on the wrong hardware, and the cost difference between bargain screws and proper exterior-rated structural fasteners is tiny compared to the cost of rebuilding. The same goes for sealing cut ends. Cutting timbers exposes fresh wood, and treating those ends is one of the easiest “future-proofing” moves you can make.
Finally, there’s the “yard reality” factor: slopes are rarely uniform, corners are rarely square, and the ground almost never matches your plan. That’s why checking level and alignment constantly is so important. It’s easier to correct a tiny drift on course two than to discover, on course six, that your wall is slowly curving toward a new career as a skateboard ramp.
If you take anything from real-world experience, let it be this: the prettiest retaining walls are usually the ones built like you’re slightly over-preparing. Over-compact the base. Over-think drainage. Over-check level. That “extra” work is exactly what makes the wall look professionaland stay that way.