Table of Contents >> Show >> Hide
- Why It Helps to Know Your Graphics Card
- 1. Check Your Graphics Card in Settings
- 2. Use Task Manager to See Your GPU
- 3. Find Your GPU in Device Manager
- 4. Use the DirectX Diagnostic Tool (DxDiag)
- 5. Use System Information for a More Detailed View
- What If Your Windows 11 PC Shows Two Graphics Cards?
- Which Method Is Best?
- Common Problems When Checking a Graphics Card
- Real-World Experiences: Why This Simple Check Matters
- Final Thoughts
- SEO Tags
Note: HTML body only, ready to copy and publish.
If your PC has ever wheezed during a game, frozen mid-video edit, or acted personally offended by a second monitor, you’ve probably wondered one thing: what graphics card do I actually have? Fair question. Your GPU, or graphics processing unit, is the component that handles visuals, video rendering, gaming workloads, and a surprising amount of “why is my computer doing that?” drama.
The good news is that checking your graphics card on Windows 11 is not difficult, and it definitely does not require a screwdriver, a flashlight, or the emotional strength to crawl under your desk. Windows 11 gives you several built-in ways to find your GPU model, see whether you have integrated or dedicated graphics, and even check driver details when something looks off.
In this guide, you’ll learn five easy ways to check your graphics card on Windows 11, when to use each method, and what the results actually mean. We’ll also cover what to do if you see two GPUs, what “Microsoft Basic Display Adapter” means, and a few real-world experiences that show why this little check can save a lot of time.
Note: Menu names can vary slightly depending on your PC brand, graphics driver, and Windows 11 version, but the methods below work on standard Windows 11 systems.
Why It Helps to Know Your Graphics Card
Before we jump into the steps, here’s why this matters. Knowing your GPU model on Windows 11 can help you:
- Check whether your PC can run a game or creative app
- Download the correct NVIDIA, AMD, or Intel driver
- Figure out whether your system uses integrated or dedicated graphics
- Troubleshoot lag, screen flickering, crashes, or display issues
- Confirm hardware before buying, selling, or upgrading a PC
In other words, this is not random tech trivia. This is useful, practical, “save yourself from installing the wrong driver at 11:47 p.m.” information.
1. Check Your Graphics Card in Settings
If you want the quickest beginner-friendly method, start with Settings. This is the easiest way to see which display adapter is connected to your screen in Windows 11.
How to do it
- Click the Start button and open Settings.
- Select System.
- Click Display.
- Scroll down and choose Advanced display.
- Look for the line that says Connected to.
You should see the name of your graphics card there, such as:
- Intel UHD Graphics
- Intel Iris Xe Graphics
- NVIDIA GeForce RTX 4060
- AMD Radeon RX 7600
This method is great when you just want the GPU name without diving into driver tabs or technical details. It is especially helpful on laptops, where the system may switch between integrated and dedicated graphics depending on what you’re doing.
Best for
Fast checks, basic identification, and users who want the least intimidating route possible.
2. Use Task Manager to See Your GPU
If you want a little more detail, Task Manager is one of the best ways to check your graphics card on Windows 11. It not only shows your GPU name, but also lets you view usage, memory, and activity in real time.
How to do it
- Press Ctrl + Shift + Esc to open Task Manager.
- Click the Performance tab.
- Scroll down the left side and select GPU.
Once you click it, Windows 11 displays useful information such as:
- Your graphics card name
- GPU utilization
- Dedicated GPU memory
- Shared GPU memory
- Driver version in some configurations
If your PC has more than one graphics processor, you might see entries like GPU 0 and GPU 1. Usually, one is the integrated GPU built into the processor, and the other is the dedicated graphics card for heavier tasks. Windows loves a plot twist, and dual-GPU setups are one of its favorites.
Best for
Checking GPU performance, identifying multiple graphics adapters, and seeing which GPU is actually doing work.
3. Find Your GPU in Device Manager
Device Manager is the classic Windows tool for seeing the hardware installed on your system. It is one of the most reliable ways to identify your graphics card and inspect its driver status.
How to do it
- Right-click the Start button.
- Select Device Manager.
- Expand Display adapters.
You should now see one or more graphics devices listed. For example:
- Intel Iris Xe Graphics
- NVIDIA GeForce RTX 3050 Laptop GPU
- AMD Radeon Graphics
If you want more information, right-click the graphics device and choose Properties. From there, you can check:
- Driver tab for driver version and update options
- General tab for device status
- Details tab for hardware IDs and deeper technical info
What if you see “Microsoft Basic Display Adapter”?
This usually means Windows is using a generic display driver instead of the full graphics driver from Intel, AMD, or NVIDIA. Your PC may still work, but performance can be limited. Games may run poorly, external display options may be reduced, and certain graphics features might be unavailable.
If that happens, the next step is usually to install the correct driver from your PC maker or GPU manufacturer.
Best for
Driver checks, troubleshooting, and confirming the exact device Windows recognizes.
4. Use the DirectX Diagnostic Tool (DxDiag)
The DirectX Diagnostic Tool, often called DxDiag, sounds like something designed by a committee that feared vowels. Still, it’s extremely useful. It gives you a clean summary of your graphics hardware and display-related information.
How to do it
- Press Windows + R to open Run.
- Type dxdiag and press Enter.
- Click the Display tab or tabs.
Here, you can find:
- Graphics card name
- Manufacturer
- Approximate memory
- Driver details
- Display features related to DirectX
This method is especially helpful if you’re checking whether your GPU supports a game, comparing system requirements, or gathering information for tech support. If your PC has multiple display devices, DxDiag may show more than one tab.
Best for
Compatibility checks, support requests, and anyone who wants a nice middle ground between “too basic” and “too technical.”
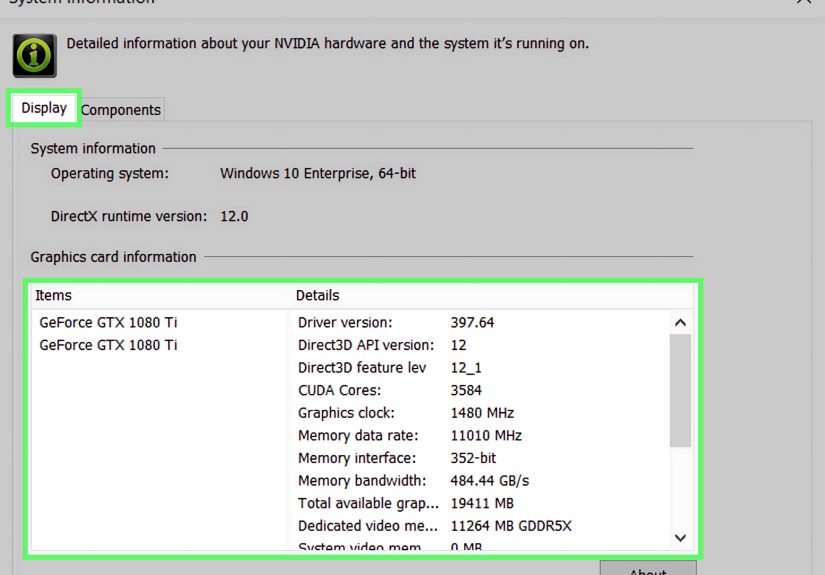
5. Use System Information for a More Detailed View
If you want a broader hardware overview, System Information is another built-in Windows 11 tool worth knowing. It is less flashy than Task Manager, but it can reveal useful display details in a structured way.
How to do it
- Open the Start menu.
- Type msinfo32 and open System Information.
- In the left pane, expand Components.
- Click Display.
You’ll see information such as:
- Adapter description
- Adapter RAM
- Installed drivers
- Display resolution details
This tool is helpful when you need more than just a GPU name and want a bigger picture of the display environment. It is also nice when you’re documenting system specs for work, resale, repair, or remote troubleshooting.
Best for
Detailed hardware reviews, system reports, and users who want more context around the graphics setup.
What If Your Windows 11 PC Shows Two Graphics Cards?
Don’t panic. Your computer is not secretly training for a graphics decathlon. Many Windows 11 systems, especially laptops, have two GPUs:
- Integrated graphics, usually built into the CPU and used for everyday tasks
- Dedicated graphics, a separate GPU from NVIDIA or AMD used for gaming, design, or heavy workloads
This setup helps balance performance and battery life. For example, your laptop may use Intel graphics while browsing the web, then switch to an NVIDIA GeForce GPU when you launch a game or edit video.
So if Task Manager or Device Manager shows two entries, that is often completely normal.
Which Method Is Best?
That depends on what you need:
- Settings: fastest way to check the current display adapter
- Task Manager: best for GPU usage and performance details
- Device Manager: best for driver and device troubleshooting
- DxDiag: best for support and compatibility info
- System Information: best for a more complete hardware snapshot
If you only need the name of your graphics card, Settings or Task Manager is usually enough. If something seems wrong, head straight to Device Manager.
Common Problems When Checking a Graphics Card
The GPU name looks too generic
If you see a vague label like Microsoft Basic Display Adapter, your proper driver may be missing, outdated, or corrupted.
Your dedicated GPU does not appear
Check Device Manager first. If it still doesn’t appear, restart the PC, scan for hardware changes, and install the latest official graphics driver from your PC maker or GPU brand.
You are not sure which GPU apps are using
Task Manager can help, especially when running a game or graphics-heavy app. In some cases, Windows graphics settings or your GPU software can also show which processor is being used.
Real-World Experiences: Why This Simple Check Matters
Now for the part that rarely shows up in dry technical guides: the actual human experience. Because most people do not search how to check your graphics card on Windows 11 for fun. Nobody wakes up, stretches, and says, “Today feels like a great day to inspect my display adapter.” Usually, there’s a reason.
One common situation is gaming. Someone downloads a new title, launches it with big hopes and a bigger snack, and then gets frame rates that move like cold syrup. The first instinct is to blame Windows, the game studio, or the moon. But checking the graphics card often solves the mystery fast. Maybe the PC only has integrated Intel graphics. Maybe the game is running on the wrong GPU. Maybe the driver is old enough to remember dial-up internet. A two-minute check in Task Manager or Device Manager can turn chaos into clarity.
Another real-world example comes from people who work with creative apps. Video editors, 3D artists, and photographers often need to confirm whether their system has the graphics hardware required for rendering, playback, or AI-assisted tools. Many discover that the app technically runs, but not happily. Once they check the GPU model, everything makes more sense. “Oh, so this laptop wasn’t built for 4K color grading. Noted.” That is not failure. That is useful information arriving fashionably late.
There’s also the used-PC scenario, which deserves its own cautionary soundtrack. Maybe you bought a secondhand desktop that was advertised as a “gaming beast.” Bold claim. Before celebrating, it makes sense to open Task Manager, Device Manager, or DxDiag and confirm the actual graphics card inside. This quick check can reveal whether the machine really has that NVIDIA or AMD GPU from the listing or whether the seller was being, let’s say, creatively optimistic.
Laptop owners run into their own version of confusion. Many modern systems use hybrid graphics, so you may see Intel graphics and an NVIDIA or AMD GPU together. People sometimes think something is wrong when they spot two adapters, but that setup is normal. In fact, it is often a smart power-saving design. The integrated GPU handles lighter tasks, while the dedicated GPU wakes up for bigger jobs. It is less a sign of trouble and more a tag-team arrangement.
Then there’s troubleshooting. Screen flicker, black screens, crashes, weird resolution issues, a second monitor refusing to cooperate like a stubborn cat on bath day, all of these can point back to the graphics system. Checking the GPU and driver version is often one of the first useful troubleshooting steps. Even if it does not fix the issue instantly, it gives you solid information before you update drivers, contact support, or start muttering darkly at your desk setup.
For remote workers and families, this check can be unexpectedly helpful too. Maybe a parent is helping a teenager install a design program for school. Maybe a coworker needs to know whether their home PC can handle a certain workflow. Maybe a freelancer wants to connect multiple monitors without guessing. In each case, knowing the graphics card removes a lot of uncertainty. It’s a small step that can prevent bad purchases, wasted downloads, and support chats that last longer than some friendships.
The main takeaway is simple: checking your graphics card is not just for enthusiasts or people who speak fluent motherboard. It is a practical Windows 11 skill. Once you know where to look, you can make smarter choices about software, upgrades, gaming, repair, and troubleshooting. And unlike many tech tasks, this one does not require opening your PC or risking a mystery screw rolling into another dimension under your desk.
Final Thoughts
If you’ve been wondering how to check your graphics card on Windows 11, the answer is refreshingly straightforward. You can use Settings for a quick check, Task Manager for usage and memory, Device Manager for driver details, DxDiag for compatibility info, or System Information for a broader hardware overview.
None of these methods takes long, and all of them can help you better understand your PC. Whether you’re gaming, troubleshooting, upgrading, or just satisfying your curiosity, knowing your Windows 11 GPU model is one of those tiny pieces of knowledge that makes computer life much less mysterious.
And honestly, in a world where computers occasionally solve problems by creating three new ones, that’s a win.