Table of Contents >> Show >> Hide
- Why Use a Pizza Stone?
- Before You Start: What You’ll Need
- How to Cook Pizza on a Pizza Stone in 15 Steps
- Step 1: Read the stone’s care instructions first
- Step 2: Put the pizza stone in a cold oven
- Step 3: Choose the right rack position for your pizza style
- Step 4: Preheat the oven hotusually 475°F to 500°F (or as high as your oven safely allows)
- Step 5: Let the stone preheat longer than the oven display says
- Step 6: Bring dough closer to room temperature
- Step 7: Prep toppings ahead and use a light hand
- Step 8: Dust your peel or use parchment paper
- Step 9: Stretch the dough gently (don’t crush all the air out)
- Step 10: Build the pizza quickly and strategically
- Step 11: Do the “shake test” before launching
- Step 12: Launch the pizza onto the hot stone
- Step 13: Bake and monitor closely (usually 6–10 minutes)
- Step 14: Rest briefly before slicing
- Step 15: Cool and clean the stone the right way
- Common Mistakes That Ruin Pizza Stone Results
- Quick Example Setups (So You Can Start Tonight)
- Bonus: Real-World Experiences and Lessons From Pizza Stone Cooking (500+ Words)
- Conclusion
If you’ve ever made homemade pizza that tasted amazing but looked like it had a rough day at the office, a pizza stone may be the upgrade you need. A good pizza stone helps you get a crispier bottom crust, better oven spring, and a more “real pizza shop” resultwithout installing a wood-fired oven in your kitchen (or explaining that decision to your landlord).
That said, a pizza stone is not magic. It’s hot, heavy, and a little dramatic if you treat it badly. Put it into a hot oven too quickly? Crack. Cool it too fast? Crack. Overload your pizza like it’s a grocery cart before a storm? Sticking disaster. The good news: once you know the method, pizza night gets much easier.
In this guide, you’ll learn exactly how to cook pizza on a pizza stone in 15 practical steps, plus the common mistakes to avoid, how to clean the stone, and real-world “what actually happens” experiences from home cooks. Whether you’re using homemade dough or store-bought dough, thin crust or thicker crust, this method will help you get consistently better results.
Why Use a Pizza Stone?
A pizza stone stores heat and transfers it to the bottom of your dough quickly, which helps create a crisp crust and reduces sogginess. It also creates a more stable baking surface than a room-temperature pan. In plain English: your pizza gets a stronger, hotter “landing pad.”
And no, you do not need a fancy pizza oven to make a great pie. A regular home oven plus a properly preheated stone can produce excellent results if your technique is solid.
Before You Start: What You’ll Need
- Pizza stone (and your manufacturer’s care instructions)
- Oven
- Pizza dough (homemade or store-bought)
- Sauce, cheese, toppings
- Pizza peel, rimless baking sheet, or upside-down sheet pan
- Flour, cornmeal, or semolina (for dusting)
- Parchment paper (optional but very helpful)
- Oven mitts
- Cooling rack (optional, but great for crust texture)
How to Cook Pizza on a Pizza Stone in 15 Steps
Step 1: Read the stone’s care instructions first
Not all pizza stones are identical. Some are unglazed cordierite or ceramic and require very minimal water and no soap. Some glazed baking stones (such as certain grill stones) may allow mild detergent and a non-abrasive sponge. Start with the manufacturer’s rules, then use general best practices. This one step prevents a lot of expensive mistakes.
Step 2: Put the pizza stone in a cold oven
This is the big safety rule. Place the stone on a rack while the oven is still cold. Do not put a room-temperature stone into a hot oven. Rapid temperature changes can cause thermal shock and crack the stone. Think “slow warm-up,” not “surprise sauna.”
Step 3: Choose the right rack position for your pizza style
Rack position affects how the top and bottom cook. A center rack is a reliable starting point for most pizzas. A lower rack can brown the bottom faster, while an upper-middle or top area can help the top brown more quickly. If you often get a pale top and a dark bottom, try moving the stone slightly higher next time. If your toppings burn before the crust sets, move it down one position.
Step 4: Preheat the oven hotusually 475°F to 500°F (or as high as your oven safely allows)
Most home pizza stone cooking works best in a hot oven. For standard thin or medium pizza, 475°F to 500°F is a strong range. Some cooks go to 525°F or 550°F if their oven allows it and their dough/topping combo can handle it. If you’re making a thicker crust pizza with lots of toppings, slightly lower heat (around 425°F to 450°F) may help the crust bake through before the cheese over-browns.
Step 5: Let the stone preheat longer than the oven display says
Your oven may beep when it hits temperature, but your stone is usually not fully ready yet. Give it extra timetypically 30 to 60 minutes more, and in many setups a full 45 to 60 minutes total is ideal. A fully heated stone makes a huge difference in crust texture. This is one of the most important steps in the entire process.
Step 6: Bring dough closer to room temperature
Cold dough is harder to stretch and can bake unevenly. Let refrigerated dough rest on the counter until it relaxes and becomes easier to shape. This also helps reduce tearing and “snap-back” when you’re stretching it. If the dough fights you like it’s training for a wrestling match, give it another 10 to 15 minutes and try again.
Step 7: Prep toppings ahead and use a light hand
Slice, grate, and organize everything before shaping the dough. Pizza cooks fast once it’s assembled, and a hot stone is not the time to start chopping mushrooms. Also, don’t overload the pie. Too much sauce, too much cheese, or watery vegetables can make the center soggy and make launching harder. A balanced pizza almost always bakes better than a “kitchen sink” pizza.
Step 8: Dust your peel or use parchment paper
To transfer pizza onto a stone, use one of these methods:
- Peel method: Dust a pizza peel (or upside-down sheet pan) with flour, cornmeal, or semolina.
- Parchment method: Build the pizza on parchment paper, then slide the parchment and pizza onto the stone.
Parchment is excellent for beginners because it dramatically reduces sticking. If using parchment, trim excess paper so it doesn’t scorch against heating elements.
Step 9: Stretch the dough gently (don’t crush all the air out)
Flatten the dough with your fingertips and stretch from the center outward. Leave a slightly thicker rim if you want a puffy edge. You can use a rolling pin, but hand-stretching usually preserves more air bubbles and gives better texture. For a 12-inch pizza, aim for an even thickness with no paper-thin center.
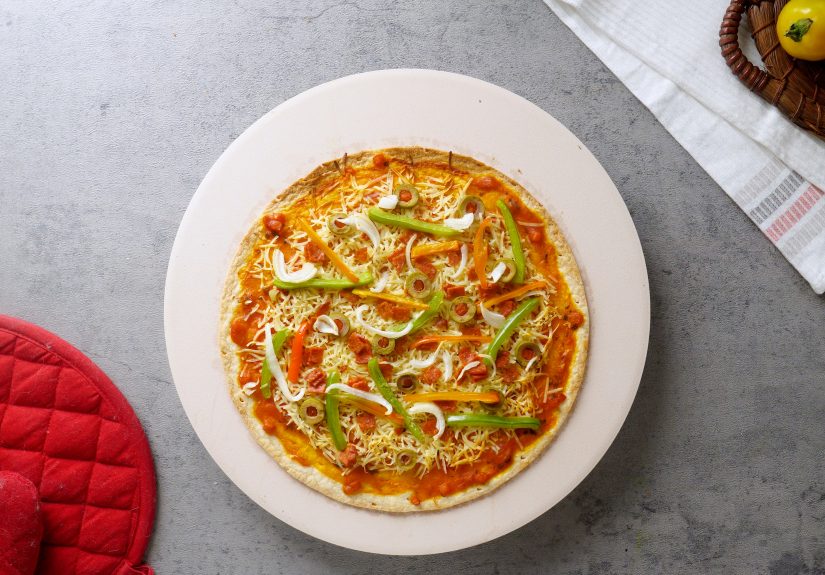
Step 10: Build the pizza quickly and strategically
Once the dough is on the peel or parchment, work efficiently. Add sauce first, then cheese, then toppings. Keep heavier toppings spaced out rather than stacked in one area. The longer a topped pizza sits on a floured peel, the more likely it is to stick. A quick build = a smoother launch.
Step 11: Do the “shake test” before launching
Gently jiggle the peel. If the pizza slides, you’re good. If it sticks, lift the edge and toss a little more flour or semolina underneath the sticky spots. Do this before you open the oven. The shake test saves many pizzas from turning into abstract art at the oven door.
Step 12: Launch the pizza onto the hot stone
Open the oven and pull the rack out slightly if your oven design allows safe access. With a quick forward-and-back motion, slide the pizza onto the stone. If using parchment, place the pizza and parchment directly on the stone. Close the oven promptly to keep heat in. Confidence helps herehesitation is the natural enemy of a clean launch.
Step 13: Bake and monitor closely (usually 6–10 minutes)
Bake time depends on oven temperature, dough thickness, hydration, and toppings. Thin pizzas in a very hot oven may be done in 6 to 8 minutes. Medium pizzas often need 8 to 10 minutes. Watch for these signs:
- Cheese fully melted and bubbling
- Crust edge browned (not pale)
- Bottom crust firm and lightly charred in spots
If one side browns faster, rotate the pizza partway through the bake. Every oven has hot spots, even the ones that claim they don’t.
Step 14: Rest briefly before slicing
Remove the pizza with a peel or tongs plus a spatula, then place it on a cooling rack or cutting board. Let it rest for 1 to 3 minutes. This gives the cheese and sauce a moment to settle so your slices don’t slide apart the second you cut them. It also helps preserve crust crispness.
Step 15: Cool and clean the stone the right way
Let the stone cool completely before cleaning. Never dunk a hot stone in water. For most unglazed stones, scrape off baked-on bits, wipe with a barely damp cloth, and air-dry thoroughly. Avoid soaking. Stains are normal and harmlessthey’re not “dirty,” they’re just your pizza résumé. If your stone is a glazed model, follow the manufacturer’s cleaning instructions (some allow mild detergent and a non-abrasive brush).
Common Mistakes That Ruin Pizza Stone Results
1) Not preheating long enough
This is the #1 reason for pale, soft bottoms. A hot oven does not automatically mean a hot stone.
2) Too many toppings
A heavily loaded pizza can stay wet in the center while the crust edges overcook. Keep it balanced, especially on thin crust.
3) Letting the assembled pizza sit too long on the peel
Moisture from sauce and dough will glue the pizza to the peel if it sits there too long.
4) Moving the stone while it’s blazing hot
Besides being risky, this can lead to drops, burns, or cracks. The best move is usually no move.
5) Over-cleaning the stone
Pizza stones naturally darken over time. That patina is normal. You’re baking on it, not serving tea on it.
Quick Example Setups (So You Can Start Tonight)
Example 1: Classic Cheese Pizza (Beginner-Friendly)
- Oven: 500°F
- Stone preheat: 45–60 minutes
- Rack: Center or upper-middle
- Dough: 12-inch ball, room temp
- Bake time: 7–9 minutes
Example 2: Thicker Crust Veggie Pizza
- Oven: 450°F
- Stone preheat: 45–60 minutes
- Rack: Lower-middle
- Topping tip: Pre-cook watery vegetables (mushrooms, zucchini)
- Bake time: 10–14 minutes (watch closely)
Bonus: Real-World Experiences and Lessons From Pizza Stone Cooking (500+ Words)
Let’s talk about the part no one tells you in the pretty recipe photos: your first few pizza stone attempts may be a little chaotic, and that is completely normal. In fact, “chaotic but delicious” is basically a rite of passage in homemade pizza.
One of the most common beginner experiences is the great launch panic. Everything looks perfect on the peel. You open the oven, angle the peel, and then… nothing. The pizza refuses to move, as if it has signed a lease. You jiggle harder, and suddenly half the toppings go airborne while the dough folds over itself like a defeated taco. If this happens, welcome to the club. The fix is simple: do the shake test before opening the oven, work faster after topping, and use parchment paper until your confidence grows.
Another common experience is the “dark bottom, pale top” mystery. Home cooks often assume they need an even hotter oven, but the issue is usually heat balance, not just heat level. If the stone is too low, the bottom can brown too quickly while the top lags behind. Moving the stone up a rack can improve top browning. On the other hand, if the top is browning too fast and the crust seems underdone, moving the stone slightly lower or reducing the oven temperature a bit can help. Tiny rack changes make surprisingly big differences.
Many people also discover that less topping makes better pizza. The first homemade pizza is often loaded with everything in the refrigerator: extra cheese, olives, peppers, onions, mushrooms, sausage, spinach, and maybe optimism. The result can be tasty, but also wet in the center and hard to launch. After a few tries, most home cooks start building more intentionally: one sauce, one cheese, two or three toppings max. Suddenly the crust gets crispier, the slices hold together, and pizza night feels much less stressful.
There’s also the stone cleaning anxiety. New stone owners often panic when the surface gets stained or dark patches appear after a few bakes. Good news: that’s normal. A pizza stone is not supposed to stay showroom-pretty forever. It’s a working surface. Many experienced home bakers actually prefer a “broken-in” stone because they stop worrying about cosmetic marks and focus on results. The real maintenance goal is removing stuck-on bits and keeping the stone drynot making it look brand new.
Another thing people notice over time is how much routine improves consistency. Once you develop a repeatable pizza flowstone in cold oven, long preheat, dough resting, toppings prepped, quick assembly, shake test, launchthe process becomes smooth. What felt difficult on night one starts to feel easy by night five. You’ll even start making small upgrades, like preheating longer on colder days, using semolina instead of flour for easier sliding, or par-cooking mushrooms to prevent excess moisture.
Finally, there’s the best part: the payoff moment. It’s when you pull out a pizza with bubbling cheese, a crisp base, and that slightly blistered edge and realize, “Oh. This is actually really good.” Not “good for homemade.” Just good. That moment is why pizza stones are still so popular. They don’t do the work for youbut they reward good technique in a big way.
So if your first attempt is messy, keep going. Pizza stone cooking is one of those kitchen skills that gets dramatically better with repetition. And even the “mistakes” tend to be edible, which is honestly the kindest learning curve a hobby can offer.
Conclusion
Learning how to cook pizza on a pizza stone is mostly about mastering heat, timing, and transfer. Preheat thoroughly, keep toppings balanced, launch confidently, and clean the stone gently after it cools. Follow the 15 steps above, and your homemade pizza will start coming out with a crispier crust, better browning, and fewer “why is the middle still soggy?” moments. In other words: better pizza, less drama.