Table of Contents >> Show >> Hide
- Table of Contents
- What “Group Chat on Facebook” Actually Means
- Before You Start (Small Things That Prevent Big Headaches)
- How to Create a Group Chat on Facebook: 11 Steps
- Step 1: Decide where you’re creating it (Messenger vs. Facebook)
- Step 2: Open the Chats screen
- Step 3: Tap “New Message” / “Compose”
- Step 4: Choose “Group chat” (or “Create a new group”)
- Step 5: Add at least two other people
- Step 6: Confirm the group creation
- Step 7: Name the group (do this now, not “later”)
- Step 8: Add a group photo or icon (optional, but surprisingly helpful)
- Step 9: Send the first message that sets the tone
- Step 10: Customize basic settings (so it doesn’t become notification torture)
- Step 11: Learn the “grown-up” controls: add members, manage roles, and remove people
- Common Issues and Quick Fixes
- Pro Tips for Managing a Facebook Messenger Group Chat
- Real-World Experiences: The Part Nobody Warns You About (Extra ~)
- Conclusion
A Facebook group chat is basically a digital living room: one person says “quick question,” and suddenly your phone is auditioning for a role as a vibrating massage chair.
The good news? Creating a group chat on Facebook is easy once you know where Meta hides the “make it a group” buttons (they move around like they’re paid by the shuffle).
In this guide, you’ll learn exactly how to create a group chat on Facebook (usually via Messenger), how to name it without starting a civil war, how to add people later,
and how to keep notifications from eating your soul. Let’s build your group conversation the right wayfast, clean, and with minimal chaos.
Table of Contents
- What “Group Chat on Facebook” Actually Means
- Before You Start (Small Things That Prevent Big Headaches)
- How to Create a Group Chat on Facebook: 11 Steps
- Common Issues and Quick Fixes
- Pro Tips for Managing a Facebook Messenger Group Chat
- Real-World Experiences: The Part Nobody Warns You About
- Conclusion
- SEO Tags (JSON)
What “Group Chat on Facebook” Actually Means
When most people say “create a group chat on Facebook,” they mean a Messenger group chat: a single conversation thread where 3+ people can message,
share photos, send voice notes, start calls, and spam each other with GIFs like it’s an Olympic sport.
Don’t confuse this with a Facebook Group (the community space with posts, rules, and that one member who only shares blurry memes).
A Facebook Group can have its own chat features (often called community chats), but a standard group chat is just messagingno posts, no Group admin panel,
no “please read the pinned announcement” guilt trip.
Before You Start (Small Things That Prevent Big Headaches)
- Use Messenger if possible: Facebook messaging on mobile often routes you into the Messenger app anyway.
- Update the app: If your screen doesn’t match what you see online, it’s usually because your version is older than your last haircut.
- Know who you can add: Depending on privacy settings, not everyone is addablesome people restrict who can message them.
- Decide the vibe: Is this “Family Plans” or “Project Launch”? Name and rules are easier when you know the purpose.
How to Create a Group Chat on Facebook: 11 Steps
These steps work whether you’re on iPhone, Android, or a desktop browser. The button labels can vary slightly, but the flow is the same:
start a new message → select multiple people → name the group → send your first message.
Step 1: Decide where you’re creating it (Messenger vs. Facebook)
If you’re on mobile, Messenger is usually the fastest route. If you’re on a computer, you can use
Messenger on the web or Facebook’s Messages interface.Think of it like choosing a door into the same house: different entryway, same couch, same group chat drama.
Step 2: Open the Chats screen
In Messenger, go to Chats. On desktop, open your messages panel or go to Messenger’s web interface and find your chat list.
If you’re already staring at your inbox, congratulationsyou’re exactly where you need to be.
Step 3: Tap “New Message” / “Compose”
Look for the compose icon (often a pencil, plus sign, or “New message” button). This is the “I am about to create something” button.
If you don’t see it, scroll up in your chat listsome interfaces hide it until you’re at the top, like a shy elevator button.
Step 4: Choose “Group chat” (or “Create a new group”)
In many versions of Messenger, you’ll see an option that clearly says Group chat or Create a new group.
Tap that option to tell Messenger you want a group conversation (not a one-to-one chat).If the interface doesn’t explicitly say “Group,” you can often create a group by simply selecting multiple people in the “To:” field.
Step 5: Add at least two other people
A “group chat” needs a group. Select friends or type names in the “To:” field until you have 3+ participants (you + at least two others).
Example: Planning a surprise party? Add the planners firstthen double-check you didn’t accidentally add the guest of honor.
(Messenger is forgiving, but your friends will not be.)Step 6: Confirm the group creation
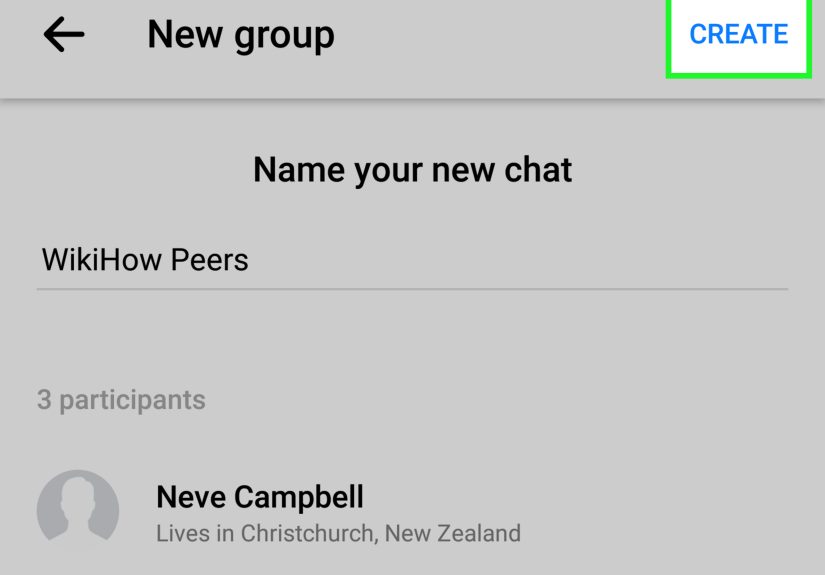
Tap Next, Create, or Done depending on your device. This locks in the member list and starts the thread.
If you get an error, it’s usually a privacy setting issue (yours or theirs) or you’re trying to message someone who doesn’t allow group adds.
Step 7: Name the group (do this now, not “later”)
Messenger often prompts you to add a group name. Take the hint and do it right away.
Otherwise your chat may display as a scroll of names that looks like a law firm: “Taylor, Jordan, Sam, Alex & You.”Naming formula that won’t cause arguments: Topic + timeframe (e.g., “Vegas Trip • April” or “Marketing Sprint • Week 2”).
Step 8: Add a group photo or icon (optional, but surprisingly helpful)
A group image makes it easier to find the chat in a crowded inbox. Choose something that signals the purpose:
a calendar emoji screenshot, a team logo, or a photo that won’t get anyone fired.Bonus: it reduces mis-sends. No one wants to accidentally drop a spicy meme into “Neighborhood Watch Updates.”
Step 9: Send the first message that sets the tone
Your first message is the group chat’s “pilot episode.” Make it clear why the chat exists.
Example opener: “Hey teamusing this chat to coordinate Saturday’s move. Drop your availability and whether you’re bringing a car or just moral support.”
Clear opening messages reduce the “wait what is this group” confusion by about 87%.
Step 10: Customize basic settings (so it doesn’t become notification torture)
Tap the group name at the top of the conversation to open settings. Here’s what’s worth adjusting early:
- Notifications: Mute if the chat is high-volume, or schedule focus time if your phone supports it.
- Nicknames: Helpful for large chats where “Alex” is not a unique identifier.
- Theme/emoji: Optional, but a fun way to visually separate chats.
Think of this step like putting labels on leftovers. You can skip it, but you’ll regret it later when everything looks like “mystery container.”
Step 11: Learn the “grown-up” controls: add members, manage roles, and remove people
Once the group exists, you can usually add more people from the chat settings (“Add,” “Add people,” or similar).
Some group chats also support admin-style tools, like approvals or invite links, depending on the group type and your setup.If someone needs to leaveor needs to be removedthose options live in the members list inside group settings.
Use responsibly. (A removal is forever remembered, even if it’s technically not.)
Common Issues and Quick Fixes
I can’t find “Group chat.”
Try selecting multiple people in the “To:” field. Some versions don’t label “Group chat” until you choose more than one recipient.
Also make sure you’re in Messenger (not a random “message request” screen).
I can’t add a person to the group chat.
Common reasons include privacy settings, blocked accounts, or the person not allowing messages from non-friends.
If you can message them one-to-one, ask them to message the group first or adjust message delivery settings.
Notifications are out of control.
Mute the chat temporarily, set “mentions only” if available, or agree on a rule like: “Big updates onlyrandom memes go to the memes chat.”
(Yes, you might need a memes chat. No, this is not a sign of weakness.)
Pro Tips for Managing a Facebook Messenger Group Chat
- Name it for searchability: “Soccer Parents • U12” beats “The Gang” when you’re trying to find it six months later.
- Pin the key message (or repost it): If your chat has one crucial detail (address, date, checklist), make it easy to find.
- Use calls when text gets messy: If everyone is typing paragraphs, it’s probably a sign you should hop on a quick voice call.
- Keep membership intentional: The right people = smoother planning. The wrong people = “why are we debating pizza for 45 minutes?”
- Separate social vs. logistics: One chat for coordination, one for jokes. Your future self will thank you.
Real-World Experiences: The Part Nobody Warns You About (Extra ~)
Here’s what creating a Facebook group chat looks like in the wildwhere humans live, plans change, and someone always replies “lol” to a serious question.
Experience #1: The “quick plan” that turns into a 200-message novel.
A group chat is fantastic for coordinationuntil it becomes the main entertainment. The best move is to set expectations early.
When I create a planning chat, I open with something like: “Let’s keep this to decisions and updates. Memes are welcome… but maybe not during work hours.”
It sounds corny, but it actually works because you’ve defined the chat’s job. Without that, your grocery pickup plan becomes a full-blown sitcom.
Experience #2: Names matter more than you think.
I once left a chat unnamed for “just a minute.” Three weeks later, I had two identical threads: both showed as a stack of first names.
One was for a volunteer event. The other was for fantasy football trash talk. Guess where I accidentally posted “bring trash bags and gloves”?
Exactly. Name the group immediately, and choose a name that stands out in your inbox at a glance. Boring is good if it’s clear.
Experience #3: Adding people later can be awkwardplan for it.
Sometimes you create the chat with the “core” crew, then realize you need to add one more person. That’s fine.
What helps is messaging the group before adding them: “Adding Chris for rideshare logistics.” It prevents the “who is this and why are they here?”
moment. Group chats have social physics; introduce new members like you would at a party.
Experience #4: Notification burnout is realdesign the chat for humans.
High-volume chats can be exhausting, especially if they spike while people are working or sleeping. The fix isn’t “everyone mute forever.”
The fix is having a system: use short updates, avoid five back-to-back messages when one would do, and if you’re about to drop a wall of text,
lead with a summary line. Example: “TL;DR: We’re meeting at 6, bring $10.” Then details. People will actually read it.
Experience #5: Every group chat needs an exit strategy.
After the event is over, decide what happens next. Does the chat live on for future plans, or does it get archived like a completed mission?
If it’s temporary, say so: “After Saturday, we can close this chat unless we want a ‘future hikes’ thread.”
Otherwise, the chat becomes a zombierandomly reanimated months later by someone sending “anyone free today?” into the void.
If it’s long-term, rename it to match the ongoing purpose so it doesn’t become a clutter magnet.
Bottom line: creating a Facebook Messenger group chat is easy. Keeping it useful is the real art. A little structure up front saves a lot of scrolling later.
Conclusion
Creating a group chat on Facebook is less about “finding the right button” and more about setting up a conversation that stays helpful.
Follow the 11 steps to create the chat, name it, and customize the basicsthen use simple norms (clear purpose, smart notifications, intentional membership)
to keep it from turning into an always-on group therapy session for planning a brunch.
If you do nothing else: name the chat immediately, send a purpose-setting first message, and adjust notifications before your phone starts filing complaints.