Table of Contents >> Show >> Hide
- Why Cupcake Candle Holders Are Such a Smart DIY
- What You’ll Need
- Before You Start: Important Prep Tips
- How to Make Cupcake Candle Holders With Plaster of Paris
- Design Ideas That Make Them Look Extra Special
- Common Mistakes and How to Avoid Them
- Are Plaster of Paris Cupcake Candle Holders Safe?
- How to Style Them in Your Home
- Experience: What Making These Actually Feels Like
- Final Thoughts
If you’ve ever looked at a plain tea light and thought, “Cute, but what if it looked like dessert?” welcome to the craft table. Cupcake candle holders made with plaster of Paris are one of those wonderfully extra DIY projects that somehow manage to be both charming and surprisingly classy. They’re sweet without being sticky, customizable without requiring an art degree, and budget-friendly enough that you won’t cry into your paintbrush if one turns out a little wonky. In fact, the slight imperfections are part of the charm. A handmade cupcake candle holder should look lovingly crafted, not mass-produced by a joyless candle robot.
This project combines the quick-setting magic of plaster of Paris with the playful look of frosted cupcakes. The result is a decorative piece you can use for parties, seasonal displays, birthdays, dessert-themed tablescapes, vanity decor, or gifts for the friend who believes everything in life should be a little cuter. Better yet, once you understand the basic method, you can create bakery-inspired designs in every style, from pastel sprinkle-shop sweet to sleek monochrome “Parisian pastry counter” chic.
Why Cupcake Candle Holders Are Such a Smart DIY
There are plenty of plaster of Paris crafts out there, but cupcake candle holders hit a very satisfying sweet spot. They’re small enough to finish in an afternoon, decorative enough to feel special, and practical enough to use instead of just dusting forever on a shelf. Because plaster of Paris captures shape and texture so well, it’s ideal for making a cupcake base with ridges, swirls, and sculpted “frosting” details.
Another reason this project works so well is flexibility. You can make mini holders for a party table, oversized ones for a centerpiece, or a matching set for gifts. You can leave them matte and modern, paint them in candy colors, add faux sprinkles, or dry-brush metallic highlights for a more elevated finish. In other words, this is not just a craft. It’s a tiny design studio disguised as dessert decor.
What You’ll Need
- Plaster of Paris
- Cold water
- Silicone cupcake molds or a flexible baking mold used only for crafting
- Disposable mixing cups or bowls
- Measuring cup
- Plastic spoon, craft stick, or silicone spatula
- Petroleum jelly or mold release
- Fine-grit sandpaper
- Acrylic craft paint
- Small paintbrushes
- Clear craft sealer or shellac-style finish
- LED tea lights or a metal/glass insert for a tea light well
- Optional: glitter, faux sprinkles, mica powder, ribbon, tiny pearls, or paint pens
If you’re a first-timer, do yourself a favor and keep the first batch simple. Resist the urge to create a six-color ombré strawberry shortcake masterpiece with gold trim on your very first try. You are making candle holders, not auditioning for a tiny dessert-themed reality show.
Before You Start: Important Prep Tips
Use small batches
Plaster of Paris sets fast. Really fast. This is not the kind of material you mix, answer a text, make coffee, and then casually return to. Mix only what you can use right away.
Protect your workspace
Cover the table with plastic, kraft paper, or an old trash bag. Wear an apron or old clothes. Plaster has a sneaky talent for ending up exactly where you did not want it.
Do not pour leftover plaster down the drain
Let extra plaster harden in the cup, then toss it in the trash. Your plumbing deserves better.
Plan the candle well ahead of time
If you want the finished holder to fit a tea light, create a centered recess while the plaster is still workable. The safest decorative route is to use an LED tea light. If you plan to use a real tea light, create space for a snug metal or glass insert rather than placing flame directly against painted plaster and embellishments.
How to Make Cupcake Candle Holders With Plaster of Paris
Step 1: Prep the mold
Lightly coat the inside of your silicone cupcake mold with a very thin layer of petroleum jelly or craft-safe mold release. You want just enough to help the plaster release cleanly, not so much that the finished surface looks greasy or blurred. If you’re using a mold with deep ridges like a cupcake wrapper, a soft brush helps spread the release agent into the grooves.
Step 2: Mix the plaster
A reliable starting ratio is two parts plaster of Paris to one part cold water. For example, use 1 cup of plaster to 1/2 cup of water for a small batch. Sprinkle the plaster into the water rather than dumping it in all at once. Stir gently until the mixture is smooth and about as thick as pancake batter or slightly thicker. Don’t whip it like cake mix. Too much enthusiastic stirring creates bubbles, and bubbles are the sworn enemies of pretty molded crafts.
Step 3: Pour the cupcake base
Fill each mold about three-quarters full, tapping the mold gently on the table after each partial fill. That little tap-tap move helps release trapped air and makes the finished piece look more polished. If you want a recessed center for a candle insert, wait until the plaster begins to thicken slightly, then press the bottom of a small disposable cup, a tea light cup, or a round object wrapped in plastic into the center. Keep it shallow but defined.
Step 4: Shape the “frosting” top
For the cupcake effect, you have two good options. The easy method is to cast the base first and then add a decorative swirl on top using a second, slightly thicker plaster batch. Spoon or pipe the thicker plaster onto the top of the base and shape it with a butter knife, palette knife, or craft stick. Build soft spiral ridges like frosting, but leave the center open if the candle needs to sit there.
The faster method is to pour the base and shape the top while everything is still in one workable session. This takes a little confidence and a willingness to embrace a few delicious-looking imperfections.
Step 5: Let it set
Allow the plaster to harden fully in the mold before removing it. Once it feels firm and cool rather than warm, gently pop it out. Flex the silicone mold instead of yanking on the plaster. Tugging is a great way to turn “cupcake chic” into “mysterious plaster rubble.”
Step 6: Dry completely
Even if the holder feels hard, it still needs additional drying time. Let the piece sit for several hours or overnight before sanding, sealing, or painting. This step matters more than impatient crafters want to admit. Painting damp plaster is the decorative equivalent of putting mascara on while sprinting.
Step 7: Sand and refine
Use fine-grit sandpaper to smooth rough seams, flatten the base if needed, and clean up the candle recess. Don’t over-sand the decorative ridges unless you’re going for a softer, less frosted look. A little texture makes the finished piece more realistic and more interesting.
Step 8: Paint your cupcake candle holder
This is where the fun really starts. Paint the “wrapper” base in one shade and the “frosting” top in another for a classic cupcake look. Try combinations like cream and blush, mint and white, lavender and gold, chocolate brown and pale pink, or white with cherry-red details. Acrylic paint works beautifully here because it offers strong color and easy layering.
If you want added depth, start with a base coat, let it dry, then dry-brush a lighter shade across the ridges. You can also paint tiny faux sprinkles, dots, or swirls with a fine brush or paint pen. For a bakery-window finish, seal the dried paint with a clear protective sealer.
Design Ideas That Make Them Look Extra Special
Classic bakery style
Paint the base to resemble a cupcake wrapper in soft brown, cream, or pastel stripes. Then create white or pale pink “frosting” with colorful faux sprinkles. This version is playful, bright, and perfect for birthdays or dessert tables.
Modern monochrome
Use one color from top to bottom, such as matte white, dusty rose, sage green, or charcoal. The sculptural shape becomes the star, and the finished holder looks more like boutique decor than novelty craft. Very chic. Very “I absolutely meant to make this look expensive.”
Holiday themes
Red and green for Christmas, orange and cream for fall, pastel yellow and lilac for spring, or black and metallic gold for Halloween. Seasonal cupcake candle holders make easy tabletop accents and surprisingly good handmade gifts.
Faux confection perfection
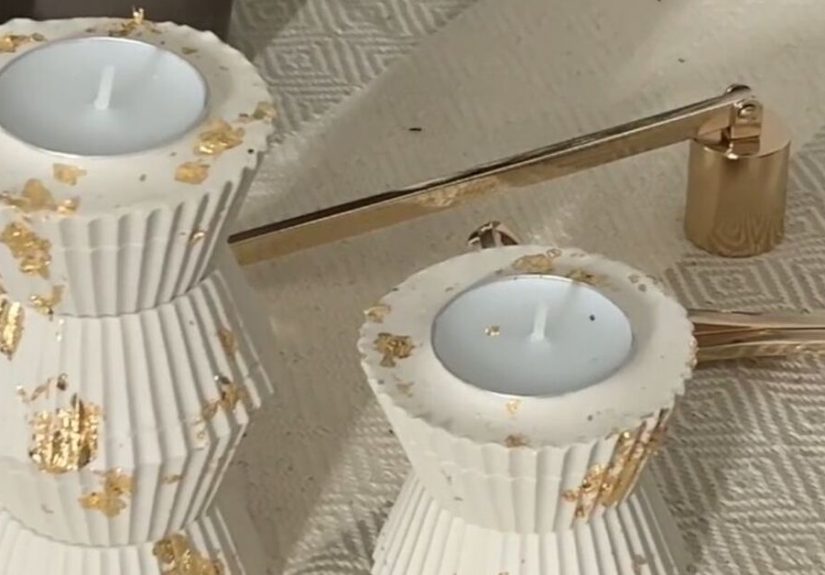
Add glitter only in tiny doses, use pearl paint on the swirl ridges, or brush metallic gold onto the edges of the “wrapper.” The secret is restraint. You’re aiming for stylish dessert decor, not a craft explosion in the baking aisle.
Common Mistakes and How to Avoid Them
Making the mix too thin: watery plaster tends to weaken details and create a flatter shape. Stick close to the recommended ratio.
Mixing too much at once: a big bowl of plaster can start setting before you finish pouring. Small batches are easier to control and less wasteful.
Overstirring: aggressive stirring introduces bubbles, which leave pits on the finished piece.
Removing too early: if the cast is still warm or delicate, wait longer. Patience now prevents heartbreak later.
Painting before fully dry: this can make colors look uneven and reduce adhesion.
Using open flame carelessly: decorative crafts and fire need boundaries. LED tea lights are the safest choice for this kind of embellished holder.
Are Plaster of Paris Cupcake Candle Holders Safe?
For decorative use, LED tea lights are the easiest and smartest option. They give you the cozy glow without heat, dripping wax, or worries about painted surfaces, sealer, glitter, ribbons, or faux sprinkles sitting too close to a flame. If you want to use a real tea light, place it in a proper metal or glass insert inside the holder, keep all embellishments well away from the flame, and use the finished piece only on a sturdy, uncluttered surface under supervision.
In plain English: these holders are adorable, but adorable is not a fire code. Use common sense, and when in doubt, go flameless.
How to Style Them in Your Home
These DIY candle holders look fantastic in small grouped arrangements. Try three in complementary colors on a tray, windowsill, shelf, vanity, or dessert buffet. They also work well as party decor for baby showers, birthdays, bridal brunches, and tea parties. If you make a matching set with gift tags and boxed LED tea lights, they become an easy handmade present that feels thoughtful instead of last-minute.
You can also style them with other sweet-themed decor like faux macarons, pastel books, vintage cake stands, or small floral arrangements. The point is not to make your house look like an actual bakery. Unless that is your dream, in which case, carry on.
Experience: What Making These Actually Feels Like
One of the best things about making cupcake candle holders with plaster of Paris is that the project feels a little theatrical from the very beginning. You start with powder and water, which sounds boring enough, but within minutes it becomes a creamy mixture that suddenly has serious potential. The first time you pour it into a cupcake mold, it feels like you’re halfway between baking and sculpting. That strange in-between quality is part of the fun. You’re not following a fussy fine-art process, but you’re also not just gluing random things together and hoping for the best.
There’s usually a small moment of panic the first time the plaster starts to thicken. It happens quickly, and most beginners immediately think, “Oh no, I ruined it.” Usually, you didn’t. You just discovered that plaster has its own personality. It wants decisiveness. Once you accept that, the craft becomes much easier. Instead of trying to make everything perfect, you start working with the material, shaping ridges, smoothing edges, and letting the swirls be a little organic. Ironically, that’s often when the holders start looking better.
The demolding stage is especially satisfying. Pulling a finished cast out of a silicone mold feels a bit like opening a present you wrapped for yourself. Sometimes the ridges are cleaner than expected. Sometimes a tiny air bubble gives the piece a handmade charm. Either way, the reveal is fun. This project gives quick visual payoff, and that’s one reason people tend to make one cupcake holder and then immediately decide they need six more in different colors.
Painting is where the experience becomes personal. A simple white-on-white holder can feel modern and elegant, while a pink swirl with confetti dots looks cheerful and whimsical. That range is part of what keeps the project interesting. Two people can use the same mold and the same plaster and end up with completely different results. One might create something that belongs on a birthday table. The other might make a neutral piece that looks right at home in a stylish living room.
There’s also something oddly relaxing about the finishing stage. Sanding the edges, dry-brushing highlights onto the swirl, and sealing the piece turns a rough cast into something display-worthy. It feels less like a kiddie craft and more like building a small decor object with intention. That shift matters. It’s the difference between “I made a thing” and “I made something I actually want to keep.”
Most of all, this is a craft that rewards experimentation. Your first cupcake candle holder might be slightly lopsided. Your second will probably be better. By the third, you’ll start making design decisions on purpose instead of by accident. You’ll learn how thick you like the mix, how deep to make the candle recess, and how much detail to add to the frosting swirl. That’s when the project really clicks. It stops feeling like following instructions and starts feeling like creating a collection. And honestly, that’s the sweet spot every good DIY project should aim for.
Final Thoughts
If you want a DIY that is affordable, creative, giftable, and just plain delightful, cupcake candle holders made with plaster of Paris are hard to beat. They’re beginner-friendly enough to try on a weekend, customizable enough to match almost any decor style, and charming enough to make people ask where you bought them. Which, of course, is your cue to say, “Oh, these? I made them,” with just the right amount of casual pride.
Start simple, work in small batches, let the plaster dry fully, and decorate with intention. Whether you go for soft pastel bakery vibes, sleek modern neutrals, or full-on faux-frosted drama, the finished result will feel handmade in the best possible way. Cute, clever, and a little extra? That’s basically the cupcake candle holder brand.