Table of Contents >> Show >> Hide
- Why Feeding Worm Farm Worms Correctly Matters
- How to Feed Worm Farm Worms: 12 Steps
- Step 1: Make Sure You Have the Right Worms
- Step 2: Start with Bedding Before You Start with Food
- Step 3: Keep the Bedding as Damp as a Wringed-Out Sponge
- Step 4: Feed Small Amounts at First
- Step 5: Choose Foods Worms Actually Like
- Step 6: Chop or Pre-Soften Scraps for Faster Feeding
- Step 7: Bury the Food Instead of Leaving It on Top
- Step 8: Rotate Feeding Spots Around the Bin
- Step 9: Add Bedding Every Time You Add Food
- Step 10: Learn What Not to Feed Worms
- Step 11: Feed on a Schedule, but Let the Bin Set the Pace
- Step 12: Watch for Feedback and Adjust Fast
- Quick Examples of Good Worm Feeding Combinations
- Common Worm Feeding Mistakes to Avoid
- Conclusion
- Practical Feeding Experiences and Lessons from Real-World Worm Bin Care
If you have a worm farm, congratulations: you are now the proud manager of a tiny underground restaurant where the guests never complain, never ask for the check, and turn yesterday’s carrot peels into black gold. That said, feeding worm farm worms is not as simple as tossing scraps into a bin and hoping for the best. Compost worms, especially red wigglers, thrive when their food, moisture, airflow, and bedding all stay in balance.
Get that balance right, and your worm bin becomes a low-drama, high-reward system that quietly recycles kitchen scraps into nutrient-rich castings. Get it wrong, and the bin can turn soggy, smelly, buggy, or weirdly theatrical. One banana peel too many and suddenly the fruit flies are treating your laundry room like a vacation property.
This guide breaks down exactly how to feed worm farm worms in 12 practical steps. You will learn what compost worms like to eat, what they absolutely do not want on the menu, how often to feed them, and how to spot trouble before your worm bin starts smelling like a science fair gone rogue. Whether you are brand-new to vermicomposting or trying to improve a sluggish bin, these steps will help you feed your worms more effectively and keep your worm farm healthy.
Why Feeding Worm Farm Worms Correctly Matters
Worm farm worms do not actually chew food the way people imagine. They rely on microorganisms to start breaking scraps down, then they consume that softened organic matter along with grit and bedding. In other words, feeding worms is not just about the food itself. It is about creating a comfortable system where food decomposes at the right pace, moisture stays consistent, and the worms can move through the bin without turning it into a swamp.
When people search for how to feed worms, they often focus only on scraps. But successful vermicomposting depends on more than leftovers. A healthy feeding routine also includes carbon-rich bedding, proper portion sizes, gentle rotation of feeding spots, and patience. The best worm keepers are not flashy. They are basically the calm, organized meal preppers of the compost world.
How to Feed Worm Farm Worms: 12 Steps
Step 1: Make Sure You Have the Right Worms
Before you worry about food, make sure you are raising the right kind of worms. A worm farm is designed for compost worms like red wigglers, not common garden earthworms. Red wigglers live near the surface in rich organic matter, which makes them ideal for a worm bin. They handle confinement well, reproduce quickly, and process food scraps efficiently.
If your worms came from a healthy worm farm supplier, you are probably set. If you grabbed random worms from the yard, you may have workers who did not apply for this job and are already planning their resignation.
Step 2: Start with Bedding Before You Start with Food
Worms need bedding as much as they need food. In fact, bedding is part of the menu. Good bedding materials include shredded newspaper, plain cardboard, paper bags, dried leaves, or coconut coir. The goal is a fluffy, carbon-rich base that holds moisture without becoming dense and airless.
Think of bedding as the worm version of a mattress, pantry, and dining room all in one. A worm bin with too little bedding gets wet and compacted fast. A bin with enough bedding stays airy, balanced, and much easier to manage. If your first instinct is to pile on food scraps and skip the paper, pause. Your worms would prefer a comfortable home over an all-you-can-eat buffet on a bare floor.
Step 3: Keep the Bedding as Damp as a Wringed-Out Sponge
Moisture is one of the most important parts of feeding worm farm worms. Worms breathe through their skin, so they need a moist environment. But they do not want to live in soup. The sweet spot is bedding that feels like a wrung-out sponge: damp enough to hold together, but not dripping or waterlogged.
If the bin is too dry, the worms slow down and the scraps break down more slowly. If it is too wet, airflow drops, odors appear, and anaerobic conditions take over. That is when the bin starts to smell like regret. Add dry shredded paper if the bin is too wet. Mist lightly or add wetter bedding if it is too dry.
Step 4: Feed Small Amounts at First
One of the biggest beginner mistakes in worm composting is overfeeding. New worm bins need time to stabilize, and your worms need time to settle in. Start with a small amount of food and wait until most of it is broken down before adding more. This is especially important in the first few weeks.
A modest feeding schedule beats a generous disaster every time. If you dump in a mountain of scraps, the food can rot before the worms and microbes catch up. That leads to odors, excess moisture, and pests. A worm bin is not impressed by ambition. It rewards restraint.
Step 5: Choose Foods Worms Actually Like
The best worm bin food is soft, plant-based, and easy to break down. Great choices include vegetable scraps, fruit scraps in moderation, coffee grounds, paper filters, tea leaves, crushed eggshells, stale bread, cereal, and small amounts of grains. Melon rinds, lettuce, cucumber peels, squash scraps, and pumpkin pieces are often easy wins because they soften quickly.
Variety helps. A diverse mix of food scraps creates a more balanced environment and keeps the bin moving along. Picture a good worm menu as mostly produce, a little paper, and occasional extras, not a chaotic dump of whatever came out of the fridge drawer.
Step 6: Chop or Pre-Soften Scraps for Faster Feeding
If you want your worm farm worms to work faster, do some of the prep for them. Chop food into smaller pieces before feeding. Smaller scraps break down faster, which makes them easier for worms and microbes to process. Freezing and thawing scraps first can also soften the material and speed decomposition.
This is especially helpful for firmer foods like broccoli stems, carrot peels, and apple cores. You do not need to puree dinner leftovers like you are opening a smoothie bar for invertebrates, but a little size reduction goes a long way.
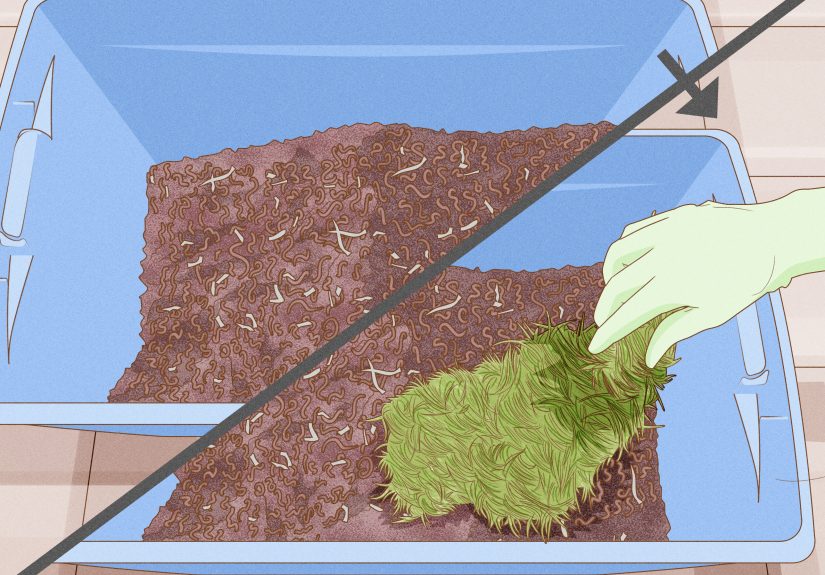
Step 7: Bury the Food Instead of Leaving It on Top
When feeding a worm farm, bury the scraps under the bedding. This one step helps control fruit flies, reduces odors, and keeps the bin looking cleaner. Dig a small pocket, place the food inside, and cover it completely with bedding.
Exposed scraps are basically a party invitation for pests. Covered scraps stay moist, decompose more evenly, and let worms feed in darkness, which they prefer. Your worms are not into spotlight dining.
Step 8: Rotate Feeding Spots Around the Bin
Do not always feed in the exact same spot. Move around the bin so scraps are distributed across different sections. Rotating feeding zones prevents one soggy, compacted corner from becoming a mess and encourages worms to travel throughout the bedding.
This also helps you track how fast the worms are eating. If last week’s pocket is still mostly intact, hold off on more food there. If it is nearly gone, you can feed again. Rotating sections turns your feeding routine into a simple monitoring system.
Step 9: Add Bedding Every Time You Add Food
Every feeding should include a little fresh bedding on top. This is the secret move that separates thriving worm bins from bins that smell like a forgotten lunchbox. Extra bedding helps absorb moisture, adds carbon, keeps the surface covered, and discourages flies.
If your worm bin gets heavy on food scraps but light on paper or cardboard, the balance shifts too far toward wet nitrogen-rich material. That is when trouble starts. A handful or two of dry shredded paper after feeding is often enough to keep things in line.
Step 10: Learn What Not to Feed Worms
Knowing what not to feed worms matters just as much as knowing what they can eat. Skip meat, dairy, oily foods, bones, pet waste, heavily salted foods, and anything greasy. Large amounts of onion, garlic, and citrus can also create problems because they are pungent or acidic. Spicy food is another poor choice.
Could worms eventually break down some of these materials? Maybe. Should you turn your worm bin into an experiment involving fish bones, sour cream, and salsa? Absolutely not. A worm farm is a compost system, not a dare.
Step 11: Feed on a Schedule, but Let the Bin Set the Pace
A good starting point is feeding two or three times per week, but there is no universal calendar that works for every bin. Temperature, worm population, bedding depth, and the type of scraps all affect how fast food disappears. A warm, established bin with lots of red wigglers can handle more than a new bin in a cool garage.
The best rule is simple: do not add more until most of the previous food is gone. If scraps are piling up, slow down. If the worms are clearing pockets quickly, you can gradually increase the amount. Worm keeping is less about strict scheduling and more about reading the room. Or, more accurately, reading the rot.
Step 12: Watch for Feedback and Adjust Fast
Your worm bin gives clues when the feeding routine needs work. A sour or rotten smell usually means overfeeding, too much moisture, or poor airflow. Fruit flies usually mean food is exposed or scraps are piling up too fast. If the bin seems sluggish, it may be too cold, too dry, or too acidic.
Here is the good news: most worm farm problems are fixable. Reduce feeding for a week, remove any obviously rotten food, fluff the bedding gently, add dry paper, and get back to smaller feedings. Worm bins are forgiving as long as you listen early. Ignore the signs long enough, though, and the worms start filing silent complaints.
Quick Examples of Good Worm Feeding Combinations
Need a few easy ideas? Try these balanced feeding mixes:
Example 1: chopped lettuce, cucumber peels, coffee grounds, and shredded newspaper.
Example 2: banana peel pieces, crushed eggshells, stale cereal, and a layer of cardboard strips.
Example 3: melon scraps, tea leaves, pumpkin bits, and dry paper to absorb extra moisture.
These combinations work because they pair soft food with absorbent bedding. In other words, they feed the worms without turning the bin into a wet casserole.
Common Worm Feeding Mistakes to Avoid
The most common worm farm mistakes are overfeeding, under-bedding, poor moisture control, and feeding too many problem foods at once. Another classic mistake is assuming the worms will instantly process everything. They will not. Worm composting is efficient, but it is still a biological system, not a disposal chute with magic powers.
Do not panic if your worm bin is not devouring scraps on day one. Healthy feeding is gradual. Once the microorganisms, worms, and bedding settle into balance, the system gets faster and much more forgiving.
Conclusion
Feeding worm farm worms well comes down to a few simple habits: use the right worms, keep the bedding moist but airy, feed small chopped scraps, bury the food, cover it with bedding, and avoid greasy, salty, or strongly acidic foods. That is the core of successful vermicomposting.
If you remember nothing else, remember this: your worm bin should smell earthy, feel damp but not soggy, and show steady progress rather than instant perfection. Compost worms do their best work in a stable, low-stress environment. Give them that, and they will quietly turn kitchen scraps into some of the most useful material your garden will ever get.
And honestly, that is not a bad deal. You give them pumpkin peels. They give you premium compost. That is better customer service than most subscription apps.
Practical Feeding Experiences and Lessons from Real-World Worm Bin Care
One of the most useful things people learn from actually caring for a worm bin is that worms are less dramatic than beginners expect and more sensitive than they look. At first, many people assume compost worms will eat everything quickly and forgive any mistake. Then reality shows up wearing a banana peel cape. The bin slows down, the surface gets wet, and someone realizes they have been feeding like they are stocking a cafeteria instead of managing a living compost ecosystem.
A common early experience is surprise at how little food a new bin needs. People open the freezer, find a week’s worth of kitchen scraps, and imagine the worms are about to host a feast. In practice, a young worm farm often does better with a small handful of scraps than with a heroic pile. Once keepers see food lingering too long, they usually become more observant. That is the moment worm care starts getting easier. The routine changes from “feed on schedule no matter what” to “check first, then feed.”
Another real-world lesson is that moisture sneaks up on you. Fruit and vegetable scraps carry a lot of water, especially melon, cucumber, and squash. Many beginners think a worm bin looks dry on top, so they add water, then more food, then wonder why the lower layers turn heavy and smelly. Experienced worm keepers often learn to treat dry bedding as a regular tool, not an emergency fix. A stack of shredded newspaper nearby can solve problems before they even start.
People also notice that worms clearly prefer some foods over others. Soft produce disappears quickly. Pumpkin, melon, lettuce, and coffee grounds often move fast. Tough onion skins, thick citrus peels, and large woody scraps tend to sit there like uninvited guests. This does not mean worms are picky in a fussy way. It simply means the bin works best when food is prepared with decomposition in mind. Chop it smaller, bury it well, and the worms usually get through it much faster.
Many long-term worm bin owners describe a turning point where the system begins to feel almost self-managing. The smell becomes pleasantly earthy, the scraps vanish steadily, and the bedding texture starts to look dark and crumbly. At that stage, feeding stops feeling like a chore and starts feeling more like a rhythm. A little food here, a little bedding there, a quick moisture check, done. No drama, no mystery, no fruit fly nightclub.
The biggest takeaway from experience is that successful worm feeding is not about perfection. It is about attention. Worm farms respond well to small corrections made early. When the bin is a bit wet, add paper. When food lingers, feed less. When odors appear, back off and rebalance. People who stick with worm composting usually do so because they realize the worms are not asking for complicated care. They are asking for consistency. Once you understand that, feeding worm farm worms becomes simple, efficient, and oddly satisfying.