Table of Contents >> Show >> Hide
- Why Elevation Matters More Than You Think
- The Short Answer
- Method 1: Find Elevation on Google Maps Desktop
- Method 2: Check Terrain on the Google Maps App
- Method 3: Use Google Earth for an Exact Point Elevation
- Method 4: Get an Elevation Profile for a Route
- How to Read Contour Lines Without Pretending You Are a Cartographer
- Real-World Examples of Using Google Maps Elevation
- Common Problems and Fixes
- When Google Maps Is Enough and When It Is Not
- Pro Tips for Better Elevation Results
- Conclusion
- Experience Notes: What It Actually Feels Like to Use Google Maps for Elevation
Some people open Google Maps to find tacos. Others open it to find out whether their “easy little walk” is actually a stealth mountain climb. If you are in the second group, welcome. Knowing how to find elevation on Google Maps can help you plan hikes, bike rides, road trips, property checks, travel routes, and even those dramatic vacation photos where you look outdoorsy for exactly six minutes.
Here is the quick truth: Google Maps can show elevation information, but it does it best in Terrain view on desktop. If you want a more exact point elevation or a route elevation profile, Google Earth is often the better companion tool. In other words, Google Maps is great at helping you see the lay of the land, while Google Earth is the overachiever who brought charts.
Why Elevation Matters More Than You Think
Elevation is not just a fun number for geography nerds. It changes how hard a route feels, how weather behaves, how much effort a bike ride demands, and how realistic your hiking plans really are. A trail that looks short on a map can become a quad-burning workout if the elevation gain is steep. A home or campsite that seems close to a river may sit high enough to feel safe, or low enough to deserve a second look.
That is why learning how to find elevation on Google Maps is useful for more than one niche hobby. It can help runners compare routes, hikers spot steep terrain, travelers understand mountain roads, and curious humans answer classic questions like, “Why am I out of breath after only ten minutes?”
The Short Answer
If you want to find elevation on Google Maps, the easiest method is this:
- Open Google Maps on a desktop browser.
- Click Layers in the lower-left corner.
- Select More, then turn on Terrain.
- Zoom in until you can see contour lines and gray altitude numbers.
That works well when you want a visual sense of hills, valleys, ridges, and slope changes. If you need an exact number for a point or an elevation profile along a route, move over to Google Earth.
Method 1: Find Elevation on Google Maps Desktop
Step-by-step instructions
Desktop is still the best place to use Google Maps elevation features in a practical way.
- Go to Google Maps in your browser.
- Search for the place you want to inspect.
- Click Layers.
- Choose Terrain or click More and enable Terrain, depending on the layout you see.
- Zoom in gradually.
Once Terrain is active, Google Maps can display the shape of the landscape. In many areas, you will notice contour lines overlaid on the map, plus gray numbers that indicate altitude. Those labels are the part most people miss because they either do not zoom in enough or they zoom in too far and expect the map to behave like a surveying tool.
Yes, this is one of those moments where the app politely asks for the “Goldilocks zoom level.” Too far out, and you do not see useful detail. Too far in, and some of the broader topographic cues can disappear.
What the desktop view is good for
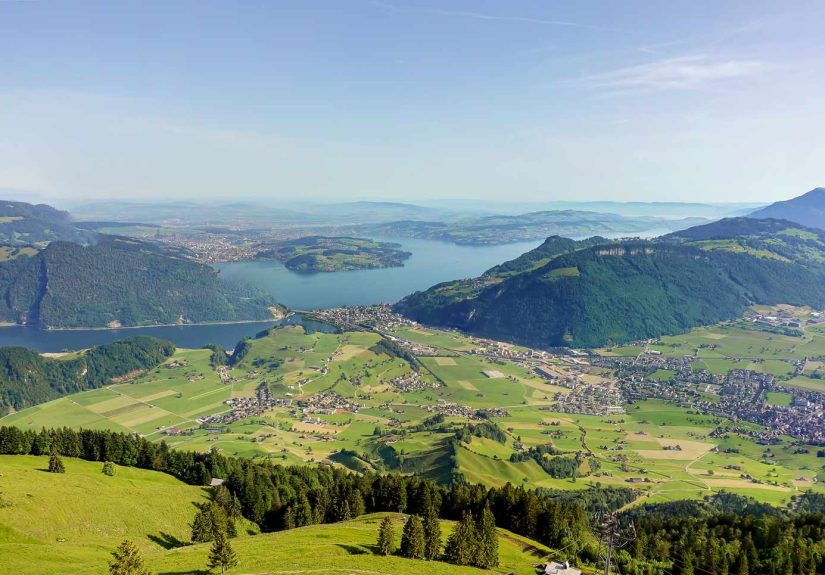
- Spotting mountain terrain and elevation changes
- Checking whether a neighborhood sits on a hill or in a low basin
- Planning hiking, cycling, or scenic driving routes
- Reading contour patterns for a general sense of slope
What it is not great for
Desktop Google Maps is not the best tool for a precise, one-click elevation reading for a specific point. It is more of a visual terrain guide than a hardcore elevation instrument. Think of it as helpful, but not bossy.
Method 2: Check Terrain on the Google Maps App
If you are on a phone, you can still use the Google Maps terrain view to get a feel for elevation. On Android or iPhone, open the app, tap Layers, and choose Terrain.
On mobile, Terrain view is handy for seeing mountains, ridges, and landscape features. It is useful when you are already out and about and want a quick read on the surrounding area. That said, the mobile app is usually better for general terrain context than for a clean, exact elevation readout of a single point.
So yes, the app can help you understand whether a route is flat, rolling, or suspiciously dramatic. But if you need a precise number, a desktop workflow with Google Earth is usually stronger.
Method 3: Use Google Earth for an Exact Point Elevation
This is where many people realize they were asking Google Maps to do a Google Earth job.
If you want the elevation of a specific point, open Google Earth on a computer. Then hover your cursor over the spot you care about. The elevation appears in the lower-right area of the screen. That makes Google Earth a much better option for people who want an actual number instead of just contour lines and educated squinting.
When Google Earth makes more sense
- You want the elevation of a house, trailhead, overlook, or campsite
- You need a more exact reading than Google Maps typically shows
- You are comparing several points in one area
- You want to confirm whether a location is higher or lower than nearby terrain
Google Earth also shines when you want to understand how a place sits in 3D space. Suddenly, “that road looked gentle on the map” becomes “oh, it is wrapped around a mountainside like spaghetti.” Useful, humbling, character-building.
Method 4: Get an Elevation Profile for a Route
If you want to know how steep a route becomes over distance, use Google Earth Pro. This is especially useful for hiking, biking, trail running, and trip planning.
How to do it
- Open Google Earth Pro on your computer.
- Draw a path or open an existing one.
- Click Edit.
- Select Show Elevation Profile.
You will see a chart showing elevation on the vertical axis and distance on the horizontal axis. That means you can tell not only how high something is, but how brutally it climbs. This is the feature that turns vague optimism into realistic packing decisions.
If the elevation profile reads zero, make sure the terrain layer is turned on. That tiny detail has confused plenty of users, so if the chart looks empty, the problem may not be your route. It may just be one checkbox playing hard to get.
How to Read Contour Lines Without Pretending You Are a Cartographer
A big part of understanding elevation on Google Maps is learning what contour lines are telling you.
Contour lines connect points of equal elevation. If the lines are close together, the slope is steep. If they are far apart, the slope is more gradual. Gray altitude labels may appear on some terrain views to show actual elevation values.
Here is a simple cheat sheet:
- Tight contour lines = steep terrain
- Wide spacing = gentler slope
- Closed loops = hills or depressions, depending on the pattern
- Repeated altitude labels = quick clues to how the land rises and falls
This matters because elevation is not only about one number. It is also about the shape of the climb. A route with modest total elevation gain can still feel intense if the climb is packed into a short distance.
Real-World Examples of Using Google Maps Elevation
1. Planning a hike
You find a scenic trail near a national park. The distance looks manageable, but Terrain view reveals packed contour lines near the summit. Translation: that “casual morning walk” might require actual snacks, water, and some emotional maturity.
2. Comparing bike routes
Two routes are both five miles long. One is mostly flat. The other has repeated hill climbs. Google Maps Terrain view can help you spot the difference before your legs file a complaint.
3. Checking a house location
If you are researching a home, lot, or vacation rental, terrain context can help you understand whether the property sits on higher ground, in a valley, or on a slope that might make your driveway exciting in winter.
4. Evaluating travel routes
Mountain roads, scenic drives, and overlook stops all make more sense when you understand the surrounding elevation. It can also help explain weather shifts, road grades, and why your ears pop during a road trip.
Common Problems and Fixes
I turned on Terrain, but I do not see much
Zoom in more slowly. Terrain details often become more useful at mid-level zooms. If you are too far out, the map is too generalized. If you are too far in, you may lose the broader contour context.
I want one exact elevation number in Google Maps
Switch to Google Earth on a computer. Google Maps is better for topographic context; Google Earth is better for exact point elevation.
I need route steepness, not just terrain
Use Google Earth Pro and the elevation profile feature. That will tell you how the route rises and falls over distance.
The route still feels harder than the map suggested
That can happen. Elevation data is based on digital elevation models, and map tools simplify reality. Surface conditions, stairs, rough footing, heat, and your backpack full of “just a few essentials” all affect how hard a route actually feels.
When Google Maps Is Enough and When It Is Not
Google Maps is enough when you want a fast visual check. It is excellent for answering questions like:
- Is this area hilly or flat?
- Does this route cross steep terrain?
- Is this overlook actually high up?
- Should I expect climbing on this bike ride or hike?
Google Maps is not always enough when you need:
- A precise point elevation
- A clean elevation profile along a route
- Detailed slope analysis for technical outdoor planning
- Professional surveying or engineering-grade data
For those cases, Google Earth, specialized trail apps, or GIS tools are more appropriate. Developers who need elevation data in an app or website can also use Google’s Elevation API.
Pro Tips for Better Elevation Results
- Use desktop first if you want the clearest terrain view in Google Maps.
- Switch to Google Earth for point elevation or route profiles.
- Look for contour spacing, not just one number.
- Compare a few nearby points to understand how the land changes.
- For hiking and trail planning, combine map elevation with route difficulty, surface conditions, and weather.
Conclusion
Learning how to find elevation on Google Maps is easier once you know what the platform is good at. On desktop, Terrain view helps you read the landscape through contour lines and altitude labels. On mobile, Terrain gives you a useful overview of hills and landforms. When you need a more exact point elevation or a route profile, Google Earth steps in like the smart sibling who always has the extra spreadsheet.
The best workflow is simple: start with Google Maps for a fast topographic overview, then move to Google Earth when the details matter. That combination works well for hikers, cyclists, runners, travelers, homeowners, and anyone who has ever looked at a route and thought, “That hill seems rude.”
Experience Notes: What It Actually Feels Like to Use Google Maps for Elevation
Using Google Maps to check elevation is one of those small digital habits that quietly changes how you travel. At first, it feels like a niche trick. Then one day you use Terrain view before a hike, avoid a painfully steep detour, and suddenly you become the friend who says things like, “Let me check the contour lines first.” Congratulations. You now have map opinions.
One of the most common experiences people have is realizing that distance and difficulty are not the same thing. A two-mile walk sounds easy until the terrain reveals that one of those miles goes mostly uphill. Google Maps helps you catch that mismatch early. Even when it does not give you a perfect point elevation, it can still warn you that the route ahead is not exactly a flat stroll past daisies and good decisions.
It is also surprisingly useful in cities. Travelers often assume elevation only matters in the mountains, but it shows up in urban trips too. Maybe your hotel looks “close” to a historic district, yet Terrain view hints that the route includes a serious climb. That changes your shoe choice, your timing, and possibly your willingness to book dinner reservations immediately after the walk.
Another real-world benefit is confidence. When people see hills, ridges, or valleys laid out visually, they make better choices. They pack more water. They leave earlier. They stop underestimating switchbacks. They stop saying things like, “We will just wing it,” which is rarely the start of a great trail story.
There is also a satisfying detective element to it. You check Google Maps Terrain, then confirm a point in Google Earth, then compare the route profile in Google Earth Pro. Suddenly you are not just looking at a map. You are reading the shape of the land. It feels part practical, part nerdy, and honestly, a little powerful.
Of course, the experience is not perfect. Sometimes labels do not appear where you expect. Sometimes the mobile app gives you enough context to be helpful, but not enough to be precise. Sometimes you zoom in and out like a confused owl trying to negotiate with contour lines. That is normal. The trick is understanding which Google tool solves which problem.
Once that clicks, the whole process becomes much easier. Use Google Maps when you want a fast terrain overview. Use Google Earth when you want specific elevation data. Use route profiles when your knees deserve advance notice. That is the practical rhythm, and it works.