Table of Contents >> Show >> Hide
- Why Freezing Fresh Green Beans Properly Matters
- Choose the Best Green Beans Before You Freeze Them
- What You Need
- Step-by-Step: How to Freeze Fresh Green Beans Properly
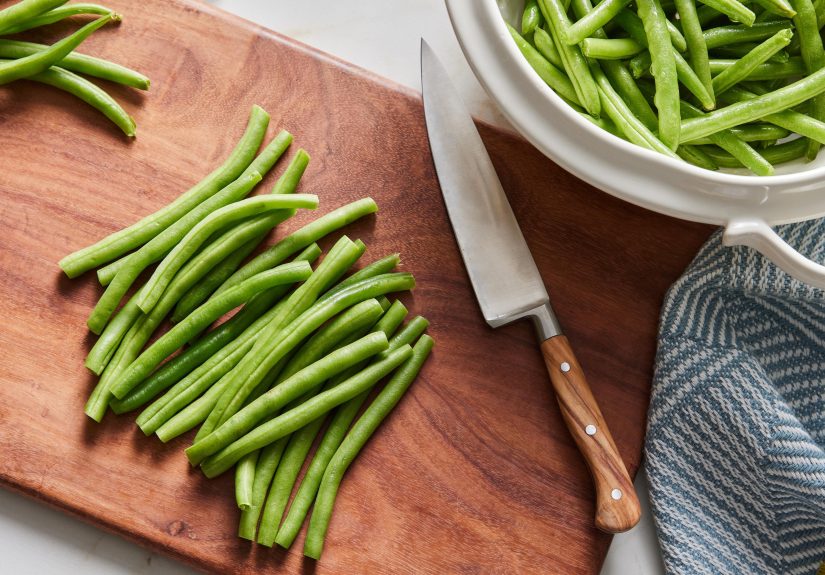
- 1. Wash and Trim the Beans
- 2. Bring a Large Pot of Water to a Boil
- 3. Prepare the Ice Bath Before You Blanch
- 4. Blanch the Green Beans
- 5. Shock Them in Ice Water
- 6. Drain and Dry Thoroughly
- 7. Flash Freeze for Better Texture and Easy Portioning
- 8. Pack in Freezer Bags or Airtight Containers
- 9. Label and Freeze Promptly
- Common Mistakes That Ruin Frozen Green Beans
- How Long Do Frozen Green Beans Last?
- How to Cook Frozen Green Beans
- Can You Freeze Fresh Green Beans Without Blanching?
- Real-Life Kitchen Experiences With Freezing Green Beans Properly
- Final Thoughts
Fresh green beans have a very short window between garden glory and why are these limp and sad? That is exactly why freezing them properly is such a smart move. Done right, frozen green beans keep their bright color, pleasant bite, and fresh flavor far better than the “mystery bag of icy vegetables” many people fear. Done wrong, they can turn dull, mushy, and weirdly damp, like they just went through a breakup in your freezer drawer.
The good news is that freezing fresh green beans properly is not complicated. It is a simple kitchen routine: choose good beans, trim them, blanch them, cool them fast, dry them well, and pack them like you actually want to enjoy them later. Whether you picked up a big haul at the farmers market or your garden suddenly decided to produce enough beans to feed a neighborhood, this method helps you preserve that harvest without wasting a thing.
In this guide, you will learn exactly how to freeze fresh green beans properly, why blanching matters, what common mistakes to avoid, and how to use your frozen beans later without ending up with a soggy side dish that makes everyone stare quietly at their plates.
Why Freezing Fresh Green Beans Properly Matters
If you have ever tossed raw green beans into a freezer bag and called it a day, you are not alone. It feels efficient. It feels practical. It also usually leads to a lower-quality result. The issue is not that green beans become unsafe overnight. The issue is quality. Enzymes inside fresh vegetables continue working even in cold conditions, which can slowly damage flavor, color, and texture.
That is why blanching green beans before freezing is the gold standard. A short dip in boiling water helps slow down those natural changes, while the ice bath immediately stops the cooking so the beans do not become soft. Think of blanching as pressing pause instead of letting your produce age in slow motion.
Proper freezing also reduces freezer burn, cuts down on clumping, and makes meal prep easier later. A few extra minutes upfront can save you from pulling out a frozen brick of beans that can only be used with a chisel and strong language.
Choose the Best Green Beans Before You Freeze Them
The freezer is not a magic wand. It preserves quality; it does not create it. So start with fresh green beans that are actually worth freezing.
What to look for
Pick green beans that are firm, bright green, and smooth, with no major brown spots, bruising, or slimy patches. Younger, more tender beans usually freeze best. They tend to have better texture and fewer tough strings. If the beans bend slightly but still feel crisp, that is a good sign. If they look tired and rubbery, your freezer cannot perform miracles.
Whole or cut?
Either works. You can freeze green beans whole, trimmed, or cut into bite-size pieces. The best choice depends on how you cook. If you often toss beans into soups, casseroles, stir-fries, or quick skillet dinners, cutting them into 1- to 2-inch pieces now will save time later. If you love a cleaner side-dish look, freeze them whole after trimming the ends.
What You Need
You do not need special gadgets or a freezer wizard certificate. Just gather the basics:
A large pot of water, a large bowl of ice water, a colander or slotted spoon, clean towels or paper towels, a sheet pan or tray, freezer-safe bags or airtight containers, and a marker for labeling. If you want the beans to stay loose instead of freezing in one big lump, a tray for pre-freezing is especially helpful.
Step-by-Step: How to Freeze Fresh Green Beans Properly
1. Wash and Trim the Beans
Rinse the green beans under cool running water and remove any dirt or garden grit. Trim off the stem ends, and trim the tail ends too if you want a neater look. If you see damaged spots, remove those. Then decide whether to leave the beans whole or cut them into smaller pieces.
This is the least glamorous part of the process, but it is the part your future self will appreciate most. Frozen beans that are already trimmed are basically a tiny gift from Past You to Future You.
2. Bring a Large Pot of Water to a Boil
Use a generous amount of water so the temperature rebounds quickly after the beans go in. Working in smaller batches helps too, especially if you are freezing a large amount. Crowding the pot can lower the water temperature too much and turn blanching into a sluggish spa treatment instead of a quick, effective step.
3. Prepare the Ice Bath Before You Blanch
Do not wait until the beans are boiling to start hunting for ice. Fill a large bowl with cold water and plenty of ice before the blanching starts. Once the beans come out of the hot water, they need to cool fast. This is what keeps them from overcooking and helps preserve a better texture and color.
4. Blanch the Green Beans
Drop the prepared green beans into the boiling water and blanch them briefly. For standard fresh green beans, about 3 minutes is the classic target for water blanching. If your beans are especially thin and tiny, you can stay near the lower end of the range. If they are thicker and larger, they may need a little more attention.
The goal is not to cook them for dinner. The goal is to preserve them for later. So when the time is up, move quickly.
5. Shock Them in Ice Water
Transfer the beans immediately into the ice bath. Let them cool completely. This step stops the cooking process and helps the beans hold onto more of their fresh texture. Skip it, and your beans may continue softening from residual heat, which is a fast road to mushy freezer regret.
6. Drain and Dry Thoroughly
This step is easy to underestimate, but it matters a lot. Once the beans are chilled, drain them well and spread them on clean towels or paper towels. Pat them dry. Excess surface moisture turns into ice crystals, and ice crystals are bad news for texture. Wet beans also tend to freeze into clumps, which makes it harder to grab just what you need later.
If you remember only one phrase from this article, let it be this: dry beans freeze better.
7. Flash Freeze for Better Texture and Easy Portioning
If you want the best convenience later, spread the dried beans in a single layer on a baking sheet or tray. Put the tray in the freezer until the beans are firm. This quick pre-freeze helps prevent them from sticking together in the final container.
Is this step absolutely required? No. Is it helpful? Very. Especially if you want to pull out a handful for a skillet dinner instead of thawing a giant frozen bean comet.
8. Pack in Freezer Bags or Airtight Containers
Transfer the beans to freezer-safe bags or airtight freezer containers. Press out as much air as possible if using bags. If you are using rigid containers, leave a little room at the top as needed, but do not leave lots of empty space. Air is the enemy here. More air means more risk of freezer burn and stale flavor.
9. Label and Freeze Promptly
Write the contents and date on every package. Yes, every package. No, you will not remember in eight months. Freezer confidence is built on labels, not optimism.
Common Mistakes That Ruin Frozen Green Beans
Skipping blanching
You can technically freeze green beans without blanching, but if your goal is to freeze fresh green beans properly, blanching is the better move. Unblanched beans tend to lose quality faster in the freezer, especially in color and texture.
Not drying the beans enough
Wet beans collect frost and form ice crystals. That extra moisture can leave them mushier when cooked and make the bag look like a tiny snowstorm happened inside.
Overcrowding the blanching pot
Too many beans at once can drop the water temperature and make the blanching less effective. Work in batches and keep things moving.
Using poor-quality beans
If the beans are already limp, bruised, or old, freezing will not suddenly make them premium produce. Start with the freshest beans you can find.
Forgetting to remove excess air
This is how freezer burn sneaks in. Squeeze out the air, seal well, and give your future green beans a fighting chance.
How Long Do Frozen Green Beans Last?
For best quality, properly frozen green beans are usually best used within about 8 to 12 months. They may remain safe longer if kept continuously frozen, but flavor and texture are likely to decline over time. If you want the sweet spot, use them within the first several months when their quality is still at its peak.
If you open a bag and notice heavy frost, grayish dryness, or a stale freezer smell, the beans may have suffered from freezer burn. They might still be usable in soups or casseroles, but they will not be at their best.
How to Cook Frozen Green Beans
One of the best things about frozen green beans is that you usually do not need to thaw them first. You can toss them straight into a skillet, casserole, soup, stir-fry, or sheet-pan dinner. Because the beans were already blanched, they often need less cooking time than raw beans.
Best uses for frozen green beans
Frozen green beans work especially well in soups, stews, casseroles, sautés, roasted vegetable mixes, and quick butter-and-garlic side dishes. They are also handy for holiday cooking, because the prep is already done and your kitchen is busy enough without trimming vegetables at the last minute.
When thawing helps
If you are adding the beans to a baked dish where extra moisture could be a problem, thawing and patting them dry first can help. In most other cases, straight from freezer to pan is perfectly fine.
Can You Freeze Fresh Green Beans Without Blanching?
You can, but it is not the best answer to the question of how to freeze fresh green beans properly. Freezing raw beans may seem faster, and it certainly saves a step, but the trade-off is usually lower quality over time. The beans may lose color more quickly, develop a rougher texture, or taste less fresh after storage.
If you know you will use them very quickly, raw freezing may be acceptable in a pinch. But for the best long-term results, blanching is the smarter method. It is the difference between “technically frozen” and “actually worth eating.”
Real-Life Kitchen Experiences With Freezing Green Beans Properly
The first time I froze fresh green beans properly, I made the classic beginner mistake of assuming the freezer would forgive shortcuts. I washed the beans, trimmed them, patted myself on the back for being productive, and shoved them into a bag without blanching. A few weeks later, they were edible, sure, but they had the personality of damp shoelaces. They cooked unevenly, the color was dull, and they tasted like they had lost interest in being vegetables. That was the moment I learned that “frozen” and “well preserved” are not the same thing.
Once I started blanching, everything changed. The process looked fussy at first, but it quickly became one of those kitchen habits that pays for itself. I found that setting up the ice bath before the beans hit the water made the whole thing smooth and fast. I also noticed that drying the beans thoroughly was the difference between loose, usable beans and one stubborn frozen clump that required either a heavy spoon or a dramatic amount of counter banging.
Another lesson came from freezing beans in different sizes. Whole beans looked beautiful, but cut beans were more practical for busy weeknight cooking. When I opened a bag of already trimmed, already portioned green beans and dropped them straight into a skillet with olive oil, garlic, and a pinch of salt, I felt absurdly organized. It was the kind of small kitchen victory that makes you believe you have your life together, at least until you remember the laundry.
I have also learned that portion size matters. Large freezer bags seem efficient until you only need a cup of green beans for soup and the rest of the bag tries to come with it. Freezing smaller portions solves that problem. A one-meal bag is a beautiful thing. It saves time, reduces waste, and keeps you from thawing more than you need.
Over time, frozen green beans became one of the most useful ingredients in my kitchen. They work in holiday casseroles, quick chicken dinners, vegetable medleys, and lazy buttered side dishes on nights when no one wants a complicated meal. They are not exactly the same as garden-fresh beans served the day they were picked, and they do not need to be. Their magic is different. They bring convenience without sacrificing too much quality, and they make seasonal abundance last longer.
So if you are standing in the kitchen with a pile of fresh green beans and wondering whether the process is worth it, the answer is yes. Freeze them properly once, and you will understand why people swear by it. Skip the steps, and your freezer will hand you a crunchy little life lesson later.
Final Thoughts
If you want to know how to freeze fresh green beans properly, the answer is refreshingly simple: start with fresh beans, blanch them briefly, shock them in ice water, dry them well, pack them tightly, and freeze them fast. That method gives you better color, better texture, better flavor, and fewer sad surprises later.
It is one of the easiest ways to preserve green beans for long-term use, and it turns a seasonal ingredient into a practical, ready-to-cook staple. Whether your beans came from a backyard garden, a roadside stand, or a grocery run that got a little too ambitious, freezing them the right way helps you waste less and cook more easily for months to come.