Table of Contents >> Show >> Hide
- The First Two Minutes: What to Do (and What Not to Do)
- The Core Method That Works for Most Tablecloths: Freeze, Chip, Then Lift
- Fabric Matters: Adjust the Plan for Linen, Cotton, Synthetics, and Delicates
- Colored Wax and Scented Wax: The Plot Twists
- Wash, Dry, Inspect: The “Don’t Bake the Stain” Rule
- Mistakes That Make Candle Wax Stains Harder to Remove
- Prevention Tips for Future Candle Nights
- Quick FAQ
- Experience Corner: Real-Life Wax Mishaps (and What They Taught Me)
- Conclusion
Candlelight dinners are supposed to be romantic. Candle wax on your tablecloth is… a different kind of mood lighting. The good news: wax looks dramatic, but it’s usually a very fixable problemif you don’t panic-scrub it like you’re trying to erase your search history.
This guide pulls the best, most consistent advice from laundry pros, cleaning organizations, and home editors into one simple plan. You’ll learn what to do in the first two minutes, the safest “wax sandwich” technique, how to handle dyed and scented candles, and how to avoid the one mistake that turns a minor spill into a permanent souvenir.
The First Two Minutes: What to Do (and What Not to Do)
Do this immediately
- Stop the spread. If the wax is still soft, keep hands off the smear zone.
- Let it cool, then harden it fast with an ice cube in a plastic bag.
- Lift, don’t rub. Rubbing warm wax pushes it deeper into fibers.
Do NOT do this (unless you enjoy regret)
- Don’t wipe hot wax. That’s how you turn one spot into a modern art installation.
- Don’t throw it in the dryer “to see what happens.” Heat can set oily residue and dye.
- Don’t use high heat on synthetics. Polyester and friends can melt or shine.
The Core Method That Works for Most Tablecloths: Freeze, Chip, Then Lift
Whether your tablecloth is cotton, linen, polyester blend, or a “this was on sale but I’m emotionally attached” fabric, the winning strategy is usually the same: harden the wax, remove the bulk, then use gentle heat to transfer what’s left into something disposable.
Step 1: Harden the wax (yes, even if you’re in a hurry)
Put ice cubes in a zip-top bag and press it against the wax for a few minutes. You want the wax to turn brittle. Brittle wax is cooperative wax. Soft wax is a tiny villain with big ambitions.
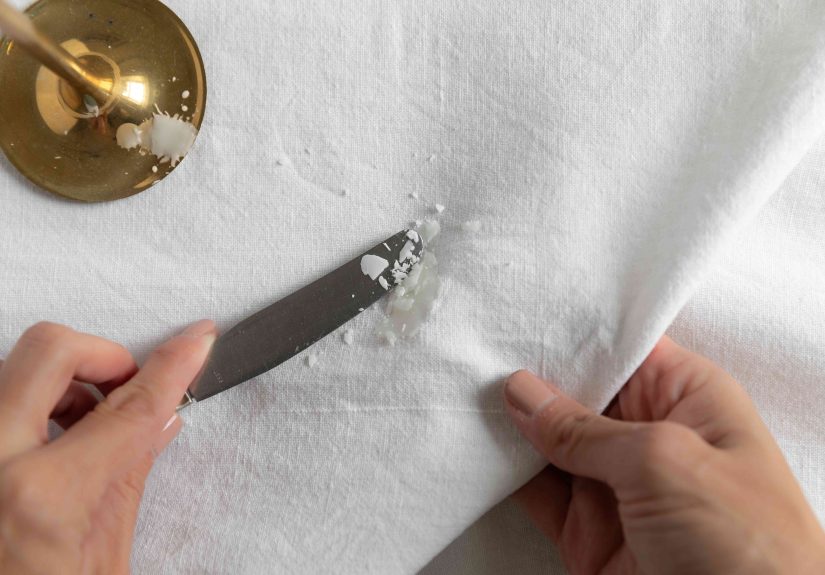
Step 2: Chip off the “crust” without hurting the fabric
Lay the tablecloth on a flat surface. Use a dull knife, spoon edge, or old credit card to gently lift wax off the surface. Work from the outside toward the center. If the weave is delicate (think lace or loose linen), go slow and let the tool do the liftingno stabbing, no sawing.
Pro move: If wax is embedded in texture, flex the fabric slightly. Brittle wax often pops free like it’s late for another appointment.
Step 3: Make a “wax sandwich” and iron it out
This is the part that feels like magicsafe, controlled magic. You’ll need plain white paper towels (no prints) or a brown paper bag with no coating or ink. The goal is to melt remaining wax just enough that it transfers into the paper, not deeper into the cloth.
- Set up your station: Put the tablecloth on an ironing board or a folded towel on a flat surface.
- Place absorbent layers: Slide paper towels under the stained area and lay more paper towels on top.
- Use a dry iron on low: Start at the lowest setting (often “synthetic”). No steam.
- Press, don’t glide: Press for 2–5 seconds, lift, check the paper, and move to a clean section.
- Repeat with fresh paper: Replace towels often so wax doesn’t redeposit back into the fabric.
If you don’t have an iron, a hair dryer on low can work: warm a small section and blot with paper towels as the wax softens. It’s slower, but gentler on tricky fabrics.
Step 4: Tackle what wax leaves behind (the “ghost stain”)
After the wax is gone, you may see one of two leftovers:
- Oily residue (common with scented candles, paraffin blends, and some soy candles)
- Dye shadow (from colored waxespecially red, purple, or deep blue)
For oily residue, treat it like a grease stain: work a small amount of heavy-duty liquid laundry detergent or dish soap into the area, let it sit 10–15 minutes, then rinse with warm water (if the care label allows).
For dye shadow, you’ll usually need a second act (don’t worry, it’s still a short play). Options include oxygen bleach soaks for washable fabrics or careful spot treatment with a fabric-safe remover.
Fabric Matters: Adjust the Plan for Linen, Cotton, Synthetics, and Delicates
Linen and cotton tablecloths
These usually handle the iron-and-paper method well. Use low-to-medium heat depending on the care label. Linen can be sturdy, but it can also crease like it’s auditioning for a wrinkle commercialkeep your pressing time short and your paper layers fresh.
Polyester, rayon, and blends
Use the lowest iron setting and keep the iron moving via short presses. If you see shine, puckering, or a change in texture, stop and switch to a hair dryer method. When in doubt, test on a hidden hem first.
Silk, lace, vintage, or “dry clean only”
Proceed carefully: harden and chip off what you can, then use very low heat (or a hair dryer) and blot gently. If the item is valuable, sentimental, or fragile, professional dry cleaning is often the safest choiceespecially after you’ve removed the bulk wax.
Colored Wax and Scented Wax: The Plot Twists
If the wax was colored
Colored wax can leave dye behind even after the wax transfers out. Here’s a safe sequence for washable tablecloths:
- Remove wax fully (freeze → scrape → paper towel/iron).
- Pretreat with a heavy-duty detergent or enzyme-based stain remover and let it sit.
- Wash on the warmest setting the care label allows.
- If color remains, soak in an oxygen bleach solution (color-safe) before washing again.
If the candle was heavily scented (or “mystery luxury blend”)
Scent oils can behave like grease. Pretreat with dish soap or heavy-duty detergent, gently work it in with a soft toothbrush, then rinse and launder. The key is: don’t apply high heat until the oily mark is gone.
If someone suggests boiling water
Boiling water can be useful for certain hard, heat-safe items, but for most tablecloths it’s risky: it can spread softened wax through fibers or distort delicate fabrics. If you try hot-water methods, it should be after bulk wax is removed and only if the fabric can truly handle it.
Wash, Dry, Inspect: The “Don’t Bake the Stain” Rule
Once you’ve removed wax and treated residue:
- Wash according to the care label (use the warmest safe water for oily residue).
- Inspect while damp under good light. Dye shadows love hiding until the fabric dries.
- Air dry first. If anything remains, repeat pretreatment. Only use the dryer when the stain is truly gone.
Mistakes That Make Candle Wax Stains Harder to Remove
- Scrubbing while wax is warm: pushes wax deeper and enlarges the stain.
- Using steam: moisture + heat can drive dye and oils into fibers.
- Using printed paper towels/newspapers: ink can transfer under heat (now you have wax and headlines).
- Not changing your absorbent layer: wax can redeposit back onto the cloth.
- Drying too soon: sets leftover residue, turning “easy fix” into “new tablecloth day.”
Prevention Tips for Future Candle Nights
- Use dripless tapers when you can. They’re not truly “dripless,” but they try harder.
- Trim wicks to about 1/4 inch to reduce soot and erratic burning.
- Put candles in holders with a wide catch plate or place them on a small tray.
- Skip drafty spots (vents, open windows). Drafts turn candles into wax sprinklers.
- Keep an ice cube bag ready if you host often. Yes, really.
Quick FAQ
Can I use a knife to scrape wax off a tablecloth?
Yesuse a dull knife, spoon edge, or old card. Sharp blades can snag fibers or slice the fabric.
What if the wax soaked through to the table or padding underneath?
Remove the tablecloth and treat it separately. Protect surfaces during the iron step with a folded towel and fresh paper layers. For wood, scraping brittle wax gently and buffing afterward is usually safer than aggressive solvents.
How do I remove wax from a white tablecloth without yellowing?
Most yellowing is leftover oil or dye. Remove wax first, then pretreat, wash, and if needed use an oxygen bleach soak. Avoid chlorine bleach unless the care label allows it and you’re confident it won’t weaken the fabric.
Experience Corner: Real-Life Wax Mishaps (and What They Taught Me)
The first time I dealt with wax on a tablecloth, I did what many well-meaning adults do in a crisis: I tried to “handle it” with confidence and zero strategy. The candle was a festive red (because of course it was), the tablecloth was light linen, and the wax landed right where everyone could see itlike it was trying to win a spotlight. My instinct was to wipe it before it “set,” which is a phrase that makes sense for concrete but not for wax. Within five seconds, I had transformed one neat drip into a smeared red comet with a greasy tail. Lesson one: hot wax is not your friend. Don’t rub. Don’t chase it. Let it cool.
The second lesson came from impatience. I tried the iron method but used the same paper towel too long because it “didn’t look that bad.” It looked that bad. Wax transferred into the towel, then back into the fabric, like a tiny boomerang with a grudge. Once I started swapping towels every few presses, the progress suddenly felt dramatic. The stain literally got lighter in front of me. Lesson two: fresh absorbent layers are the secret sauce. If you reuse the same spot on the towel, you’re basically re-stamping wax onto your tablecloth.
Then came the “mystery residue” momentwax was gone, but there was still a faint darker halo. This is where people get tricked into declaring victory and tossing the cloth in the dryer. I almost did. Instead, I treated it like grease: a little dish soap, a little patience, and a gentle scrub with a soft toothbrush. The halo faded, but a faint pink dye shadow remained because red candle wax loves drama even after it’s dead. Lesson three: wax is a two-part problemthe wax itself plus whatever oils and dye it brought to the party.
Another time, at a holiday dinner, someone suggested putting the tablecloth under very hot running water to “melt it out.” That advice can work in very specific scenarios, but in our case it softened the remaining wax and encouraged it to migrate. We spent extra time correcting what the water started. Lesson four: remove wax mechanically first (freeze/scrape/absorb), then wash. Water too early can make wax more enthusiastic about spreading.
My final lesson came from a synthetic blend tablecloth that looked innocent but behaved like a diva under heat. A medium iron setting left a slight shinenothing catastrophic, but enough to make you squint and mutter, “Is it me, or is that… glossy?” Switching to the lowest setting and using shorter presses fixed the wax without cooking the fabric. Lesson five: always respect the care label and start low. You can always increase heat. You can’t un-melt polyester.
Now my routine is boringin the best way. Ice bag, gentle scrape, paper towel sandwich, low dry iron, swap towels often, then pretreat and air dry until I’m sure it’s gone. It’s not glamorous, but it saves tablecloths, saves money, and saves you from explaining to guests why your “rustic look” includes one suspiciously candle-shaped stain.
Conclusion
If you remember nothing else: don’t rub hot wax. Harden it with ice, lift the brittle chunks, then use gentle, dry heat with clean paper layers to pull the remaining wax out of the fibers. After that, treat whatever’s leftoil or dye like a normal stain, and don’t use the dryer until you’ve confirmed it’s gone. Your tablecloth deserves a second chance (and your candles can keep their drama in the flame, where it belongs).