Table of Contents >> Show >> Hide
- Forest Pansy Redbud: A Quick Snapshot
- Choosing the Right Planting Spot (This Is 80% of Success)
- Soil and Drainage: The Non-Negotiables
- How to Plant a Forest Pansy Redbud (Step-by-Step)
- Watering: The “New Tree” Phase vs. the “Established Tree” Phase
- Feeding and Mulching: Keep It Moderate
- Pruning Forest Pansy Redbud (Without Ruining Next Spring)
- How to Keep the Purple Leaves Looking Their Best
- Common Problems (and What to Do About Them)
- Seasonal Care Calendar (So You Don’t Have to Guess)
- Landscape Design Ideas: Make It Look Intentional (Even If You’re Improvising)
- Troubleshooting: Quick Diagnoses for Common Symptoms
- Buying Tips (and Why “Seeds” Won’t Give You the Same Tree)
- Conclusion: The Simple Formula for a Thriving Forest Pansy
- Experiences & Real-World Lessons (The “I Learned This the Hard Way” Section)
If you’ve ever wanted a tree that shows up to spring like it’s walking a pink-flower runway and then spends the rest
of the year flexing purple, heart-shaped leaves… meet the Forest Pansy redbud
(Cercis canadensis ‘Forest Pansy’). It’s the kind of ornamental tree that makes neighbors slow down on
purpose“Oh wow, what is that?”and makes you pretend you’re casually watering while internally accepting
your gardening award.
This guide covers where to plant it, how to water it, when to prune it, what can go wrong (and how to fix it), plus
real-world “what I wish I knew sooner” experiences at the end.
Forest Pansy Redbud: A Quick Snapshot
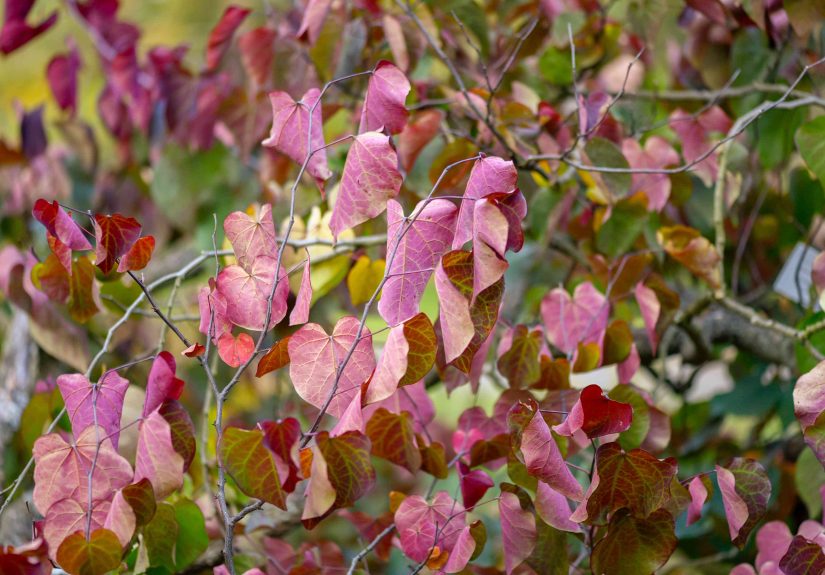
Forest Pansy is a cultivar of the Eastern redbud, prized for its lavender-pink spring flowers and
deep burgundy to purple foliage. It’s typically a small-to-medium ornamental treeperfect when you
want “tree presence” without needing a crane or an apology letter to your foundation.
Quick facts (the cheat sheet)
- Botanical name: Cercis canadensis ‘Forest Pansy’
- Typical size: about 20–30 ft. tall and 25–35 ft. wide (often smaller in tougher sites)
- Best use: specimen tree, understory tree, patio/entry focal point
- Light: full sun to partial shade (afternoon shade helps in hot climates)
- Soil: moist, well-drained; adaptable, but hates soggy feet
- Hardiness: commonly grown in USDA Zones 5–9 (microclimates matter)
Choosing the Right Planting Spot (This Is 80% of Success)
Forest Pansy can be low-maintenance if you give it what it wants upfront. The big three are light, drainage,
and breathing room.
Sun vs. shade: where the color looks best
In many regions, full sun produces the strongest flowering and best leaf color. But in hotter areas
(or spots with blazing afternoon sun), the leaves can scorchthose crispy brown edges that look like your tree tried
to make toast and forgot it.
A smart compromise: morning sun + afternoon shade. That often gives you bold color without summer
leaf stress.
Wind and placement
Redbuds can develop multiple trunks and tight branch angles, which may be more prone to splitting in storms. Avoid
the windiest corner of your yard if you can. If you live in a high-wind zone, plan to do a little structural pruning
early (we’ll cover that).
Space it like you mean it
That “cute little tree” at the nursery can widen out with age. Give it breathing roomat least
15–20 feet from structures if possibleso the canopy can spread without constant haircut
appointments.
Soil and Drainage: The Non-Negotiables
Forest Pansy prefers moderately fertile, consistently moist, well-drained soil. It tolerates a
range of soil types, but it will sulk (and sometimes decline) in waterlogged ground.
How to tell if drainage is your problem
- Water stands in the planting area for hours after rain
- The soil feels sticky and smells sour
- Plants nearby struggle with root rot or chronic yellowing
Fixes for heavy clay or slow drainage
- Plant slightly high: set the root flare 1–2 inches above grade and taper soil outward
- Build a gentle berm: raise the planting area 4–8 inches
- Avoid over-amending the hole: too much “perfect soil” can create a bathtub effect
How to Plant a Forest Pansy Redbud (Step-by-Step)
The best planting times are typically early spring or fall when weather is mild
and the tree can focus on roots instead of survival drama.
Step 1: Find the root flare (and don’t bury it)
The root flare is where the trunk widens and transitions into major roots. It should sit at, or slightly above,
the surrounding soil. Planting too deep is one of the most common reasons newly planted trees struggle.
Step 2: Dig wide, not deep
Dig a hole 2–3 times as wide as the root ball, but only as deep as the root ball. Wide loosening
helps new roots spread into native soil.
Step 3: Set the tree, straighten it, and backfill
Place the tree so it’s upright from multiple angles. Backfill with the native soil you removed. If your soil is
truly awful, a modest amount of compost is finebut keep it reasonable so roots don’t refuse to leave the comfy
“penthouse” zone.
Step 4: Water deeply and mulch correctly
Water slowly until the root zone is thoroughly moistened. Add a 2–3 inch layer of mulch in a wide
ring, keeping mulch several inches away from the trunk. (Mulch volcanoes are not a love language.)
Step 5: Stake only if needed
If the tree wobbles badly in wind, stake it loosely for one growing season. Remove stakes promptlytrees need a
little movement to build strength.
Watering: The “New Tree” Phase vs. the “Established Tree” Phase
Year 1: Deep, consistent watering wins
For the first growing season, aim for deep watering that encourages roots to grow down and out. A common guideline
is roughly 1 inch of water per week (rain included), adjusted for heat, soil type, and drainage.
Water slowly at the root zone rather than sprinkling the leaves.
Years 2+: Still likes moisture, but less babysitting
Once established, Forest Pansy can handle short dry spells better, but it looks and performs best with steady
moistureespecially in hot weather. Drought stress often shows up as leaf scorch, premature leaf drop, or slowed
growth.
Signs you’re overwatering
- Leaves yellowing while the soil stays wet
- Mushy soil and fungus gnats or persistent mushrooms
- Dieback that doesn’t improve after watering
Feeding and Mulching: Keep It Moderate
Forest Pansy is not a “feed me every weekend” kind of tree. Overfertilizing can push soft growth that’s more
attractive to pests and more vulnerable to stress.
Best approach
- Start with compost: a light top-dressing in spring can be plenty
- Fertilize only if needed: use a slow-release tree/shrub fertilizer if growth is weak and a soil test supports it
- Stop fertilizing by mid/late summer: late feeding can encourage tender growth before winter
Pruning Forest Pansy Redbud (Without Ruining Next Spring)
The goal is a strong structure and fewer broken branches later. Redbuds often want to grow multiple leaders and
tight “V” branch anglespretty at first, risky during storms.
When to prune
- Right after flowering is ideal if you’re shaping and thinning
- Any time: remove dead, damaged, or diseased wood as soon as you notice it
How to prune for strength (the “U is good, V is bad” rule)
Aim for branch unions with a wider, “U-shaped” angle. If two branches form a narrow “V” and compete, selectively
remove the weaker one while the tree is young. This reduces the odds of splitting later.
Single trunk vs. multi-trunk
Forest Pansy often looks great as a multi-stem tree. If you want a single trunk, choose one leader early and remove
competing leaders gradually over a couple of seasons (not all at onceno sudden identity crises).
How to Keep the Purple Leaves Looking Their Best
Forest Pansy’s leaf color can shift through the season. In some conditions, leaves may become greener by midsummer.
That’s normal, but you can influence it.
Color boosters
- More light: brighter sites typically maintain deeper coloration
- Even moisture: drought stress can dull color and cause scorch
- Protect from harsh afternoon sun in hot regions: reduces leaf burn
Common Problems (and What to Do About Them)
Redbuds are generally easygoing, but they can run into a few repeat offenders. The best prevention is proper siting,
correct planting depth, steady watering, and pruning out dead wood.
Canker and branch dieback
Canker often shows up as sunken or discolored areas on branches, followed by dieback. Prune out affected branches
several inches below the damaged area, cutting back to healthy wood. Disinfect tools between cuts and avoid wounding
the tree.
Verticillium wilt
This soil-borne disease can cause wilting, leaf discoloration, and branch death. Unfortunately, there is no simple
“spray fix.” If verticillium is confirmed and the tree declines severely, removal and replacement with a less
susceptible species may be the best long-term option.
Leaf spots and mildew
In wet seasons, fungal leaf spots can appear. Improve airflow by thinning crowded branches, rake up fallen leaves,
and avoid overhead watering when possible. Most mild cases are cosmetic.
Insect pests (Japanese beetles, scale, borers, and friends)
Healthy trees tolerate occasional chewing or sap-sucking insects. Watch for heavy infestations, sticky residue on
leaves (honeydew), or significant defoliation. When pests become chronic, a local extension office can help with
identification and targeted management options in your area.
Seasonal Care Calendar (So You Don’t Have to Guess)
Spring
- Enjoy the flowers (mandatory)
- Water during dry spells
- Prune for structure after bloom
- Refresh mulch if needed
Summer
- Deep water during heat waves
- Watch for leaf scorch; adjust watering and consider afternoon shade if possible
- Monitor for beetles, scale, and leaf spots
Fall
- Plant new trees (often an excellent time)
- Keep watering until the ground cools if rainfall is scarce
- Rake and discard diseased leaves to reduce fungal carryover
Winter
- Inspect structure (without heavy pruning that removes next season’s buds)
- Protect young trunks in areas with sunscald risk
- Plan spring pruning and cleanup
Landscape Design Ideas: Make It Look Intentional (Even If You’re Improvising)
Forest Pansy shines as a focal point. The flowers glow against evergreens, and the purple foliage pops next to
chartreuse and silver plants.
Easy, good-looking combinations
- Underplant with: hostas (shade), heuchera, ferns, hellebores, or spring bulbs
- Pair with evergreens: boxwood, yew, or dwarf conifers for contrast
- Try a “purple + gold” theme: Forest Pansy + golden spirea or golden hakone grass
Keep turfgrass pulled back from the trunk (mulch ring = less mower damage and fewer “oops, I nicked the bark”
moments).
Troubleshooting: Quick Diagnoses for Common Symptoms
Leaves are crispy on the edges
- Likely causes: drought stress, hot afternoon sun, wind
- Fix: deep water, expand mulch ring, provide afternoon shade if feasible
Lots of green leaves, not much purple
- Likely causes: too much shade, heavy nitrogen fertilization
- Fix: increase light exposure (if possible), go easy on fertilizer
Dieback in sections of the canopy
- Likely causes: canker, verticillium wilt, root stress, mechanical damage
- Fix: prune dead wood, improve overall vigor, consider professional diagnosis if worsening
Buying Tips (and Why “Seeds” Won’t Give You the Same Tree)
Forest Pansy is a named cultivar, and it’s usually propagated by grafting or budding to preserve its leaf color and
traits. If you grow Eastern redbud from seed, you may get a perfectly nice redbudbut it likely won’t be a true
Forest Pansy.
Also: redbuds generally do best when planted young and left undisturbed. Pick your site carefully so you’re not
trying to relocate it later like a couch that suddenly won’t fit through the doorway.
Conclusion: The Simple Formula for a Thriving Forest Pansy
Want your Forest Pansy redbud to look like a magazine cover? Keep it simple:
good drainage, the right light, deep watering while young,
mulch done correctly, and smart structural pruning early on. Do that, and your tree
will reward you with spring flowers that make winter feel like a bad dream and foliage that looks custom-painted.
Experiences & Real-World Lessons (The “I Learned This the Hard Way” Section)
Garden care guides are great, but the best advice often comes from the moment you’re standing in the yard holding a
hose, whispering, “Please don’t die,” like you’re negotiating with a leafy toddler. Forest Pansy redbuds have a few
patterns that show up again and again for homeownersand knowing them upfront can save you years of confusion.
1) The “It was purple… now it’s kind of green?” surprise
Many Forest Pansy owners expect the foliage to stay a deep royal purple all season. In reality, the color can shift
with heat, shade, and the natural rhythm of the tree. If the tree gets too much shade, it may lean greener. If it
gets punishing afternoon sun in a hot summer, the leaves may fade and scorchdouble betrayal. The most
consistently happy reports tend to come from yards where the tree gets morning sun and a break from late-day heat.
The “purple stays richer” effect is most noticeable when the tree has bright light but not scorching stress.
2) The watering sweet spot is deeper than you think
A common early mistake is frequent, shallow watering: a little sprinkle here, a little sprinkle there. It makes the
surface look damp, but the roots don’t learn to chase moisture downward. People who switch to slower, deeper
watering often notice a big improvementfewer crispy edges, better leaf size, and less mid-summer leaf drop.
Practically, that can look like a slow trickle for 30–60 minutes (depending on soil) once or twice a week rather
than a quick daily splash. Your goal is to moisten the root zone, not just rinse the mulch.
3) Planting depth drama is real
If you take nothing else from the “experiences” section, take this: trees planted too deep often struggle in slow,
confusing ways. They can look fine for a season, then start declining. Homeowners frequently report improved vigor
when they correct mulch volcanoes, expose the root flare, and stop piling “just one more inch” of soil around the
trunk. The tree’s base should look like a gentle flare, not a telephone pole stuck in the ground.
4) Early pruning prevents the heartbreak split
Redbuds are eager multi-leader machines. That can be beautifuluntil two leaders form a tight V and a storm turns it
into an unplanned “before and after” photo. People who do light, thoughtful pruning when the tree is young often
avoid major breakage later. It doesn’t have to be aggressive: remove the worst competing leader, favor wider branch
angles, and eliminate branches that rub. The tree still looks naturaljust better engineered.
5) The healthiest trees usually have a boring secret: consistency
The best-looking Forest Pansies in neighborhoods tend to be the ones that receive steady, unglamorous care: a wide
mulch ring, occasional deep watering in dry spells, and deadwood removed promptly. Not daily fussing. Not mystery
fertilizers every time someone posts a “miracle bloom” photo online. Just consistent basics.
If you’re the kind of person who names plants (no judgmentsome trees deserve it), Forest Pansy will reward you.
Give it the right spot and steady care, and it will give you that rare garden feeling: “Wow… I actually nailed it.”