Table of Contents >> Show >> Hide
- Why Attic Ventilation Matters More Than You Think
- How Attic Ventilation Works: Intake + Exhaust
- Signs Your Attic Ventilation Needs Help
- Step 1: Inspect Your Existing Attic Ventilation
- Step 2: Do a Simple Ventilation Calculation
- Step 3: Improve Intake Ventilation at the Soffits
- Step 4: Upgrade Exhaust Vents at the Roof
- Step 5: Don’t Forget Air Sealing and Insulation
- Step 6: Safety, Codes, and When to Call a Pro
- Ongoing Maintenance: Keep Your Attic Breathing
- Real-World Experiences: What Homeowners Learn About Attic Ventilation
If your summer attic feels like the inside of a pizza oven or your winter roof sprouts icicles worthy of a holiday movie, your home is trying to tell you something: the attic can’t breathe. Improving attic ventilation isn’t glamorous, but it’s one of those projects that quietly pays you back with a longer-lasting roof, lower energy bills, and a more comfortable home.
The good news? You don’t need to be a roofing pro to understand the basics. With a little planning, some math (don’t worry, we’ll keep it simple), and a healthy respect for ladders, you can dramatically improve attic airflow and protect your house from the top down.
Why Attic Ventilation Matters More Than You Think
Attic ventilation is all about moving air: bringing fresh air in and pushing hot, moist, or stale air out. Done right, this simple idea has a big impact on your home.
Temperature control and comfort
In summer, the sun bakes your roof. Without proper attic ventilation, heat builds up under the shingles and pours into the living space below, making your AC work overtime. A well-ventilated attic lets hot air escape, helping keep upstairs rooms cooler and cutting down on those “Why is it still 78°F in here?” arguments.
Moisture control and mold prevention
In colder months, warm, humid air from showers, cooking, and everyday life rises into the attic. If it can’t escape, it condenses on cold surfaces like roof decking, feeding mold, mildew, and even rot. Good attic ventilation works with proper air sealing to move that moisture out before it becomes a science experiment on your rafters.
Roof longevity and ice dam prevention
When your attic overheats, shingles age faster, curl, and crack. In snowy climates, uneven roof temperatures can cause ice damssnow melts on the warm upper roof, refreezes at the cold eaves, and traps water behind a ridge of ice. Balanced attic ventilation helps keep roof temperatures more even, reducing the risk of ice dams and extending the life of your roofing materials.
Energy efficiency and lower bills
Pairing proper attic ventilation with good insulation and air sealing is one of the most cost-effective ways to improve energy efficiency. Your HVAC system doesn’t have to fight a super-heated or damp attic, which can lower utility bills and make your home more consistently comfortable.
How Attic Ventilation Works: Intake + Exhaust
Think of your attic like a chimney system: air needs a way in and a way out. That’s where intake vents and exhaust vents come in.
Intake vents: Fresh air in
Intake vents are typically located low on the roof, usually in the soffits (the underside of your roof overhang). Their job is to pull in cooler outside air that pushes hot and moist air upward and out. No intake means no real airflowjust trapped, stale air sitting in your attic doing damage.
Exhaust vents: Hot, moist air out
Exhaust vents are located high on the roof, near the ridge or at the gables. Hot air naturally rises, and exhaust vents give it somewhere to go. Common types include:
- Ridge vents: Continuous vents that run along the roof peak, often paired with soffit vents for a balanced system.
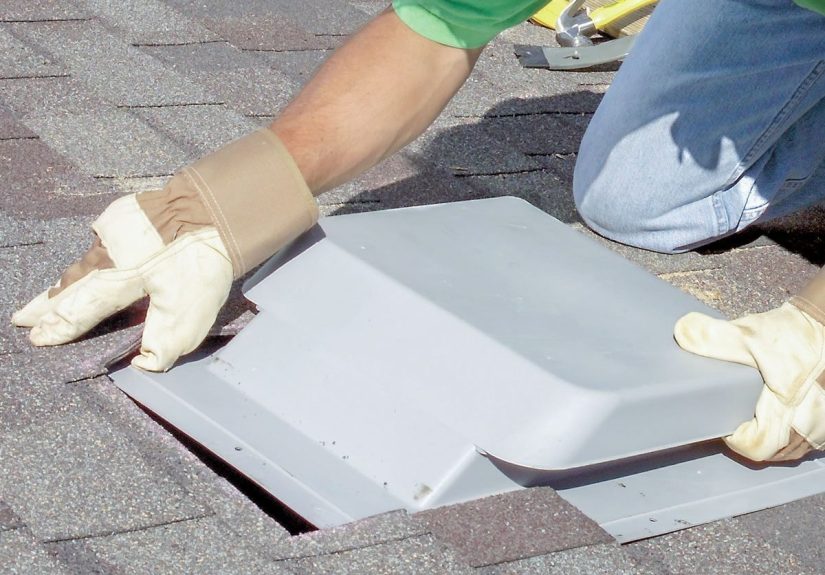
- Box (hood) vents: Individual vents spaced near the top of the roof.
- Turbine vents: Spinning vents that use wind to help pull air out of the attic.
- Gable vents: Installed in gable end walls, often used in older homes.
Balanced ventilation: The golden rule
For attic ventilation to work properly, intake and exhaust need to be balanced. That typically means roughly equal net free vent area (NFVA) at the soffits and at the ridge or other exhaust points. Many building codes and manufacturers recommend a minimum of about 1 square foot of total net free vent area for every 150–300 square feet of attic floor, with intake and exhaust split as evenly as possible.
Don’t worryyou don’t need to become a code lawyer. Just aim for this: enough total vent area, and roughly half of it low (intake) and half high (exhaust).
Signs Your Attic Ventilation Needs Help
Before you start installing new vents, check whether you’re dealing with a real issue. Common warning signs include:
- Hot second floor or stuffy rooms in summer, even when the AC is running.
- High cooling bills compared with similar homes.
- Mold or mildew on attic rafters, insulation, or roof sheathing.
- Rusty nails or damp, dark stains on wood in the attic.
- Peeling paint on exterior trim near the eaves.
- Ice dams and giant icicles forming along roof edges in winter.
- Musty smells when you open the attic hatch.
If you recognize one or more of these, your attic ventilationand possibly your insulation and air sealingneeds a closer look.
Step 1: Inspect Your Existing Attic Ventilation
Start with a simple inspection inside and out. You’ll want to identify what you already have before planning upgrades.
Outside: Walk around your home
- Look under the eaves for soffit vents (continuous strips or individual panels with perforations).
- Check the roof peak for a ridge venta low-profile vent running along the entire ridge.
- Look for box vents, turbine vents, or gable vents.
- Note any combinationsfor example, ridge vents plus gable ventswhich can sometimes work against each other and disrupt proper airflow.
Inside: Take a look in the attic
- On a cool day, carefully enter the attic with good lighting and a dust mask.
- Look for daylight shining through at the soffits and ridge. If you see no daylight at the soffits, they may be blocked by insulation.
- Check for rafter vents (baffles)thin plastic or foam channels stapled to the underside of the roof deck above the eaves. If you don’t see them, your insulation may be blocking airflow from the soffits.
- Look for signs of moisture damage such as mold, mildew, damp insulation, or dark stains on wood.
Make a quick sketch of your roof and attic and mark where vents are located. This will help you plan improvements and avoid “mystery” vents later.
Step 2: Do a Simple Ventilation Calculation
You don’t need an engineering degree; just grab a tape measure, some basic math, and, if you like, a manufacturer’s online ventilation calculator.
-
Measure attic floor area.
Measure the length and width of your attic floor (or use your home’s footprint if the attic covers most of the house) and multiply for total square footage. -
Estimate total vent area needed.
A common guideline is about 1 square foot of net free vent area for every 150–300 square feet of attic floor. Many homes fall closer to the 1:300 side when conditions are right. When in doubt, stick with the more conservative 1:150 ratio and check local codes. -
Split intake and exhaust.
Plan for roughly half of that total vent area to be intake (soffits) and half to be exhaust (ridge, box, or other roof vents). -
Check your current vent area.
Vent manufacturers list net free vent area (NFVA) per piece or per linear foot. Add up how much intake and exhaust you already have and compare it to what you need.
If your intake is far below your exhaust, you may be trying to “pull” air from wherever it can find itsometimes from inside the house instead of from outside. If your exhaust is lacking, hot air gets trapped, and your attic becomes a stagnant sauna. The solution is usually to boost the side that’s underperforming, starting with intake vents.
Step 3: Improve Intake Ventilation at the Soffits
Intake is the unsung hero of attic ventilation. Many homes technically have soffit vents, but they’re painted over, clogged with debris, or buried under insulation.
Clear and open existing soffit vents
- From the exterior, gently clean soffit vents with a soft brush or compressed air to remove dust, cobwebs, and flaking paint.
- Inside the attic, pull back insulation at the eaves to make sure vents are not blocked.
- Install or adjust rafter vents (baffles) between rafters near the eaves to create a clear air channel from the soffits into the attic, while keeping insulation in place.
Add more soffit vents if needed
If your calculation shows that you’re short on intake, consider installing additional soffit vents:
- Continuous strip vents along the entire soffit provide the most consistent airflow.
- Individual rectangular or circular vents can be added between rafters if your soffits are solid.
- Follow manufacturer spacing guidelines and factor the added NFVA into your ventilation math.
Improved intake often delivers the biggest bang for your effort because it powers the entire airflow system and supports whatever exhaust vents you already have.
Step 4: Upgrade Exhaust Vents at the Roof
Once intake is in good shape, turn your attention to exhaust vents so hot and moist air can leave efficiently.
Ridge vents: The go-to option
If your roof has a long ridge, a continuous ridge vent paired with soffit vents is one of the most effective and visually discreet solutions. It allows hot air to escape evenly along the peak. Installing ridge vents usually involves cutting a narrow slot along the ridge, then adding the vent and re-shingling around itoften best left to an experienced roofer if you’re not comfortable working at heights.
Box vents and turbine vents
On more complex roofs or shorter ridge lines, box vents or turbine vents can help. They’re installed near the peak and spaced as needed to provide enough NFVA. Turbine vents add a little extra pull on windy days, but both styles can work well when properly sized and combined with adequate intake.
Gable vents and powered fans: Use with caution
Gable vents are common in older homes and can help in certain setups, but mixing gable vents with ridge vents or powered fans can sometimes short-circuit the airflow. Instead of pulling air from the soffits, a fan might just pull air from one gable to anotheror worse, from the conditioned living space.
If you’re considering an attic fan (powered roof or gable fan), make sure:
- Your soffit vents are open and not blocked.
- The attic floor is well air-sealed, so the fan doesn’t suck cooled or heated air from the house.
- The fan is properly sized and controlled (thermostat and/or humidistat) to avoid wasting energy.
In many homes, a passive balanced system (soffits + ridge vents) is quieter, more reliable, and more energy-efficient than a powered fan.
Step 5: Don’t Forget Air Sealing and Insulation
Attic ventilation is only part of the story. For best results, combine it with good air sealing and adequate insulation.
Seal air leaks between the house and attic
Before you pile on more insulation, seal the gaps where indoor air sneaks into the attic:
- Around recessed lights, electrical boxes, and wiring penetrations.
- At plumbing vent stacks and flues (using appropriate fire-safe materials).
- Around the attic hatch or pull-down stairsinstall weatherstripping and an insulated cover.
Air sealing helps keep your conditioned air where it belongs and reduces moisture and heat flowing into the attic in the first place.
Add or upgrade insulationwithout blocking vents
Once air leaks are sealed, bring your attic insulation up to the recommended R-value for your climate zone. Just remember:
- Keep rafter vents in place at the eaves so fluffy insulation doesn’t choke off soffit airflow.
- Use depth markers to ensure consistent coverage across the attic.
- Avoid stuffing insulation into roof slopes unless you’re following a specific vented or unvented roof design.
With air sealing, insulation, and balanced attic ventilation working together, your home gains comfort, durability, and efficiencyall at once.
Step 6: Safety, Codes, and When to Call a Pro
Climbing around in the attic and on the roof isn’t for everyone. Keep these safety and code considerations in mind:
- Check local codes. Requirements for vent area, fire blocking, and roof work vary by location.
- Work safely. Use proper fall protection on the roof, walk only on framing members in the attic, and watch for exposed nails and low clearances.
- Be cautious around wiring. If you see damaged electrical cables or old knob-and-tube wiring, stop and call an electrician.
- Bring in a roofing or insulation pro if your roof is steep, high, complex, or if moisture damage appears extensive.
Sometimes the smartest DIY move is knowing when to put the phone number of a good contractor to use.
Ongoing Maintenance: Keep Your Attic Breathing
Attic ventilation isn’t a “set it and forget it” system. A little periodic maintenance goes a long way:
- Every year or two, visually check soffit and ridge vents for blockages from dust, paint, or debris.
- Trim back trees whose branches drop piles of leaves and needles onto the roof.
- Inspect the attic for new signs of moisturestains, condensation, or musty odorsespecially after extreme weather.
- If you have a powered attic fan, verify that thermostats, humidistats, and shutters still work properly.
A quick seasonal checkup helps your attic ventilation system keep doing its job quietly in the background.
Real-World Experiences: What Homeowners Learn About Attic Ventilation
On paper, attic ventilation seems simple: add vents, move air, live happily ever after. In real life, homeowners often discover a few “lessons learned” along the way. Here are some experience-based insights that can help you avoid common headaches.
Lesson 1: Intake is usually the missing hero
Many people assume they need more vents on the roof because that’s what they see from the ground. Once they get into the attic, though, they realize the soffit vents are either tiny, painted shut, or buried behind a wall of insulation. After adding rafter vents and clearing soffits, it’s not unusual to notice the upstairs feeling slightly cooler on hot dayseven before touching the exhaust vents. The simple change of letting air actually enter the attic can make the whole system come alive.
Lesson 2: Attic work is dusty, cramped, and totally worth planning
Homeowners who’ve DIYed attic ventilation upgrades often say the hardest part isn’t the math or the materialsit’s physically moving around in a cramped, dusty space. Crawling between rafters, dodging roofing nails poking through the deck, and juggling tools on a narrow “catwalk” is nobody’s idea of fun. Creating a sturdy temporary platform down the attic center line, wearing knee pads, and bringing plenty of lighting can turn a miserable crawl into a manageable project.
Lesson 3: Air sealing changes everything
Some people start with attic fans or extra vents, only to discover they’re still uncomfortable and their energy bills remain high. Later, when they finally air-seal the attic flooraround light fixtures, chases, and vent stacksthey notice a big difference. With fewer leaks, less humid indoor air ends up in the attic, and the ventilation system doesn’t have to fight against a constant stream of new moisture and heat. It’s a reminder that ventilation and air sealing are teammates, not separate projects.
Lesson 4: Mixing vent types can backfire
Another common experience: combining a powered fan with ridge vents or gable vents and expecting “more is better.” Instead, the fan sometimes pulls air from the path of least resistancesay, from one gable vent to anotherwhile leaving hot air sitting stubbornly in corners of the attic. After consulting with a roofer, some homeowners end up simplifying their systems: choosing a passive ridge-and-soffit setup or carefully sizing a fan and closing off competing vents. The takeaway: a simple, well-balanced system usually beats a complicated one.
Lesson 5: Small signs are early warnings
Most people don’t check their attic regularly, which is how small moisture problems turn into major repairs. Those faint dark streaks on roof decking, the faint musty smell when you open the attic hatch, or a bit of frost on nails in winter are early warning signs. Homeowners who catch these clues early can often fix the problem with better ventilation, air sealing, and insulationrather than having to replace moldy sheathing or framing later on.
Lesson 6: Professional help can save time (and your weekend)
Even confident DIYers sometimes decide that cutting into the roof for ridge vents or working on a steep, two-story roof is where they draw the line. They’ll handle attic prep workclearing soffits, installing baffles, and air sealingand then bring in a roofing crew for the exterior vents. This “hybrid” approach can save money while still keeping you off dangerous slopes and out of situations that require specialized tools or experience.
At the end of the day, improving attic ventilation is one of those projects you only notice when it’s done wrong. When it’s done right, your home just feels better: fewer temperature swings, fewer drafts, lower energy bills, and a roof that quietly does its job year after year. Once your attic can finally breathe, you might wonder why you didn’t help it sooner.