Table of Contents >> Show >> Hide
- What Is Quarter Round Molding, Exactly?
- Why Homeowners Install Quarter Round
- Tools and Materials You’ll Want Nearby
- Should You Paint or Stain Quarter Round Before Installing It?
- How to Measure Quarter Round Without Creating Emotional Damage
- Understanding the Main Types of Cuts
- Step-by-Step: How to Install Quarter Round Molding
- Step 1: Prep the room
- Step 2: Dry-fit before you nail anything
- Step 3: Start with the longest, simplest run
- Step 4: Handle inside corners carefully
- Step 5: Cut outside corners cleanly
- Step 6: Add returns where the trim ends
- Step 7: Nail the molding to the baseboard, not the floor
- Step 8: Work around the room one piece at a time
- Step 9: Fill holes and touch up
- Step 10: Stand back and admire your suspiciously competent work
- Common Quarter Round Installation Mistakes to Avoid
- Pro-Looking Tips That Make a Big Difference
- Frequently Asked Questions
- DIY Experience Notes: What Installing Quarter Round Actually Feels Like
- Conclusion
Quarter round molding is one of those small details that can make a room look crisp, finished, and suspiciously more expensive than it really is. It covers the gap where the baseboard meets the floor, helps disguise slight waves in the flooring, and makes the whole room look less like “we just stopped working at 8:47 p.m.” and more like “yes, this was the plan all along.”
The good news is that installing quarter round molding is absolutely doable for a reasonably patient DIYer. The bad news is that trim work has a way of humbling people who usually feel very confident around power tools. The secret is not magic. It is careful measuring, clean cuts, a lot of dry-fitting, and resisting the urge to yell “good enough” before the corners agree to behave.
This guide walks you through how to install quarter round molding the right way, from choosing materials and tools to cutting corners, attaching trim, hiding nail holes, and fixing the tiny mistakes that always show up the second you think you are done.
What Is Quarter Round Molding, Exactly?
Quarter round is a small trim profile shaped like one-quarter of a circle, with two flat sides that sit against the baseboard and the floor. It is commonly used to cover expansion gaps, uneven floor lines, or minor spacing issues where the baseboard alone does not fully hide the transition.
People often use the terms quarter round and shoe molding interchangeably, and in casual conversation that is usually fine. But they are not identical. Quarter round has a fuller, more rounded profile. Shoe molding is usually a little taller than it is deep, which gives it a slimmer look. If you want a chunkier, classic trim detail, quarter round works well. If you want something slightly more subtle, shoe molding may be the prettier choice.
For this article, we are focusing on quarter round molding, but the installation process is almost the same for either trim style.
Why Homeowners Install Quarter Round
There are a few common reasons quarter round ends up in a room:
1. It hides floor-to-baseboard gaps
If your flooring installer left an expansion space, or your floors are slightly uneven, quarter round covers the seam neatly.
2. It gives the room a finished look
Even when a gap is small, trim at the base can make the whole room look more intentional and polished.
3. It helps with imperfect floors
Most floors are not laser-straight. Quarter round has enough flexibility to follow minor dips and waves better than a stiff baseboard edge can.
4. It is easier than replacing all the baseboards
If the gap is the issue, adding quarter round is usually faster and cheaper than tearing off and reinstalling baseboards.
Tools and Materials You’ll Want Nearby
Before you start, gather everything so you do not end up balancing a trim piece with one hand while searching for a pencil with the other.
Basic tools
Tape measure, pencil, miter saw or miter box, coping saw if you plan to cope inside corners, brad nailer or finish nailer, hammer, nail set, caulk gun, putty knife, and sanding sponge.
Materials
Quarter round molding, wood filler or putty, paintable caulk, touch-up paint or stain, wood glue for tiny returns or scarf joints, and painter’s tape if you like clean edges and lower blood pressure.
Safety gear
Safety glasses and hearing protection. Trim work looks harmless until a saw starts spinning.
Should You Paint or Stain Quarter Round Before Installing It?
In most cases, yes. Pre-finishing the molding is easier than crouching on the floor later with a brush the size of a toothbrush. Paint or stain the long pieces first, let them dry well, then install them. After that, fill nail holes and do a quick touch-up pass.
If you are matching stained wood trim, pre-finishing is even more helpful because it is much easier to get a clean, even coat before the molding is attached. White painted quarter round is more forgiving, but it still usually looks better when most of the finishing is done in advance.
How to Measure Quarter Round Without Creating Emotional Damage
Start by measuring each wall section separately. Do not assume opposite sides of the room are identical just because the house appears rectangular. Houses enjoy lying.
Measure from corner to corner, or from a corner to a door casing, and write each measurement down. If you are cutting around outside corners, note which direction the piece runs. Measure carefully and cut slightly long when in doubt. You can always shave a little off. You cannot un-cut trim unless you have invented time travel.
It is also smart to buy extra material. A little waste is normal with trim work, especially once corners enter the chat.
Understanding the Main Types of Cuts
If quarter round installation feels intimidating, it is usually because of the cuts, not the nailing. Once you understand the basic cut types, the whole project becomes much less mysterious.
Butt cuts
A straight 90-degree cut is used where the molding dies into a door casing or another flat stop point.
Miter cuts
A 45-degree cut is the standard choice for outside corners and many inside corners. Two matching miters come together to form a corner joint.
Coped cuts
A coped inside corner is made by cutting one piece square into the corner and shaping the next piece to fit the profile of the first. This takes more effort, but it often creates a tighter inside corner, especially in older houses where walls are not perfectly square.
Scarf joints
If one wall is longer than your trim stock, you can join two pieces with matching angled cuts. This makes the seam less obvious than a straight butt joint.
Returns
A return is a tiny little finished end piece used where quarter round stops at a door frame or open end. It looks elegant. It is also the trim equivalent of handling a grain of rice with oven mitts. Glue helps.
Step-by-Step: How to Install Quarter Round Molding
Step 1: Prep the room
Vacuum or sweep along the wall edges. Dust, grit, and little chunks of mystery debris will make it harder for the molding to sit tight against the floor and baseboard.
If old quarter round is already installed, remove it carefully with a pry bar and utility knife so you do not destroy the baseboard or the flooring edge.
Step 2: Dry-fit before you nail anything
Cut one piece, place it in position, and check the fit. Do this before firing nails. Dry-fitting helps you catch gaps, wrong-angle cuts, or a piece that somehow became an inch too short because your tape measure and optimism teamed up against you.
Step 3: Start with the longest, simplest run
Beginning with a straight wall section is a confidence booster. It lets you get used to the molding, the nailer, and how tightly the trim needs to sit against the floor.
Step 4: Handle inside corners carefully
For a simple room with reasonably square corners, you can miter both inside-corner pieces at 45 degrees. For a more professional result, especially in older homes, cope one side into the other. That method hides seasonal movement better and often leaves you with tighter-looking corners.
Step 5: Cut outside corners cleanly
Outside corners are where sloppy cuts announce themselves loudly. Measure carefully, cut matching 45-degree angles, and dry-fit them together before attaching either piece. If the corner is not perfectly square, you may need to tweak the angle slightly instead of forcing a textbook 45.
Step 6: Add returns where the trim ends
If quarter round stops at a door casing or open trim end, create a tiny return so the exposed end grain is hidden. Usually this means cutting the main piece with a small angled back cut, then gluing on a tiny matching return piece. It is a small detail, but it makes the trim look custom instead of abruptly abandoned.
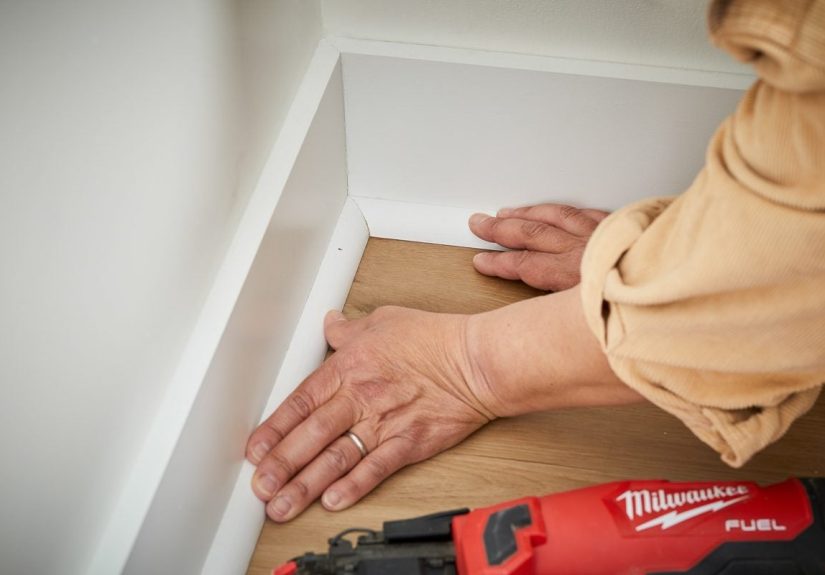
Step 7: Nail the molding to the baseboard, not the floor
This is one of the biggest rules in the entire project. Fasten quarter round into the baseboard or wall, not into the flooring. That matters even more with laminate, engineered wood, or floating floors that need room to move.
Press the molding gently downward so it follows the floor, then nail through the center or slightly upward into the baseboard. Space nails consistently. You want enough fasteners to hold the trim snugly without turning it into a pin cushion.
Step 8: Work around the room one piece at a time
Do not cut the entire room all at once unless you enjoy gambling. Walls, corners, and casing details often vary just enough to punish overconfidence. Measure, cut, dry-fit, install, repeat.
Step 9: Fill holes and touch up
Once everything is installed, set any proud nail heads with a nail set. Fill the holes with wood filler or putty that matches your finish. If the trim is painted, caulk tiny seams along the top edge where the quarter round meets the baseboard. After that dries, do your touch-up paint or stain.
Step 10: Stand back and admire your suspiciously competent work
At this point, the room should look cleaner, more finished, and slightly more grown-up. Congratulations. You have entered the dangerous phase of home improvement where you begin looking for other rooms to “quickly refresh.”
Common Quarter Round Installation Mistakes to Avoid
Nailing into the floor
This is the classic mistake. It can interfere with floor movement and cause headaches later.
Skipping dry-fitting
Even a good cut can look bad in a crooked corner. Always test the fit first.
Using only glue for everything
Glue is helpful for returns and some joints, but the molding generally needs mechanical fastening for a secure, neat installation.
Ignoring uneven floors
Press the trim down as you fasten it so it follows the floor. Quarter round is there to disguise unevenness, not hover above it dramatically.
Rushing the finishing work
Nail holes, caulk lines, and touch-up paint are what separate “installed” from “finished.” Do not skip the last ten percent.
Pro-Looking Tips That Make a Big Difference
Use full-length pieces whenever possible
Longer pieces mean fewer joints, and fewer joints mean fewer places for your mistakes to throw a party.
Label every cut
Write where each piece goes before carrying it across the room. Once several white trim pieces are leaning against a wall, they all develop the same personality.
Test your saw on scrap first
This is especially helpful if you have not used your miter saw recently or if you are switching between inside and outside corners.
Keep a little wood glue nearby
Glue is excellent for tiny returns and can help hold delicate miter joints together while the nails do the real structural work.
Match quarter round to the baseboard most of the time
For most rooms, matching the trim color to the baseboard creates a cleaner, more seamless look than matching the floor.
Frequently Asked Questions
Is quarter round outdated?
No. It depends on the house, the trim style, and the execution. Installed neatly, quarter round still looks appropriate in many traditional and practical DIY situations.
Can you install quarter round without a nail gun?
Yes. A hammer and finish nails can work. It is just slower, more awkward, and a little more likely to leave marks if you are not careful.
Should quarter round touch the floor?
It should sit snugly enough to visually cover the gap and follow the floor line, but the fastening should go into the baseboard or wall, not into the flooring.
Do you caulk quarter round?
For painted trim, many DIYers caulk the top seam against the baseboard and fill nail holes for a cleaner look. For stained wood, use color-matched filler more selectively so the finish still looks natural.
DIY Experience Notes: What Installing Quarter Round Actually Feels Like
There is the official version of installing quarter round, and then there is the real-life version. In the official version, you measure, cut, nail, and suddenly your room looks like it was finished by a trim carpenter who drinks coffee out of a thermos and never loses a pencil. In real life, the first corner usually teaches you that walls are not square, floors are not level, and your tape measure has a wicked sense of humor.
A very common experience is getting overconfident after the first straight wall. That first run goes beautifully. You cut the piece, it sits down nicely, and the nailer makes you feel like a professional. Then you reach an outside corner and the room reminds you who is in charge. Suddenly one piece is tight at the top and open at the bottom, or the miter closes nicely until you move back two feet and realize the joint looks like it is quietly judging you.
Another classic DIY moment is discovering how important dry-fitting really is. A trim piece can look perfect on the saw stand and completely wrong at the wall. That is not failure. That is trim work. The people who get the best results are usually not the people who cut fastest. They are the people who check the fit, shave a hair off the cut, check again, and only then commit.
Door casings are another rite of passage. The first time you cut a tiny return, you may wonder whether humanity has gone too far. The piece is absurdly small, weirdly delicate, and somehow capable of disappearing the instant it leaves your fingers. But once you glue it in place and see that finished little end instead of a raw cut, you realize why good trim details matter so much.
Most DIYers also learn quickly that finishing work is where the magic happens. Before filler and touch-up, quarter round can look merely okay. After the nail holes are filled, the top seam is caulked, and the paint is touched up, the same installation suddenly looks clean and intentional. It is the home-improvement version of ironing a shirt. Technically optional, emotionally decisive.
One of the best parts of this project is that it builds practical confidence. By the end of one room, you start reading corners better. You understand which cuts go left and which go right. You stop treating every joint like a math exam and start seeing the pattern. That is when the project becomes fun instead of stressful.
The biggest lesson many people take away is that precision matters, but perfection is not the goal. Quarter round is designed to help rooms look better, not to satisfy a microscope. If the trim sits snug, the joints are neat, the finish is clean, and nobody can spot your tiny correction unless they lie down on the floor with a flashlight, you won. And frankly, if somebody does that, they should probably be handed a tool belt and assigned a room of their own.
So yes, installing quarter round molding can absolutely make you feel like you know what you are doing. Not because every cut will be flawless, but because you will learn how to recover, adjust, and finish strong. That is real DIY energy. Slightly dusty, mildly annoyed, but extremely effective.
Conclusion
If you want a room to look cleaner and more finished without taking on a huge remodeling project, quarter round molding is a smart upgrade. It hides gaps, softens awkward floor lines, and gives the base of the room that last polished detail. The trick is to slow down, measure carefully, dry-fit everything, nail into the baseboard instead of the floor, and treat the finishing touches like part of the installation, not an optional side quest.
Do that, and your trim will not just look installed. It will look intentional. Which, in DIY, is basically a superpower.