Table of Contents >> Show >> Hide
- Why Choose a Silk Flower Wreath?
- What You Really Need: Smart Supply List
- Design Like a Pro (Before You Glue Anything)
- Step-by-Step: How to Make a Silk Flower Wreath
- Pro Tips for a Realistic, Long-Lasting Silk Flower Wreath
- Style Ideas: Make It Look Custom, Not Cookie-Cutter
- Common Mistakes (So You Can Casually Avoid Them)
- Quick FAQ
- Conclusion
- Real-World Experiences: What You Learn After Making a Few (Extra )
If your front door looks like it just rolled out of bed, a silk flower wreath is the fastest way to make it look fully dressedwithout you having to water, trim, or apologize to dying petunias ever again. This Hometalk-style guide walks you through how to make a silk flower wreath that looks high-end, survives real weather, and earns those “Wait, you made that?” compliments from neighbors.
We’ll cover everything: choosing realistic silk flowers, building a balanced design, pro-level tricks for durability, and easy style ideas for every season. Think of this as crafting with a friend who’s already burned their fingers on the glue gun so you don’t have to.
Why Choose a Silk Flower Wreath?
Silk (and other faux) flower wreaths have quietly gone from “grandma’s dusty arrangement” to “designer-secret weapon.” Here’s why they’re worth your time and your front door real estate:
- They last season after season: Quality faux stems keep their color, shape, and fullness far longer than fresh florals, especially when you choose UV-resistant varieties and protect them properly.
- Low maintenance, high impact: No wilting, no watering, no pollen mess. A quick dusting and you’re done.
- Allergy-friendly: All the blooms, none of the sneezing.
- Budget-smart: You can reuse the base and most stems, swapping accent pieces for holidays or new color schemes instead of buying brand-new wreaths all the time.
- Custom everything: Color, shape, fullness, vibefarmhouse, coastal, boho, modern, cottagecoreyour wreath, your rules.
What You Really Need: Smart Supply List
Best Bases for Silk Flower Wreaths
You don’t need a craft closet the size of a warehouse. Start with one of these dependable bases:
- Grapevine wreath: Natural, sturdy, and easy to work with. Perfect for sliding stems into the branches for a lush, organic look.
- Wire wreath frame: Great if you’re adding mesh, ribbon, or want a big, dimensional front-door statement.
- Foam or straw form: Ideal for tightly packed designs (like hydrangeas or roses all the way around) where you want a polished, full ring.
Florals & Greenery
Look for faux flowers that pass the “blink test”if you have to blink to tell if they’re real from a few steps away, you’re good:
- Silk or high-quality polyester blooms: peonies, roses, ranunculus, hydrangeas, dahlias, tulips, sunflowers (depending on your theme).
- Greenery: eucalyptus, boxwood, olive, fern, ruscusthese fill gaps and make everything look intentional.
- Filler elements: berries, seed pods, tiny blossoms, or textural sprigs to break up solid color blocks.
Tools & Essentials
- Wire cutters (non-negotiable).
- Floral wire or green paddle wire.
- Hot glue gun & glue sticks (use high-temp for stronger hold).
- Optional: floral tape, ribbon, zip ties, UV-protectant spray for outdoor wreaths.
Design Like a Pro (Before You Glue Anything)
Five extra minutes planning your layout will save you from the “random flower explosion” look.
- Pick a color story:
For example:
– Soft & romantic: blush, ivory, sage.
– Bold & happy: coral, yellow, fuchsia.
– Neutral & modern: whites, beige, muted greens. - Choose a focal point: Cluster your largest flowers on one side or at the bottom for that modern asymmetrical style that looks expensive.
- Vary sizes & textures: Combine big blooms, medium accents, and delicate fillers so your wreath has depth, not flatness.
- Work in odd numbers: Use 3, 5, or 7 main blooms per clusterit’s a design trick that’s weirdly satisfying to the eye.
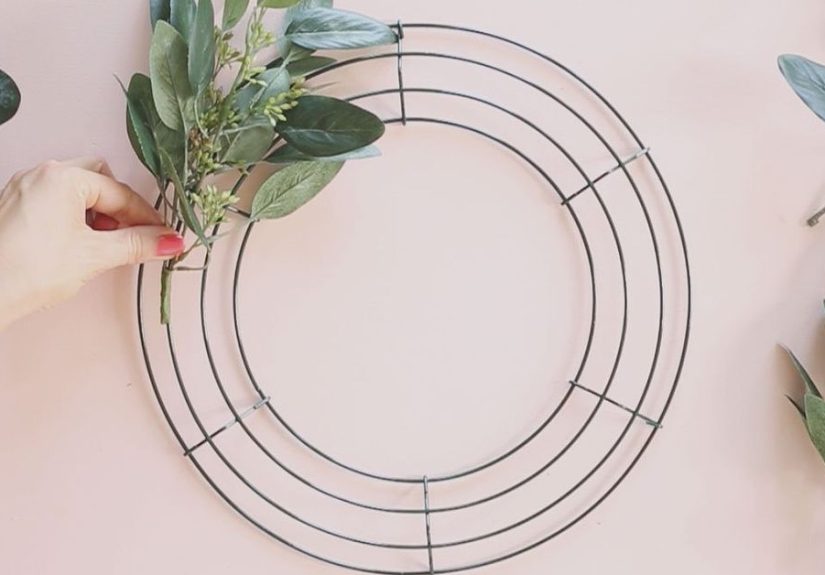
Step-by-Step: How to Make a Silk Flower Wreath
Step 1: Prep Your Base
Fluff your grapevine or dust off your foam form. If you’re using a foam or straw base, wrap it with ribbon or burlap first to hide the surface and give the glue something to grip.
Step 2: Trim & Test Your Stems
Use wire cutters to trim each stem to about 4–6 inches. Keep a bit of length so you can tuck stems into the wreath base securely. Bend the stems slightly so they follow the curve of the wreath instead of sticking straight out like antennas.
Step 3: Start with Greenery
Think of greenery as your “background filter.” Lay stems along the curve of the wreath, all going in the same direction (clockwise or counterclockwise). Attach using floral wire or hot glue. Aim to cover 60–80% of the base, leaving room for your blooms.
Step 4: Add Focal Flowers
Decide where your main focal area will beusually the lower right/left or bottom center. Place your largest flowers there first. Push the stems into the base and secure with hot glue. Step back a few feet and adjust until the cluster feels balanced.
Step 5: Layer Supporting Blooms
Next, tuck in medium-sized flowers around your focal blooms and across the wreath. Keep colors grouped in soft clusters instead of evenly polka-dotting the entire circle. This gives a more natural, “blooming from one side” feel.
Step 6: Fill, Fluff, and Add Texture
Use small blossoms, berries, or delicate stems to fill gaps, hide glue, and soften transitions. Rotate the wreath as you work. If you can see obvious bald spots or harsh lines, add a leaf or small flower there, not another massive bloom.
Step 7: Add Ribbon & Hanger
Tie a ribbon at the top or tuck a bow into your focal cluster. Use floral wire to make a simple hanging loop on the back. Make sure the wreath hangs straightif it leans, balance it with an extra stem or two.
Pro Tips for a Realistic, Long-Lasting Silk Flower Wreath
- Choose higher-quality stems: Look for wired petals, natural color gradients, and matte (not shiny plastic) finishes.
- Hide your mechanics: No naked glue blobs. No obvious wire. Tuck, tilt, and cover connection points with leaves or fillers.
- Secure for real-life weather: For outdoor wreaths, combine glue + wire. Anything only “lightly glued” is one windy day away from the sidewalk.
- Protect from sun fade: Use UV-protectant spray designed for artificial florals if your wreath hangs in direct sun.
- Keep it clean: Dust regularly with a microfiber cloth or cool hairdryer to keep colors bright and textures crisp.
- Store smart: Hang in a closet or place in a wreath storage box. Don’t wedge it under winter boots and hope for the best.
Style Ideas: Make It Look Custom, Not Cookie-Cutter
1. Modern Farmhouse Entry
Use a grapevine base with eucalyptus, white peonies, soft beige roses, and a simple linen bow. Neutral, pretty, works year-round.
2. Bold Spring Welcome
Layer tulips, ranunculus, and daisies in pink, coral, and yellow. Keep most of the blooms along the lower half of the wreath for a fresh, modern arc.
3. Minimal & Chic
Try a slim ring wreath with just a cluster of white orchids or roses and trailing greenery on one side. Clean lines, big impact.
4. Holiday Flip Version
Start with a neutral greenery base and swap in seasonal accents: mini pumpkins for fall, red berries and velvet ribbon for Christmas, pastel flowers for Easterone wreath, endless outfits.
Common Mistakes (So You Can Casually Avoid Them)
- Overloading the wreath: If you can’t see any shape or greenery, it may look heavy instead of lush. Edit.
- Tiny flowers only: All small blooms = visual static. Add at least a few larger focal flowers.
- Random color chaos: Pick 2–3 main colors and repeat them. Your door is not a clearance-bin mix.
- One glue point per stem: Double-secure key stems with both glue and wire, especially for outdoor doors.
- Ignoring scale: Small wreath on a large door will look shy. For most front doors, 18–24 inches is the sweet spot.
Quick FAQ
Can I use a silk flower wreath outdoors?
Yes. Choose outdoor-safe or UV-resistant florals, secure everything firmly, and avoid placing the wreath in constant harsh direct sunlight or heavy rain exposure.
How many flowers do I need?
For an 18–20 inch wreath, plan on:
– 5–9 large blooms,
– 8–15 medium blooms,
– plenty of greenery and fillers to tie it all together.
Can I redo or update my wreath later?
Absolutely. That’s the beauty of faux. You can snip, swap, and refresh stems seasonally without starting from zero.
Conclusion
Creating a silk flower wreath is one of those projects that looks advanced but is totally doable once you understand structure, balance, and a few pro tricks. Start with a solid base, invest in realistic stems, stick to a clear color palette, and secure everything like it needs to survive a surprise gust of wind. Do that, and your wreath won’t just decorate your doorit’ll quietly announce, “Yes, this house is loved, and yes, someone crafty lives here.”
sapo: Want a front door that looks styled, not stressed? This step-by-step Hometalk-inspired guide shows you exactly how to make a silk flower wreath that looks professionally designed using realistic faux blooms, smart layering, and durable construction methods. From choosing the right wreath base and color palette to pro tips on UV protection, outdoor safety, and seasonal styling, you’ll learn how to create a custom wreath that works for your home, your budget, and your personalityno floral degree (or perfectionism) required.
Real-World Experiences: What You Learn After Making a Few (Extra )
Once you’ve made your first silk flower wreath, a few “insider truths” start to show upthings you only learn after hot-gluing your way through multiple seasons.
1. The “Cheap-but-Cute” Trap. It’s incredibly tempting to load your cart with bargain-bin stems. But on the finished wreath, those plasticky petals and neon leaves stand out instantly. Many experienced DIYers find that mixing a few higher-end focal blooms with budget greenery gives the best result: your wreath reads “boutique,” but your receipt says “I’m fine.” Invest in key flowers (like peonies, roses, hydrangeas) and let simpler fillers do the quiet work.
2. Editing Is a Skill. First-time makers usually try to use every single flower they bought. Seasoned crafters learn to lay everything out, build the design, and then remove two or three pieces. A little breathing room lets the eye appreciate your focal blooms and overall shape. When in doubt, step back across the roomif it looks heavy or busy, pull something out. Subtraction almost always improves the design.
3. Asymmetry Wins in Real Life. Perfectly even wreaths can feel stiff. Many Hometalk-style makers naturally drift toward asymmetrical layouts: a heavier floral cluster on one side, greenery sweeping around, and a few blooms trailing off. It feels modern, artistic, and forgivingif one stem is slightly off, it just looks intentional.
4. Weather Will Test Your Commitment. Outdoor wreaths go through wind, heat, dust, sun, the occasional delivery-driver shoulder bumpso experienced DIYers over-secure everything. They use wire plus glue on big blooms, tuck stems deep into grapevine bases, and avoid super-delicate picks on exposed edges. The lesson: build for real life, not just the photo.
5. One Good Base = Multiple Wreaths. After a season or two, many makers stop building entirely new wreaths and start “remodeling” old ones. They’ll strip off a few stems, swap colors, add seasonal accents, and suddenly that spring wreath becomes a neutral everyday piece or a fall design. This reuse mindset saves storage space and money and keeps your style evolving with almost no waste.
6. Personal Details Matter Most. The wreaths people talk about aren’t always the most polishedthey’re the most personal. A silk magnolia wreath for a Southern-style porch, a coastal wreath with soft blue hydrangeas and rope, a farmhouse wreath with a tiny wooden monogram, or a minimalist ring wreath that perfectly matches your modern black door. Once you realize your wreath can echo your home’s story, you stop copying product photos and start designing like a stylist.
7. Confidence Grows Fast. The first time, you second-guess every flower. By your second or third wreath, you’re mixing textures, bending stems, reworking sections without panic, and experimenting with bolder palettes. That’s the Hometalk spirit: community-style creativity where you try, tweak, and proudly say, “Here’s how I did itnow you try.” And that shared, approachable, “we’re all figuring this out together” energy is exactly what turns a simple silk wreath project into part of how you shape your home.
So when you hang your finished silk flower wreath, don’t just see it as decor. See it as proof that you can take a pile of stems, a bit of wire, and an ideaand turn it into something beautiful, durable, and totally you.