Table of Contents >> Show >> Hide
- Why Terra-cotta Pots Make Such Good Centerpieces
- Pick Your Centerpiece Style (Choose Your Adventure)
- Supplies You’ll Actually Use
- Prep Step (Don’t Skip This If You Like Nice Tables)
- DIY #1: Classic Fresh Flower Terra-cotta Pot Centerpiece
- DIY #2: Terra-cotta Pot Candle Centerpiece (Cozy, Easy, and Table-Friendly)
- DIY #3: Succulent Terra-cotta Pot Centerpiece (Pretty, Durable, Low Drama)
- Easy Styling Formulas (So It Looks Intentional)
- Finishing Touch Ideas (Paint, Texture, and Personality)
- Troubleshooting (Because Crafting Is Basically Problem-Solving in Cute Shoes)
- Wrap-Up: Your Table Just Got an Instant Upgrade
- Experience Notes: What I Learned After Making (a Few) Terra-cotta Pot Centerpieces
Terra-cotta is the crispy baguette of home decor: simple, a little rustic, and somehow it makes everything around it look more expensive. If you’ve ever stared at a bare table thinking, “This needs… something,” a terra-cotta pot centerpiece is the fast, flexible fix. You can go fresh and floral, cozy and candlelit, or green and succulent-y (a very scientific term).
This guide walks you through several easy centerpiece stylesplus the prep steps that keep your project from turning into a flaky, leaky, “why is there dirt in my napkin rings?” situation.
Why Terra-cotta Pots Make Such Good Centerpieces
Terra-cotta pots are cheap, widely available, and naturally warm-tonedso they play nicely with farmhouse decor, boho tablescapes, modern neutrals, and seasonal setups. They also come in tons of sizes, which means you can scale your DIY table centerpiece for a coffee table, dining table, or even a long buffet.
- Texture: The matte, porous clay adds instant character.
- Versatility: Works with flowers, candles, herbs, succulents, faux stems, even mini pumpkins.
- Budget-friendly: One pot can look “boutique” with a few smart finishing touches.
- Season-proof: Swap the top layer and keep the pot year-round.
Pick Your Centerpiece Style (Choose Your Adventure)
Option A: Fresh Flower Terra-cotta Pot Centerpiece
Best for parties, showers, brunches, and anytime you want that “I casually arrange flowers on weekdays” vibe. This style uses floral foam (or a water-holding method) so blooms stay upright and hydrated.
Option B: Candle + Greenery Terra-cotta Centerpiece
Best for cozy dinners, fall tables, and low-effort elegance. You’ll build a stable base, then add candles (real or LED) and tuck in greenery, berries, dried citrus, or ornaments.
Option C: Succulent Centerpiece in Terra-cotta
Best for patios, outdoor tables, and people who love plants but also love forgetting to water plants. Succulents look sculptural and stay pretty for ages.
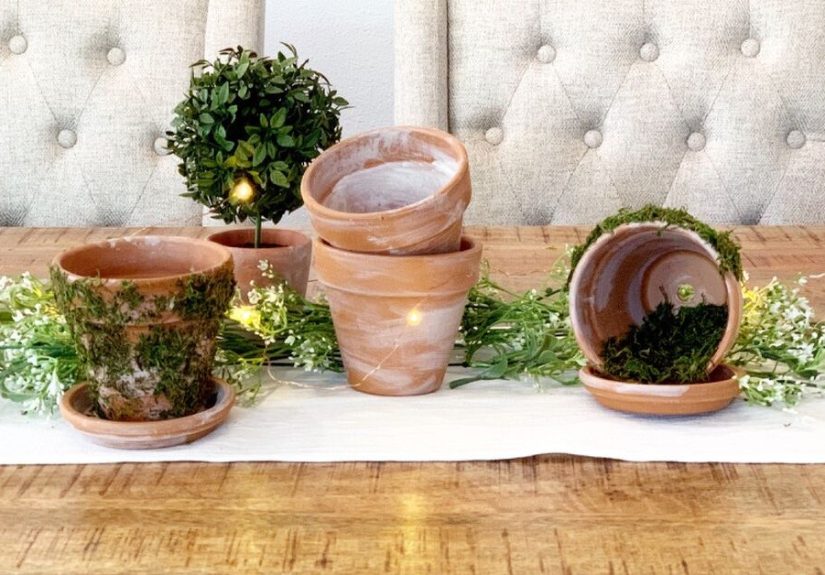
Option D: Seasonal “Swap-Top” Centerpiece
Best if you want one base you can reinvent: spring bulbs, summer herbs, fall pumpkins, winter pineconessame pot, new personality.
Supplies You’ll Actually Use
You don’t need a craft room that looks like a glitter factory. Keep it simple, then add extras if you feel fancy.
- Terra-cotta pot(s): 3–8 inches wide is a sweet spot for most tables.
- Optional saucer or tray: Protects your table from moisture and scratches.
- Cleaner: Mild dish soap + water, plus a towel for drying.
- Sealer (optional but smart): Clear spray sealer, polyurethane, or water-repellent sealant for indoor use.
- Floral foam (fresh): The wet kind for fresh flowers, or dry foam for faux stems.
- Plastic liner: A small piece of plastic (or a bag) to keep water from soaking through clay.
- Flowers/greenery: Fresh stems, faux picks, herbs, succulentsyour call.
- Candles: Tapers, pillars, tealights, or LED candles (excellent for “no surprises” hosting).
- Weighting material: Pebbles, sand, or small rocks for stability.
- Tools: Scissors or floral shears, optional hot glue gun for faux stems or decor accents.
Prep Step (Don’t Skip This If You Like Nice Tables)
1) Clean and Dry the Pot
Terra-cotta can be dusty. Wash with mild soap and water, rinse well, and let it dry completely. Moisture trapped in porous clay can mess with paint, adhesive, and any sealant you apply later.
2) Decide If You Need Sealer
If your centerpiece will include water (fresh flowers, damp foam, live plants), sealing helps prevent moisture rings and “mystery dampness” on wood tables. For a quick solution, place the pot on a saucer or inside a shallow tray. For a longer-term solution, seal the inside (and optionally the outside) and let it cure fully before assembling.
3) Protect the Surface
Even a dry pot can scratch delicate finishes. A felt pad under the base or a simple saucer is a small step that saves big regret.
DIY #1: Classic Fresh Flower Terra-cotta Pot Centerpiece
This is the “looks professional, costs reasonable” option. Great for dinner parties, weddings, baby showers, and anyone who enjoys compliments.
Step 1: Line the Pot
Cut a piece of plastic big enough to cover the inside of the pot. Press it in gently so it hugs the sides. This liner helps keep water from seeping through the clay (and onto your table).
Step 2: Soak and Fit Fresh Floral Foam
Use wet floral foam designed for fresh flowers. Let it soak naturally in water (don’t force it underfoam likes to take its time). Once saturated, trim it to fit snugly inside the pot. You want it stable, not wobbling like a Jell-O audition.
Step 3: Build a Structure First (The “Skeleton” Layer)
Start with greenery (eucalyptus, ruscus, fern, whatever fits your vibe). This creates a base shape and helps the arrangement look full. Keep the profile low enough that people can see each other across the tableunless your goal is “romantic mystery dinner,” in which case, carry on.
Step 4: Add Focal Flowers
Pick 3–5 standout blooms (like roses, ranunculus, dahlias, peonies, or sunflowers depending on season). Place them first to establish height and balance. A helpful rule: the tallest stems should be about 1.5 times the container height for a centerpiece that feels intentional but not towering.
Step 5: Add Fillers, Then Finishers
Fillers (like baby’s breath, waxflower, or small mums) help bridge gaps. Finishers (like airy greens, berries, or wispy accents) soften edges and make the arrangement feel “designed,” not “I panicked at the grocery store.”
Step 6: Clean the Rim and Style the Base
Wipe any water off the rim. Cover exposed foam with moss (fresh or faux) for a polished look. Add a ribbon or twine if you want rustic charmjust don’t tie a bow so big it steals the whole show.
DIY #2: Terra-cotta Pot Candle Centerpiece (Cozy, Easy, and Table-Friendly)
This is the centerpiece that says, “Yes, I host,” even if you’re serving store-bought cookies on a good plate.
Step 1: Add Weight for Stability
Fill the pot halfway with sand, pebbles, or small rocks. This keeps tall candles steady and reduces tipping risk.
Step 2: Choose Your Candle Setup
- Taper candle: Push the base into sand/pebbles until stable. For extra hold, use a candle holder insert or a bit of wax at the base.
- Pillar candle: Use a flat base (or set the pillar on a small coaster inside the pot) so it burns evenly.
- Tealight or votive: Place inside a glass votive holder for safety and a clean look.
- LED candle: Ideal for kids, pets, or “I will absolutely forget this is lit” households.
Step 3: Add Greenery and Accents
Tuck greenery around the candle base: faux eucalyptus, fresh rosemary, olive branches, or seasonal greens. Then add accents: cinnamon sticks and dried orange slices for fall, berries and pinecones for winter, pastel eggs for spring, or simple citrus for summer.
Step 4: Keep It Low and Open
If your table is used for eating (wild concept, I know), keep the arrangement compact and avoid anything that sheds glitter or tiny bits into the mashed potatoes.
DIY #3: Succulent Terra-cotta Pot Centerpiece (Pretty, Durable, Low Drama)
Succulents bring color and structure without demanding constant attention. This works best outdoors or in bright indoor light.
Step 1: Handle Drainage Like an Adult
If the pot has a drainage hole and you’re placing it indoors, use a saucer. If you don’t want water on the table at all, create a liner inside the pot (plastic + a hidden inner container) so you can remove plants for watering.
Step 2: Build a Stable Base
Add a layer of small rocks at the bottom if needed, then cactus/succulent soil. If you’re making a temporary centerpiece, you can keep succulents in their nursery pots and “nest” them inside with moss for a cleaner swap later.
Step 3: Arrange by Height and Shape
Place taller succulents toward the center and trailing varieties near the edge. Use odd numbers (3, 5, 7 plants) for a natural look. Finish with top dressing like pea gravel, sand, or moss for that “designed” surface.
Step 4: Style for the Season
Add mini pumpkins in fall, shells in summer, tiny ornaments in winter, or pastel stones in spring. Succulents are basically the little black dress of centerpiece plants.
Easy Styling Formulas (So It Looks Intentional)
The 60–30–10 Color Rule
Choose 60% of one main color (greens or neutrals count), 30% of a secondary color, and 10% of an accent. This keeps your terra-cotta centerpiece from turning into a “craft aisle explosion.”
The “Talk-Over-It” Height Rule
For dining tables, aim for arrangements that are either low enough to see over or tall enough to see under. The awkward middle zone blocks faces and makes dinner feel like a floral-themed video game.
The Triangle Trick
Place your tallest elements in a loose triangle shape (even in round arrangements). It creates balance without looking stiff.
Finishing Touch Ideas (Paint, Texture, and Personality)
- Chalk paint: Soft matte finish that looks modern and cozy.
- Whitewash: Diluted paint + wipe-back for rustic farmhouse centerpiece style.
- Painter’s tape patterns: Clean stripes and geometric designs with minimal effort.
- Gold leaf or metallic accents: Turns basic clay into “special occasion” decor.
- Clay embellishments: Add botanical textures or raised details for a custom look.
Troubleshooting (Because Crafting Is Basically Problem-Solving in Cute Shoes)
Paint Is Peeling or Bubbling
Usually the pot wasn’t fully dry, or moisture is soaking through from the inside. Let the pot dry longer and consider sealing the interior before painting the exterior.
Water Rings on the Table
Use a saucer, tray, or liner. Terra-cotta is porous by naturethink of it as “thirsty.” Give it a barrier.
Candle Feels Wobbly
Add more weight (sand/pebbles) and push the candle base deeper. For real flames, stability is non-negotiable.
Flowers Look Sparse
Add greenery first, then fillers. If you still see gaps, tuck in smaller blooms around the rim for a “full” silhouette.
Wrap-Up: Your Table Just Got an Instant Upgrade
A terra-cotta pot centerpiece DIY is the rare project that’s affordable, flexible, and genuinely good-looking. Once you nail the basicsclean pot, stable base, smart stylingyou can remix it forever: candles in winter, herbs in summer, fresh flowers for celebrations, and succulents when life gets busy.
Experience Notes: What I Learned After Making (a Few) Terra-cotta Pot Centerpieces
The first time I tried a terra-cotta pot centerpiece, I thought I could skip the “prep” part. I mean, it’s a pot. How complicated could it be? Turns out, terra-cotta has a personality: it’s charming, it’s classic, and it is absolutely not shy about absorbing water like it’s training for a marathon. My early version used fresh flowers and wet floral foam, and it looked great for about twenty minutesuntil I noticed a faint damp ring forming on the table. Not a dramatic puddle, just enough to make you stare at it while pretending to listen to conversation. Since then, I’ve become a big fan of saucers, trays, and quick liners. Even when you seal the pot, a simple barrier underneath is peace of mind you can actually feel.
The second lesson was about “centerpiece height” and human behavior. You can design the prettiest arrangement on earth, but if it blocks eye contact, people will lean left and right like they’re dodging traffic. I started building lower profiles for dining tablesgreens that spread outward instead of upward, and focal blooms that sit just above the rim. When I want height, I go vertical in a way that still feels airy: a taper candle in the center with greenery around it, or tall stems that leave open space underneath. It sounds picky, but it’s the difference between “beautiful table” and “why is everyone shouting?”
I also learned that terra-cotta looks better when it’s not trying too hard. Painting can be gorgeous, but the pot’s natural warm color is already doing a lot. My favorite upgrades are subtle: a soft whitewash, a band of matte paint near the rim, or a chalkboard-style label if I’m using herbs. One time I grouped three small potsone with rosemary, one with thyme, one with little white flowersand it became both centerpiece and conversation starter. People love anything that smells good and looks like it might be edible later.
Candle centerpieces taught me the value of stability. Terra-cotta is sturdy, but tall candles can still wobble if the base is too light. The “pebbles or sand” step felt optional at firstuntil a chair bumped the table and my candle leaned like it was auditioning for a dramatic movie scene. Now I always add weight, even for LED candles, because it keeps everything looking neat and upright. And when I use real flames, I keep greenery tucked safely away from the wick and trim anything that creeps upward. Cozy ambience is great; accidental campfire is not.
Finally, the best part of terra-cotta centerpieces is how forgiving they are. If a flower droops, swap it. If the season changes, swap the accents. If you’re short on time, grab grocery store blooms and a handful of greenery, and you’re still ahead of the game. The pot itself carries the design, so you don’t need to overcomplicate it. Honestly, terra-cotta is like that friend who looks effortlessly put together in a plain teemeanwhile you’re over here trying to coordinate twelve accessories. Keep it simple, let the clay do its thing, and you’ll end up with a centerpiece that feels warm, welcoming, and surprisingly “high-end” for something that started in the garden aisle.