Table of Contents >> Show >> Hide
- Why This Pumpkin Yarn Wreath Works (Even If You’re “Not Crafty”)
- Supplies You’ll Need
- How to Make a Pumpkin Yarn Wreath in 30 Minutes
- How Much Yarn Do You Need?
- Design Variations That Look Expensive (But Aren’t)
- Troubleshooting: Quick Fixes for Common Issues
- Hanging, Storage, and Keeping It Looking Fluffy
- Frequently Asked Questions
- Final Thoughts: Cozy Fall Style in Under an Hour
- of Real-Life Experience Making This Pumpkin Yarn Wreath
If your front door could talk, it would absolutely ask for a seasonal outfit change. And while some fall wreaths require a craft room,
a hot glue apprenticeship, and the patience of a saint… this one is the cozy, low-drama option: a fluffy pumpkin yarn wreath you can make
in about 30 minutes with just a few supplies.
The secret is chunky loop yarn (the kind that looks like it’s already doing the “fluffy” part for you). Wrap it around a simple wreath form,
add a quick stem and bow, and suddenly your door looks like it’s ready for apple cider and a rom-com marathon.
Why This Pumpkin Yarn Wreath Works (Even If You’re “Not Crafty”)
This project is basically fall décor on easy mode. You’re not cutting a thousand tiny felt leaves, you’re not wiring fresh florals,
and you’re not trying to figure out why your wreath looks like a sad tumbleweed. You’re wrapping yarn. That’s it.
- Fast: Loop yarn covers space quickly, so you get “full and fluffy” without a marathon wrapping session.
- Budget-friendly: A basic wire form and one skein of chunky yarn can go a long way.
- Kid-friendly: Older kids can help with wrapping while you handle the hot glue.
- Customizable: You can keep it classic pumpkin orange, or go glam with velvet ribbon, neutrals, or farmhouse plaid.
Supplies You’ll Need
This list is intentionally short because your time is precious and your cart does not need 47 “optional embellishments” (unless you want it to).
Core Supplies
- Wreath form: 12–14 inch wire wreath form (or foam wreath form if that’s what you have)
- Chunky loop yarn: 1 large skein in pumpkin orange (buy a second skein if you want extra fluff)
- Scissors
- Hot glue gun + glue sticks
“Turn It Into a Pumpkin” Extras
- Burlap ribbon (green is classic, but plaid is undefeated in fall)
- Small scrap of burlap fabric (or brown felt) for the stem
- Optional: twine, faux leaves, mini pumpkins, wooden “Hello Fall” tag, cinnamon sticks
How to Make a Pumpkin Yarn Wreath in 30 Minutes
This is the speedy version with a clean finishno weird bald spots, no “why is my yarn sliding around?” drama.
Step 1: Anchor the Yarn (2 minutes)
Flip your wreath form so you’re starting from the back. Tie the end of your loop yarn around an outer wire ring using a tight double knot.
If knots make you nervous, add a small dab of hot glue to lock it in place.
Speed tip: Start on a spot that will end up hidden behind your bow or stem later. That way, even if your first wrap is a little awkward,
nobody will ever know (except you, and you’re going to forgive yourself).
Step 2: Wrap the Yarn Around the Form (15–18 minutes)
Wrap the loop yarn around the entire wreath form, passing the yarn ball through the center each time. Keep each wrap snug and pressed tightly
against the previous row so the wreath looks plush and evenly filled.
- Wrap close and tight for a “stuffed pumpkin” look.
- If you see gaps, gently nudge the yarn rows together.
- If the yarn twists, pause and untwistyour wrists will thank you.
Continue until the wreath form is fully covered. When you reach the end, tie off the yarn on the back and secure with hot glue.
Trim any extra and tuck the tail underneath the wraps so it disappears.
Step 3: Fluff and Fix the Back (2 minutes)
Turn the wreath over and check for any loops or yarn that look like they’re hiding in the back. For loop yarn, you can gently push
some loops from the back toward the front to make it look fuller and more even.
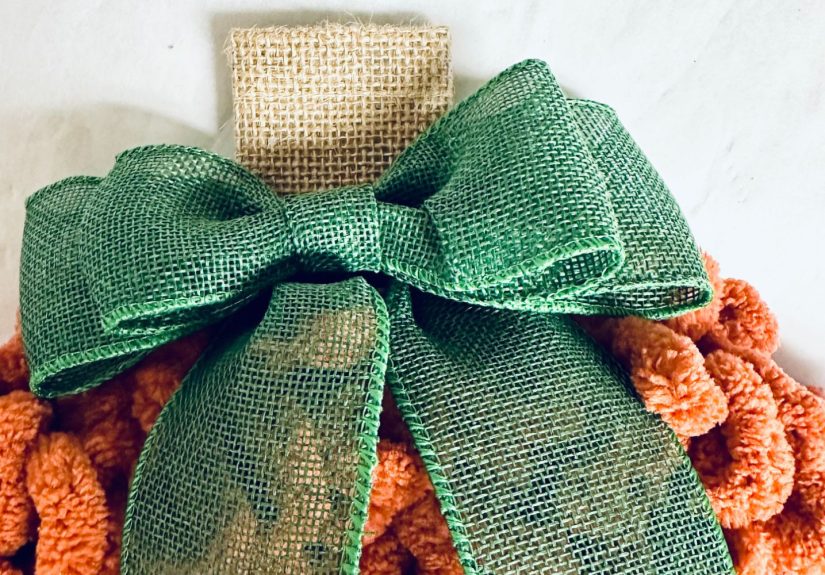
Step 4: Make a Quick Burlap Pumpkin Stem (3 minutes)
Cut a small rectangle of burlap, about 5 inches by 4 inches. Tri-fold it lengthwise (like you’re folding a tiny burrito that definitely
does not contain salsa). Hot glue the folds so it keeps its shape.
Hot glue the stem to the back/top area of the wreath where a pumpkin stem would naturally sit.
Press firmly for a few seconds so it bonds well.
Safety note: Burlap can have open weave holeshot glue can seep through and burn fingers. Press with the back of scissors,
a craft stick, or a silicone finger protector if you have one.
Step 5: Add a Simple Bow (5 minutes)
A bow makes the “pumpkin” read instantly as fall décor (and not “mysterious orange fluff circle,” which is a different aesthetic).
- Cut three ribbon pieces: one about 5 inches long and two about 7 inches long.
- Fold the 5-inch piece into a loop and secure in the center with twine or a thin strip of ribbon.
- Fold one 7-inch piece into a second loop and stack it behind the first loop.
- Use the last 7-inch piece as tails: fold it in half, glue it behind the bow, and cut dovetail ends.
- Wrap a small ribbon strip around the center to cover the tie point, and glue it in place.
Hot glue the bow to the front of the wreath near the stem. Hold it in place for a few seconds until it sets.
How Much Yarn Do You Need?
For a 12–14 inch wire wreath form, one skein of chunky loop yarn is often enough for full coverage. If you want a thicker “plush pumpkin”
look (or you’re using a larger form), plan on two skeins.
If you’re using thinner yarn, expect to use more yardage and more timethin yarn looks great, but it’s not the “30-minute victory lap” option.
Design Variations That Look Expensive (But Aren’t)
Want your wreath to look like it came from a boutique instead of your living room floor? Try one of these upgrades.
1) Neutral “Sweater Pumpkin”
Use cream, tan, or oatmeal chunky yarn. Add a brown velvet bow and a twig or cinnamon-stick stem. It’s cozy-chic and works with almost any décor.
2) Farmhouse Plaid Pumpkin
Keep the orange yarn, but swap the bow for plaid ribbon (black-and-white buffalo check is a classic). Add faux eucalyptus or cotton stems for contrast.
3) Rustic Woodland Pumpkin
Use twine or jute wrapped in sections (not the entire wreathjust accents). Add faux leaves, acorns, or a small wooden tag that says “Harvest.”
4) Kid-Made “Cute Pumpkin”
Let kids choose the bow color (brace yourself). Add felt eyes or a small friendly face for a playful Halloween-to-Thanksgiving transition piece.
Troubleshooting: Quick Fixes for Common Issues
My yarn keeps sliding around.
Anchor the starting tail more securely (double knot plus glue), and add a tiny dot of glue every few inches on the back if neededespecially on a wire form.
I can see the wreath frame through the yarn.
Wrap tighter, push rows closer together, and consider a second skein for extra density. If you’re using a foam form, you can also add a layer of batting
underneath to build volume before wrapping.
The bow looks sad and limp.
Use wired ribbon if possible, or double your loops. A slightly larger bow often fixes the “meh” factor instantly.
Hot glue strings are everywhere.
Congratulations, you have made something with hot glue. Let the glue cool, then gently pull strings away. A quick pass with a hair dryer on low can help
loosen stubborn glue threadscarefully.
Hanging, Storage, and Keeping It Looking Fluffy
- Hanging: Use a wreath hanger, removable hook, or loop ribbon through the frame to hang.
- Storage: Store in a large wreath box or a trash bag to keep dust off. Avoid crushing the bow.
- Fluff refresh: Before rehanging, gently separate loops and nudge yarn rows back into place.
Frequently Asked Questions
Can I use a foam wreath form instead of wire?
Yes. Foam forms are great for yarn wreaths, but they may require more yarn. If you want a fuller look without extra yarn, wrap the foam with batting first.
Is loop yarn necessary?
No, but it’s the fastest option. Traditional yarn works tooit just takes longer to fully cover the form, and you’ll likely need multiple skeins.
Can I make it without hot glue?
You can tie and tuck the yarn ends instead of gluing, but hot glue makes it sturdierespecially if your wreath will be on a frequently used front door.
Final Thoughts: Cozy Fall Style in Under an Hour
This pumpkin yarn wreath is the kind of DIY that delivers big “I have my life together” energy with minimal effort. It’s soft, textured, easy to customize,
and fast enough to make on a weeknightno craft hangover required.
of Real-Life Experience Making This Pumpkin Yarn Wreath
The first time I made a pumpkin yarn wreath, I had the confidence of someone who has watched exactly two craft videos and now believes they are unstoppable.
I laid everything out like a cooking show: wreath form here, yarn there, glue gun heating up like it had something to prove. And honestly? The first five wraps
were suspiciously easy. That’s the loop yarn trickit feels like it’s doing the work for you, like a fluffy orange assistant that doesn’t require snacks.
Then I hit the “hand fatigue” stage, which is not dramatic, but it is real. The key was keeping the wraps snug without turning my fingers into cramped little
claws. I started wrapping tighter (because every tutorial says tight wraps = fuller wreath) and realized there’s a sweet spot: tight enough to cover the frame,
but not so tight that you’re wrestling the yarn like it owes you money. When I noticed a gap, I didn’t unwrapbecause I’m not emotionally prepared for that.
Instead, I nudged the rows closer together, and it worked. Yarn is forgiving like that.
The funniest part was how quickly the wreath started looking “done.” At around the 70% mark, I had that rush of victory where you want to text someone,
“Look what I made!” even though it’s technically still missing a stem, a bow, and any indication it’s a pumpkin and not a fuzzy life preserver.
Adding the burlap stem solved that immediately. Folding burlap into a stem feels oddly satisfying, like making a tiny craft croissant. The only caution:
hot glue and burlap can be sneaky. If you press too hard, the glue can seep through the weave and remind you that crafting is, at times, a contact sport.
I learned to press with a craft stick, which is basically crafting’s version of “use oven mitts.”
The bow was where my personality showed up. Some people make perfect bows. I make “charming bows with potential.” Wired ribbon helped a lot, but I also learned
that bigger is better on this kind of fluffy wreath. A small bow gets swallowed by the yarn. A bold bow looks intentional, even if your loops aren’t perfectly
aligned. I ended up fluffing the yarn one last time, stepping back, and realizing the whole wreath looked like a cozy sweater pumpkinexactly the vibe.
The real win was how it performed on the door. It didn’t look fragile, it didn’t droop, and it handled the daily door opening without shedding yarn like a
stressed-out cat. When I stored it, I made the mistake of squishing it under heavier décor, and the bow got flat. The fix was easy: a quick reshape and a
gentle fluff, and it bounced back. Now I store it in a wreath bag like it’s a celebrity. Because once you make a 30-minute wreath that looks this cute,
you start treating it like a seasonal heirloom.