Table of Contents >> Show >> Hide
- Why Newspaper Nails Still Work in 2026
- What You Need Before You Start
- Before the 10 Steps: Quick Prep Rules
- How to Make Newspaper Nails: 10 Steps
- Step 1: Shape and clean your nails
- Step 2: Apply a base coat
- Step 3: Paint 1–2 coats of a light polish
- Step 4: Let the polish dry fully
- Step 5: Prep your newspaper strips and alcohol dish
- Step 6: Dip one nail in alcohol for about 5–10 seconds
- Step 7: Press the newspaper strip onto the nail
- Step 8: Peel off carefully
- Step 9: Repeat on all nails, then clean edges
- Step 10: Seal with top coat
- Troubleshooting: Common Problems and Easy Fixes
- Style Variations to Try After You Master the Basics
- Nail Health and Safety Notes (Important, But Make It Practical)
- Quick FAQ
- Extended Experience Section (500+ Words): What People Learn After Actually Trying Newspaper Nails
- Final Thoughts
If you’ve ever wanted your manicure to look like it reads the morning edition before coffee, newspaper nails are your moment.
This classic DIY nail art trick transfers tiny text onto polish using alcohol, giving you that edgy, editorial look with surprisingly little drama.
It’s affordable, beginner-friendly, and wildly customizable: vintage headlines, comic strips, bold fonts, even map snippets.
Think “bookworm meets runway” without needing a nail studio, a ring light, or a second mortgage.
In this guide, you’ll get a complete, practical tutorial for how to make newspaper nails in 10 steps, plus pro tips, common mistakes, style ideas, and a long-form experience section so you know what it really feels like to do this at home.
Whether you’re a total beginner or already own 14 top coats “for research,” this walkthrough is designed to help you get clean transfer, minimal smudging, and a manicure that actually lasts.
Why Newspaper Nails Still Work in 2026
Trends come and go, but text-print manicures keep resurfacing because they hit a rare beauty sweet spot: creative, low-cost, and conversation-starting.
You don’t need advanced freehand skills.
The printed pattern does the visual heavy lifting for you.
That means even if your dominant hand paints like a caffeinated squirrel, you can still get a result that looks intentional and artsy.
Plus, newspaper nail art plays nicely with both short and long nails, soft neutrals and dramatic colors, and minimalist or maximalist styles.
One day it can look literary and chic; the next day it can pair with pearls, chrome accents, or French tips and go full fashion editorial.
What You Need Before You Start
- Base coat
- Light-colored nail polish (white, light gray, nude, pale pink, or cream)
- Clear top coat
- Rubbing alcohol (isopropyl alcohol)
- Small cup or dish for alcohol
- Small newspaper strips (10–15 pieces, slightly larger than each nail)
- Tweezers (optional, but helpful)
- Cotton swabs + polish remover for cleanup
- Paper towel or lint-free pad
- Cuticle oil or hand cream for post-manicure hydration
Before the 10 Steps: Quick Prep Rules
- Use a light base color so text shows clearly.
- Let polish dry completely before transfer (seriously).
- Pre-cut all newspaper pieces so you’re not hunting scissors with wet nails.
- Work one nail at a time for cleaner results.
- Keep remover away from transferred text until after top coat is set.
How to Make Newspaper Nails: 10 Steps
Step 1: Shape and clean your nails
File nails to your preferred shape (round, squoval, almond, coffinwhatever fits your vibe and daily life).
Then wash and dry your hands thoroughly.
Remove any old polish and oil residue so products grip better.
Clean nails help transfer stick where you want it, not where you accidentally touched your moisturizer five minutes ago.
Step 2: Apply a base coat
Brush on a thin, even base coat.
This protects natural nails from staining and helps color cling more evenly.
Don’t glob it on.
Thick layers can trap solvents and cause dents later.
Give it a minute or two to dry before moving on.
Think of base coat as primer for a wall: not glamorous, but the reason the final look behaves.
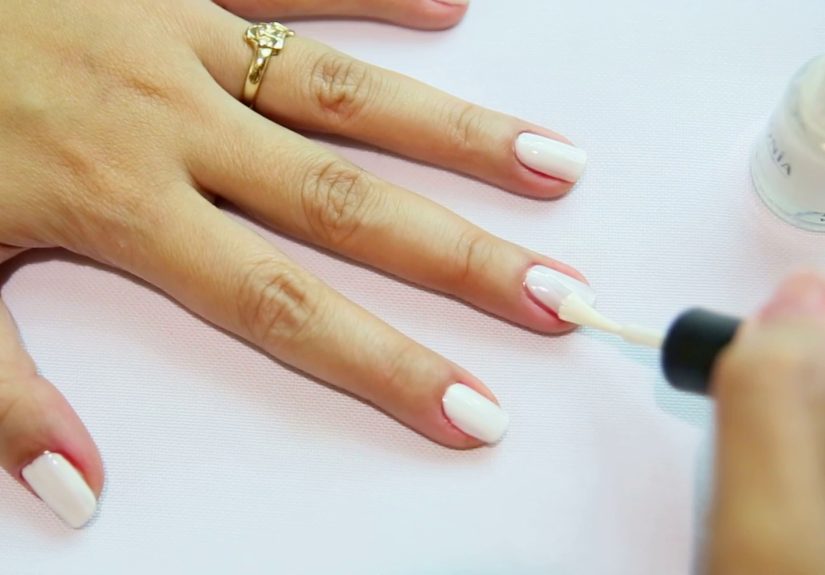
Step 3: Paint 1–2 coats of a light polish
Choose a light shade for contrast.
White and pale gray are newspaper-nail MVPs because black print pops.
Apply thin coats and let each coat dry before the next.
Two thin coats beat one thick coat every time.
If you want a softer vintage effect, try creamy beige or muted blush.
If you want high contrast and “headline energy,” go white.
Step 4: Let the polish dry fully
This is where most people sabotage themselves.
If the polish is still tacky, the paper can stick and pull polish off with it.
Wait until nails feel dry-to-touch and slightly set underneath.
Depending on formula, this can take several minutes.
Use this time to cut your newspaper strips and pour alcohol into a small dish.
Patience here saves cleanup later.
Step 5: Prep your newspaper strips and alcohol dish
Cut around 10 to 15 strips, each slightly larger than the nail it will cover.
Pick text-heavy sections with crisp black print.
Tiny serif fonts often transfer beautifully.
Pour a small amount of rubbing alcohol into a cup deep enough to dip a fingertip.
You can also soak the paper strip if preferred, but fingertip dipping usually gives better control.
Step 6: Dip one nail in alcohol for about 5–10 seconds
Dip one finger at a time.
The alcohol softens the ink transfer process and helps the print release onto polish.
Don’t over-soak for ages; you want a quick, controlled dip.
If your environment is very dry, aim closer to 10 seconds.
If it’s humid or your polish is delicate, keep it shorter.
This is the part where you feel like a lab tech and a magazine editor at the same time.
Step 7: Press the newspaper strip onto the nail
Immediately place a newspaper strip over the wet nail.
Press gently but firmly.
Hold steady for around 15–30 seconds.
Do not slide the paper around or you’ll blur text.
If needed, lightly dampen the back of the paper with a drop of alcohol to help transfer.
Keep pressure even from center to edges so sidewalls also pick up letters.
Step 8: Peel off carefully
Slowly lift one corner and peel the strip off in one smooth motion.
If text transferred well, you’ll see mirrored print on the nail.
(Mirrored text is normal for this techniquedon’t panic.)
If transfer is faint, your polish may have been too dry or the paper too dry.
If it smears, you probably moved the strip while pressing.
Either way, keep goingsecond nail usually looks better than first.
Step 9: Repeat on all nails, then clean edges
Repeat steps 6–8 for each nail.
Work steadily, not speedily.
Once done, use a cotton swab dipped in remover to tidy skin around nails.
Avoid scrubbing over the printed nail surface itself.
If your cuticle area has stubborn polish, use a pointed cleanup brush for precision.
By now your nails should look like tiny op-ed pages with better lighting.
Step 10: Seal with top coat
This is non-negotiable.
Apply a generous but controlled top coat to lock in text and add shine.
Float the brush lightly over the surface rather than dragging hard to avoid smearing.
Let dry thoroughly.
Optional: apply a second top coat after a few hours for extra durability.
Congratulationsyou now have DIY newspaper nails worthy of close-up photos and unnecessary hand gestures.
Troubleshooting: Common Problems and Easy Fixes
Problem: Print barely shows
- Use darker text sections from newspaper.
- Switch to a lighter base color.
- Increase press time slightly (up to ~30 seconds).
- Make sure alcohol is actually touching the nail/paper contact zone.
Problem: Smudged letters
- Stop moving the strip while pressing.
- Don’t over-wet the paper.
- Use a floating top-coat technique (minimal pressure).
- Wait longer before sealing if transfer is still damp.
Problem: Polish lifts off with paper
- Base color wasn’t fully drywait longer before transfer.
- Use thinner polish coats next time.
- Reduce press pressure and peel slowly.
Problem: Manicure chips quickly
- Cap the free edge with top coat.
- Reapply top coat every 2–3 days.
- Wear gloves for dishes/cleaning.
- Moisturize cuticles daily to reduce brittleness.
Style Variations to Try After You Master the Basics
- French Headline: Keep base sheer nude, transfer text only on tips.
- Accent Nail: Do full newspaper on ring fingers only.
- Comic Panel Mix: Use monochrome comic text blocks for bolder contrast.
- Map + Newspaper Combo: Alternate nails between map print and text print.
- Pearl Editorial: Add tiny pearls or metallic studs after top coat dries.
- Matte Pressroom: Finish with matte top coat for a modern newspaper texture vibe.
Nail Health and Safety Notes (Important, But Make It Practical)
Rubbing alcohol and polish removers are effective, but they can be drying and flammable.
Use them in a well-ventilated space, keep away from flames, and cap bottles promptly.
If your nails are already brittle, reduce remover exposure and hydrate cuticles after every manicure.
Also, don’t peel polish or scrape aggressivelymechanical trauma can do more damage than the polish itself.
A simple routine helps: moisturize nightly, avoid prolonged water exposure right after painting, and give nails occasional “naked days” between manicures.
Healthy nails hold polish better, chip less, and make every design look cleaner.
In other words, nail prep is not boringit’s the secret plot twist.
Quick FAQ
Can I use regular printed paper instead of newspaper?
Sometimes, but results vary.
Newspaper and some magazine inks transfer more reliably.
Laser printer ink on plain paper often resists transfer.
Do I need 70% or 90% alcohol?
Both can work.
Many DIY users find standard rubbing alcohol enough.
The technique (timing + pressure) matters more than chasing a perfect percentage.
How long do newspaper nails last?
Usually 4–7 days with one good top coat, longer with careful wear and top-coat refresh.
Longevity depends on your base polish, daily hand use, and whether you cap nail tips.
Can I do this on gel polish?
Yes, but cure and layer sequence matter.
For beginners, regular polish is easier to troubleshoot.
Once you’re comfortable, you can adapt the transfer technique to gel systems.
Extended Experience Section (500+ Words): What People Learn After Actually Trying Newspaper Nails
Most first-time attempts follow the same emotional storyline: excitement, chaos, mild panic, then unexpected victory.
The setup feels simplehow hard can “paper on nail” really be?until you realize nail art has a strong opinion about timing.
The people who get great results fastest are not necessarily the steadiest painters; they’re the ones who respect drying time and work methodically.
The moment beginners stop rushing Step 4 (full dry time before transfer), their success rate jumps dramatically.
One common experience is underestimating how much difference paper choice makes.
DIYers often grab any page nearby, only to discover that some inks barely transfer while others show up crisp and bold.
Narrow columns of dense black text usually perform better than pale gray print or ad-heavy glossy sections.
A practical trick that many users report: pre-sort strips before painting so you can choose “high-ink” pieces fast while nails are ready.
That tiny prep step removes stress and keeps hands steadier.
Another frequent lesson is that pressure should be firm, not forceful.
Beginners often press too hard or rub the paper like they’re polishing a countertop.
That tends to blur letters.
People who get cleaner designs describe a “press and hold” motion instead of “press and move.”
Imagine applying a temporary tattoo to a tiny curved surface.
You want contact, not friction.
If text is patchy at the edges, gently rocking pressure side-to-side (without sliding the strip) helps transfer around nail curves.
Smudging after top coat is probably the biggest heartbreak.
The nail looks perfect, then the brush drags ink into a gray haze.
Over time, DIY nail artists learn the “float coat” move: load enough top coat and glide lightly so bristles barely touch the design.
Some also wait an extra minute before sealing each nail, especially in humid rooms.
A few even do a quick first seal coat, let it set, then apply a second coat for shine.
The second coat often transforms a decent manicure into one that looks intentionally glossy and polished.
People with short nails often worry the design won’t read clearly.
In practice, short nails can look amazing because text appears denser and more graphic.
The key is scaling paper pieces smaller and choosing larger-font newspaper sections when possible.
Longer nails, meanwhile, give room for dramatic layouts but require more careful pressure along sidewalls.
In both cases, nail shape changes the final vibe: squoval looks classic editorial, almond feels softer and fashion-forward, and coffin makes the print look more avant-garde.
Wear experience varies by lifestyle.
If your day includes dishwashing, frequent hand sanitizer, or opening boxes, chipping arrives faster.
Users who report the best longevity usually do three things: cap the free edge with top coat, reapply top coat every couple of days, and moisturize cuticles at night.
That last one sounds unrelated, but better hydration means less brittleness and fewer edge snags.
In short, manicure durability is partly chemistry and partly behavior.
There’s also a creativity curve.
First attempt is often a strict tutorial copy.
By attempt three, people start experimenting: comic strips on accent nails, map coordinates on thumbs, French tips with text only at the edge, or layered decals for a mixed-media look.
The technique becomes less about copying and more about personal style.
Many creators mention this is the first nail art method that made them feel artistic without needing freehand drawing skills.
The biggest takeaway from long-term DIY experience is simple: newspaper nails reward process.
Not expensive tools.
Not perfect hands.
Process.
Prep well, keep layers thin, let things dry, press without sliding, and seal like you mean it.
Do that, and you get a manicure that looks clever, editorial, and surprisingly professional.
Plus, you get the deeply satisfying sentence nobody expects to hear in beauty talk: “Hold on, I need to pick better font alignment for my thumbnail.”
Final Thoughts
Newspaper nails are one of the best entry points into DIY nail art because they combine creativity with structure.
You follow a repeatable method, then personalize it with paper style, polish shade, and finishing details.
If your first set isn’t perfect, you’re normal.
If your third set looks better than salon inspo screenshots, also normal.
Keep the process consistent, treat your nails kindly, and enjoy the oddly joyful experience of wearing tiny headlines on your fingertips.