Table of Contents >> Show >> Hide
- Before You Start: Is Your Floor a Good Candidate?
- What You’ll Need
- Step-by-Step: Paint and Stencil Tile Floors Like You Mean It
- Step 1: Clear the room and protect everything
- Step 2: Clean like you’re prepping for surgery
- Step 3: Scuff-sand for better adhesion
- Step 4: Prime with a bonding primer (this is not optional)
- Step 5: Paint your base coat
- Step 6: Plan your stencil layout so the pattern looks intentional
- Step 7: Stencil without bleed (the calm, controlled way)
- Step 8: Work in sections and keep your “escape route”
- Step 9: Touch-ups: the five-minute step that saves the whole look
- Step 10: Seal it for durability (the “don’t skip me” finale)
- Choosing Paint and Primer: What Actually Matters
- Timing and Cure: The Part Nobody Wants to Hear (But Everyone Needs)
- Common Mistakes (and How to Avoid Them)
- Care and Maintenance: Keep It Looking Good
- FAQ
- Conclusion
- Real-World Experiences: What This Project Feels Like (and What People Commonly Learn)
If your tile floor is giving “late-’90s rental” and you’re not ready to give your wallet a full-on nervous breakdown,
painting and stenciling can be the glow-up you’re looking for. Done right, a painted tile floor can mimic those gorgeous
encaustic/cement-tile lookswithout demolition dust, contractor schedules, or the emotional support latte you’ll need after buying new tile.
The secret sauce isn’t fancy paint. It’s prep, adhesion, and patience (yes, patiencesorry). In this guide, you’ll learn
what to use, what to avoid, how to stencil without bleeds, and how to seal everything so your new “tile” pattern doesn’t
peel the first time someone walks in with gritty shoes.
Before You Start: Is Your Floor a Good Candidate?
Painting and stenciling works best on solid, well-bonded ceramic or porcelain tile in areas like bathrooms, laundry rooms,
entryways, mudrooms, and even kitchensassuming you’re realistic about wear and commit to sealing.
What it will not do is fix cracked tiles, loose tiles, major lippage, or crumbling grout. Paint is a makeover, not a miracle.
Green lights
- Tile is firmly attached (no hollow sounds, no movement).
- Grout is intact (minor stains are fine; missing chunks are not).
- You can keep foot traffic off for a few days and treat it gently while it cures.
- You’re okay with periodic touch-ups over the years (especially in high-traffic lanes).
Red flags
- Tiles are loose, cracked through, or shifting.
- Floor stays wet often (like the inside of a showerdon’t do it).
- Waxed or specialty-sealed surfaces you can’t fully strip/clean.
- Textured tile so rough you can’t get a smooth painted finish.
What You’ll Need
You can keep this project budget-friendly by choosing smart tools (foam rollers are your best friends here) and not buying
every gadget the internet has ever loved. Here’s a practical list:
Supplies
- Cleaner/degreaser (no-residue is ideal) + scrub brush
- Sandpaper (typically fine grit like 180–240) or a sanding sponge; optional orbital sander
- Painter’s tape + plastic/paper for masking
- Bonding primer (high-adhesion primer made for slick surfaces)
- Base coat paint (often a durable floor paint/porch & floor enamel, or a tile/floor coating system)
- Stencil (sized for your tile) + optional low-tack spray adhesive
- Stencil paint (often the same paint as your base coat, or a compatible durable paint in accent colors)
- Foam roller(s) and/or stencil brush; small angled brush for grout lines and edges
- Clear, water-based protective topcoat/sealer (compatible with your paint)
- Knee pads (your knees would like to continue being employed)
Budget snapshot
Many DIYers land in the $80–$200 range depending on room size, the primer/paint system you choose,
and whether you already own rollers and sanding tools. Stencils are usually cheaper than tile and dramatically less heavy to carry.
Step-by-Step: Paint and Stencil Tile Floors Like You Mean It
Step 1: Clear the room and protect everything
Remove rugs, furniture, and (if possible) the toilet in a small bathroom. Mask baseboards and any transitions.
If you’re keeping appliances in place, plan your pattern so you don’t start with the hardest cut-in area first.
Step 2: Clean like you’re prepping for surgery
Paint hates grease and soap scum. Scrub tile and grout thoroughly, rinse well, and let it dry completely.
If your cleaner leaves residue, your paint may bond poorlyso follow product directions and rinse until water runs clear.
Pay extra attention near stoves, doorways, and where bath mats used to trap moisture.
Step 3: Scuff-sand for better adhesion
You don’t need to sand your tile into dust (please don’t), but you do want to dull the shine and create “tooth” for primer.
Lightly scuff the tile surface, then vacuum and wipe up every last bit of dust.
Dust is sneaky; it’ll hide in grout lines like it pays rent.
Step 4: Prime with a bonding primer (this is not optional)
For slick surfaces like glazed tile, a bonding primer is what keeps your paint from peeling later.
Use a brush to prime grout lines and edges, then roll the field with a foam roller for a smoother finish.
Let it dry fully and apply a second coat if your primer instructions recommend it or if coverage looks uneven.
Step 5: Paint your base coat
Your base coat is the “background tile color.” Many people choose a soft white, warm cream, or pale gray to mimic classic
cement tile. Use a brush around edges and grout lines, then roll the main area.
Two thin coats generally look better (and cure harder) than one thick coat.
Let the base coat dry thoroughly before you stencil. If you stencil too soon, you risk lifting paint with tape,
dragging the pattern, or creating texture that looks like an alligator had a rough day.
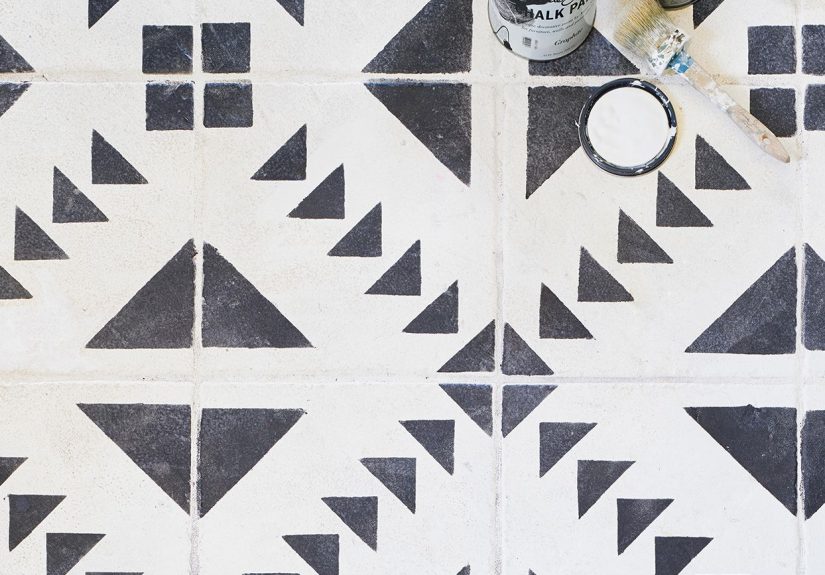
Step 6: Plan your stencil layout so the pattern looks intentional
The difference between “wow, custom tile!” and “huh, interesting…” is usually layout. Find the visual center of the room
(or the most visible walkway area) and start there. Dry-fit the stencil and confirm how it aligns with grout lines.
- Tip: If your tile sizes vary slightly (common in older floors), align by eye in the most visible area and “cheat” the edges.
- Tip: Use a light pencil mark or small pieces of tape to keep your pattern square as you move across the room.
Step 7: Stencil without bleed (the calm, controlled way)
Secure the stencil with painter’s tape. Many stencil pros use a light coat of low-tack spray adhesive on the back
to reduce shifting and bleedlet it get tacky before placing it down.
Load a foam roller or stencil brush with a small amount of paint, then offload excess onto a paper towel or tray.
The goal is multiple light passesnot one juicy coat that floods under the stencil.
- Use a foam roller for faster coverage and crisp edges on many patterns.
- Use a stencil brush (pouncing motion) for intricate corners and small cutouts.
- Peel the stencil up carefully and place it on the next tile only after the previous tile is set enough not to smudge.
Step 8: Work in sections and keep your “escape route”
Always stencil yourself toward an exit. Unless you enjoy being trapped in your bathroom like a very stylish prisoner.
If you’re doing a large room, break it into zones and allow extra dry time between zones.
Step 9: Touch-ups: the five-minute step that saves the whole look
Once everything is dry, inspect for tiny bleeds, skips, and drips. Use a small artist brush or angled sash brush to tidy edges.
Touch-ups are normal. Even pros do themquietly, with intense focus, and sometimes snacks.
Step 10: Seal it for durability (the “don’t skip me” finale)
A protective clear coat helps defend against scuffs, moisture, and cleaning. Use a compatible water-based clear coat
if you want a non-yellowing finish and easier cleanup. Apply thin, even coats with a foam roller or applicator recommended by the product.
Keep the first days gentle: avoid dragging furniture, skip harsh cleaners, and let the floor cure fully before heavy use.
This is where most “painted tile failed” stories beginright after someone ignored cure time and hosted a dance party.
Choosing Paint and Primer: What Actually Matters
There are a lot of ways to do this project, but the best results usually follow the same logic:
make it stick (bonding primer), make it durable (floor-rated paint), and protect it (clear coat).
Primer: pick bonding, not “whatever’s in the garage”
Tile is slick. Bonding primers are designed to grip difficult surfaces. If you skip this step, you may get peeling, chipping,
or paint that scratches off with a fingernail (which is a terrible magic trick).
Paint: floor-rated products win
For the base coat (and often for the stencil colors), look for:
a porch & floor enamel, a tile/floor coating system, or other durable paint designed for foot traffic.
Some DIYers use wall paint or chalk-style paint for the pattern, but it should be sealed properly and treated gently while curing.
Sheen: why matte/flat is popular for “cement tile” vibes
Flat or matte can mimic the look of unglazed encaustic tile. The trade-off is it can show dirt more easilyso sealing and
thoughtful cleaning matter. Satin can be easier to wipe down, but can read a bit shinier.
Timing and Cure: The Part Nobody Wants to Hear (But Everyone Needs)
Dry-to-touch isn’t the same as cured. A floor can feel dry and still be soft underneath.
Plan for a project that takes a few days, even if the hands-on work fits into a weekend.
A realistic weekend-ish timeline
- Day 1: Clean, rinse, dry. Scuff-sand. Vacuum/wipe.
- Day 2: Prime (and possibly second primer coat). Base coat #1.
- Day 3: Base coat #2. Stencil pattern.
- Day 4: Touch-ups. Clear coat(s). Then protect it while it cures.
Common Mistakes (and How to Avoid Them)
Mistake 1: Skipping cleaning or rinsing
Residue and grime cause adhesion problems. Clean thoroughly and rinse well.
Mistake 2: Using too much paint on the stencil
Most stencil bleed is caused by overloaded rollers/brushes. Offload paint and build color in thin layers.
Mistake 3: Rushing the cure time
If you put furniture back too soon, you can dent the finish or glue felt pads to a still-soft topcoat.
Patience now saves repainting later.
Mistake 4: Harsh cleaners too early
Avoid abrasive scrubbers and strong chemicals until the coating is fully cured. Even after curing, gentle cleaners extend the life of the finish.
Care and Maintenance: Keep It Looking Good
- Sweep oftengrit is basically sandpaper with opinions.
- Use felt pads and avoid dragging furniture.
- Use mild soap and water for cleaning; avoid abrasive powders.
- Place doormats at entrances to reduce grit and moisture.
- Expect touch-ups in high-traffic lanes over time; keep leftover paint labeled.
FAQ
Will painted tile floors last?
They can, especially in lower-to-moderate traffic areas with the right prep and a protective clear coat.
High-traffic kitchens may show wear sooner, but touch-ups are usually manageable.
Can I do this over glossy tile?
Yesglossy tile is common. The key is scuff-sanding and using a bonding primer made for slick surfaces.
Do I paint the grout too?
Most people do, because it creates a cohesive “new tile” look. Just work primer and paint into grout lines with a brush,
then roll the field for a smoother finish.
Can I paint tile in a shower?
It’s not recommended for areas with constant soaking and immersion. Even strong coatings can struggle long-term in shower conditions.
What stencil size should I buy?
Match your tile size whenever possible (for example, a 12" x 12" stencil on 12" tiles), and test placement before you paint.
If your tiles aren’t perfectly sized, center the pattern on each tile and keep alignment consistent in the most visible area.
Conclusion
Painting and stenciling tile floors is one of the most satisfying “did that really cost so little?” upgrades you can make
as long as you treat it like a coating project, not a craft project. Clean thoroughly, scuff-sand, use a bonding primer,
apply thin coats, stencil with restraint, and seal it like you want it to survive real life.
The payoff is big: a refreshed floor with designer style, a fraction of the cost of replacement, and a fun story for guests
who will absolutely assume you found “rare imported tile.” You don’t have to correct them. That’s between you and your paint roller.
Real-World Experiences: What This Project Feels Like (and What People Commonly Learn)
The first “experience” most people report is the emotional whiplash of the cleaning phase. You start optimisticmusic on, supplies lined up,
feeling like the main character of a home makeover show. Then you scrub the grout lines and realize your floor has been hiding secrets.
Grease near the stove, soap scum in the bathroom corners, mystery grime by the doorway that appears to be a fossil record of every shoe that ever lived there.
It’s not glamorous, but it’s oddly satisfying when the rinse water stops turning gray. That’s usually the moment you think, “Okay… this might actually work.”
Next comes sanding, which is where confidence either grows or gets humbled. A lot of DIYers expect sanding tile to be dramatic,
but it’s usually more like “dulling the shine.” The experience is less about grinding and more about persistence: light pressure, steady movement,
and checking your progress under good lighting. People often say they didn’t sand enough the first time they tried a painted floor project.
If you’re unsure, imagine paint trying to cling to a dinner platethen sand until it feels more like a slightly worn ceramic mug.
Priming is the first “wow” moment. Tile transforms fast when the bonding primer goes on, and it suddenly looks like a blank canvas instead of dated tile.
A common lesson here: grout lines drink more product than you expect. Many people end up using a small brush for grout and edges
and then a foam roller for the flat surfaces to keep it smooth. If you’re aiming for a faux cement-tile look, the smoother you keep primer and base coat,
the more convincing the final pattern looks.
The stenciling phase is where the project becomes a personality test. The experience is part art, part assembly line.
You place the stencil, tape it down, dab the roller, offload paint, roll lightly, and liftover and over.
Most people describe two competing emotions: pride when the pattern looks crisp, and irritation when they realize how many tiles exist in one room.
The trick many DIYers learn mid-project is that less paint is more. If you load the roller heavily, you get bleed. If you go light,
you get crisp edges and can add a second pass. It feels slower at first, but it’s faster than fixing smudges across a whole row of tiles.
Another common experience is “pattern anxiety.” Halfway across the room, you start noticing tiny inconsistenciesone tile slightly off center,
one corner lighter than the others, a micro-bleed you swear is visible from space. Here’s the truth most homeowners discover:
once the room is put back together, those tiny imperfections melt into the overall design. The pattern reads as intentional and handmade,
which is part of the charm. People often say the biggest improvement comes from simple touch-upsfive minutes with a small brush can make
the whole floor look more professional.
Finally, sealing and curing teaches the hardest lesson: the floor may look “done,” but it isn’t ready for real life yet.
DIYers commonly report that the best-looking floors are the ones they babied for the first weekno dragging furniture, no harsh mopping,
and socks-only rules if possible. It’s annoying, but it pays off. Many also learn to keep a small jar of leftover base color and stencil color
for future touch-ups. Floors are floors: grit, chair legs, pet nails, and heavy traffic will eventually leave a mark. The “experienced” approach
isn’t expecting perfection foreverit’s building a finish that’s easy to refresh when needed. And when you step back and see that bold, tile-like
pattern you created with paint? That satisfaction is real. It’s the rare DIY that looks expensive, photographs beautifully, and makes you smile
every time you walk into the room.