Table of Contents >> Show >> Hide
- What “Perfect” Parallel Parking Actually Means
- Before You Start: Set Yourself Up for Success
- The Parallel Parking Formula: Three Phases That Work
- How Close to the Curb Should You Be?
- Use Reference Points (Because Your Brain Loves Shortcuts)
- Common Mistakes (and Quick Fixes)
- Safety Rules That Make You Look Like a Pro
- Using Backup Cameras, Sensors, and Park Assist (Without Letting Tech Drive Your Brain)
- A 15-Minute Practice Plan That Actually Works
- Quick FAQ: Parallel Parking Questions People Whisper to Their Steering Wheel
- Real-World Parallel Parking Experiences (500+ Words)
- Conclusion: The Calm Method Beats the Flashy Method
Parallel parking is the driving skill that turns otherwise reasonable adults into people who suddenly “remember” an urgent appointment three blocks away.
The good news: it’s not magic. It’s a repeatable little geometry trickplus patience, mirror checks, and the humility to pull out and try again like a responsible grown-up.
This guide breaks down how to parallel park with simple phases, reliable reference points, and real-world adjustments so you can slide into a spot
smoothly, safely, and (most importantly) without donating your bumper to the city.
What “Perfect” Parallel Parking Actually Means
“Perfect” doesn’t mean you park in one swoop while a choir sings. It means:
- Safe: you check for pedestrians, cyclists, and cars before and while backing.
- Legal: you’re close enough to the curb to avoid sticking out into traffic, and you obey signs/paint/curb rules.
- Courteous: you signal, move slowly, and don’t block traffic longer than necessary (your future self appreciates this).
- Centered: you leave reasonable space in front and behind, not “kiss-the-bumper” tight.
Before You Start: Set Yourself Up for Success
1) Pick a spot your car can actually fit into
If you’re learning, be picky. Choose a space with extra room in front and behind so you can practice without panic.
For training, you can even build a “practice spot” with cones or boxes and make it generously longer than your car.
That way you learn the motion firstthen tighten your standards later.
2) Get your positioning and mirrors right
Parallel parking is mostly about angles. If your setup is sloppy, your finish will be sloppy.
Adjust your seat so you can turn your torso and look out the back window comfortably.
Clean your mirrors and rear camera lens if you have one (a smudged lens turns your screen into abstract art).
3) Signal early and “announce your intentions”
Use your turn signal in the direction of the space. This is your way of saying, “I’m about to do a slow, careful thingplease don’t tailgate my soul.”
Many driving programs teach signaling well before the maneuver (think “well in advance,” not “mid-panic”).
The Parallel Parking Formula: Three Phases That Work
Most methods are the same maneuver wearing different outfits. Here’s the version that’s easiest to repeat:
Set up parallel → swing the rear in → swing the front in → straighten and center.
(We’ll assume you’re parking on the right side of the street, which is most common in the U.S.)
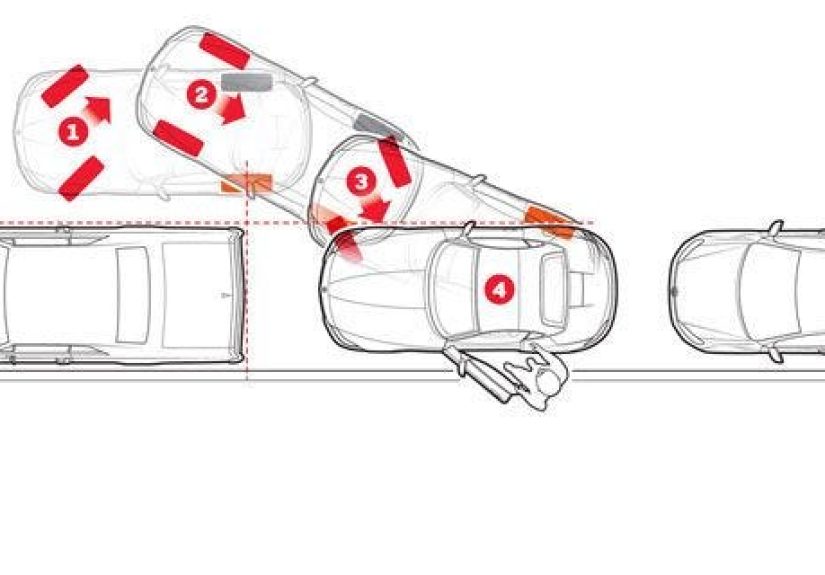
Phase 1: Set Up (The Part That Makes Everything Else Easy)
- Pull up alongside the car in front of the empty space.
Line up roughly “mirror-to-mirror” with the parked car, leaving about 2–3 feet of side space.
A good starting cue: your car should be parallel to the parked car, not angled. - Stop when your rear bumpers are roughly even.
If your car is shorter or longer than theirs, “even” isn’t exact scienceuse it as a starting point.
The goal is to begin the turn when your rear end has room to swing into the gap. - Quick safety scan.
Check mirrors, look over both shoulders, and confirm the space is still clear.
Backing incidents often happen because someone steps behind you or a cyclist slips past quietlyso treat this like a mini “takeoff checklist.”
Phase 2: Swing the Rear In (Your Car’s “Hip” Moves First)
- Shift to reverse and back up slowly.
Slow is not “nervous.” Slow is “in control.”
Use your mirrors, but also turn your head and look out the rear window while backing. - Turn the wheel toward the curb (to the right).
Many step-by-step guides teach a strong initial steering input here so the rear of your car moves into the space decisively.
As you back, your car will start to angle in. - Back until you reach about a 45-degree angle.
You’ll know you’re close when your front end has cleared the rear of the car in front,
and your car is diagonally entering the space rather than “sneaking in sideways.”
(Don’t obsess over the exact numberthink “noticeably diagonal, but not jackknifed.”)
Phase 3: Swing the Front In (Now You “Tuck the Nose”)
- Straighten the wheel briefly as you continue backing.
This moves you deeper into the space without increasing the angle too fast. - Turn the wheel away from the curb (to the left) to bring the front in.
Keep backing slowly, watching your distance to the curb in the right mirror and your front clearance in the left mirror.
Your car will “unwind” into a parallel position. - Stop when you’re parallel and centeredthen straighten your wheels.
Your tires should be straight when you finish. If you’re angled at the end, you’re basically leaving future-you a surprise.
How Close to the Curb Should You Be?
Rules vary by state and city, but many driver manuals and laws use a “within about a foot” standard.
Practically, aim for close enough that you’re not sticking out, but not so close you grind the curb.
If you’re new, check your final position by looking in the right mirror: if you can see a comfortable ribbon of pavement between tire and curb, you’re usually fine.
Tip: If you’re too far from the curb, don’t try to “fix it” with wild steering while stopped.
Instead, make small, slow adjustments: pull forward a bit, back a bit, and re-center.
Use Reference Points (Because Your Brain Loves Shortcuts)
Reference points are visual cues that help you repeat the same movement in the same car.
They’re not universal across every vehicleyour hood length, seat height, and mirror placement change the pictureso treat them as “training wheels,” not eternal truth.
Easy reference-point ideas
- Mirror-to-mirror setup: a simple cue to get the starting distance and alignment right.
- “Bumper even” cue: begin turning when your rear bumper is about even with the other car’s rear bumper.
- Curb-in-the-mirror cue: use the right mirror to track the curb line while backing (especially helpful at night).
- Hood/curb alignment cue: in some vehicles, the curb appears to “cut” across a consistent point on the hood when you’re a few inches awayuse that as a practice clue.
Common Mistakes (and Quick Fixes)
Mistake: You’re drifting toward the car behind you
Fix: Stop. Pull forward slightly while straightening out, then reset your angle and continue backing slowly.
The secret sauce is tiny corrections, not dramatic hero moves.
Mistake: You end up a foot-and-a-half from the curb
Fix: Pull forward a little with the wheel turned slightly toward the curb, then back up with the wheel straight, then re-check.
Think “shuffle into place,” not “teleport.”
Mistake: You hit the curb
Fix: First, breathe. Then pull forward a few inches and give yourself more side clearance next time.
Most curb taps happen because the initial setup was too close to the parked car or the first turn was too aggressive for that particular space.
Mistake: You freeze because traffic is watching
Fix: Signal, move slowly, and commit to the process. People can handle waiting. What they can’t handle is unpredictability.
If you need to restart, do it calmly. A controlled reset looks competenteven if your heart is doing parkour.
Safety Rules That Make You Look Like a Pro
Back slowly and scan constantly
Backing crashes often involve blind zones behind vehicles, especially in driveways and parking-lot areas.
Treat every parallel park like a “backing-up scenario”: mirror checks, shoulder checks, and slow movement.
If visibility is limited, consider using a spotter (a safe helper outside the vehicle) in appropriate situations.
Don’t “door” a cyclist
After you park, check for cyclists before opening the driver-side door. A simple habit: glance in the mirror and do a quick shoulder check.
If you want the gold-star version, use the “Dutch Reach” (open your door with the far hand), which naturally turns your body to look behind you.
If you park on a hill, secure the car
When parked on an incline, set the parking brake and turn your wheels appropriately toward the curb so the car won’t roll into traffic if it moves.
(This is one of those unglamorous habits that quietly prevents very expensive problems.)
Pulling out matters, too
Leaving a parallel spot is its own little dance: check behind you for pedestrians and cyclists, use mirrors, signal, and check over your shoulder before moving back into the lane.
Start with your wheels straight, create space, and merge only when it’s safe.
Using Backup Cameras, Sensors, and Park Assist (Without Letting Tech Drive Your Brain)
Modern tech can help, but it’s not a substitute for awareness. Safety agencies and regulators have emphasized that rear visibility systems improve what drivers can see behind a vehicleyet drivers still need to check surroundings and use good judgment.
Backup camera: great tool, not a hall pass
Use the camera to spot low objects and confirm curb distance, but keep scanning mirrors and over-shoulder views.
Cameras can be affected by rain, glare, dirt, and limited perspective.
Parking sensors: helpful beeps, imperfect detection
Sensors can warn you that something is near, but detection varies by object size and position.
Treat beeps as “pay attention,” not “you’re safe.”
Automatic parking assist: convenient, sometimes slower
Some vehicles can steer themselves into parallel spots with minimal driver input, while others still require the driver to manage braking and acceleration.
If you use it, practice in a low-pressure environment first so you understand what the system doesand what it doesn’t.
A 15-Minute Practice Plan That Actually Works
- Start with cones (or boxes) in a quiet lot. Give yourself extra room front and back.
- Do 5 slow reps focusing only on setup. If setup is consistent, everything else improves.
- Do 5 reps focusing on the 45-degree moment. Learn what it looks like in your mirrors.
- Do 5 reps adding a final “center and straighten” finish. End with straight wheels every time.
- Graduate to a calm street with low traffic. Add pressure gradually, like seasoningnot like dumping the whole salt shaker.
Quick FAQ: Parallel Parking Questions People Whisper to Their Steering Wheel
How big does the space need to be?
Bigger is easier. In the real world, a little extra room in front and behind makes your life better.
When learning, choose spaces with generous buffer so you can practice clean technique instead of improvising under stress.
Do I have to do it in one try?
No. The “one-and-done” myth is why people scrape curbs. A calm adjustment is normal and often safer.
What if I’m parking on the left on a one-way street?
Same steps, mirrored: you set up alongside the front car, then steer toward the curb (left) while reversing, then steer away (right) to tuck in.
Be extra careful checking for traffic when you pull out, because you’re re-entering from the opposite side.
What’s the #1 secret to looking confident?
Speed control. Slow and steady makes your steering smoother, your checks more effective, and your corrections smaller.
Fast backing turns small mistakes into loud mistakes.
Real-World Parallel Parking Experiences (500+ Words)
Most people don’t hate parallel parking because it’s hard. They hate it because it’s public. You’re performing a tiny driving ballet in front of
an audience of pedestrians, cyclists, and drivers who are convinced they’re late for something extremely importantlike a meeting with destiny.
One common experience is the “great spot illusion.” You spot an open space, your brain sings, and you pull uponly to realize the space is
technically a parking spot in the same way a shoebox is technically a studio apartment. The fix isn’t heroics; it’s honesty. If you’re learning,
pick the bigger space. Your confidence grows faster when you succeed repeatedly, and success is addictive in the best way.
Another classic: the first rainy-night parallel park. Rain on the windows, reflections everywhere, and suddenly your mirrors feel like they’re showing
a different universe. Drivers who do well in that moment tend to lean on a simple habit: clean the glass, slow everything down, and use the curb line
as a steady visual anchor. Many people discover that looking out the rear window plus quick mirror checks feels more reliable than staring at a screen
that’s being washed by water droplets.
City driving adds its own flavor. In busy neighborhoods, you’ll notice a pattern: the best parallel parkers don’t rush the turnthey rush the preparation.
They signal early, pull up smoothly, and set their car parallel and properly spaced. That calm setup sends a message to traffic: “I know what I’m doing.”
Even if your heart is practicing percussion, your process looks confident, and other drivers usually give you the few seconds you need.
If you’ve ever practiced for a road test, you know the “cone space” anxiety. Cones feel like they’re judging you.
What helps most learners is turning the maneuver into checkpoints: setup alignment, slow reverse, reach the diagonal angle, tuck the front, straighten.
Breaking it into phases makes it less like one big scary event and more like four small, manageable actions. It’s also why practicing in a quiet lot first
is so effectiveyou can build muscle memory before you add nerves.
Bigger vehicles create a different experience: you may sit higher (great visibility), but your turning arc and rear swing can surprise you.
Many SUV and pickup drivers say the moment that changes everything is learning where the rear corner “travels” when the wheel is cranked.
Once you respect that swing, you stop clipping curbs and start parking cleanly. Tech helps herecameras and sensors provide extra informationbut the
best results come from using tech as confirmation, not as your only input.
Finally, there’s the “reset revelation.” Almost everyone remembers the first time they felt brave enough to pull out and restart instead of forcing a bad angle.
That moment is huge. It replaces panic with control. And ironically, it’s what makes you faster over time: when you’re willing to reset, you stop making
frantic micro-mistakes that create bigger problems. You become the kind of driver who can parallel park on a busy street, then walk away like it was no big deal
(even though, inside, you’re doing a victory lap).
Conclusion: The Calm Method Beats the Flashy Method
If you remember one thing, make it this: parallel parking is setup + slow steering + constant scanning.
Use the three phases, practice with roomy spaces first, and treat small corrections as normalnot as failure.
With repetition, you’ll stop “trying” to parallel park and start simply doing it.