Table of Contents >> Show >> Hide
- Before You Start: Know What You’re Fixing
- Tools and Materials You’ll Actually Use
- Safety Notes (Because Siding Isn’t Worth a Trip to the ER)
- Step 1: Find a Matching Piece (Color Match Is Half the Battle)
- Step 2: Quick Fixes for Small Holes and Hairline Cracks
- Step 3: Fix Loose Vinyl Siding (Unhooked Seams and Flapping Panels)
- Step 4: Replace a Damaged Vinyl Siding Panel (Best for Cracks, Big Holes, and Melted Spots)
- Step 5: Fix Buckling, Warping, and “Wavy” Panels
- Step 6: Repair Around Trim: J-Channel, Corner Posts, and Near Windows
- Step 7: Don’t Ignore What’s Behind the Siding
- Cost Expectations: DIY vs. Hiring Help
- When to Call a Pro (No ShameJust Smart)
- Vinyl Siding Repair Tips That Make You Look Like a Genius
- FAQ: Quick Answers to Common Vinyl Siding Questions
- Real-World Experiences and Lessons Learned (The Stuff People Tell You After the Repair)
- Conclusion
Vinyl siding is the sweatpants of home exteriors: comfortable, low-maintenance, and forgiving…
until it gets snagged on a grill, smacked by hail, or bullied by a wayward baseball. The good news?
Most vinyl siding repair jobs are totally doable for a careful DIYer with a few basic tools (and a healthy respect for ladders).
This guide pulls together real-world best practices commonly recommended by major U.S. home-improvement retailers,
DIY publishers, siding manufacturers, and industry installation guidance (think: This Old House, Family Handyman,
BobVila, Better Homes & Gardens, The Home Depot, Lowe’s, CertainTeed, and vinyl-siding industry manuals).
No fluff, no fillerjust practical steps, specific examples, and the little “gotchas” that keep repairs from looking like a patchy quilt.
Before You Start: Know What You’re Fixing
Vinyl siding problems usually fall into a few categories. Identify the type of damage first, because the best repair is different for each:
- Loose panel / unhooked seam: Often from wind, a bumped ladder, or nails that backed out.
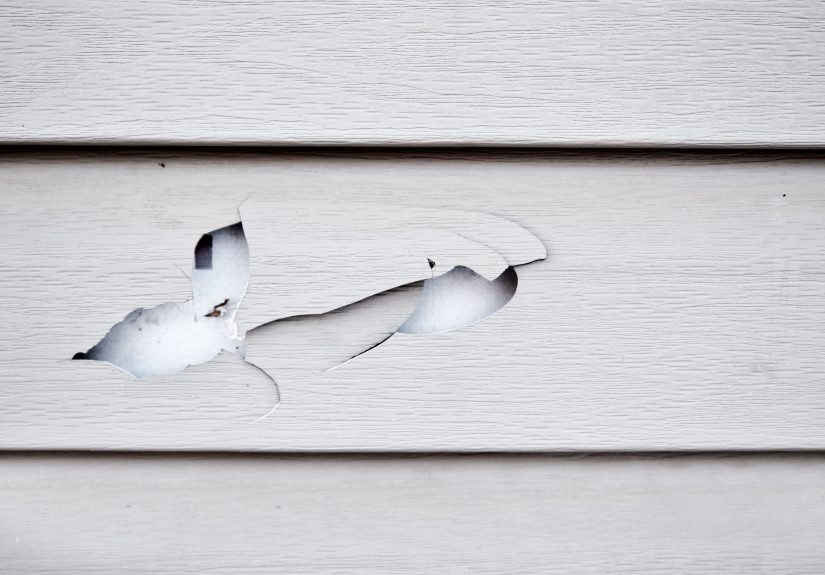
- Crack or small hole: From impact (hail, rocks from a mower, sports equipment).
- Warped, buckled, or “oil-canned” siding: Typically from nails driven too tight or not enough expansion room.
- Melted siding: Heat source nearby (grill) or sunlight reflecting off low-E windows.
- Water stains, soft spots, or musty smell: Might signal moisture getting behind sidingthis is the “don’t ignore me” category.
Tools and Materials You’ll Actually Use
You don’t need a garage full of gadgets. Here’s the short list that covers most vinyl siding repairs:
- Zip tool (vinyl siding removal tool): The MVP for unlocking and re-locking panels.
- Hammer and flat pry bar (or nail puller): For removing nails carefully.
- Utility knife and tin snips (aviation snips): For cutting siding and trimming edges.
- Tape measure and marker: Because “eyeballing it” is how siding becomes modern art.
- Corrosion-resistant nails (galvanized or aluminum/stainless, depending on your trim): For re-fastening.
- Exterior-grade, paintable caulk (often butyl/gutter-style for some patch methods): For sealing cut edges or patches.
- Replacement siding piece: Ideally a color-matched piece from leftovers, or a hidden area of the house.
- Work gloves and eye protection: Vinyl edges can be surprisingly sharp.
- Ladder safety gear: Stable ladder, level ground, and a spotter if you can get one.
Safety Notes (Because Siding Isn’t Worth a Trip to the ER)
- Work on dry days with good daylight.
- Keep ladders away from power lines and set them on firm, level ground.
- Vinyl can get brittle in cold weathermove slowly to avoid cracking adjacent panels.
- If you see signs of structural rot or major water damage behind the siding, pause the DIY plan and investigate more deeply.
Step 1: Find a Matching Piece (Color Match Is Half the Battle)
New vinyl often won’t match old vinyl perfectly because sun and weather fade the installed siding over time.
For the best match, homeowners often “borrow” a piece from a less visible spot (behind shrubs, a utility area,
or the back side of the house) and put the new piece there instead. It’s the home exterior version of rotating your mattressonly sassier.
If you’re buying new siding, bring a small sample (or take a clear photo in daylight) to a siding supplier or big-box store.
Be prepared for “close enough” rather than “identical twin,” especially if your siding is older.
Step 2: Quick Fixes for Small Holes and Hairline Cracks
Option A: Repair kits or flexible exterior filler (small holes)
Small holes (think: BB-sized up to a dime or quarter) can often be patched without replacing a full panel,
especially if the siding isn’t brittle and the damage isn’t near a seam.
- Clean the area with mild soap and water. Let it dry completely.
- Trim ragged edges with a utility knife so the hole perimeter is neat.
- Apply exterior-grade filler/patch product per instructions. Smooth it flush.
- Feather and blend (if the product allows light sanding once cured).
- Color match with an exterior paint pen or carefully matched paint if your siding type allows it. (Some vinyl shouldn’t be painted; check first.)
This is the “good enough from the sidewalk” fixand that’s often the whole goal.
If the hole is larger, near a seam, or in a very visible spot, a replacement section or panel looks cleaner.
Option B: Caulk for fine cracks (and why less is more)
For thin cracks, a flexible, paintable exterior caulk can seal out wind-driven rain. The trick is using a small amount
and smoothing it well so it doesn’t look like your siding has a jellybean stuck to it.
- Clean and dry the crack.
- Run a thin bead of caulk directly into the crack.
- Smooth with a damp finger or caulk tool.
- Let it cure fully.
Important: caulk is not a magic spell for everything. If a panel is split, buckled, or repeatedly pops loose,
sealing the symptom without fixing the cause won’t hold up.
Step 3: Fix Loose Vinyl Siding (Unhooked Seams and Flapping Panels)
Loose panels are common after storms or if the siding was nailed too tight (or not nailed properly).
The good news: a zip tool usually makes this a quick win.
- Find the loose seam (typically the bottom edge of a panel that has popped out).
- Slide the zip tool under the panel edge and hook the lip.
- Pull down and slide the tool along the seam to unlock the panel section.
- Check the nails on the panel underneath:
- If a nail backed out, re-seat it snug but not tight.
- If a nail is missing, replace it with a corrosion-resistant siding nail.
- Re-lock the panel by pressing it into place along the seam, then “zip” it shut with the tool.
The #1 fastening mistake to avoid: nails driven too tight
Vinyl expands and contracts with temperature changes. If it can’t move, it buckles.
When you re-nail, aim for this rule of thumb:
center the nail in the slot and leave a tiny gap under the nail head so the panel can slide.
You’re hanging the siding, not stapling it to the wall like a wanted poster.
Step 4: Replace a Damaged Vinyl Siding Panel (Best for Cracks, Big Holes, and Melted Spots)
If the damage is obvious from 10 feet away, replacement usually looks better than patching.
You can replace an entire panel (recommended) or replace a section (sometimes necessary).
Method 1: Replace the entire panel (cleanest result)
- Unzip the panel above the damaged one using the zip tool along the length you need.
- Remove nails holding the damaged panel (use a pry bar carefully so you don’t tear house wrap).
- Slide the damaged panel out from corner channels or seams.
- Fit the replacement panel:
- Hook the bottom edge into the panel below.
- Check that it sits flat and level.
- Nail the replacement:
- Place nails in the center of the nailing slots.
- Leave a small gap under the nail head (don’t nail tight).
- Don’t force the panel hard into channels; leave room for expansion at ends.
- Re-lock the panel above by snapping the seam and using the zip tool to fully engage the lock.
Method 2: Replace a section (useful when you can’t easily swap the full run)
This method is handy when removing the full panel would require disturbing a lot of trim or when damage is isolated.
The basic idea: cut out the damaged area, slide in a slightly longer replacement section, and seal it.
- Unzip the panel above the repair area.
- Cut out the damaged section with a utility knife (use a straightedge for neat lines).
- Cut a replacement section that overlaps the opening (many DIY methods use a piece a few inches longer than the cutout).
- Trim the replacement edges as needed so it can slide into place under the panel above and lock at the bottom.
- Apply exterior-grade sealant on cut edges (lightlyno caulk sculptures).
- Press the replacement into place, ensure it locks, and brace/tape temporarily if the patch method requires curing time.
- Re-lock the seam above with the zip tool.
Note: Different siding profiles lock differently. If your panel won’t lock cleanly, don’t force it until it cracks.
Consider switching to the full-panel replacement method, or consult the manufacturer’s installation guide for your specific profile.
Step 5: Fix Buckling, Warping, and “Wavy” Panels
Buckling is often caused by installation issues rather than “bad siding.”
Common culprits include nails driven too tight, nails not centered in slots, or panels cut too tight inside channels with no expansion gap.
- Unzip the area above the buckled panel.
- Check fastening:
- If nails are tight against the siding, back them out slightly and re-seat with a small gap.
- If nails are off-center in the slot, re-nail in the center (use the existing slots when possible).
- Check end spacing at corners/J-channels. If panels are jammed tight, they may need re-cutting or re-seating for movement.
- Re-lock seams and observe over a couple days of temperature changes.
If buckling repeats in the same place, look for heat sources, trapped moisture, or underlying wall issues.
Vinyl is flexible, but it’s not a magician.
Step 6: Repair Around Trim: J-Channel, Corner Posts, and Near Windows
Trim pieces matter because they guide water away and hide cut edges. If trim is cracked, loose, or missing,
even a perfect panel replacement can still leak.
J-channel issues
- Loose J-channel: Re-nail properly (center in slots, not too tight).
- Cracked J-channel: Replace the trim section if possible; patching trim tends to look rough and fail sooner.
- Gaps near windows/doors: Check flashing and sealant strategywater management is the priority.
Corner post damage
Corner posts can get hit by lawn equipment or cracked in extreme cold. Some repair approaches involve replacing the whole corner post,
while others use a “cap” repair where part of the old post remains and a new face is fitted over it.
If your corner is badly damaged or loose, replacement is usually the best long-term solution.
Step 7: Don’t Ignore What’s Behind the Siding
Vinyl siding is a weather-shedding system, not a submarine hull. It’s normal for a little moisture to get behind it.
What matters is whether that moisture can drain and dry. When you open a repair area, look for:
- Torn house wrap (patch with appropriate house wrap tape if needed).
- Black staining, softness, or rot on sheathing or trim.
- Rusty fasteners or damp insulation (signs of ongoing water intrusion).
If you find significant rot or moldy materials, the “siding repair” may actually be a water management repair
flashing, trim, gutters, or leaking penetrations. That’s where a pro assessment can save you money long-term.
Cost Expectations: DIY vs. Hiring Help
DIY repairs are usually inexpensive if you already own a few tools. A zip tool costs little, and a small bundle of matching panels
can be affordable. If you hire a contractor, costs rise with height, access difficulty, and how much siding must be removed.
- Small cosmetic fixes: Often low cost DIY; pros may charge a minimum service call.
- Single panel replacement: Commonly a manageable DIY job, but a pro can match seams faster.
- Large sections, multiple stories, or water damage: Usually worth professional help.
When to Call a Pro (No ShameJust Smart)
- You see soft sheathing, widespread staining, or recurring moisture behind siding.
- The repair area is two stories or higher and you can’t work safely.
- You need to remove/replace complicated trim, flashing, or a lot of panels.
- Your siding is older and brittle, causing collateral cracking when you try to unlock seams.
- You suspect melt damage from window reflection and want a long-term mitigation plan.
Vinyl Siding Repair Tips That Make You Look Like a Genius
- Work warm (but not scorching): Mild temperatures make vinyl easier to flex and less likely to crack.
- Start small: Practice unlocking and re-locking a seam in an inconspicuous spot first.
- Don’t over-caulk: Vinyl needs to drain and dry; sealing everything can trap moisture.
- Match the fade: Swap a hidden “faded” panel into the visible spot and put the new panel in the hidden spot.
- Check the cause: If a panel popped loose once, ask whywind? tight nails? impact? Fixing the cause prevents repeats.
FAQ: Quick Answers to Common Vinyl Siding Questions
Can you repair vinyl siding without replacing it?
Yessmall holes and hairline cracks can often be patched or sealed. Loose panels can usually be re-hooked and re-fastened.
Bigger cracks, melted areas, and major damage typically look best with a replacement panel.
Do I need to remove siding to fix a loose piece?
Usually not. A zip tool lets you unlock the seam, check nails, and re-lock the siding without removing large sections.
Why is my siding buckling?
The most common cause is restricted movement: nails driven too tight, nails not centered in slots,
or panels cut too tight in corner/J-channels with no expansion room.
What if my siding is melted?
Melted vinyl usually can’t be “un-melted.” Replacement is the typical fix, plus addressing the heat source
(moving a grill, adding a heat shield, or mitigating reflected sunlight).
Real-World Experiences and Lessons Learned (The Stuff People Tell You After the Repair)
Homeowners and contractors tend to share the same stories after a vinyl siding repairbecause vinyl is predictable,
and our mistakes are even more predictable. One common theme: the repair itself is often easy, but the setup
is what separates “nice, clean fix” from “why does my wall look like it’s wearing a bandage?”
The first lesson people mention is how much difference temperature makes. On cooler days, vinyl can feel stiff,
and seams don’t want to cooperate. A lot of DIYers discover this right after they confidently yank on a panel,
hear a sharp snap, and suddenly the repair got bigger. Experienced installers tend to move slower in cold weather,
flex panels gently, and avoid forcing locks. On mild days, panels unlock and re-lock with far less drama.
Another frequent “aha” moment is the importance of nail technique. Many folks assume tighter is betteruntil they learn
that vinyl needs to float. People who re-nail too tight often report buckling later, especially after a sunny afternoon
followed by a cool night. The story usually goes: “It looked perfect when I finished,” then a week later,
the panel is wavy like a funhouse mirror. The fix is almost always the same: unzip, loosen fasteners,
re-center nails in slots, and give the panel room to move.
Color matching is where emotions happen. New siding can look noticeably different next to older, sun-faded panels,
even if the label says it’s the same color. Homeowners who are happiest with the result typically use the “panel swap” trick:
take a faded piece from a hidden area and install it in the visible repair spot, then put the brand-new panel in the hidden area.
It feels sneaky in the best waylike you just outsmarted the sun.
People also talk about the surprise of what they find behind the siding. Sometimes it’s totally finedry wrap, clean sheathing,
no issues. Other times, a simple “replace one cracked panel” project reveals torn house wrap, damp trim, or staining around a window.
The most experienced DIYers treat that discovery as a win, not bad luck: catching moisture early is cheaper than paying for rot later.
They’ll patch wrap properly, investigate flashing, and make sure water has a path to drain.
Melted siding stories are their own category. A lot of homeowners first blame “cheap siding,” then realize the true culprit:
a grill too close to the wall, or sunlight reflecting off modern windows and concentrating heat. The repair is usually straightforward
(replace the panel), but the best outcomes come from also fixing the sourcemoving the grill, adding a heat shield,
or working with a contractor on window reflection mitigation. Otherwise, the new panel can suffer the same fate,
and nobody wants an annual “siding melt season.”
Finally, there’s the ladder lesson. Many people start confident and then realize that working one-handed while balancing tools,
keeping panels aligned, and staying safe is harder than it looks. The most common advice shared afterward is simple:
set up the work area like you’re cooking a complicated recipeeverything within reach, tools staged, replacement panel pre-cut,
and no improvising while you’re on the ladder. If the repair is high up, a spotter or professional help is often the difference
between a neat repair and a risky afternoon you regret.
The overall takeaway from these experiences is encouraging: vinyl siding repair is very learnable. Start with a small,
low-visibility fix to build confidence, focus on proper fastening and movement, and treat color matching like a strategy game.
When in doubtespecially if you see moisture problemsupgrade from “quick repair” to “solve the cause.”
Your future self (and your drywall) will thank you.
Conclusion
Repairing vinyl siding is mostly about three things: unlocking panels without breaking them, restoring proper “float” so the siding can move,
and choosing the right repair method for the damage. Small holes and cracks can often be patched; loose panels usually just need
re-hooking and correct nailing; and obvious damage (or melted siding) is typically best handled with a panel replacement.
Take your time, respect expansion space, and don’t be afraid to swap panels for a better color match. If you uncover moisture damage
or the work is too high to do safely, calling a pro isn’t giving upit’s protecting the house.